The AirPrint is a great feature that allows you to wirelessly print your documents without needing to install any additional drivers or third-party applications. It is available on all iOS and OS operating devices.
So, if you have certain documents stored on your iPhone or iPad, AirPrint can seamlessly print them within a few seconds. All you need is a compatible printer and a wireless network.
However, in some instances, you might receive an error message denoting, “No AirPrint Printers Found.”
This error commonly occurs when you’re on different Wi-Fi connections, have outdated operating software, etc.
So, without further ado, let us learn about the causes and plausible fixes for this particular issue.
Why Is My AirPrint Not Working?
Here is a list of potential reasons why your AirPrint might not be working:
- Outdated Operating Software
- Wi-Fi connection not in Range with the printer.
- You are connected to a Public Wi-Fi network.
- Apple devices and the printer have different Wi-Fi connections.
- The printer has run out of ink or papers.
How to Fix AirPrint Not Working?
Before we begin with the solutions, we suggest you first check if your printer is compatible with AirPrint. You can do a quick Google search or look through your manufacturer’s website. You can also check your printer compatibility by navigating this detailed list that contains all AirPrint-enabled printers.
Primarily, you might face AirPrint issues when your devices are connected to different Wi-Fi networks. So, please check your Wi-Fi connection on your Apple and printer devices and ensure they stay connected on the same Wi-Fi network.
Sometimes, the AirPrint can fail to function due to minor setbacks. These could include your printer running out of ink or paper. So, before jumping to conclusions, please make sure you perform regular checks on these parts.
Now that we have tackled these basic concerns out of the way, let us learn about the plausible fixes you can apply in more detail.
Check Your Internet Connection
As mentioned above, your iOS/Mac and the printer must stay connected to the same Wi-Fi network. Otherwise, AirPlay will fail to recognize your devices.
If the issue is still prevalent, you can apply these simple yet effective connectivity troubleshooting methods.
- Turn off/on your Wi-Fi toggle on your devices.
- Enable Airplane mode and turn it back off. Now, re-connect to your Wi-Fi.
- Move your printer and devices closer to the internet router.
- Switch to an internet bandwidth of 2.4 GHz to 5GHz or vice versa.
- Ensure your router supports Bonjour protocol.
- Switch or connect to a private network.
Reboot Your Devices
Although it may seem simple, rebooting helps you resolve minor device issues. This method allows you to refresh the system, and clear any glitches or bug errors. Likewise, we recommend you turn off your printer for 30-60 seconds and restart it. You can apply the reboot on all devices, including your iOS, Macs, router, and printers.
Reset Printer Settings
If you’re on a Mac device, you have the option to reset your printer. So, if there were any pre-existing problems with the connection, this method will help you clear them out.
Here is how you can do it.
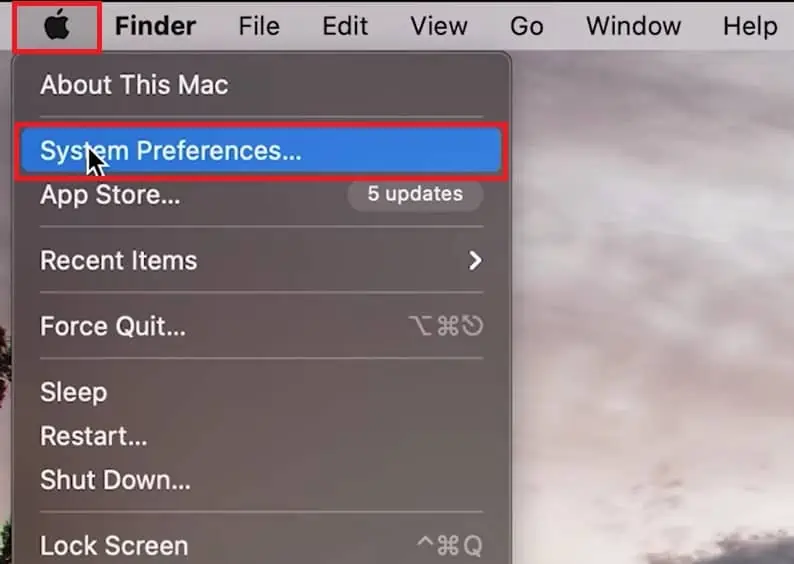
- Navigate to the Apple logo and click on System Preferences.

- Click on the Printer and Scanners icon.
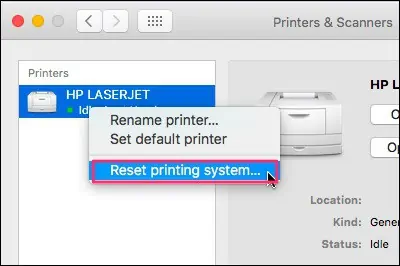
- Now, right-click on your printer from the left panel and select the Reset Printing System option.

Reset Network Settings
If all the above methods fail to connect your AirPrint, we recommend you quickly reset your Network settings. This method is known to be quite effective in fixing most of your connectivity issues as it reverts your device to its previous network settings.
Here are some step-by-step guides you can follow.
On iPhone
- Open up the Settings app from your device.
- Scroll down and tap on General.
- Head over to the bottom page and tap on Transfer or Reset iPhone.

- Tap on the Reset option.
- From the pop-up, select Reset Network Settings.

- If prompted, enter your passcode.
- Lastly, click on the Reset Network Settings to confirm your action.
On Mac
- Navigate to the top-left corner of your screen and click on the Apple Logo.
- Select the System Preferences option.

- Click on the Network icon.
- Now, from the left panel, click on Wi-Fi, head to the bottom-left corner, and click on the – symbol.
- Finally, click on the Apply button to make the changes.

Update Operating Software
In some instances, there might be prevalent minor bugs or system errors in your current operating software that might be causing your device to act out. So, it is always best to stay updated on the latest iOS or OS updates to avoid such issues.
Here are some step-by-step guides you can follow.
On iPhone
- Locate and launch your Settings app.
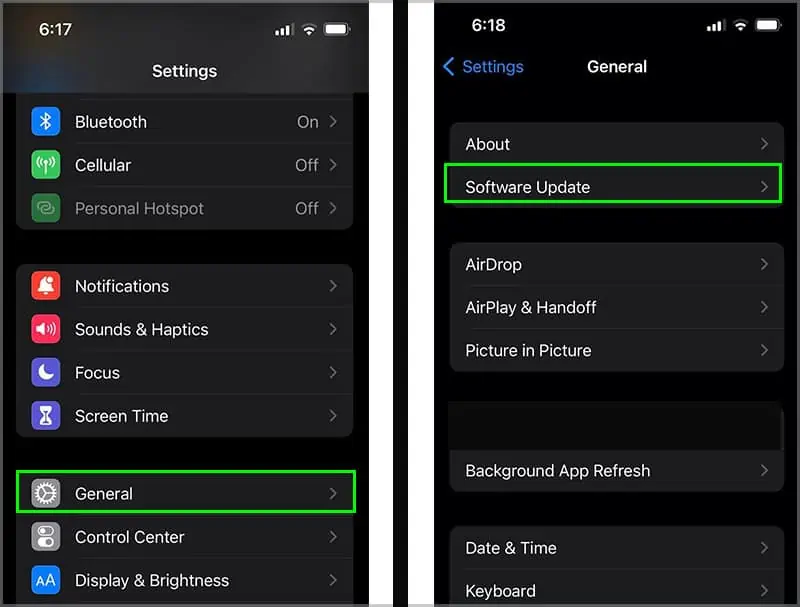
- Scroll down and tap on the General option.
- Net, tap on Software Update.

- If available, tap on the Download and Install option.
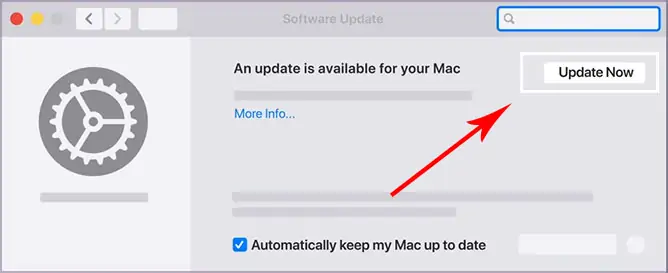
On Mac
- Navigate to the top-left corner of your screen and click on the Apple logo.
- Select the System Preferences option.

- Next, click on the Software Update icon.
- If any updates are available, click on the Update Now button.

If the issue came after the software update, you could choose to roll back the software to its previous version. Here is a detailed guide on how you can do so.
Contact Customer Support
If you cannot fix this issue even after following the above methods, your devices could have technical issues. In this case, we highly advise users to contact customer support.
Most printer companies have their designated support website. Likewise, if they cannot pinpoint the issue, we suggest you contact Apple customer support or bring your device to the nearest Apple Store to check for any defects.

