If you love playing games, you’ve certainly come across different graphics settings. One way or another, you might have tried different features and noticed changes in your game performance.
One of the many is Anti-Aliasing, often abbreviated as just AA. You may remember how blurry and pixelated digital images appeared in older games. Fast forward to today, newer technologies have made visuals more appealing and realistic.
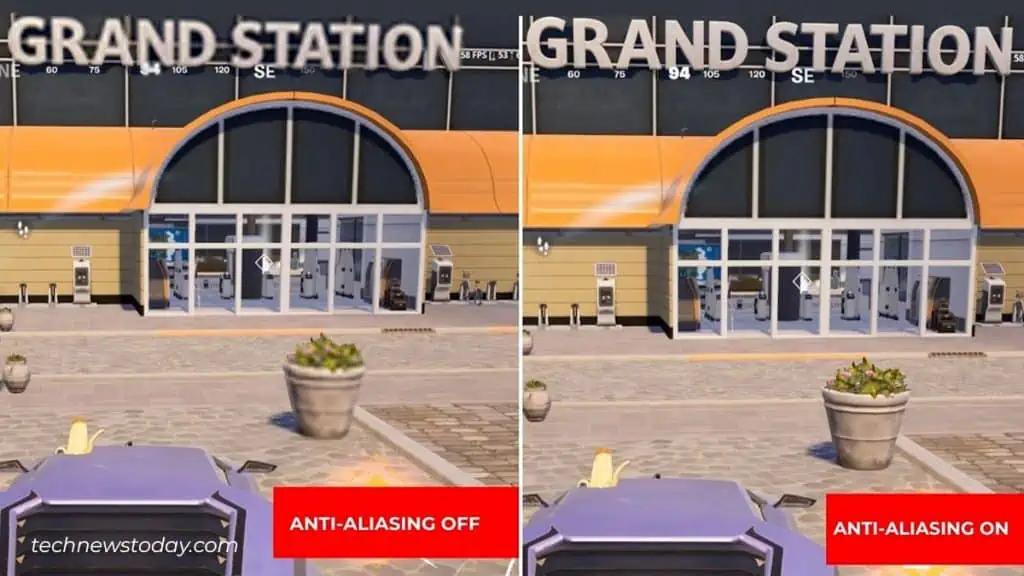
Well, that’s what AA does—smooths out the edges, ensuring none of the images appear jagged. However, this feature is known to lower the FPS, which can indeed negatively affect your gameplay.
Considering both its benefits and drawbacks, we have brought a detailed guide on Anti-aliasing to help you decide whether to enable or disable it.
What is Anti-Aliasing?
Images you see on your screen are all made of square-shaped pixels (except vector images). No matter what the shape of an object is, they are all formed using these tiniest elements.
For example, a straight line on your display is a combination of hundreds and thousands of pixels joined together.
However, not all objects are straight, and for your computer monitor to draw them, the square-shaped pixels are placed in diagonal positions.
For example, a ball has curved edges, and to outline this shape, the pixels are aligned horizontally. That’s the reason they appear distorted or jagged.
Like any other image, even the characters and objects inside your games can sometimes appear with curved lines or have staircase effects.
This is what we technically call ‘aliasing,’ and it mainly happens when your graphics card isn’t able to render the images with proper monitor resolution or due to poor sampling (conversion of analog signal to digital).
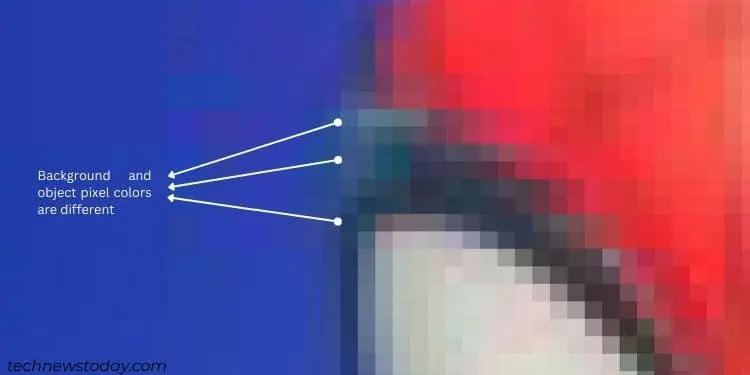
To get rid of these jaggies, the Anti-Aliasing setting was introduced. It is a technique that smoothes out the edges by adjusting the pixel colors (by calculating the average color value) and positions.
For example, it chooses different shades that match both the object and its background for a realistic appearance. There are different methods to achieve this, which we shall discuss later.
While most modern computer monitors come with higher resolutions and pixel densities, those with lower ones are more prone to aliasing.
Nonetheless, several other factors like improper sampling and implementation of poor Anti-Aliasing algorithms can bring distortions and jaggies even on high-end displays.
How Does It Work to Overcome Aliasing?
If the sampling rate is too low during scan conversion (the process of representing graphics as pixels), the images won’t be correctly represented on your computer screen. You’re likely going to see sharp edges, and this is caused by undersampling.
When the sample rate is lower than the minimum required frequency (stated as Nyquist sampling frequency), there’s a loss of signal leading to image distortions. This is called undersampling and it misrepresents the high-frequency image information and makes it appear as if it has a lower frequency (loss of information occurs).
Anti-Aliasing prevents undersampling by first removing the high-frequency components that could cause jaggies. Then, the sampling frequency is taken ensuring it’s at least twice the maximum frequency after the filtering:
Sampling frequency(f) >= 2 * Maximum frequency(fMax)
Now that the sampling frequency meets Nyquist’s criterion, you won’t see staircase effects within the game’s objects and characters.
The pixel color values of the overlapping edges appropriately blend together to produce clear images and look more realistic.
Pros and Cons of Anti-Aliasing
As mentioned earlier, Anti-Aliasing is an excellent technique to smooth out the edges and reduce staircase effects. It can help improve image quality and even offers better text readability.
Along with these benefits, it comes with a handful of negative effects. These include FPS drops, input lags, increased power consumption, and more. The below table introduces you to the basic pros and cons of AA.
Pros:
- Improves picture quality and makes them look visually appealing.
- Enhances gaming experience with realistic graphics.
- Fixes the pixelated edges which can significantly reduce eye strain.
- Texts become much clearer.
- Enhances animations and virtual reality experience.
Cons:
- When smoothing out the edges, AA can put extra load on GPUs and also take up excessive processing power.
- Due to excessive processing/graphics power and high memory usage, AA also consumes more power.
- Significant FPS drops and input lags. Hence, AA is not ideal for games if you have a low-end GPU.
- Some AA techniques can make images and text look blurry, even making them difficult to recognize.
- Can create issues within games and other 3D applications that are incompatible with Anti-Aliasing.
Different Techniques of Anti-Aliasing
There are several methods on how you can remove aliasing to get jagged-free images. For simplicity, we have categorized them into four types. Among them, the two—spatial and post-process are amongst the most popular.
While the Spatial AA technique works before the image is rasterized, the Post-Process AA does exactly the opposite.
No matter the different techniques of Anti-Aliasing, all of them work to achieve a single goal—to remove aliasing and improve image quality.
Adopt a High-Resolution Monitor
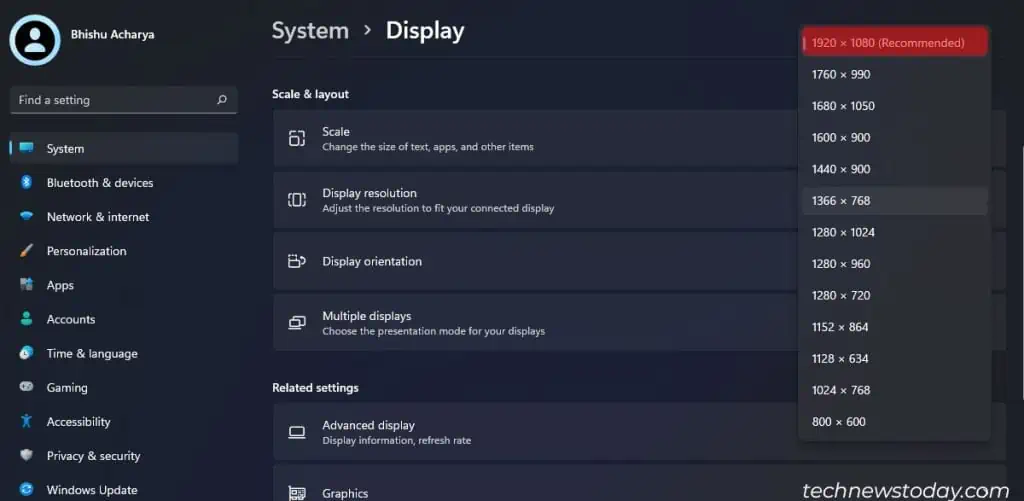
In the past, the only option to overcome aliasing was increasing the screen resolution. With more pixels on the screen, the number of colors also increases. This means your image becomes much more detailed, reducing the possibility of aliasing.
Even today, it’s a good idea to use the recommended monitor resolution for better image quality with no jaggies.
If you have placed your monitor at an ideal height and kept an arm’s distance from the monitor, opt for a monitor with 300-700 ppi.
This way, you do not have to use any Anti-aliasing algorithms to get rid of the jaggies. This is because the blurred edges become indistinguishable and our human eye will not recognize them at this point.
However, aliasing is directly proportional to the viewing distance. So, if you get closer to the monitor or simply zoom in on the object, you may still notice the jaggies.
Spatial Anti-Aliasing
Spatial Anti-Aliasing is based on your monitor’s resolution. The general idea here is to take low-resolution images and use certain approaches to render them in higher resolutions.
Basically, the process involves assigning new colors to every or some parts of the pixels such that the artifacts become less visible. It happens before the rendering and hence is also called pre-processing.
Super Sampling Anti-Aliasing (SSAA)
SSAA or FSAA (Full-scene Anti-Aliasing) comes in handy when you have a high-end graphics card that tries to render higher resolutions supported by your monitor.
To make the images fit your screen, it has to perform downsampling, which is a process of reducing the spatial resolution while keeping the 2D representation intact.
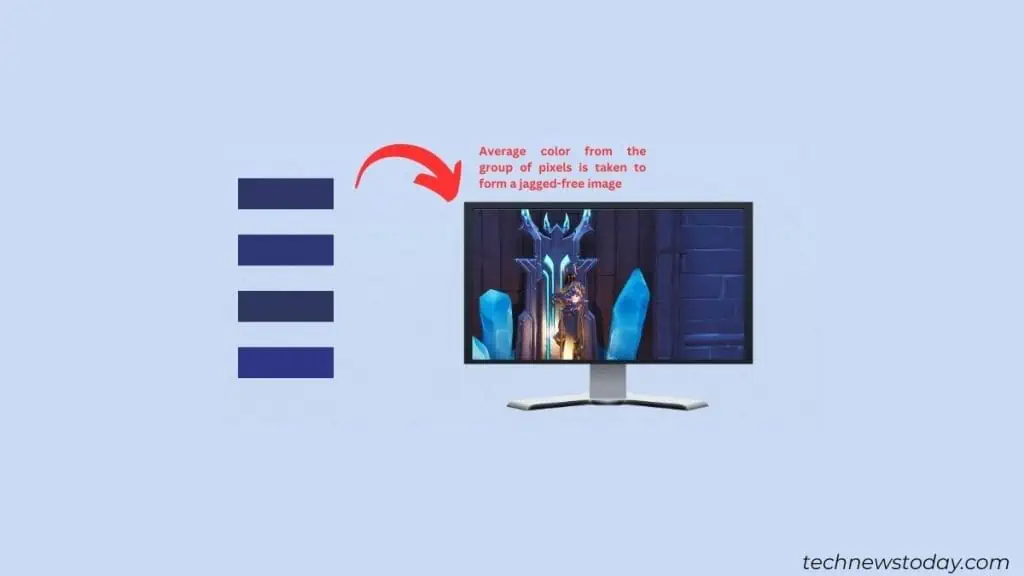
During the process, there are high chances of image distortions. But thanks to the supersampling feature, the graphics card averages the different color values taken from pixel samples. This ensures the images look much more realistic by getting rid of the pixelated edges.
The general idea of SSAA is to perform sampling at higher resolutions and produce images supported by the monitor (usually at lower resolutions).
However, the actual working methodology varies based on different algorithms—grid, rotated grid, jitter, random, and more.
Strengths:
- Produces visually appealing images.
- Applicable to run higher resolutions supported by your monitor.
Weaknesses:
- Requires more computation power to render the images.
- Significantly decreases the FPS making some high-paced games unplayable.
- Puts heavy loads on the graphics cards and hence isn’t applicable for low-end GPUs and CPUs.
- Makes horizontal and vertical lines look blurry.
Multi-Sample Anti-Aliasing (MSAA)
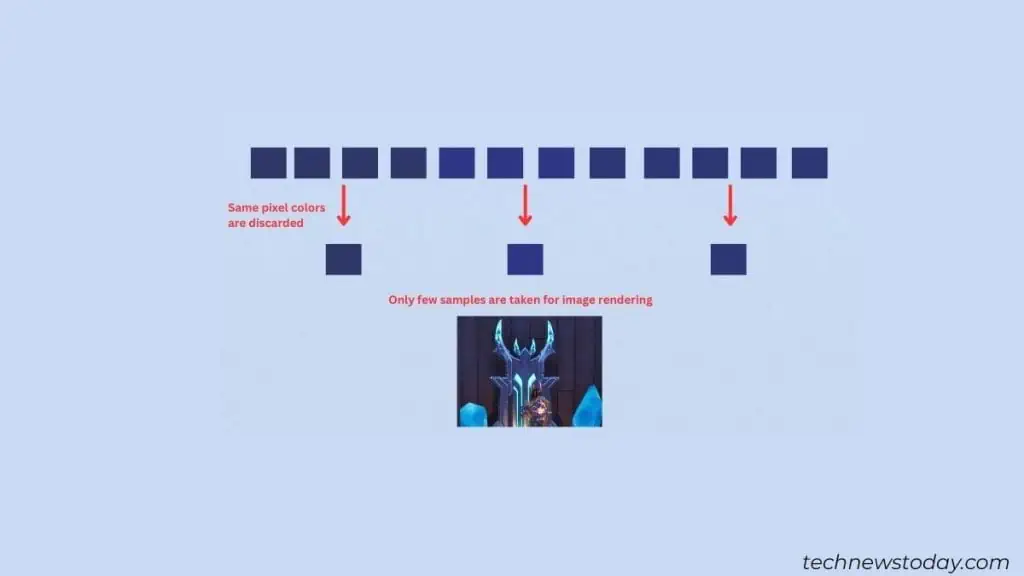
Unlike SSAA, MSAA only takes certain pixel samples from the image that’s to be rendered. Usually, those pixels with the same colors are discarded, which slightly reduces the processing power too.
During the process, first, a polygon (shape of the object) is rendered. It fixes possible jaggies and maintains the shape to make it look appealing. Only after this is completed, the texture is applied but with no changes.
Multi-sampling Anti-Aliasing can be performed using two methods—point sampling (samples are taken within the rendered primitive) and area sampling (some samples come from outside the rendered primitive).
Strengths:
- Takes up less processing power, compared to SSAA.
- Usually preferred by gamers as fewer frames are dropped.
- Performance and quality are balanced.
Weaknesses:
- Since it doesn’t work on textures, some portions may still appear pixelated.
- Still offers low performance as compared to post-process Anti-aliasing.
- Not applicable for low-end CPU and GPU.
Coverage Sampling Anti-Aliasing (CSAA) & Enhanced Quality Anti-Aliasing (EQAA)
Both CSAA and EQAA are spatial Anti-aliasing techniques developed by dedicated GPU manufacturers. While the former is an invention of NVIDIA, the latter was introduced by AMD.
They have a similar working mechanism as multi-sampling. Only those polygons with jagged edges undergo supersampling.
Strengths:
- Takes up less processing power and other computer resources.
- Only certain parts of the images require softening.
- Best for integrated graphics as well as low-end GPUs and CPUs.
Weaknesses:
- Drops FPS and may not be suitable for high-paced games.
- Less effective than MAA and FXA.
Post Process Anti-Aliasing
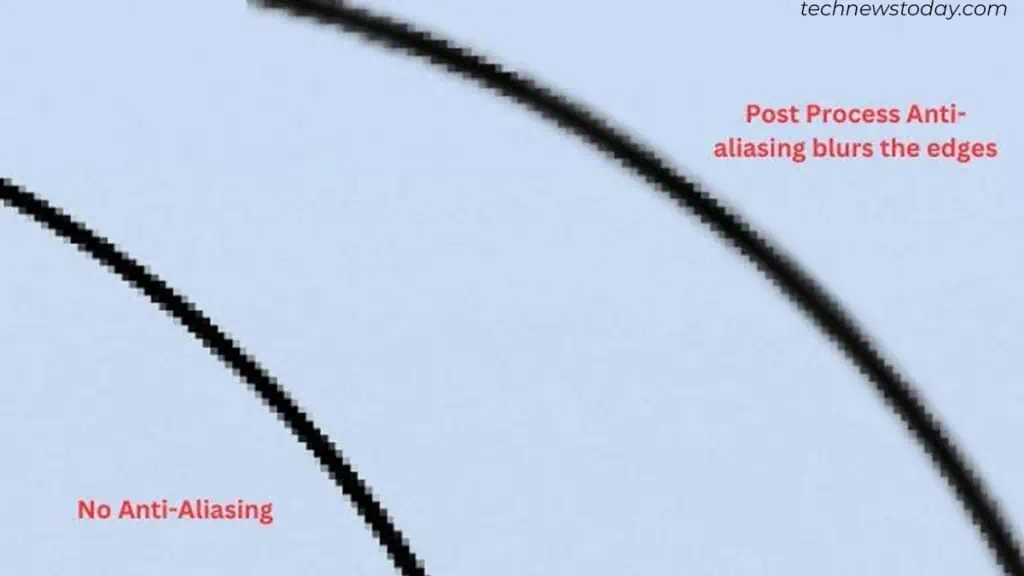
Another popular technique of AA is Post Process, where awkwardly positioned pixels are blurred rather than applying an average color. Unlike Spatial Anti-Aliasing, the edges are smoothed after the images are rendered.
Here, the GPU keeps comparing two pixels around the edges until it finds different colors. If the two have the same color, it considers the same polygon. Once it finds the difference, it blurs out the pixel.
Since this is completely based on guessing, most images turn out to be quite blurry. Nonetheless, this AA technique is becoming increasingly popular among gamers as it consumes less processing power.
Fast Approximate Anti-Aliasing (FXAA) & Morphological Anti-Aliasing (MLAA)
FXAA and MLAA work exactly the same, the only difference being their manufacturer. While the former is introduced by NVIDIA, the latter is used by AMD.
Unlike Spatial Anti-Aliasing, both FXAA and MLAA use high contrast filters to blur out the edges instead of averaging colors. During the process, smaller pixel details can’t be captured and rendered.
Moreover, these AA algorithms require less computing power but with the cost of blurriness. Since this is not really a big deal, most gamers use it and hence have become the most popular technique in the industry.
Strengths:
- Takes up less processing power and other computer resources.
- Only certain parts of the images require softening.
- Best for integrated graphics as well as low-end GPUs and CPUs.
Weaknesses:
- Images appear blurry.
- Polygonal details smaller than one pixel can’t be rendered as that with the Spatial Anti-Aliasing methods.
Subpixel Methodological Anti-Aliasing (SMAA)
Similar to FXAA and MLAA, SMAA also uses an edge detection algorithm to find pixelated edges on the objects to blur them out.
The difference is that the former takes single samples while the latter works by taking multiple samples, hence putting a little more load on your GPU. The result is you experience enhanced picture quality.
Since it provides better image quality (with fewer blurs) along with less computing power, gamers love it! However, there are still a few downsides, one of which is it has slow performance.
Also, it can’t be used on mobile phones and doesn’t support AR/VR.
Strengths:
- Better image quality than FXAA and MLAA.
- Despite adding a little more load on the CPU and GPU, it still takes up less processing power compared to Spatial Anti-Aliasing methods.
- Great for gaming due to less FPS drop.
- Works well with low-end GPUs.
Weaknesses:
- Slow Performance.
- Not applicable on mobile platforms.
- Doesn’t support AR/VR.
Temporal Anti-Aliassing (TAA or TXAA)
TAA or TXAA works by removing temporal aliasing, which is mainly caused during the movements inside a game. It works by blending the past and present pixels in different time frames to remove the jaggies from the edges.
Reportedly, TAA uses a ‘film-style’ technique which is considered to be quite complicated. It combines both supersampling and blurring.
Thus, it’s much better than FXAA or MLAA in terms of picture quality. However, due to the blurring technique, the images are still not as crisp as the spatial anti-aliasing.
Strengths:
- Produces images of high quality.
- Combination of both supersampling and FXAA.
- Better than FXAA and MLAA.
Weaknesses:
- Requires more computing power and takes up maximum PC resources.
- The procedure is quite complex.
- Only available from NVIDIA’s Kepler GPUs and higher.
Pixel Phasing
The final method to remove aliasing is pixel phasing, which involves shifting the sample pixel position near the approximate positions specified by the object geometry. This eventually reduces the visibility of the jagged edges and produces high-quality images.
How to Turn Anti-Aliasing On or Off on Windows
You can easily turn Anti-Aliasing on/off from the in-game settings. However, not all applications offer this feature and even if they do, they might not provide additional settings to tweak.
So, we highly recommend using your GPU’s control panels to get additional options.
While Intel offers users limited AA options, dedicated NVIDIA and AMD graphics offer much more advanced features. Let’s look into each of them in detail.
On Intel UHD Graphics Control Panel
- First, show your desktop and right-click anywhere on the empty area.
- Choose Show more options.
- Now, select Intel Graphics Settings and wait until the utility opens.
- From the bottom of the screen, pick 3D.
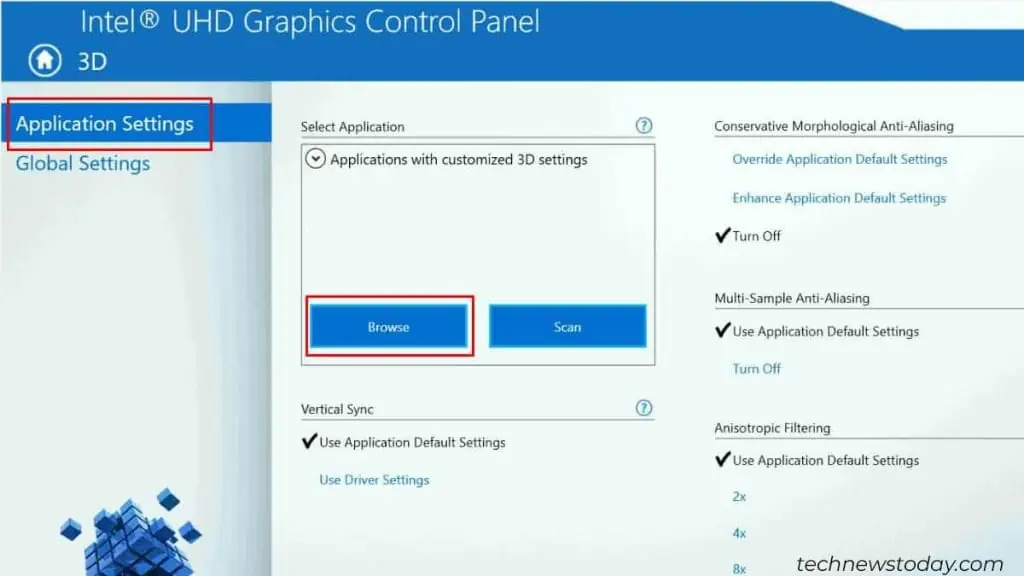
- Choose Application Settings from the left pane. In most cases, this is selected by default.
- Then, move to the right, and from the Select Application section, pick a game or any other program. You may press the Browse button and look for your application.

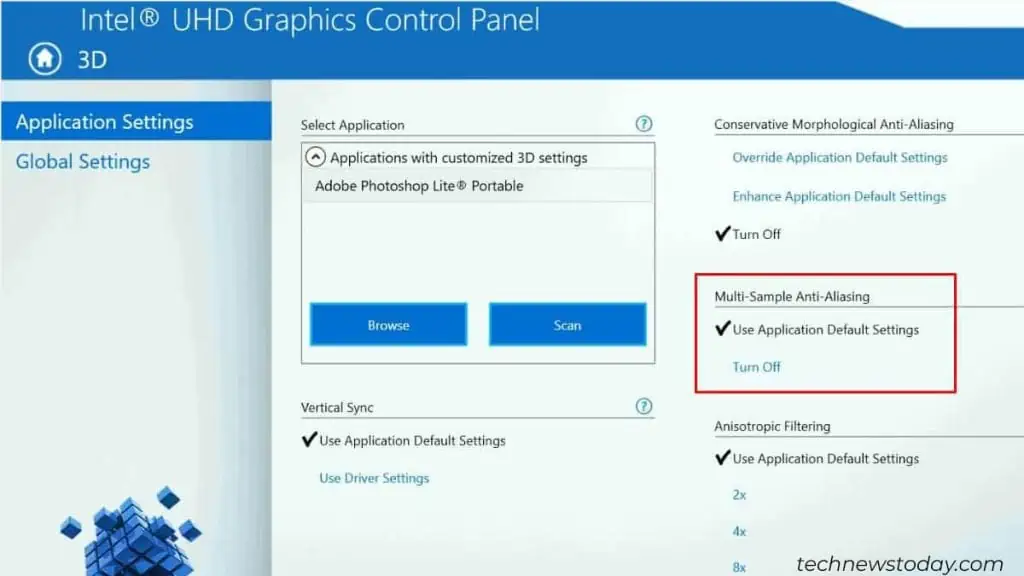
- Under Anti Aliasing, choose Use Application Default Settings to turn it on for the selected application. To disable it, simply pick Turn off. As demonstrated below, our system supports Multi-Sample Anti-Aliasing. The setting might be different on your computer.

- Hit the Apply button.
- In the confirmation prompt, press Yes before 15 seconds.
If you have disabled Anti-aliasing on your application, the feature will be automatically disabled.
On AMD Software: Adrenalin Edition
- Make sure you have downloaded the application from the official AMD website.
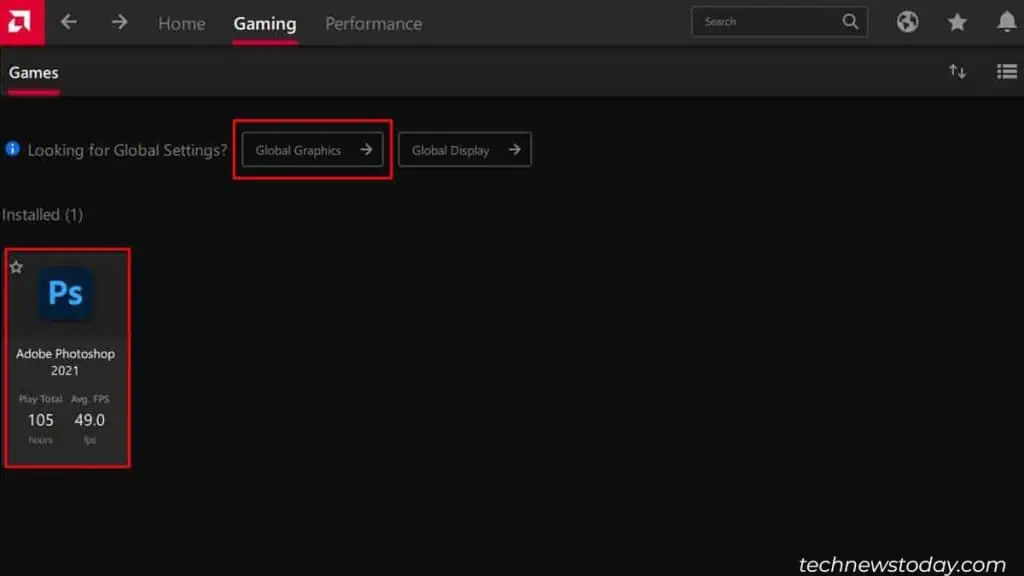
- Once installed, launch the utility and move to the Gaming tab.
- Under Installed, select your game or any other software. But if you wish to configure the same settings for all your 3D applications, you may select the Global Graphics option and follow the same procedure.

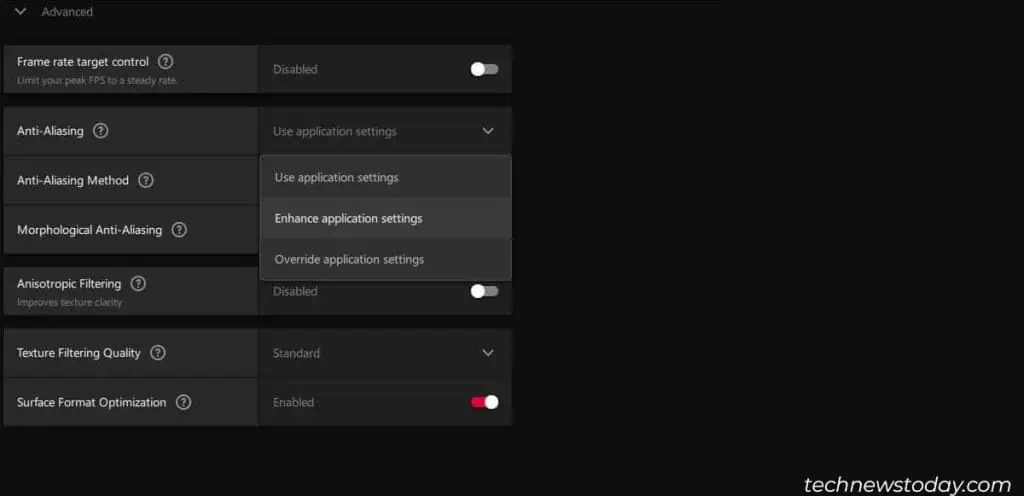
- Expand the Advanced option.
- If you wish to use the application settings, here’s what you can do:
- Expand the Anti-Aliasing option and choose Use application settings.
- Then, pick any one of the methods by expanding the Anti-aliasing Method option. We have these three choices—Multisampling, Adaptive Sampling, and Supersampling.
- If your AMD graphics offer Morphological Anti-Anliasing, you can enable/disable the feature using the dedicated slider.
- If you want to use an improved version of AA, select the Enhance application settings option in the Anti-Aliasing field. Then, pick an AA method and enable/disable Morphological Anti-Anliasing as discussed above.

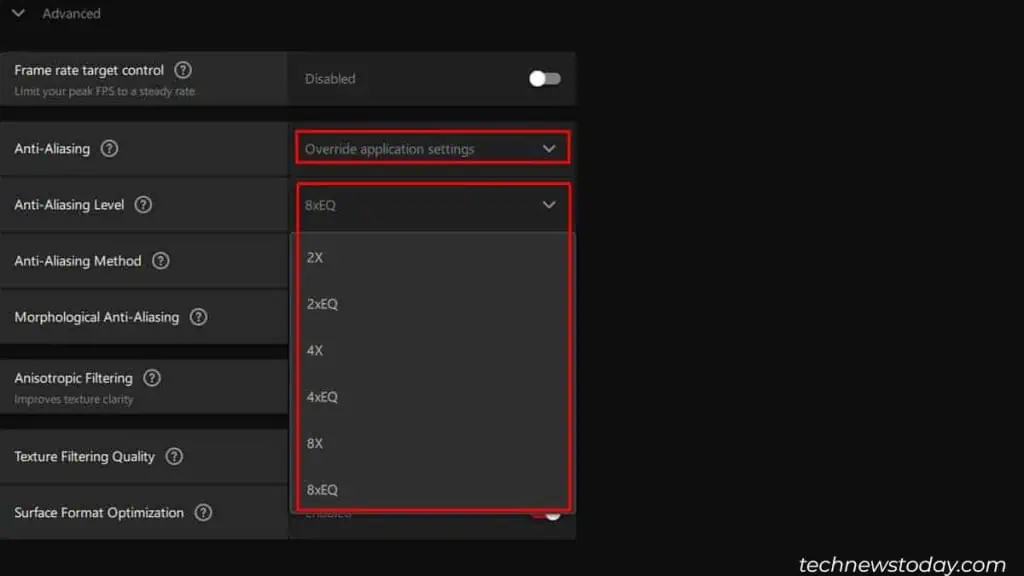
- You may choose Override Application Settings under Anti-Aliasing to enable advanced levels of AA. Along with the method and Morphological Anti-Aliasing, you even get to pick a level of your choice– 2X, 2xEQ (Enhanced Quality), 4X, 4xEQ, and more.

To disable Anti-Aliasing from AMD Software: Adrenalin Edition, configure it to Use application settings and manually disable it from your 3D application.
On NVIDIA Control Panel
- Navigate to Windows Desktop, right-click anywhere, and choose NVIDIA Control Panel.
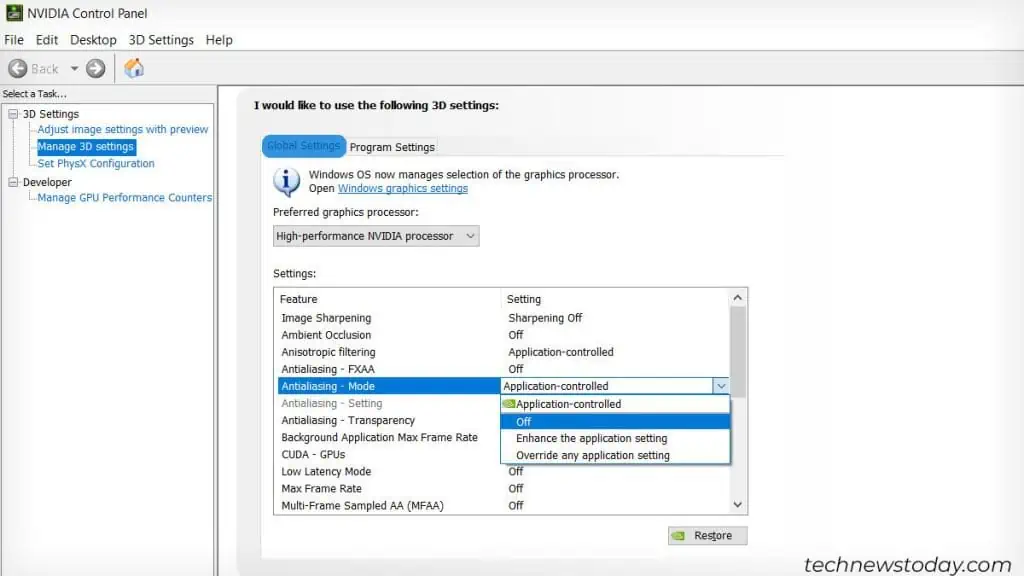
- Expand 3D Settings from the left panel and pick Manage 3D settings.
- Move to the right panel and ensure you’re in the Global Settings tab.
- From the Settings section, find the Antialiasing – Mode field and choose either of the four options:

- Application-controlled (to let the 3D application take control over the AA settings)
- Enhance the application settings (to set an AA level that your in-game settings might not offer)
- Override any application setting (to set a desired level if your game doesn’t offer AA or doesn’t support it when HDR rendering is enabled)
- Off (to disable AA)
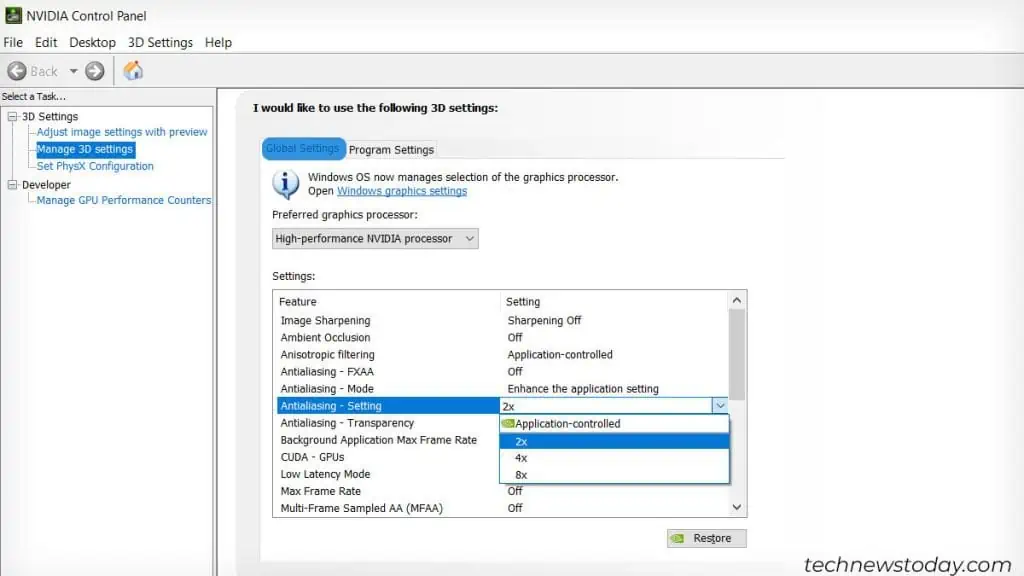
- If you’re using the Application-controlled setting, the Antialiasing Setting field is greyed out.
But if you have picked the ‘Enhance the application settings’ and ‘Override any application setting’ options, you can select any provided level of your choice—2x, 4x, 8x, or even more.
- Next, you can also set a level of AA Transparency.
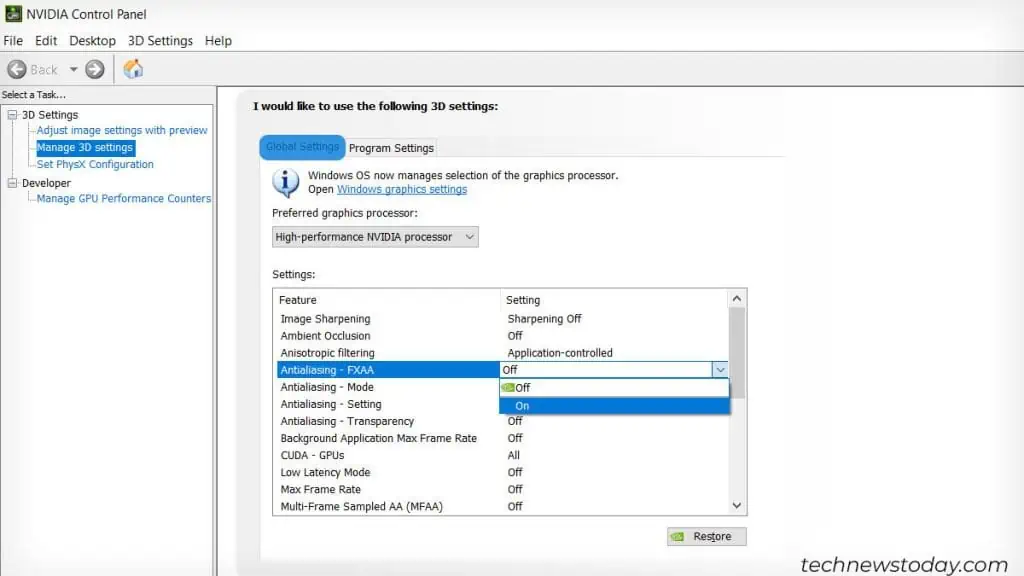
- NVIDIA offers its users FXAA (Fast Approximate Anti-Aliasing), a post-process AA technique. You can also enable/disable this as per your choice.

- Once you’ve configured the required AA settings, click on the Apply button.
Final Verdict—Should You Turn It On or Off?
It’s a hard choice whether or not to enable Anti-Aliasing.
You need to consider several factors—the types of games you play, the kinds of videos you watch, the graphics card you possess, and more. After learning about this feature in detail, the answer ultimately falls in your hand.
If you already have high-end gaming hardware (high-resolution monitor and graphics card), they’re likely to produce crisp and sharp images. In such cases, the AA feature might feel worthless and will only take up processing power. Therefore, it’s better to turn it off.
Also, we have learned that enabling AA can drop frames, making your games slow and laggy. So, one of the possible ways to boost FPS is disabling Anti-Aliasing.
However, you should also keep in mind that some highly graphics-intensive games may appear pixelated and jagged if not used with the appropriate GPU and monitor. If you’re ready to spend some bucks, it would be best to get high-end products.
Another way is to simply enable the different Anti-Aliasing technologies already available with your integrated or dedicated graphics.
As a general rule of thumb, you should opt for SMAA or CSAA/EQAA if you have integrated graphics, low-sized RAM, and low-end GPU and CPU.
Likewise, for systems with a mid-end graphics card, processor, and appropriate-sized RAM, we recommend SMAA, MLAA/FXAA, or MSAA.
Lastly, PC users with highly-optimized GPU & CPU, high memory, great cooling technology, and even a processor that supports overclocking can pick SSAA, TXAA, or MSAA.

