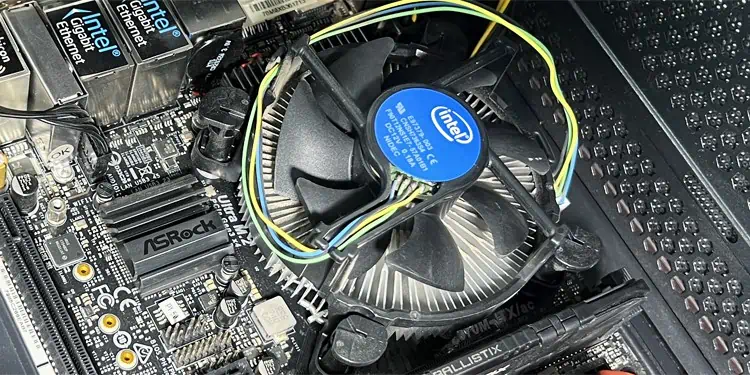
If the PC fans make a lot of noise on your ASRock system even when you’re not running any intensive tasks, it could be due to dust accumulation. But it can also indicate that the fans are running at a high speed even when not necessary. So it’s always a good idea to set a proper speed configuration for the fan for a better PC experience.
You can control your PC fans by using the OEM application, A-Tuning or through the Hardware monitor settings on your BIOS/UEFI. For the latter method, you can automatically specify some preset configurations or manually tune the settings.
In this article, I will only be talking about how you can control the CPU and Chassis fans on an ASRock motherboard. If you also want to control GPU fan speed, you won’t be able to use the motherboard BIOS for this purpose.
Control Fan Speed Using A-Tuning
ASRock provides the ASRock Motherboard Utility or A-Tuning app to control its overclocking and fan speed control settings. The app doesn’t provide you with all the options you may need to tune the fan. But it is a fast and easy way to control its speed without having to close any of your active tasks.
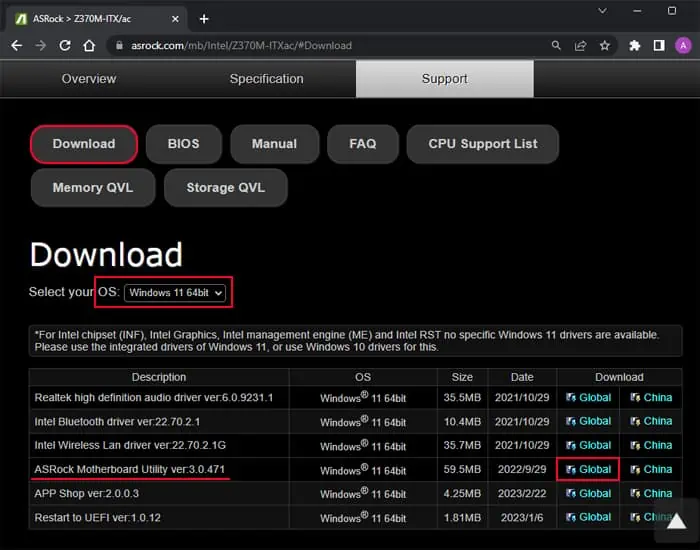
- Go to the webpage of your ASRock motherboard model.
- Go to its Support tab and click on Download.
- Select your OS version on the drop-down box.
- Then, click on the Global Download link corresponding to ASRock Motherboard Utility.

- Extract the archive after downloading it and open the file inside it.
- Follow the on-screen instructions on the installer to install the A-Tuning app.
- After that, run this application.
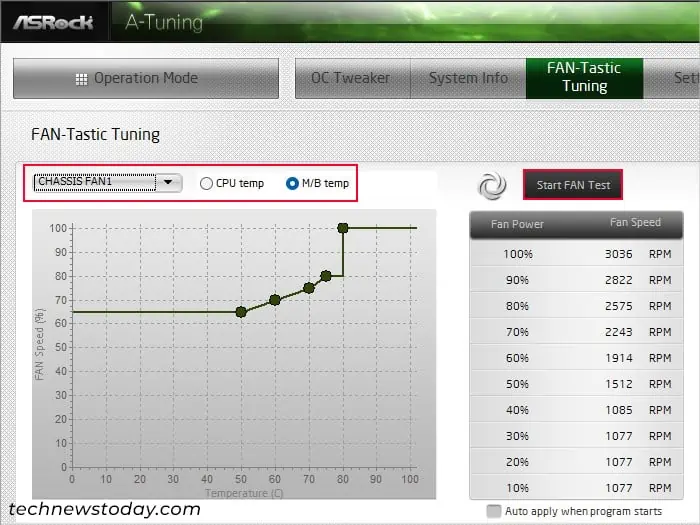
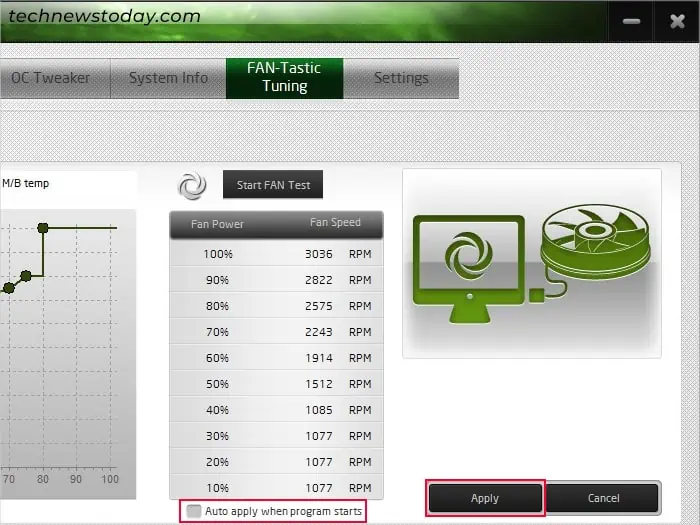
- Go to the FAN-Tastic Tuning tab.
- Select the fan from the drop-down list and choose whether your system will use the CPU temperature or the Motherboard (M/B) temperature for the monitoring.
- If you don’t see the corresponding fan speed for the duty cycle on the table, you can click on Start FAN Test to get this value.

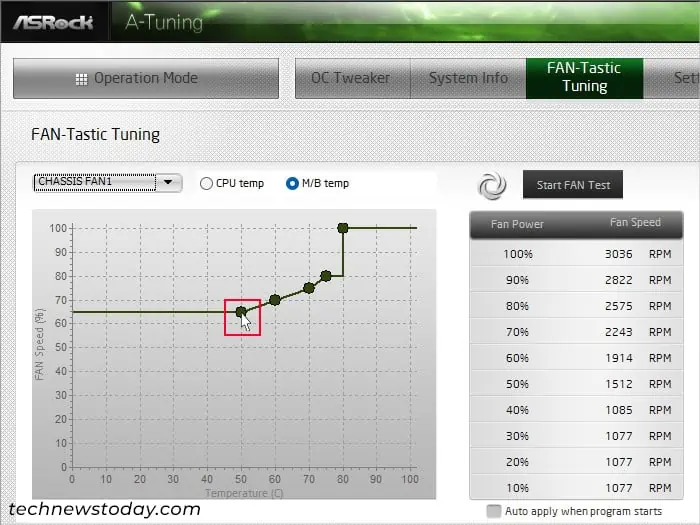
- Then, drag the circles on the Temperature vs Fan Speed graph to specify the fan control setting. Make sure to keep the following things in mind while doing so:
- The last drag-point corresponds to the critical motherboard/CPU temperature, and it’s best to set it at full speed.
- You can choose what critical temperature you want depending on your preference. Usually, the safe temperature range for CPU is about 40°C – 65°C for. If you are running intensive processes, you can push it to about 70°C – 80°C. So, I recommend setting the critical temperature somewhere in this range.
- All the successive speeds (based on the increasing temperature) must be in ascending order. Otherwise the BIOS/UEFI will automatically increase the latter value on the same level as the previous one.

- After you are done, check Auto apply when the program starts and click on Apply.

- Then, go to the Settings tab and check Auto run at Windows startup.
There is no hard and fast rule to tune the fan speed. You can come back to it and change the configuration as many times as you want after testing it out.
Control Fan Speed from BIOS/UEFI
Using the BIOS or UEFI settings is the most traditional way of controlling fan speed on a PC. It is also the method that provides the most options.
First, you need to get to the BIOS or UEFI settings interface.
- Power up or restart your computer.
- Press F2 or Del as soon as you see the manufacturer’s logo on the screen.

- You can also press this BIOS key multiple times repeatedly after powering up the computer. This way, you’ll get the timing right even if you have enabled fast boot on your BIOS and the logo screen disappears very quickly.
After that, you can use any of the methods below to configure your fan control settings. They all come with different advantages and disadvantages, so I recommend looking through all of them before deciding on a method.
Using Preset Configuration from BIOS/UEFI
Like most motherboards, ASRock provides some preset configurations for the CPU as well as Chassis fans. However, keep in mind that these configurations will not suit everyone’s needs. So, it’s best to use other methods for the best results.
You can easily select the setting for the CPU fan on the EZ UEFI mode. But you may not be able to change the mode for all the fans from there. So, it’s best to do so from the Hardware Monitor settings on the Advanced mode.
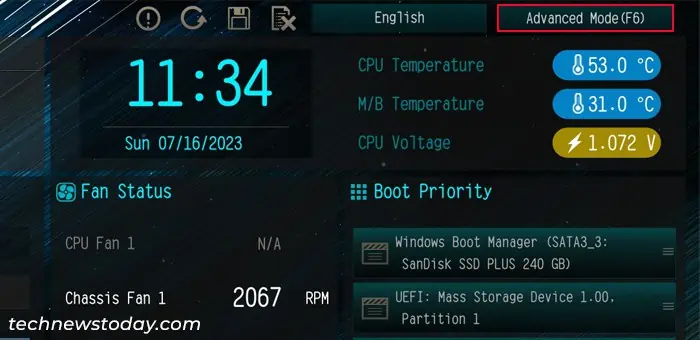
- Press F6 if you are on EZ mode after getting to the UEFI.

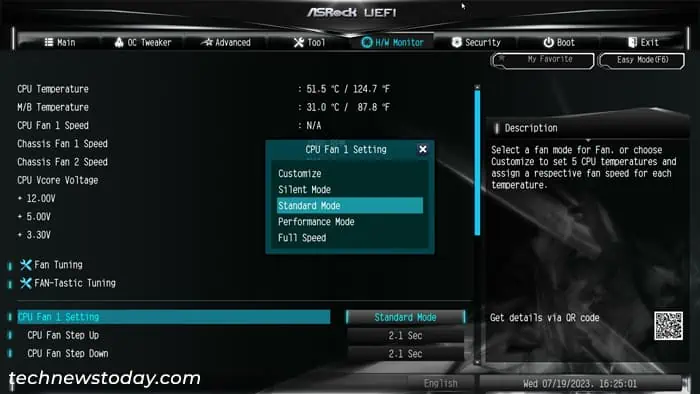
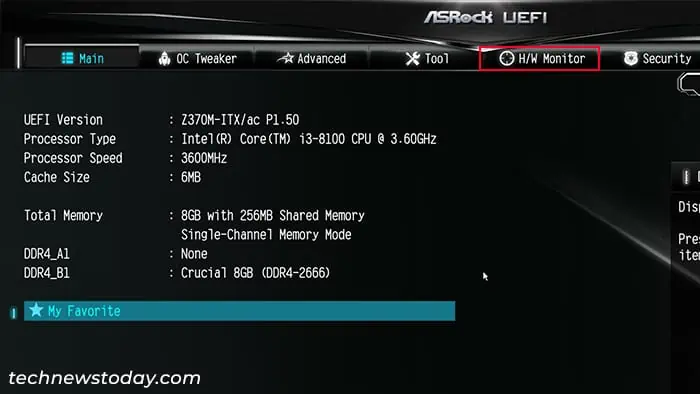
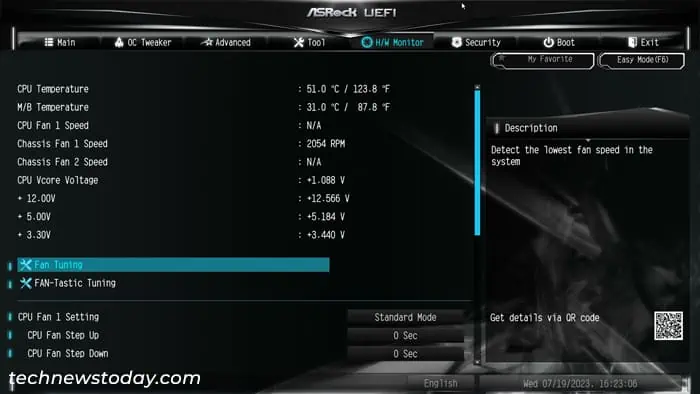
- Go to the H/W Monitor tab.
- Look for CPU Fan 1 Setting, CPU Fan 2 Setting, Chassis Fan 2 Setting, and so on depending on what fans you have.

- Set them to one of the following options depending on your need.
- Silent: The fan rotates somewhat slowly without making much noise unless your CPU or motherboard is at a very high temperature.
- Standard: The fan rotates somewhat fast while making more noise. The speed gradually increases at higher temperature until it reaches full speed.
- Performance: The fan rotates slightly faster than Standard mode on all temperatures. The fan’s speed also starts increasing at a lower temperature threshold compared to the Standard mode.
- Full Speed: The fan rotates at full speed regardless of the temperature.
- After specifying the setting for all the fans, press F10 and click Yes to save the configuration changes and exit the BIOS.
Using Automatic FAN Tuning
The UEFI on ASRock motherboard also comes with a separate option, called FAN Tuning. It tests the fan to determine the minimum possible duty cycle or speed and automatically configures the fan to run at the theoretical best speed at any given temperature.
With the most updated BIOS or UEFI firmware, this feature sets a very good fan speed configuration that most users might find suitable.
- After getting to the BIOS or UEFI Interface, press F6 to access Advanced mode.
- Go to the H/W Monitor tab.

- First, set the Switch, Control Mode, and Temperature source options for all fans according to your preference. Check the Other Parameters to Configure section down below if you are not sure what they should be.
- Then, select Fan Tuning.

- It will take some time to test the fan and set the configuration. After that, click OK.
- Go to the Exit tab.
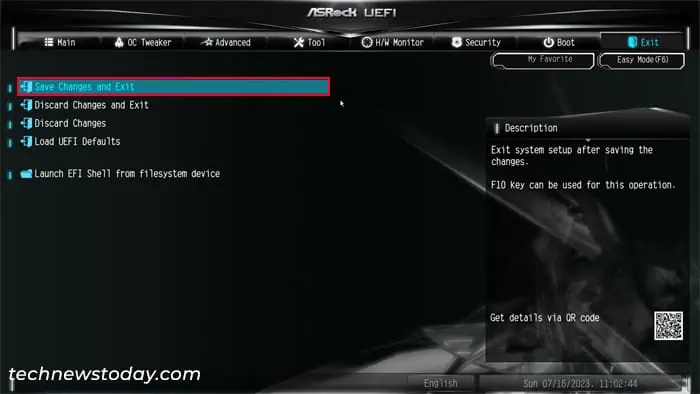
- Select Save Changes and Exit and then click Yes.

Using Custom Tuning
You can also manually set custom values for the temperature thresholds and their corresponding fan speeds from the BIOS/UEFI.
This method is especially useful If you are overclocking your CPU or even your GPU. Your computer can get hotter than normal in such cases and the preset settings as well as automatic tuning may not work well.
You can either use the FAN-Tastic Tuning tab to customize your tuning or set the temperature and fan duty cycle values manually.
- Access your motherboard BIOS.
- To use the FAN-Tastic Tuning feature,
- Select the Tools option in the EZ mode interface and click on FAN-Tastic Tuning. Or you can go to Advanced Mode (F6), select H/W Monitor and click on this option.

- Here, select one of your Fans from the left panel.
- You can select Monitor CPU or Monitor Motherboard to specify the temperature source depending on your need. I recommend choosing Monitor Motherboard for a Chassis fan and Monitor CPU for a CPU fan.
- Click on Customize on the top.
- Drag the four circles on the temperature vs fan duty cycle (% speed) graph to specify the fan speed according to the temperature.

- Click Apply and then close the tab.
- Select the Tools option in the EZ mode interface and click on FAN-Tastic Tuning. Or you can go to Advanced Mode (F6), select H/W Monitor and click on this option.
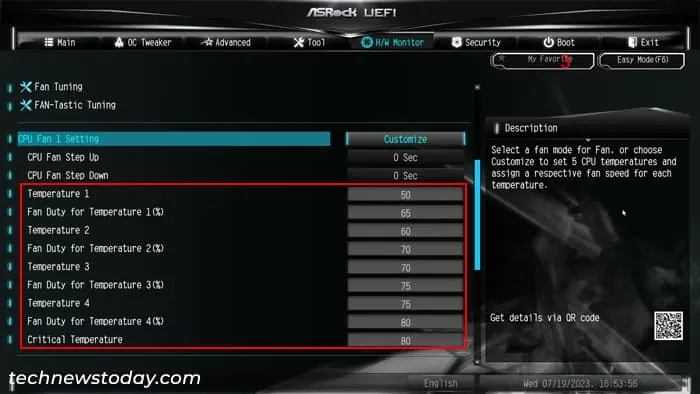
- You can also set the temperatures manually on the H/W Monitor tab after setting the CPU or Chassis Fan Setting to Customize. It follows the same pattern as above.

- Then, you will need to set the other parameters depending on the type of your fan, such as Control Mode and Step Up/Step Down. Check out the subsection below to understand more about them.
- After that, go to the Exit tab.
- Select Save changes and Exit and then confirm with Yes.
You can take the preset configurations as a reference to set the temperature/fan speed values. Or you can test things out yourself. Then, try checking how it affects your fan noise, CPU temperature and performance during your usual workload. If necessary, you can always change the fan control settings using the same method.
Other Parameters You May Need to Configure
Along with the temperature thresholds and fan speed settings, you will also need to specify some other settings to properly control your fans. You will find them in the H/W Monitor tab of the BIOS/UEFI Advanced mode.
For some motherboard models, the BIOS may not contain the Step Up and Step Down settings.
FAN and W-PUMP Switch
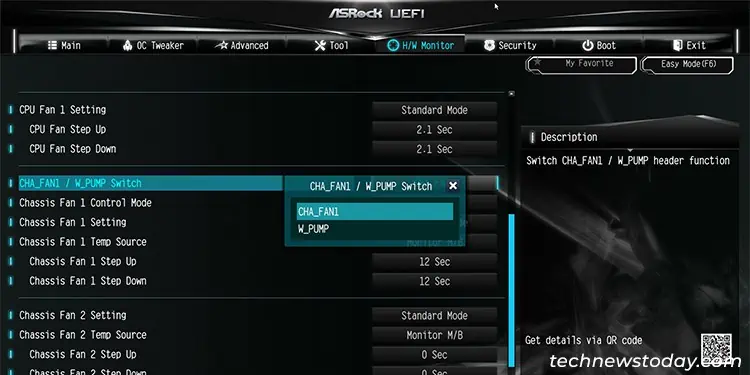
This setting is quite straightforward. If you are using an AIO or other liquid cooler pump on the relevant fan header, you need to set it to W-PUMP. Otherwise, set it as CPU_FAN or CHA_FAN.
Also, if you are using a liquid cooler it’s best to set it to full speed for the best performance. You won’t get noise from this cooler unless there are other issues with its pump or liquid.
Control Mode
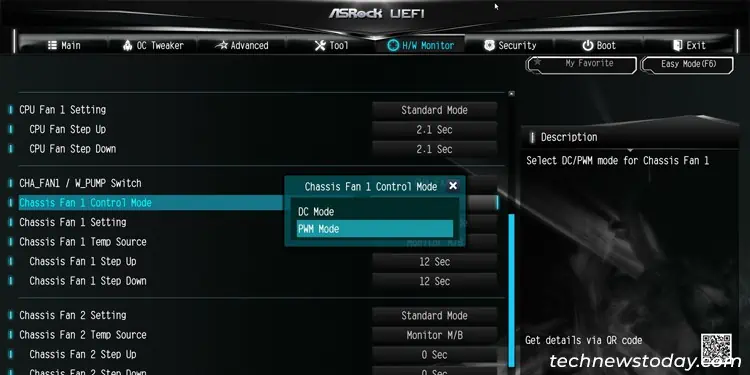
You can set the fan control mode to PWM or DC.
- DC fans have 3 pins and work by directly receiving different voltages from the fan controller to control its speed.
- PWM fans get full voltage from the controller, but they have an additional pin that the controller can use to control the fan speed in a more flexible manner.
If you are using a 4-pin adapter fan on a 4-pin fan header, set the control mode to PWM. Otherwise, you need to set it to DC. You should check the motherboard visually to know the number of pins on the adapter and the header.
Temperature Source
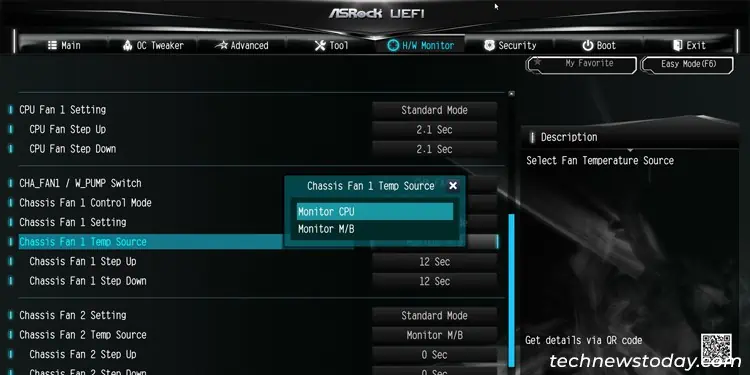
You can specify the temperature source as the CPU or the motherboard on ASRock’s UEFI or BIOS. In general, it’s better to set the CPU as the source for CPU fans and the motherboard for the Chassis fans.
However, it does not matter much in practice as the temperature change on the motherboard also affects the CPU and vice versa. You can choose any option you are comfortable with.
Step Up and Step Down
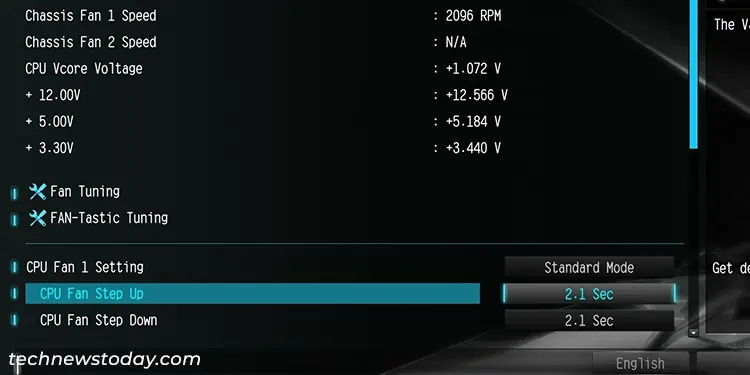
The Step Up and Step Down options represent the time it takes to increase or decrease the fan speed for the temperature thresholds. For instance, if the Step Up option has a value of 4 seconds, the fan speed will increase by 25% of the necessary speed increment each second.
Depending on your motherboard’s BIOS version, the step up and down values may be in levels instead of seconds. In such cases, the lower the level, the faster the transition will be. So you can specify these settings accordingly.
Control Fan Speed Through Other Apps
You can also use various fan control applications, such as FanControl, SpeedFan, and so on, to control the fan speed and temperature threshold settings on your computer. The manufacturers of some stock coolers also provide dedicated Original Equipment Manufacturer (OEM) apps that you can use to control the fan speed.
Apart from these, it is possible to use a few other methods to configure the fan control settings in different ways. I recommend checking out our comprehensive article on controlling fan speed on PC to learn all the possible methods..
