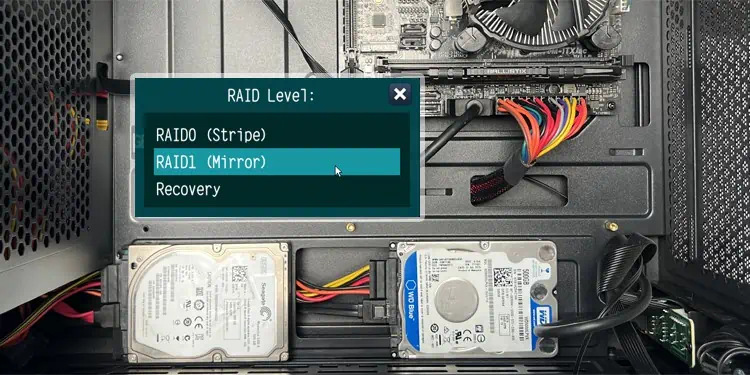
Usually, you can set up RAID as a hardware or software RAID. As BIOS-level RAID uses the onboard controller on the motherboard, it is also called Fake RAID. It is a cost-free alternative to the dedicated RAID hardware, but configuring it requires more effort.
You need to install proper storage disks, enable this technology on your BIOS/UEFI, create a RAID array, and install the necessary drivers to set it up on your ASRock motherboard. You can generally use the UEFI interface or the AMD/Intel Windows Desktop apps to configure this type of RAID.
There are many things you need to note while setting RAID on ASRock. For instance, while trying to create a non-OS RAID volume with my NVMe drives, I had mistakenly enabled RAID mode for both SATA and NVMe devices. So, my OS SATA drive was not booting at all and I was getting the INACCESSIBLE_BOOT_DEVICE BSOD error.
In this article, I will be guiding you so that you can set up RAID while avoiding all such mistakes.
Check for RAID Support
Before you begin with actually setting up RAID, you need to ensure that your motherboard supports RAID. It needs to have a built-in RAID controller for this purpose.
The onboard controller also needs to support the RAID level you want. Otherwise, you need to use a dedicated RAID controller card.
You can check the motherboard specifications on ASRock’s official website.
Enter BIOS or UEFI
Generally, you can access the BIOS setup utility or UEFI firmware settings by using the BIOS key on startup.
- Power up or restart your computer.
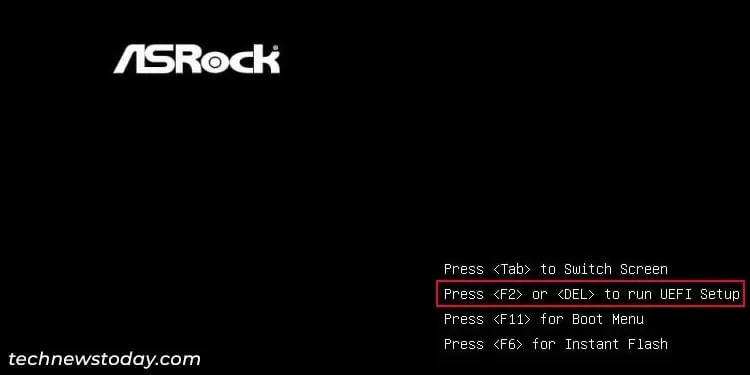
- After you get to the startup screen with ASRock’s logo, press F2 or Del to get to BIOS/UEFI.

You can also get to Advanced Startup and then select Troubleshoot > Advanced options > UEFI Firmware Settings > Restart to do the same. The latter method is useful if you have enabled Ultra Fast Boot and can’t use the BIOS key to access the UEFI setup.
Enable RAID Mode
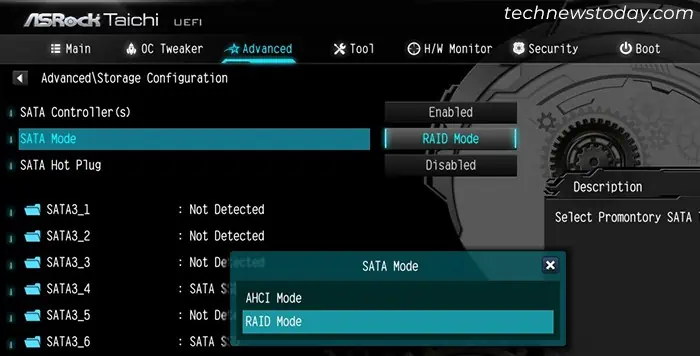
Now you will need to enable RAID mode on the UEFI/BIOS. For SATA drives, you must set the SATA controller mode to RAID instead of AHCI.
You need to perform different steps to have NVMe SSDs in the RAID array depending on your CPU. The motherboard needs to support NVMe RAID or else you won’t find the necessary settings.
Note: You need to have the same type of disks to use them in a RAID Array. For instance, if you are using an HDD, the other disks must be HDDs as well. Similarly, if you are using a NVMe SSD, other disks need to be NVMe as well.
You can’t use a M.2 SATA or SATA SSD with an NVMe SSD. You can however, use an M.2 SATA SSD with a 2.5” SATA SSD.
With AMD CPU,
- Go to the Advanced tab.
- If you want to set up RAID for SATA HDDs or SSDs,
- Go to Storage Configuration and select SATA Mode Selection.
- Set it to RAID Mode and press Enter.

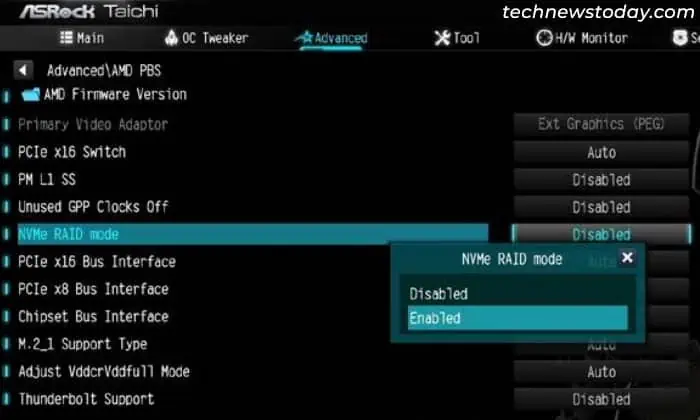
- If you want to set up a RAID array with NVMe SSDs,
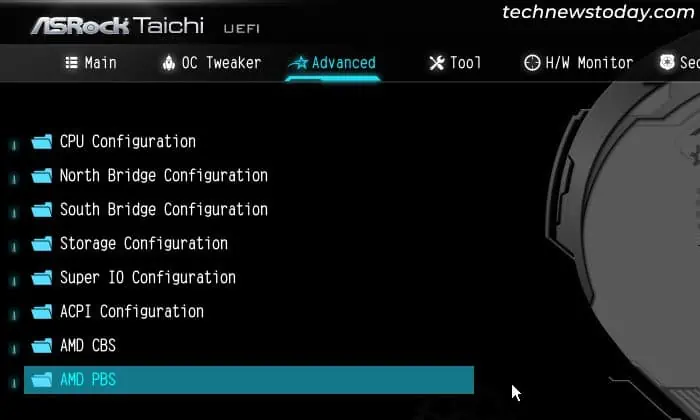
- Go back to the Advanced tab and select AMD PBS.

- Set NVMe RAID Mode to Enabled.

- Go back to the Advanced tab and select AMD PBS.
With Intel CPU,
- Go to the Advanced tab and select Storage Configuration.
- If you want to enable RAID for SATA drives,
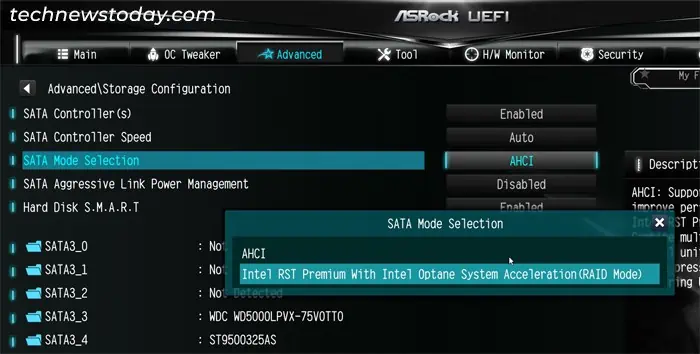
- Select SATA Mode Selection.
- Set it to Intel RST Premium With Intel Optane System Acceleration (RAID Mode) and press Enter.

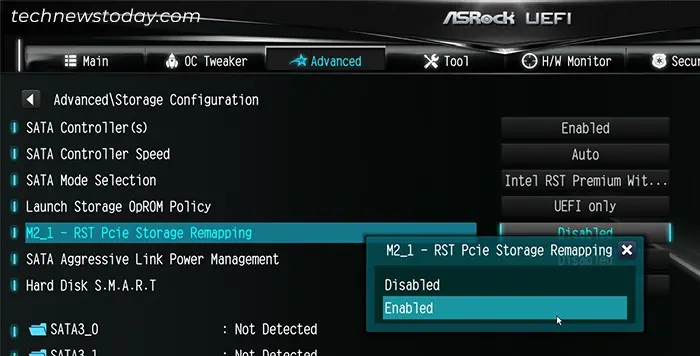
- Also, if you see M2_X – RST PCIe Storage Remapping options, make sure to disable them if you want to create a non-OS SATA RAID and have the OS on an NVMe drive.
- If you want to set up a RAID array with NVMe SSDs,
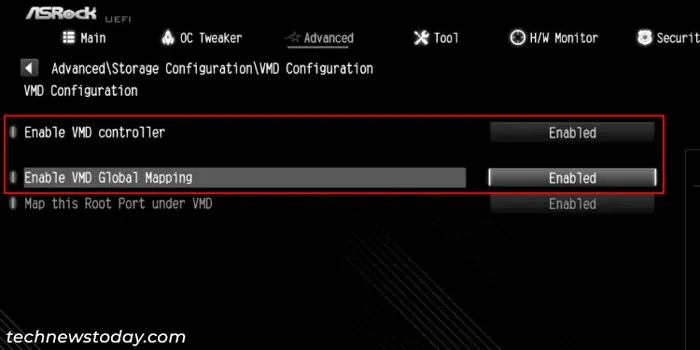
- Look for VMD Configuration and select it.
- Set Enable VMD controller and Enable VMD Global Mapping to Enabled.

Older Intel-based ASRock motherboards that do not have NVMe RAID support contain a RST PCIe Remapping feature that makes the PCIe devices seem to be connected to the SATA RAID Controller instead.
This way, you can create a bootable RAID array using the NVMe-com drives since your system thinks it is creating a RAID for SATA drives.
Note: The PCIe devices need to support remapping as well as be NVMe-compliant. You also need to connect the NVMe drives to M.2 sockets whose PCIe lanes come from the chipset’s PCH component, not the CPU. Additionally, you cannot combine an NVMe drive and a SATA drive in the same RAID array.
You also cannot install 32-bit Windows or any Linux on a RAID volume that uses PCIe Storage Remapping.
- Make sure to set SATA Mode Selection to RAID mode.
- Look for M2_X – RST PCIe Storage Remapping for the M.2 slots where you have connected SSDs and select the option.
- Set them to Enabled or RST Controlled.

Disable CSM
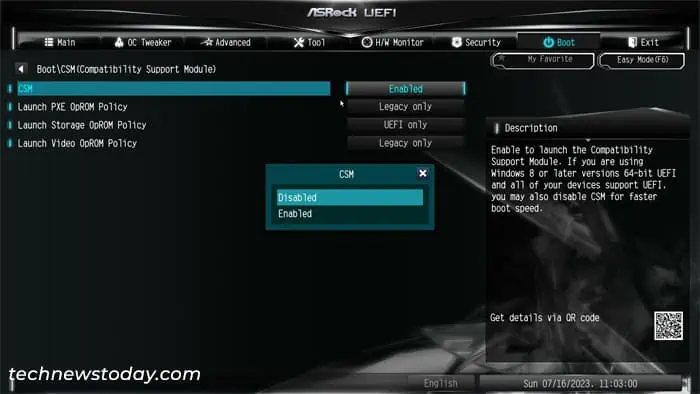
If your storage devices are set to run with Legacy support, you can’t create a RAID disk array. In fact, the BIOS option to manage RAID settings won’t show up at all.
So you need to disable the Compatibility Support Module (CSM) feature that provides legacy support to the firmware. Or you must at least set the storage device to run on UEFI only.
- Go to the Boot tab and select Compatibility Support Module (CSM).
- Set CSM to Disabled and press Enter. Or you may be able to leave it as Enabled and then set Launch Storage OpROM policy to UEFI Only.

Now, you must save the changes and exit the BIOS to apply the changes. Press F10 and select Yes to do so.
Create RAID Array
Now you need to create a RAID array or volume to use the drives with RAID functions. You can use the settings in the BIOS/UEFI or a dedicated BIOS RAID utility or even AMD/Intel’s RAID software for this purpose.
Using Windows Desktop Application
Using the Desktop Application from AMD or Intel is the easiest way to create a RAID array, especially because it will automatically install the necessary RAID drivers. However, you need to have a running Operating System on a separate type of storage disk to use such apps.
First, make sure that you have enabled RAID mode only for the storage type you want and you have an OS drive of another storage type on your computer. Then, log in to Windows and install all possible updates before going through the steps below.
With AMD CPU
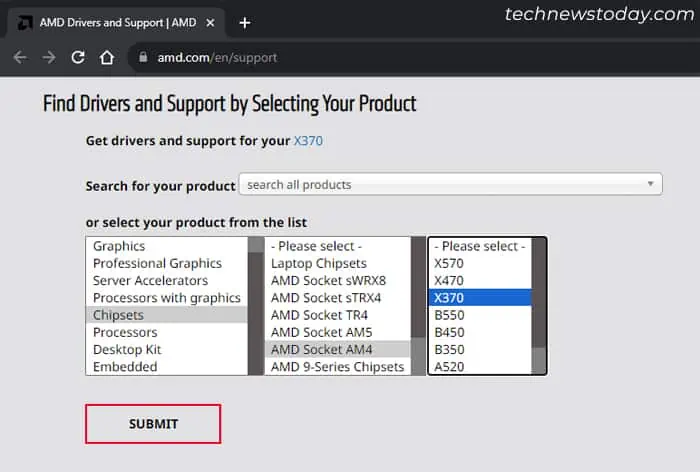
- Go to AMD’s support webpage.
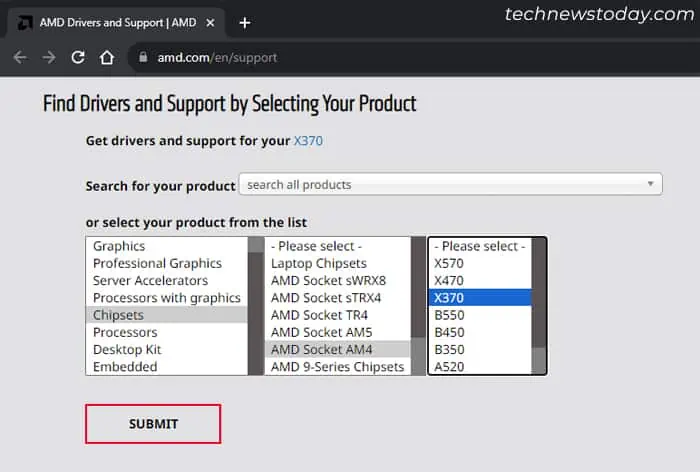
- Under Find Drivers and Support by Selecting Your Product, select your Chipset from the list and click Submit.

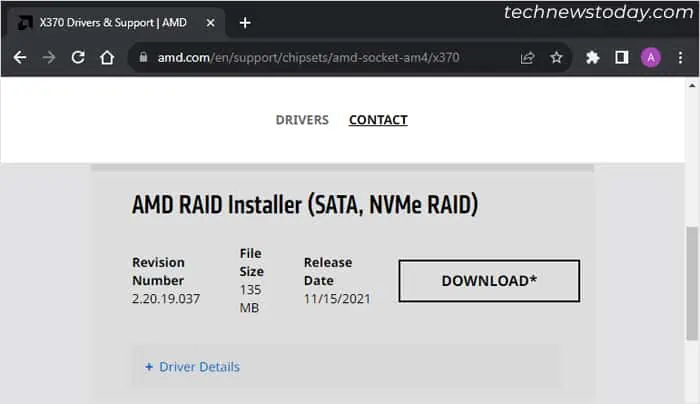
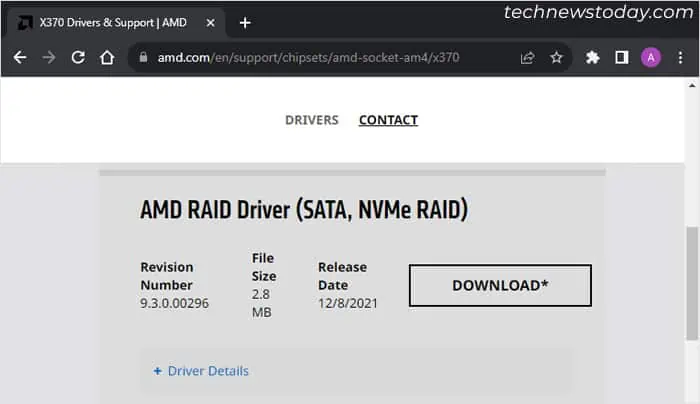
- Expand your Windows version and click on Download next to AMD RAID Installer.

- Extract the archive and run the program inside it. Follow the on-screen instructions to install RAIDXpert2 and the RAID drivers.
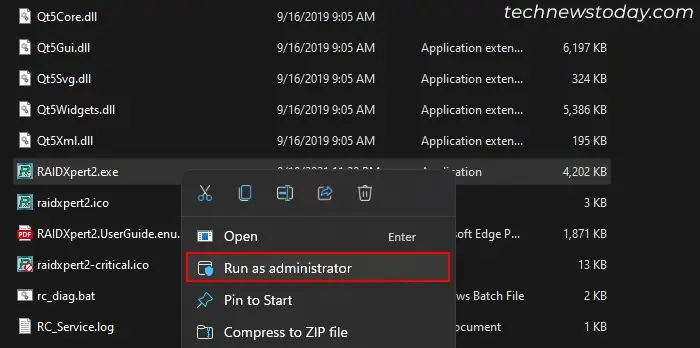
- After restarting your computer, go inside the
C:\Program Files (x86)\RAIDXpert2folder or the folder where you installed the app. - Right-click on
RAIDXpert2.exeand select Run as administrator.
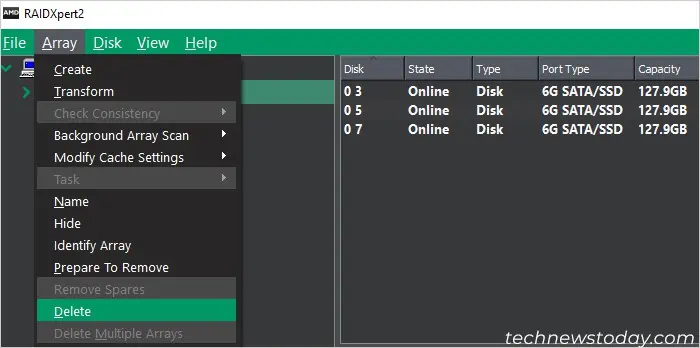
- Here, first you need to delete the Non-RAID arrays. Select an array, go to the Array tab on the menu bar and select Delete.
- Do so for all the current arrays.

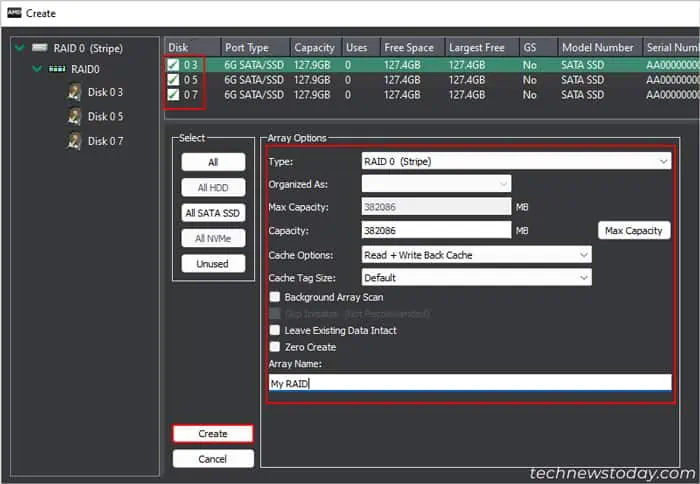
- Then, click on the Array tab and select Create.
- Check the disks you want in the list.
- Under Array Options, set the RAID level, Array Name, and other settings per your need.
- Then, click Create.

With Intel CPU
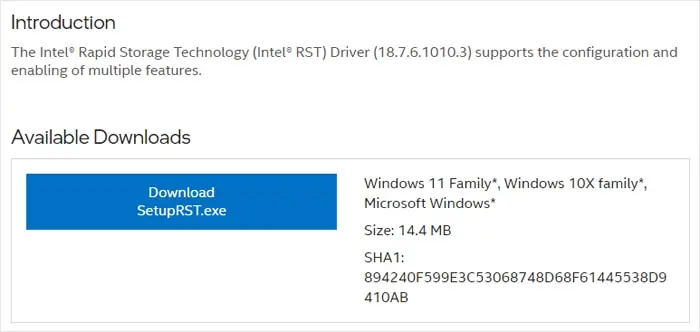
- Search for Intel Rapid Storage Technology Driver Installation Software on the internet and go to the official page of its latest version on Intel’s website.
- Click on Download SetupRST.exe or any download button for the software.

- Run the installer and follow the on-screen instructions to install the software and the drivers.
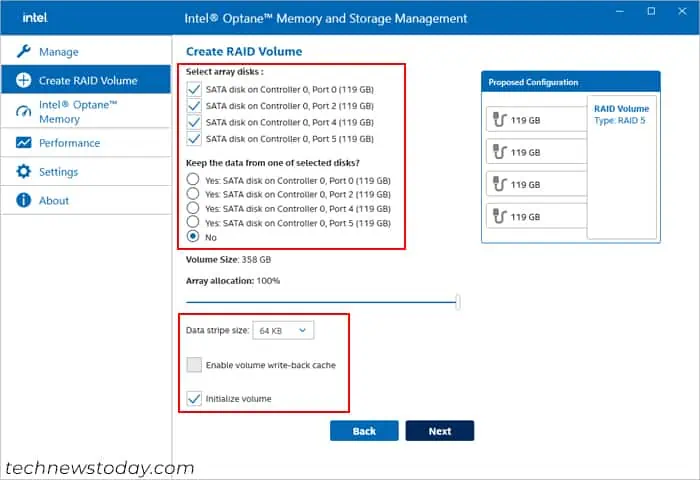
- After restarting, open the Intel Optane Memory and Storage Management app.
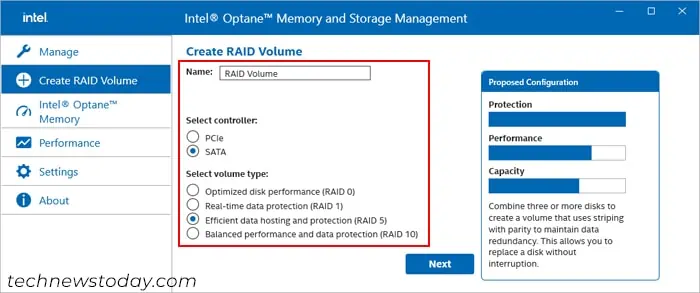
- Go to the Create RAID Volume tab.
- Set the name and select the controller (PCIe or SATA) as well as the RAID type. Click Next.

- Tick all the drives you want on the RAID.
- You can choose whether you want to keep data on your disks. However, I highly recommend selecting No for better performance.
- Set the other options depending on your RAID type and check Initialize Volume. Click Next.

- Confirm by checking Delete data on… and select Create RAID Volume.
Using BIOS/UEFI Settings
You can also use the RAIDXpert2 Configuration Utility or Intel Rapid Storage Technology Utility on the UEFI to configure a RAID array. It might be the easier method if you want to install your operating system in the RAID volume.
Here, get back to the UEFI and press F6 to access Advanced Mode if necessary. Then, follow the steps below depending on your CPU.
With AMD CPU
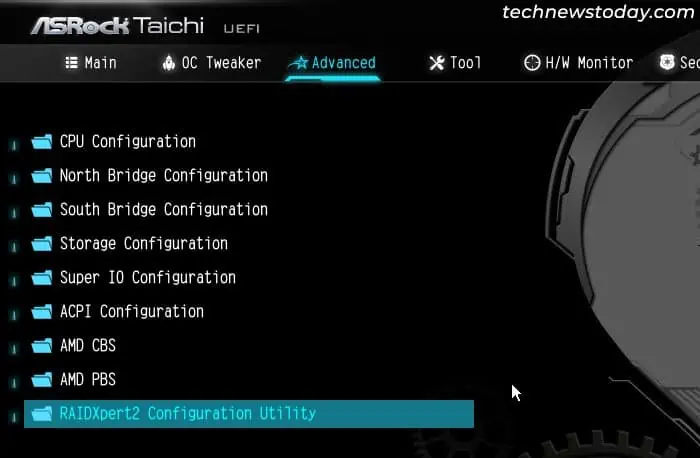
- Go to the Advanced tab and select the new option, RAIDXpert2 Configuration Utility.

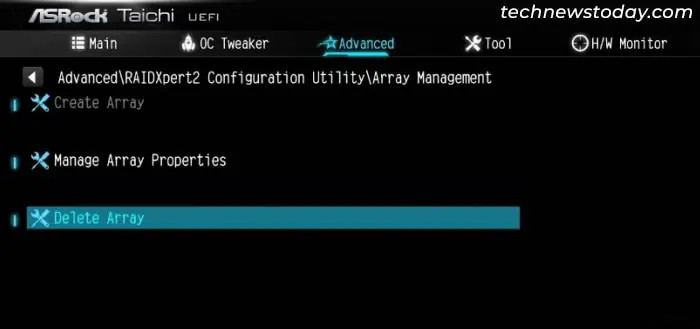
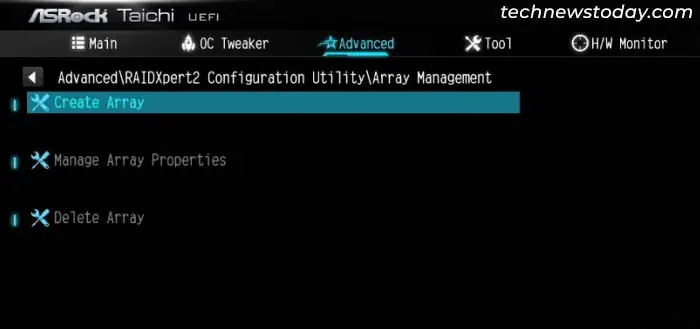
- Go to Array Management and select Delete Array. You need to delete the existing disk array before you can create a new one.

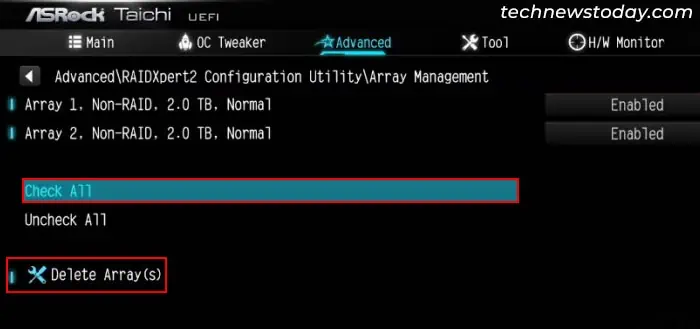
- Select Check All > Delete Array(s) > Yes. If you don’t have the Check All option, you need to select individual arrays and delete all of them.

- Set Confirm to Enabled and click Yes.
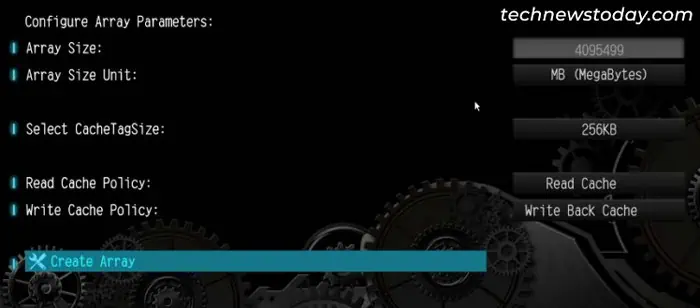
- Now, inside the Array Management setting, select Create Array.

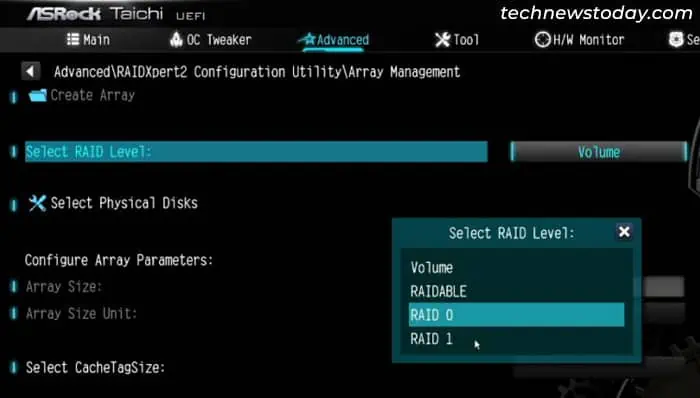
- Set the RAID level per your preference.

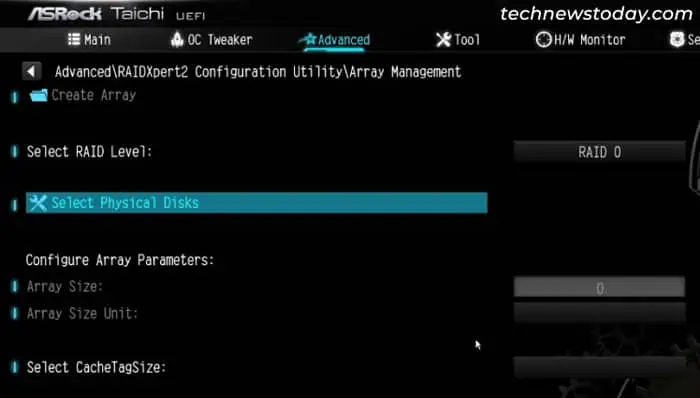
- Then, click on Select Physical Disks.

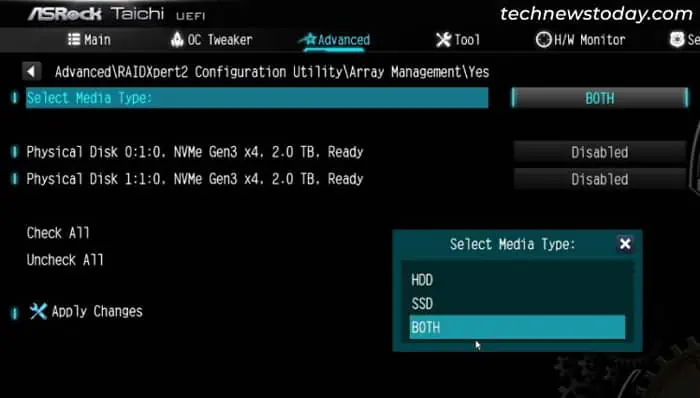
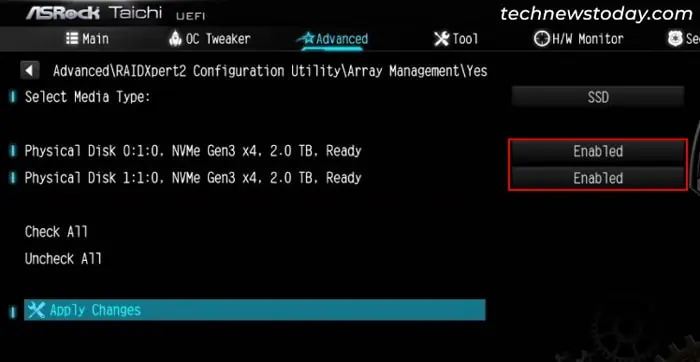
- Set the Media Type to HDD or SSD depending on what you are using. Or you can leave it as Both.

- Go down to the individual disks and set the ones you want in the RAID array to Enabled. If you want to include all the disks, you can select Check All.
- Now, click on Apply Changes.

- Select Create Array.

- Then, press F10 and click on Yes to save the changes and exit the UEFI.
With Intel CPU
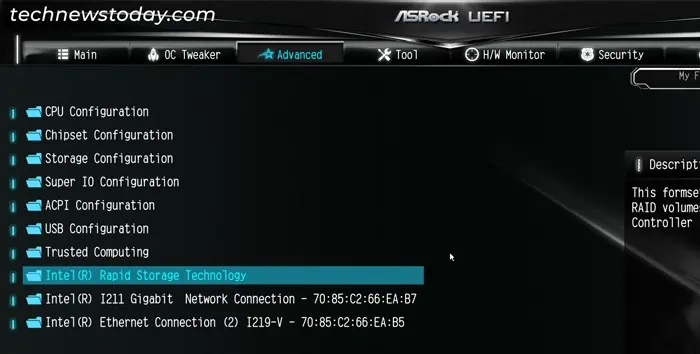
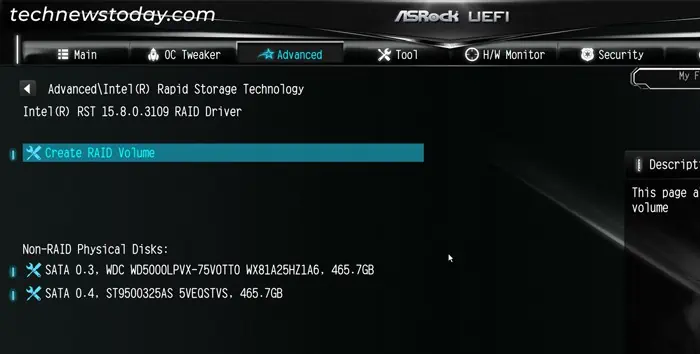
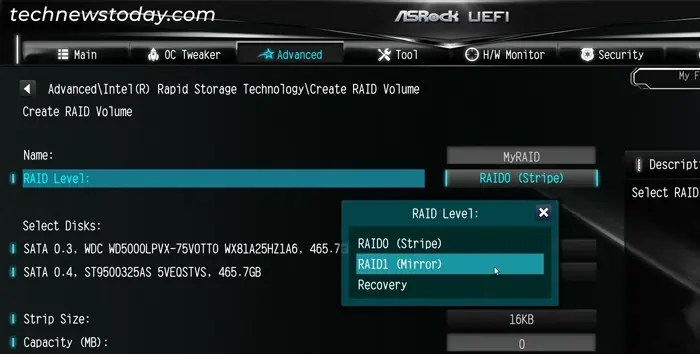
- Go to the Advanced tab and select the new option, Intel Rapid Storage Technology. Here, you will see a list of the drives you can use for the RAID. If you are using the remapping feature, the NVMe drives will show up as SATA drives.

- Choose Create RAID Volume.

- Set the Name for the RAID Volume as you wish.
- Select RAID Level and set it to your preferred RAID level.

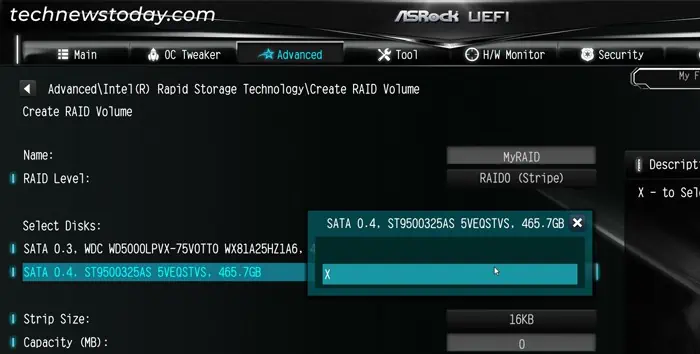
- Under Select Disks, set the value of the disks you want to include on the RAID Array to X.

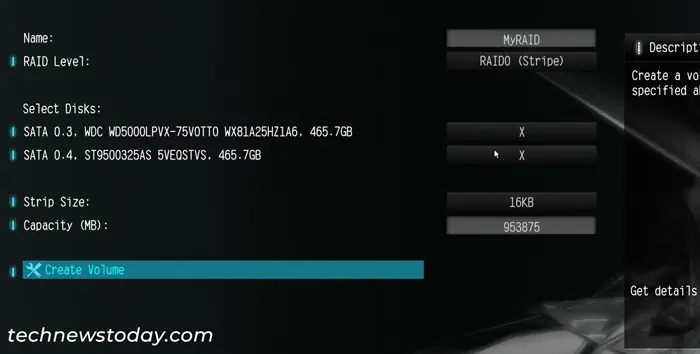
- Set the Strip Size depending on your need. You can also leave it as default
- Select Create Volume and press Enter.

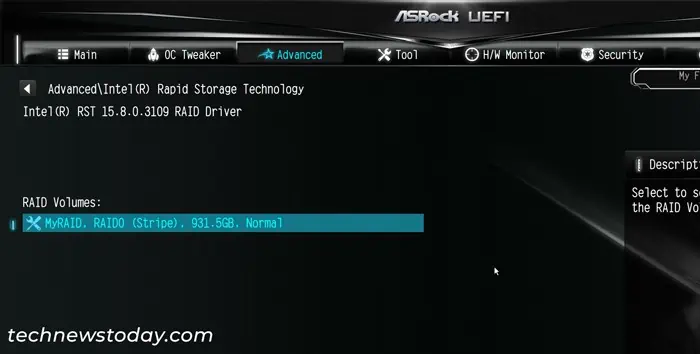
- Press Enter again.

- Press F10 and select Yes to save the changes and exit the BIOS/UEFI.
Using RAID BIOS Utility
You can also use the dedicated RAID BIOS Console or Utility on most motherboards to create a RAID array if you can’t disable CSM mode. After the ASRock logo screen, your display will show an Intel Rapid Storage Technology or AMD-RAID Controller BIOS screen. Here, you should be able to see something like “Press <CTRL-R> to Configure” or “Press <CTRL-I> to enter Configuration Utility”. Press the hotkey (Ctrl + R or Ctrl + I) to access the RAID Utility.
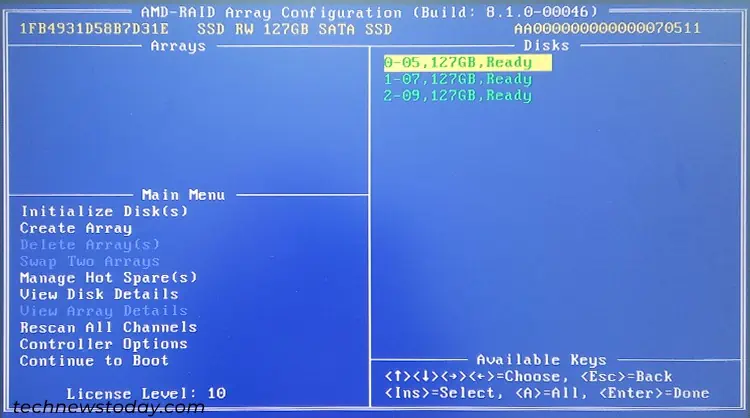
The process to create an array from this console is very similar to that using the UEFI interface. So I recommend checking that section to find out what you need to do. Navigating through the options and specifying different values may require different methods but the interface should display what you need to do, so it’s easy to follow through.
Install RAID Drivers
RAID requires specific drivers to work properly. If your operating system does not have such drivers, it won’t recognize the RAID volume at all.
Depending on whether you are creating an OS RAID volume or a non-OS RAID volume, you need to follow different steps to install the RAID drivers.
If OS Drive is Not Part of RAID Array
If you use the Windows Desktop Application to set up RAID, it should have directly installed the necessary RAID drivers into your system. However, if you set the RAID through the UEFI, you may need to install the drivers separately.
You can use the same initial steps from the Using Windows Desktop Application section to do so. You need to perform steps 1-3 for Intel and steps 1-4 for AMD.
While Installing Windows on RAID Array
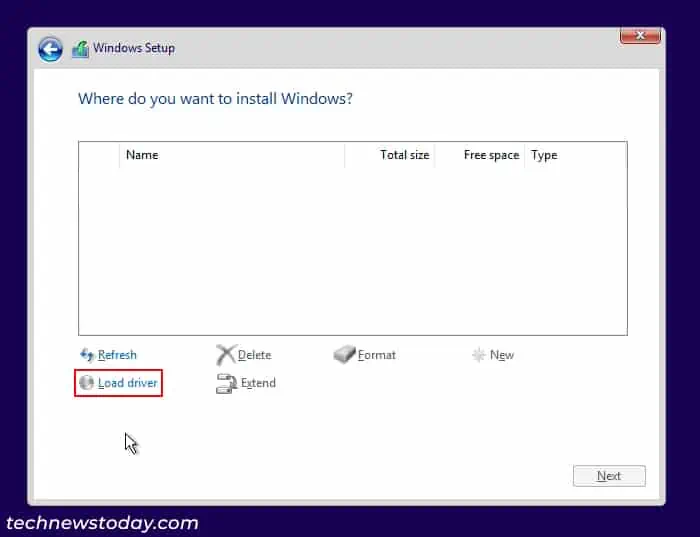
The Windows installation media may not contain the RAID drivers. In such cases, if you go through the normal installation process, you will not find any disk where you can install the OS.
You need to download the RAID drivers and store them on a USB drive and then load them on the Windows installer to find the RAID array in the setup.
Download and Extract RAID Drivers into a USB drive
For AMD CPU,
- Go to AMD’s support website.
- Under Find Drivers and Support by Selecting Your Product, select your Chipset from the list and click Submit.

- Expand your Windows version and click on Download next to AMD RAID Driver.

- Extract the archive.
- Copy the folder for your RAID controller inside (usually NVMe_CC, NVMe_DID or RAID_SATA) to a USB drive. If you are creating a SATA RAID, copy the RAID_SATA folder. For NVMe, AMD Desktop processors without iGPU or processors before and including AMD Ryzen 2000 series normally use CC drivers and all others use DID drivers. Also, 1st Gen AMD Threadripper Processors use CC while the rest use DID.
For Intel CPU,
- Search for Intel Rapid Storage Technology Driver Installation Driver on the internet and go to the official page of its latest version on Intel’s website.
- Click on Download SetupRST.exe or any download button for the software.
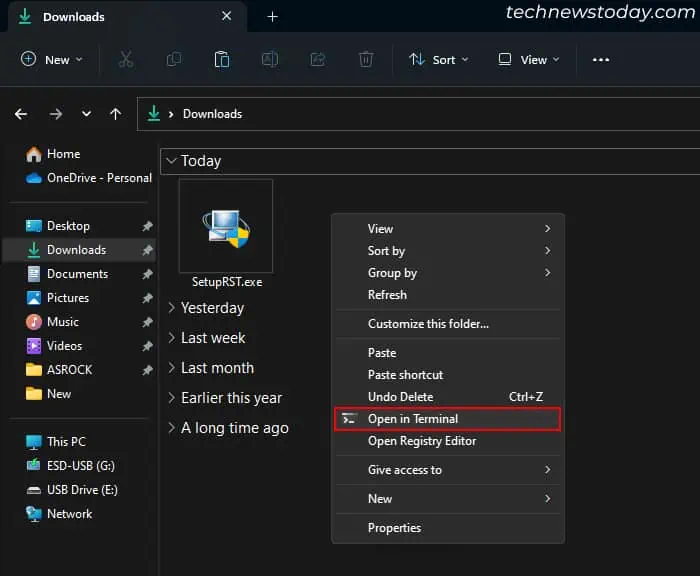
- Go to the folder where you saved or downloaded SetupRST. Right-click on the folder and select Open in Terminal. You can also click on the folder path address bar, type
powershelland press Enter.
- Type
./SetupRST.exe -v EXTRACTDRIVERS=SetupRST_extractedand press Enter to extract its contents.
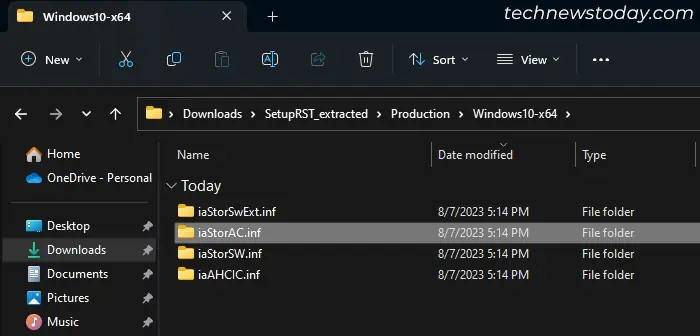
- Go inside the extracted folder and inside your windows version. Copy the
iaStorAC.inffolder to a USB drive.
Load RAID drivers while Running Windows Setup Utility.
- Create an installation media if you haven’t done so already.
- Then, boot using the USB installation media and go through the process until you get to the Where do you want to install Windows tab.
- If you see the RAID volume there, the installation should have the necessary drivers. SO you can directly install Windows there. If you don’t see the RAID volume there, follow the steps below to load the drivers.
- Insert the USB media containing the drivers into the PC and click on Load driver.

- Choose Browse and navigate to the folder you copied and select OK.
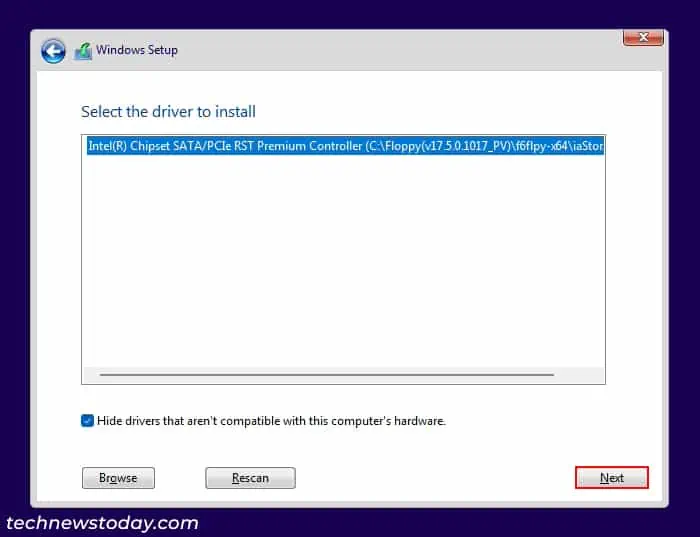
- For Intel, only one driver should be available. Select it and click Next.

- For AMD, select all the unique drivers from the list one at a time and click Next. You need to do this process three times until you get all the drivers (
rcbottom.inf,rcraif.inf,rccfg.inf)
- Insert the USB media containing the drivers into the PC and click on Load driver.
- Now, follow the rest of the process to install Windows. After doing so, don’t forget to update the system and install motherboard drivers and other utilities.
Initialize and Partition the RAID Volume
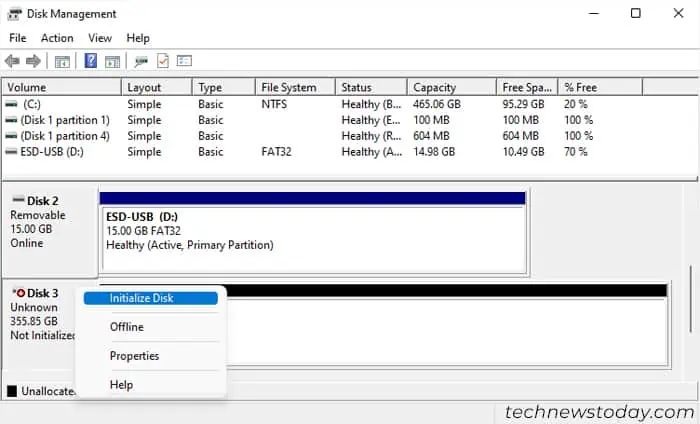
If you create a non-OS RAID volume, you must also initialize the RAID volume and create a partition. If you used the Desktop apps and also selected their options to initialize the disk, you will only need to partition the RAID volume.
You may also need to format or partition the storage drive from the Disk Management.
- Open Run (Windows key + R), type
diskmgmt.mscand press Enter. - If it asks you to initialize the disk, check GPT (or MBR depending on which disk type you want) and click OK. If not, you need to right-click on the RAID disk, select Initialize Disk and then do the same.

- Right-click on the Unallocated space next to the RAID volume and select New Simple Volume.
- Follow the on-screen instructions to create a partition.
