Hardware RAID is optimal but comes with a price tag. If you’re an ASUS motherboard user, ‘Fake RAID’ might be the way to go. This software method requires specific OS drivers rather than hardware controllers.
To set this up on your ASUS motherboard, navigate to the UEFI/BIOS utility. Enable the relevant technology like Intel Rapid Storage or AMD RAIDXpert2. Configure your SATA/NVMe options. Finally, create a RAID volume. Keep in mind that the configuration might slightly vary depending on the specific ASUS motherboard model you’re using.
Configuring multiple NVMe/PCIe SSDs isn’t a walk in the park. Our team had to deal with the PCIe Bifurcation Configuration for the SSDs to be detected when trying to create a raid using the HYPER M.2 card. But be mindful: your raid options might be limited by the available PCIe lanes.
Not all ASUS systems support splitting the PCIex16 slot. You might be limited to the onboard M.2. It may only support SATA RAID configuration. Keeping these factors in mind, I’ve narrowed down the general steps for both Intel and AMD motherboards.
Getting Started
Whether you’re trying to gain performance benefits or increase fault tolerance, it’s essential to consider a few things beforehand.
Does your ASUS motherboard embed a built-in RAID controller and support the raid level you’re seeking for? Are you using the appropriate number of storage drives alongside matching form factor and vendor? Do you have enough PCIe lanes?
Let’s break down the basics of what you should do before you begin the actual process.
Check Motherboard Compatibility
While some ASUS models support multiple RAID levels, others might not be compatible at all. Likewise, some boards only allow you to set up SATA RAID, restricting the utilization of PCIe RAID configuration.
That’s exactly what happened when our team tried setting up a PCIe RAID array (with four different WD SN810 256G NVMe SSDs in ASUS HYPER M.2 X16 CARD V2) on our PRIME B660M-K D4. Only when we were at the final steps, we came to know that this model doesn’t support PCIe RAID.
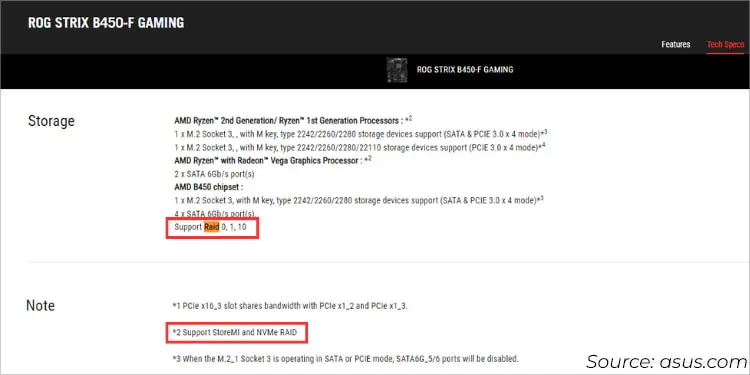
The quickest way to verify this is from the ASUS official website and inspecting the Tech Specifications page of your model. You may look up your user manual as well.
You should find something related to levels or processor technologies (RAIDXpert2/Intel Rapid Storage), along with whether it supports NVMe/PCIe RAID.
Use Compatible Storage Drives
The next thing to keep in mind is whether your HDD or SSD is of identical form factors. Even though you’ll find the option to choose ‘Both’ during the Media Type selection, it’s best to use those having the same interface for compatibility reasons.
I strongly advise using the same model for all storage drives, including disk size and speed. Creating a RAID array with different capacity drives will limit you to the specifications of the smallest one.
Should you decide to experiment with older, mismatched drives for better performance, give it a go! In my own tinkering with mixed SSDs (Samsung Evo 500GB and WD SN810 256G) for a RAID 1 setup, I found that we were constrained to the capacity of the smaller drive.
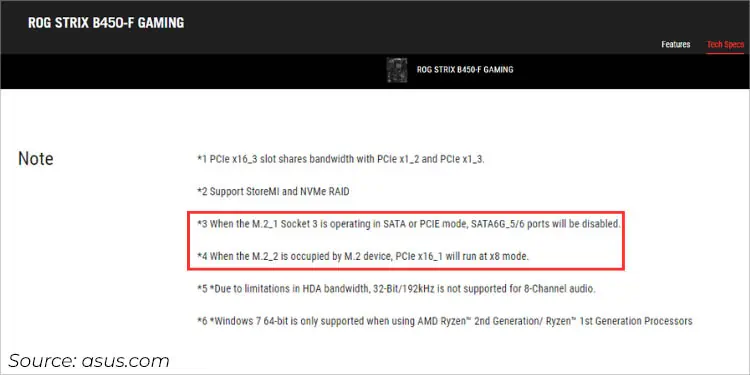
Make sure you’re using the correct SATA/M.2 slots when connecting multiple storage drives. For instance, some SATA ports get disabled if you have already installed an NVMe SSD as your primary storage component. Check your motherboard’s support page to find out more about this.
Note: When configuring SATA RAID, all the other SATA ports will also run in RAID mode.
Make Drivers Ready
You may encounter issues finding the right RAID drivers. I’ve been there. Simply head to ASUS or your processor’s (Intel or AMD) support pages for the drivers.
Though both should work, I recommend using the drivers from your specific ASUS model’s support page.
Disable CSM
Now that you have the necessary drivers ready, it’s time to enter ASUS BIOS using Del or F2 key. Once you’re in the interface, you need to disable CSM as RAID configuration is only possible in UEFI mode.
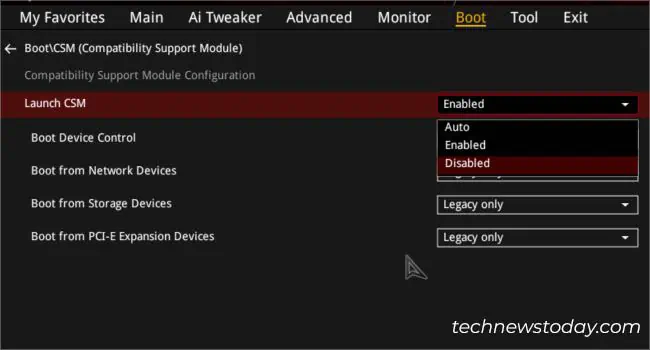
If you’re in the EZ mode, quickly switch to Advanced using F7. Look for Compatibility Support Module (CSM) in the Boot menu.
For a detailed overview, here’s my complete guide on tweaking the CSM setting on ASUS motherboards.
Intel RAID Setup (Rapid Storage Technology)
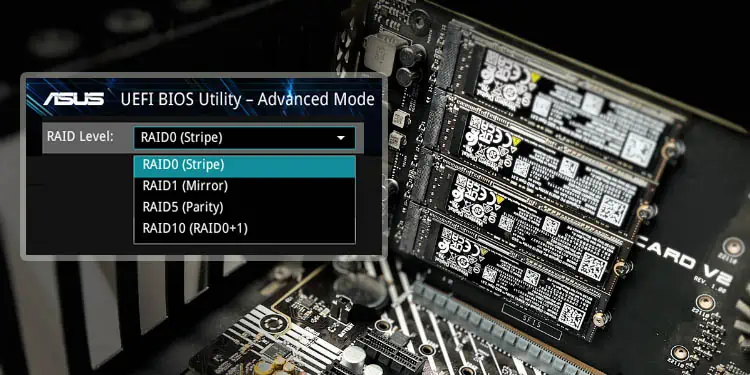
Intel users should find the Rapid Storage Technology option within your UEFI firmware. This offers four different levels–RAID 0, RAID 1, RAID 5, and RAID 10 with the right number of storage drives used. Here’s what ASUS recommends:
- RAID 0: At least 2 identical HDDs/SSDs
- RAID 1: 2 drives (the second one should be of the same capacity or higher)
- RAID 5: At least 3 identical storage drives
- RAID 10: At least 4 disks (or 3 new drives with a pre-existing one)
In this guide, I will only walk you through the common steps for setting up software-level RAID using ASUS BIOS. The exact steps may vary based on your motherboard’s chipset but the general idea is going to be the same.
While you may purchase a separate hardware RAID controller as well, the following emphasizes a cost-effective solution to gain better performance or fault tolerance.
Enable Intel Rapid Storage Technology
The first step involves enabling the Volume Management Device (VMD) for PCIe Storage, SATA Controller, or both. While you can manually navigate to the dedicated section from the Advanced mode, it’s even much easier to do it from EZ.
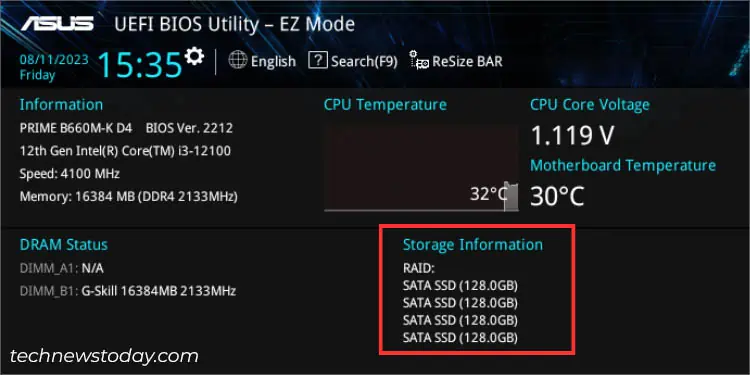
Look for Intel Rapid Storage Technology, right underneath the Storage Information section. While you’re at it, note that the connected devices aren’t shown as RAID drives yet.
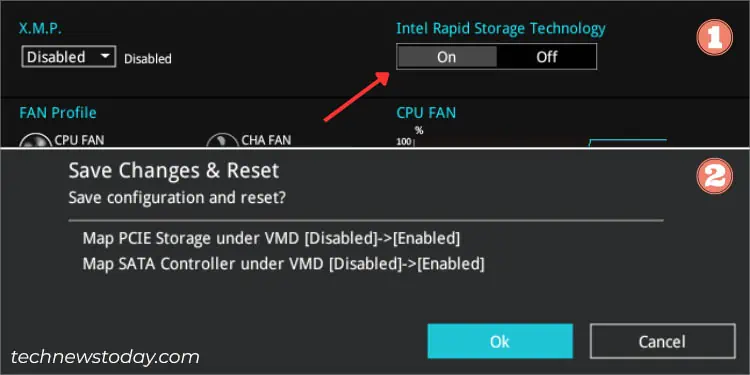
Quickly press F10 to save and exit from BIOS. A dialogue box should appear where you should notice that both the MAP PCIe Storage under VMD and Map SATA controller under VMD gets enabled.
While enabling Intel RST should be enough (as it was in my case with PRIME B660M-K D4), you might require setting the SATA mode in other models. In that scenario, switch to Advanced mode and go to Advanced > PCH Storage Configuration > SATA Mode Selection. Here, pick Intel RST Premium With Intel Optane System Acceleration (RAID).
Configure Additional Settings for M.2 or Hyper M.2 Cards
Note: Skip this section if you’re creating a RAID set using SATA drives.
If you’re using M.2 NVMe SSDs it’s essential that you turn on RAID configuration for all of them. All you have to do is get to the PCH Storage Configuration and set M.2 NVMe Storage RAID Support to Enabled.
However, if you’re using the ASUS Hyper M.2 card or any other PCIe expansion card, make sure all the PCIe slots are set to Hyper M.2 X16 or PCIE X4 SSD card respectively. That’s exactly what we had to do on our ROG STRIX X470-F GAMING motherboard to make it work.
Additionally, in some systems, you need to configure the PCIe Bandwidth Bifurcation Configuration to RAID mode (note all boards might not support it). Without doing so, the SSDs installed in the Hyper card won’t be detected. Save the changes before proceeding forward.
Create RAID Volume
Important: Setting up RAID will delete all your files (including Windows). So, make sure you back up your important data before moving ahead.
After exiting BIOS mode, reenter the interface using the dedicated BIOS menu key again. Then, follow the below instructions to create a RAID set (for both NVMe and SATA SSDs):
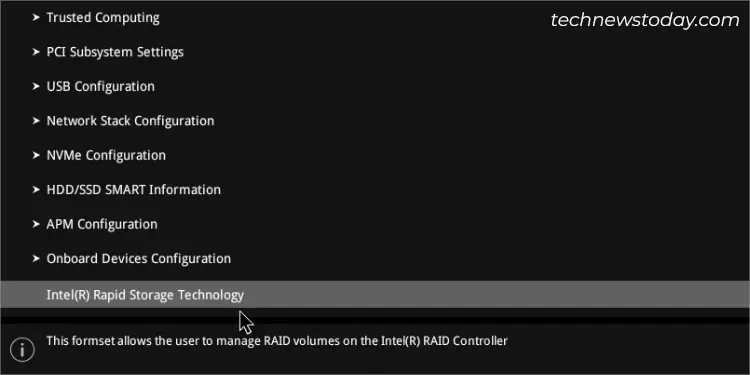
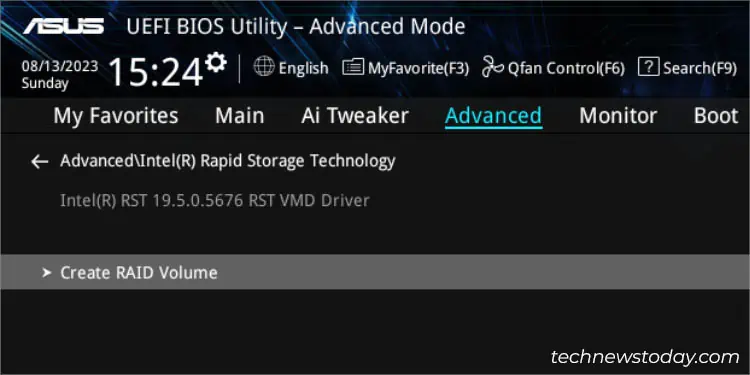
- After enabling Intel Rapid Storage Technology, you should find the related option (at the very end) in the Advanced tab.

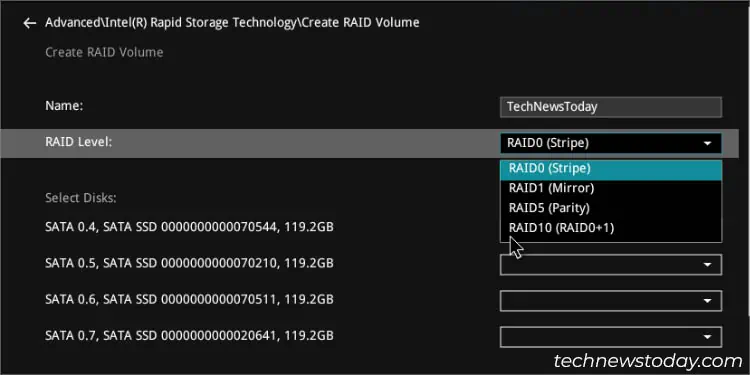
- Select the option and choose Create RAID Volume.

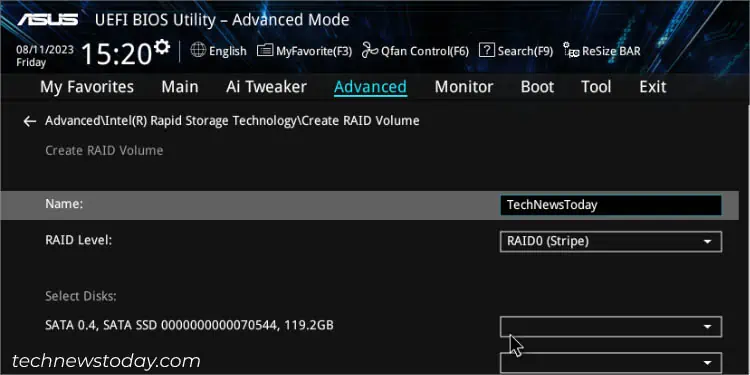
- Start by entering the name for your RAID array.

- Then, pick a supported RAID level. For demonstration, I’ve picked RAID 0 here.

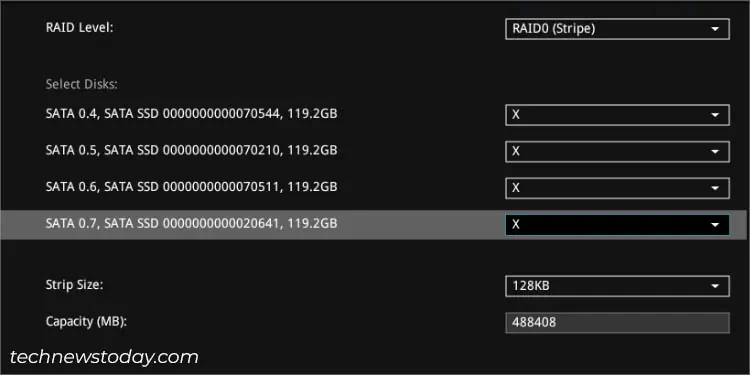
- Under Select Disks, start expanding each SATA drives you wish to keep in the RAID array. Choosing ‘X’ will select it.

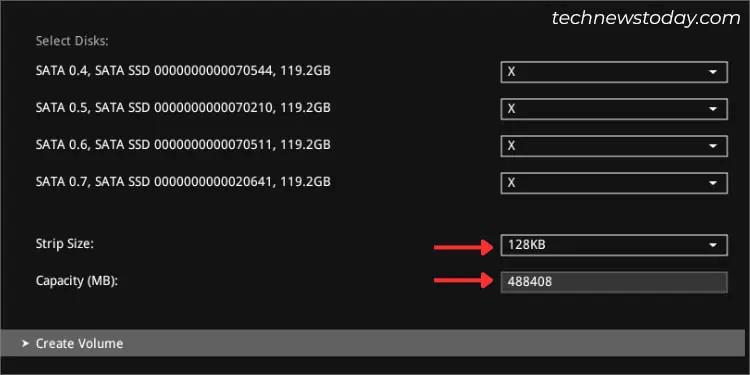
- Then, pick an appropriate strip size. Depending on the RAID level, here are recommended sizes:
- RAID 0: 128 KB
- RAID 1: 128 KB – 256 KB
- RAID 10: 64 KB
- RAID 5: 64 KB
- By default, the highest possible capacity is set. You may change this to your desired value if you wish to lower it down. I preferred to let it set to the default value and recommend the same.
- Hit the Create Volume option.

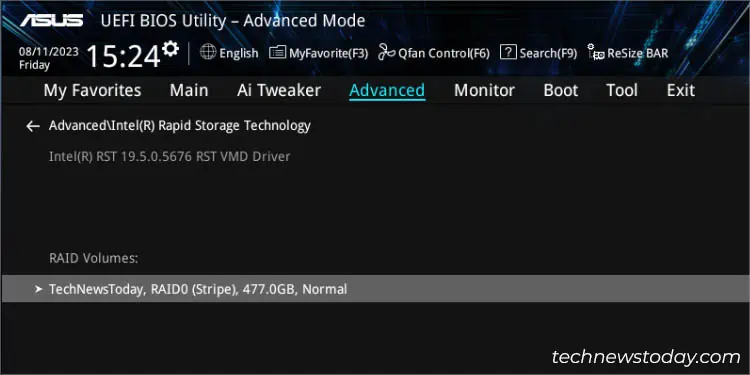
- Now, you should see your RAID array under the RAID Volumes section in the Intel Rapid Storage Technology section.

Note:
If your ASUS motherboard supports Intel VROC (Virtual RAID on CPU), you need to navigate to the dedicated section instead of Intel Rapid Storage Technology.
For RAID 1, 5, and 10, you require a KEY module in order to enable the RAID license. Also, such a feature is only supported if you’re using a compatible processor (Intel Core X-series is required) with Intel SSDs.
AMD RAID Setup (RAIDXpert2 Configuration)
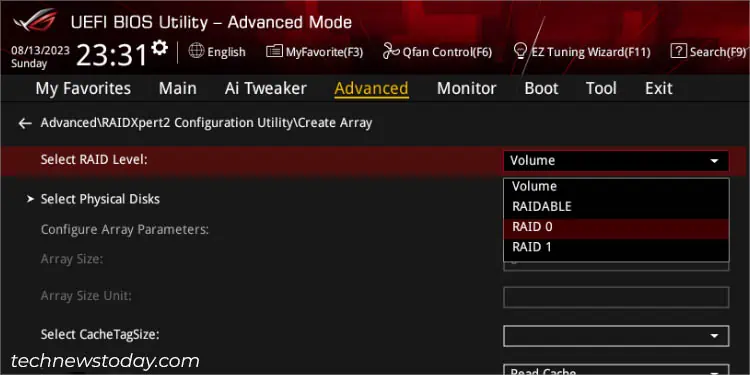
The RAIDXpert2 technology allows users to create multiple array levels using identical disk drives. Depending on your system’s licensing, ASUS AMD boards support the following RAIDs and can be configured from BIOS.
- Volume: Doesn’t provide redundancy and is only meant for scavenging space (linking different storages together regardless of their disk spaces)
- RAIDABLE: Allows you to add more storage spaces (even after system installation) and provides redundancy
- RAID 0: For data striping (at least two identical HDDs/SSDs required)
- RAID 1: For data mirroring (two drives with the second one being the same size or greater required)
- RAID 10: Combination of RAID 0 and 1 (at least four drives required)
Switch SATA Mode to RAID
By default, the SATA mode on ASUS AMD motherboards is set to AHCI. So, before proceeding to create a RAID volume, ensure that you have configured this option correctly.
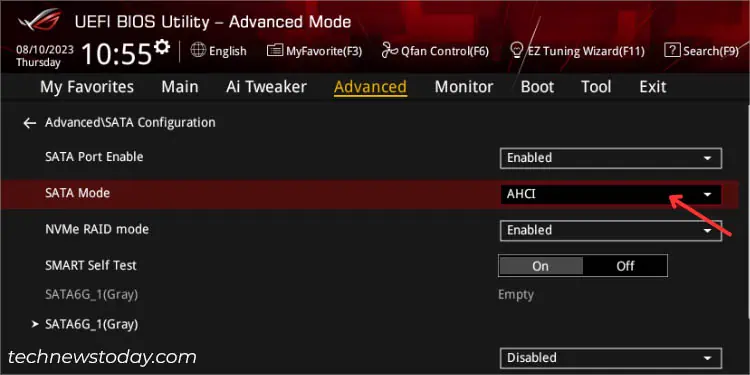
Once you’re in the ASUS BIOS, switch to Advanced mode and go to the Advanced tab. Here, look for SATA Mode and configure this option to RAID.
Additional Settings for M.2 and Hyper Cards
For users trying to set up NVMe RAID using onboard M.2 SSDs or through storage drives connected on Hyper cards (via PCIEX16 slot), make sure you have enabled the dedicated NVMe RAID mode option.
All you have to do is navigate to Advanced > SATA Configuration (in some, the related option might be included within the AMD PBS section). Look for NVMe RAID Mode, expand the drop-down, and select Enabled.
Likewise, Hyper x16 card users should set the respective PCIE slot to PCIe RAID mode. You should find this option under Advanced > Onboard Devices Configuration.
In case you do not find these options, look for PCIe Bandwidth Bifurcation Configuration and configure it to RAID mode. However, these settings might vary based on your ASUS motherboard chipsets.
In some systems, you might get an option to split x16 to x4x4x4x4 or x8x4x4. That’s exactly what our team did to set up RAID on the ASRock motherboard. It might be the same on some ASUS models as well.
Create RAID Array
Once all the settings are configured, the RAIDXpert 2 Configuration option should appear under the Advanced menu. Get to this section and follow the below instructions to complete setting up RAID set on your ASUS AMD motherboard:
- Start by selecting a RAID level, as discussed earlier.

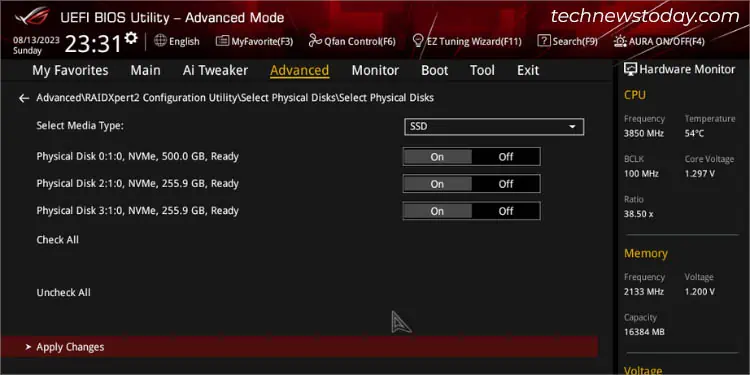
- Next, choose Select Physical Disks.
- Once you’re in the respective section, set the Select Media type to your current storage drive–HDD or SSD.
- Then, turn on all those drives that you wish to keep in the RAID array.
- Hit the Apply changes option and you should get back to the previous window.

- Now, configure all the remaining options:
- Array Size: The filled one is the default value. Depending on your preference, you can try decreasing it.
- Array Size Unit: By default, it’s set to MB. You may even change this to GB for your comfort.
- Select CacheTagSize: Set this depending on the RAID level prescribed above. For server systems, I recommend setting a lower strip size, and for multimedia computers, it’s best to go for a higher value.
- Read Cache Policy: Set your RAID array’s read cache policy (I prefer leaving it to Read Cache).
- Write Cache Policy: Set your RAID array’s write cache policy (I prefer leaving it to Write back Cache).

- Finally, select Create Array to complete the RAID setup process.
Finalizing RAID Setup
In the end, you certainly would like to install an operating system in your RAID array. During the process, you require loading the relevant drivers (that you prepared earlier).
After installing Windows, you can now log in and quickly verify the RAID array from Windows Task Manager > Performance > Disk. You’ll notice that all your HDDs/SSDs will be working as a single disk.
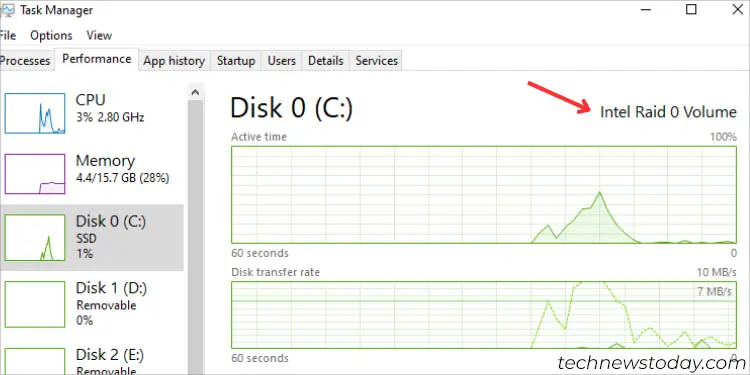
In case you hadn’t installed Windows, you may open the Disk Management utility and complete the disk initialization and partition the drive as required.
Also, I like to run a stress test on my RAID arrays each time after setting them up. While I prefer using CrystalDiskMark, you may use your preferred tools like HD Tune, UserBenchMark, etc.
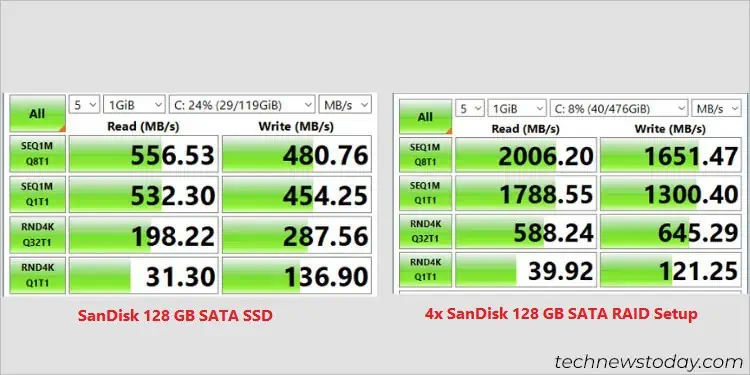
When our team tested four same models of SanDisk 128 GB SATA SSDs on the PRIME B660M-K D4 motherboard, we were able to achieve four times the performance of a single drive when setting up RAID 0. The above figure should speak for itself.
Other ways:
- You can also set up a RAID set using respective Windows applications (Intel Rapid Storage Technology Driver Installation Software or AMD RAID Installer software).
- Also, Intel users may utilize the ROM utility without having to enter the BIOS or disabling CSM. During the POST, press Ctrl + I and use your keyboard keys to navigate to the respective sections to complete the volume creation.
- In some ROG and TUF BIOS, you should find the EZ Tuning Wizard utility. Select your port (PCIE or SATA), configure the storage drives, choose a function (Easy Backup/Super Speed), and select the RAID level. This will automatically create a RAID array for you.
- For users who want to setup software RAID (without accessing their BIOS), it’s possible using the Windows Disk Management utility. Set New Striped Volume Wizard (for RAID 0) or New Mirrored Volume (for RAID 1).
How to Delete RAID Array?
If you want to split up the RAID array back to its original configuration, there’s no other option than deleting it. The process is tremendously simple and I’ll provide the necessary steps for both the Intel and AMD ASUS boards in this section.
Caution: Deleting the RAID array will remove all your files (including the OS). So, make sure you back up everything before proceeding to the below instructions.
On Intel Motherboards
- Get to Advanced > Intel Rapid Storage Technology.
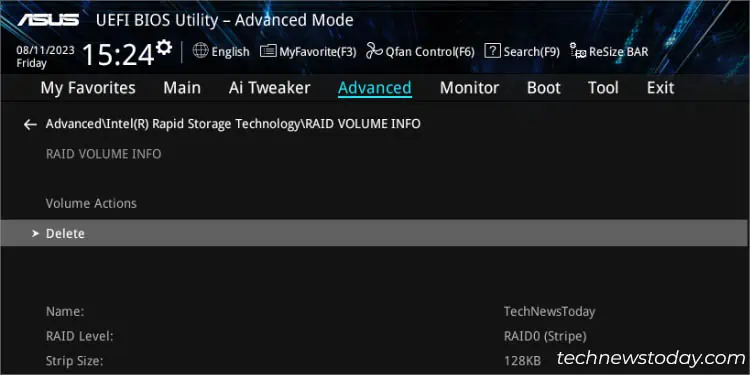
- Here, select your RAID volume.

- From the Volume Actions section, hit the Delete option.

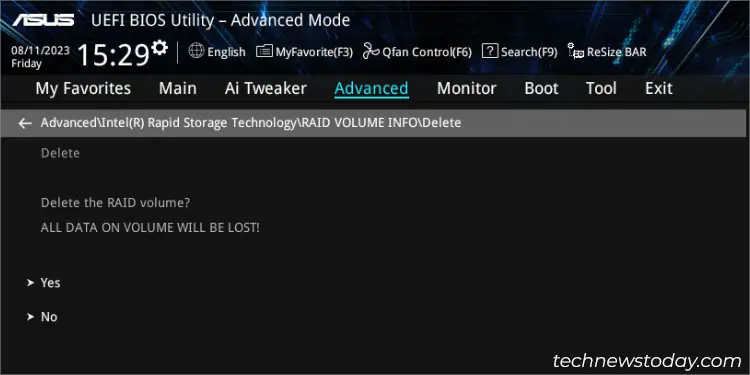
- On the confirmation page, press Yes and this should unlink all your storage drives.

On AMD Motherboards
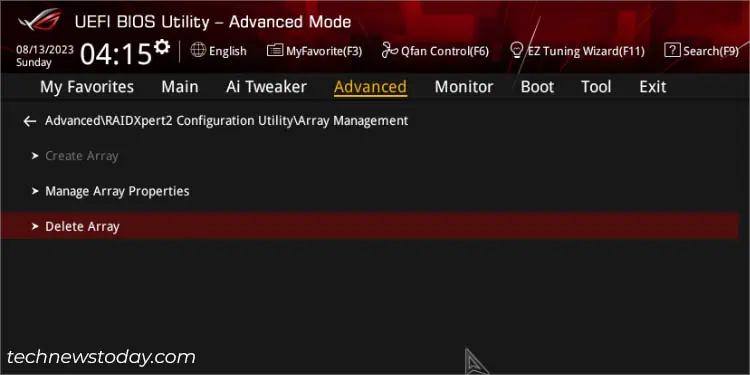
- Navigate to RAIDXpert2 Configuration Utility and get to the Array Management section.
- Choose Delete Array.

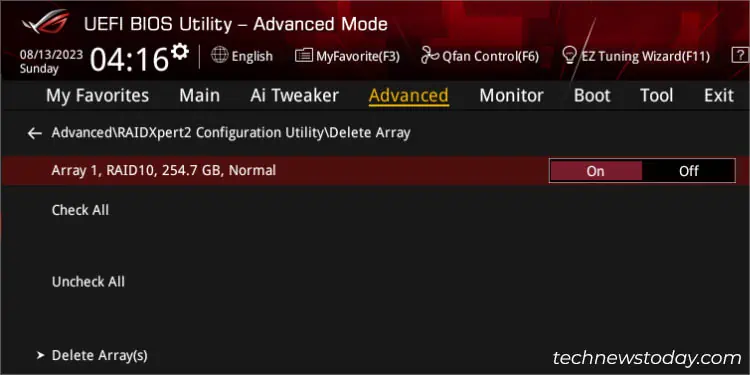
- On the next page, ensure the desired array is toggled on.

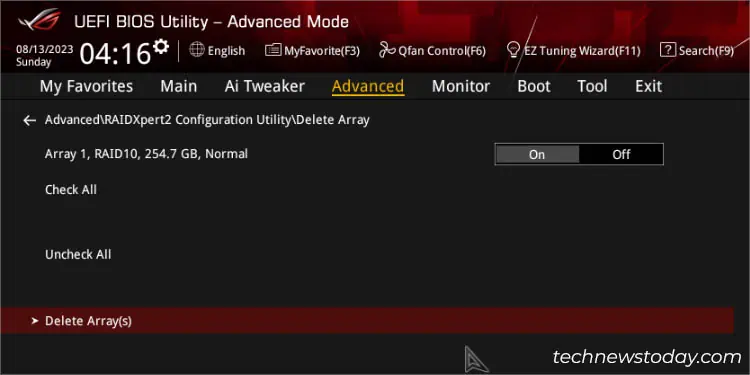
- Then, click on Delete Array(s).

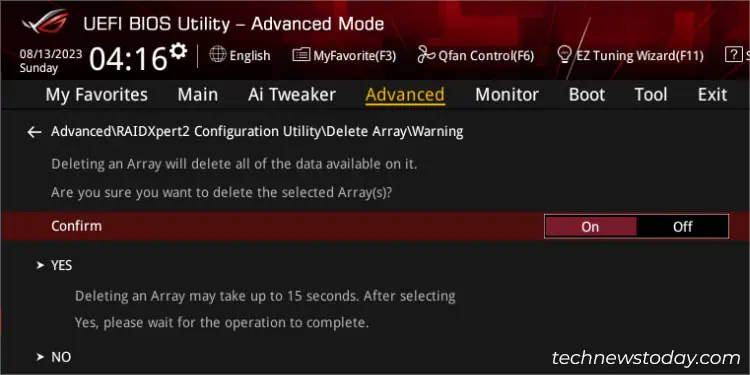
- Toggle on the Confirm option before pressing Yes.


