
Auto Login on Windows is a handy feature that allows you to log into your account without having to select an account and type in a password every single time. Enabling auto login is quite simple that only requires a few clicks. However, setting up auto login in your system might lead to some security risks as anyone can easily access your system. So, I recommend enabling auto login only on a local user account and not on an administrative account.
From User Accounts Settings
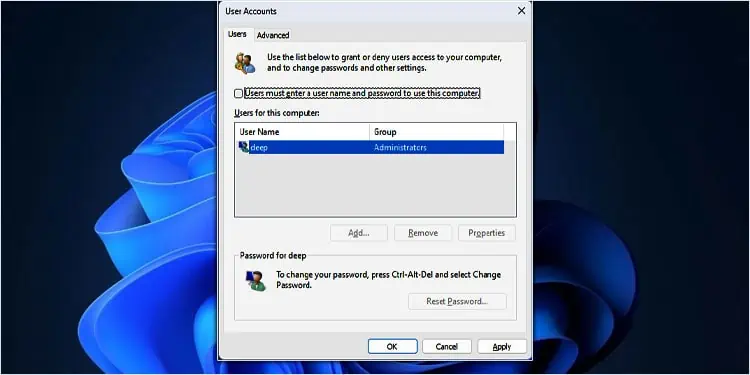
User Accounts settings allow you to add or remove any user account, view or change its properties, and manage passwords. Most importantly, it allows users to set up the auto login feature.
- Press Windows + R.
- Type
netplwizand press Enter.
- Uncheck Users must enter a user name and password to use this computer.
- Click on Apply.
- Now, write the username and password of the Windows account that you want to auto-login.
- Click on OK.
- Again click on OK.


If you cannot find the checkbox that says “Users must enter a username and password” to use this computer, you need to enable it from the registry.
Changing incorrect registry values can make your system behave unusually. So make sure that you back up the registry before you make any changes to it.
- Open Run, type
regedit, and press Enter. - Navigate to
HKEY_LOCAL_MACHINE\SOFTWARE\Microsoft\Windows NT\CurrentVersion\PasswordLess\Device - Double-click on DevicePasswordLessBuildVersion.
- Set Value data to 0.
- Restart the PC.


After the restart, the checkbox should appear. Uncheck the check box to enable auto login.
Using the Registry Editor
You can also change the registry settings to start Windows automatically without a password.
- Open Registry Editor.
- Navigate to
HKEY_LOCAL_MACHINE\SOFTWARE\Microsoft\Windows NT\CurrentVersion\Winlogon - On the right panel, double-click on AutoAdminLogon.
- If you cannot find AutoAdminLogon, right-click on the empty space on the right panel and select New > DWORD (32-bit) Value and name it
AutoAdminLogon. - Double-click on AutoAdminLogon and set its Value data to 1.
- Double-click on DefaultUserName. If you cannot find it, right-click on the empty space on the right panel and select New > String value and name it
DefaultUserName. - Double-click on DefaultUserName and set its Value data to the desired Windows account name.
- Finally, double-click on DefaultPassword. If you cannot find it, create a String value and name it
DefaultPassword. - Double-click on DefaultPassword and set its value data to the Windows account’s current password.
- Once you restart, the Windows should automatically log in.


Using Autologon
Autologon is a free and open-source application that lets you automatically log in to a user account without having to enter a password.
- Download Autologons and extract the downloaded file.
- Open the extracted file and run the Autologon executable (
.exe) file. - Here, write the username and password of the Windows account that you to log in automatically.
- Click on Enable.
- If you want to disable it, simply run Autologin and click on Disable.


How to Automatically Sign-in After the Update?
If you want the system to automatically finish setting up the device and boot into the OS after a Windows Update, you need to enable one specific setting in Windows Settings.
- Press Windows + I.
- Go to Accounts > Sign-in options.
- Scroll down to Additional settings and enable Use my sign-in info to automatically finish setting up after an update.

