The MSI BIOS provides various ways to overclock your components. You’ve got automatic overclocking features like Intel’s Turbo Boost or AMD’s Precision Boost Overdrive for your CPU. For the RAM, you’ve got standard XMP profiles as well as MSI’s proprietary Memory Try It! profiles.
You can also manually overclock in the MSI BIOS if you want to find the limits of your system. To do this, go to the Overclocking (OC) tab and tinker with the frequency and voltage parameters.
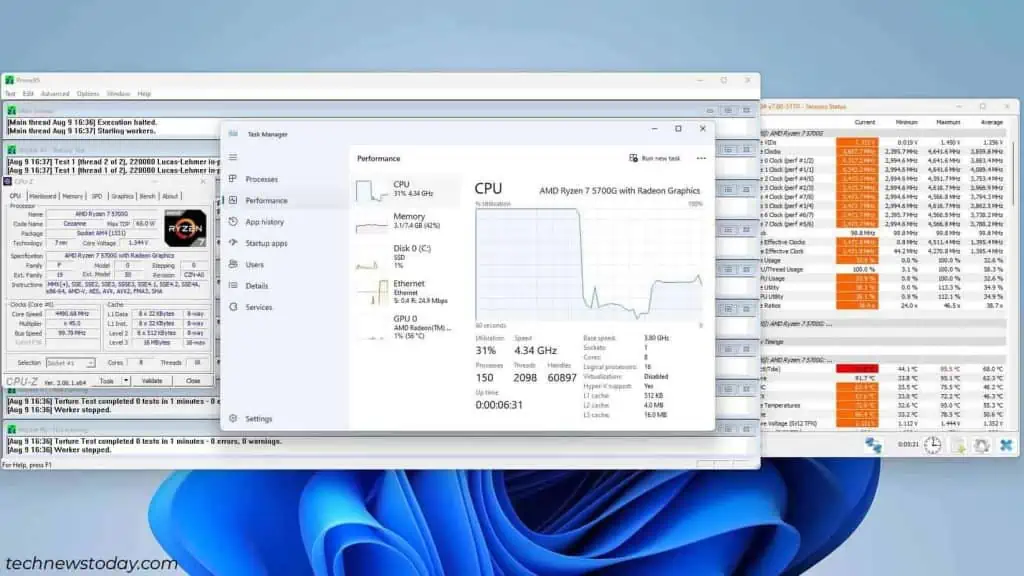
Both auto and manual methods can provide great results. For reference, the auto-OC features on my MAG B550M MORTAR got my Ryzen 7 5700G to almost 4200 MHz, while manual OC let me push it further to 4350 MHz. I’ll help you overclock your MSI system to get similar performance boosts with this article.
Note: According to AMD and Intel’s warranty policies, manual overclocking will void the warranty of your processor if you push it beyond the published specifications. Enabling XMP Profiles will also void your CPU warranty.
Auto OC Methods in MSI BIOS
If you’re just getting into overclocking, you may want to start with the auto OC features first. They’re very easy to enable and provide a considerable performance boost.
AMD Precision Boost Overdrive
Modern AMD processors use an autoregulation technology called Precision Boost (PB). It analyzes data related to the CPU workload and temperature and automatically changes the voltage and clock speed (thousands of times a second). This allows AMD CPUs to perform at their best at any given moment.
PB isn’t directly configurable, but you can manage some related features like Precision Boost Overdrive (PBO) and Core Performance Boost. These will let you get the most out of your AMD processor. To do this,
- Turn on or restart your system and repeatedly press the Del key during startup. The PC should boot to the MSI BIOS.
- Press F7 (if required) to switch to Advanced Mode.
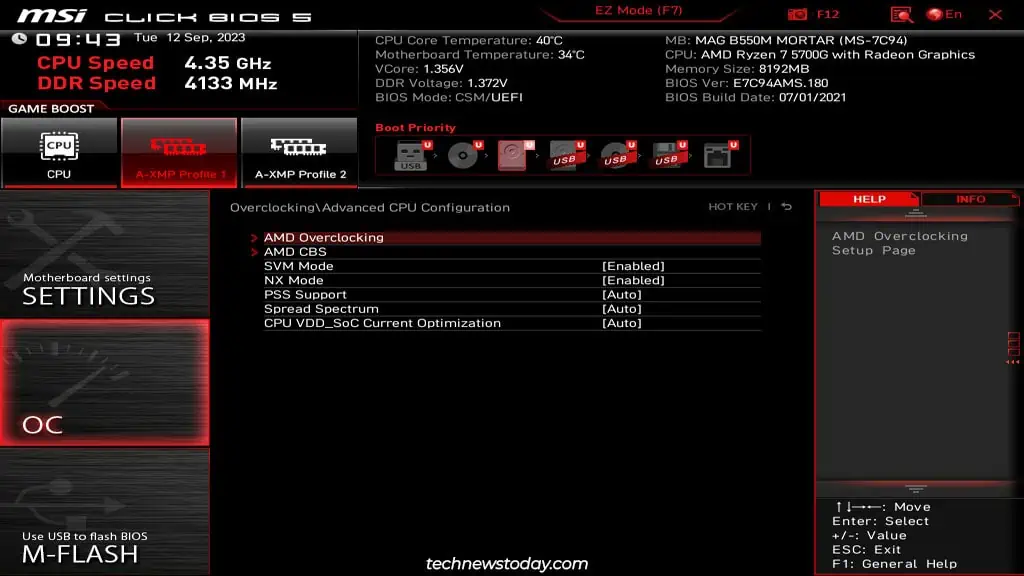
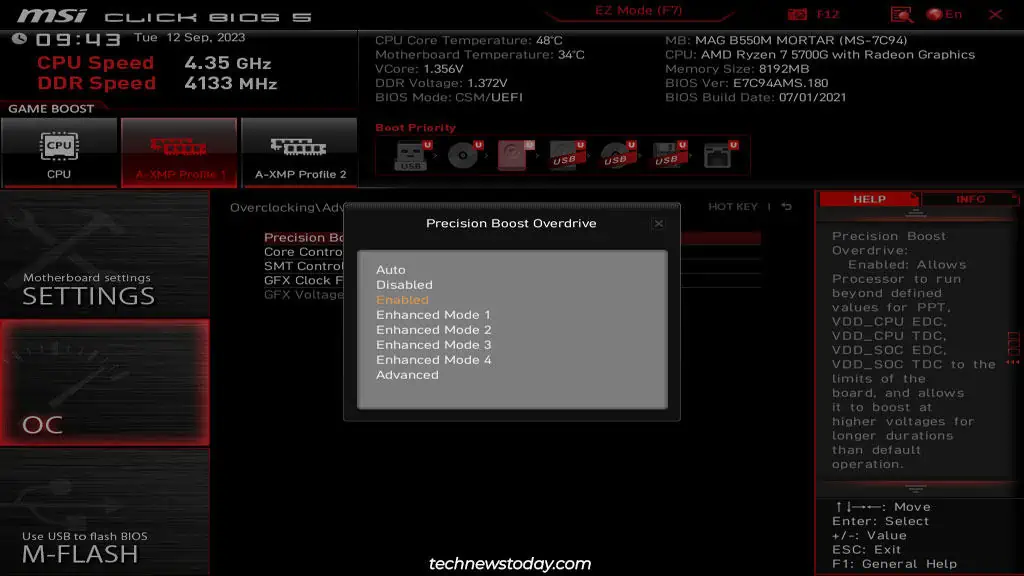
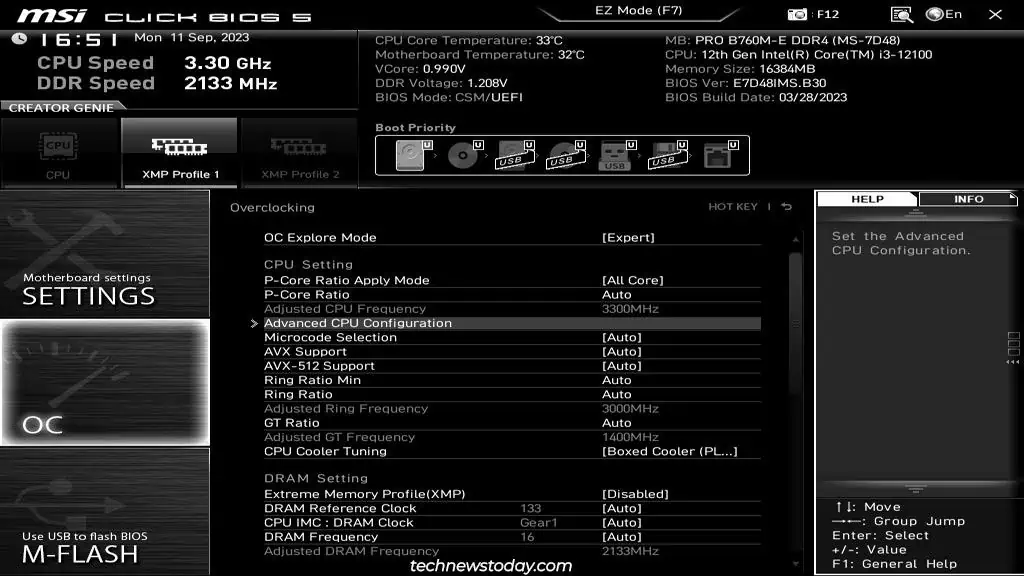
- Go to Overclocking (OC) > Advanced CPU Configuration > AMD Overclocking.

- Set Precision Boost Overdrive (PBO) to Enabled here. This will set the PPT, EDC, and TDC to the default PBO limits according to the CPU’s TDP rating. The Enhanced Modes will progressively raise these limits, while Advanced lets you manually set them. But you don’t need to worry about these for now, just stick to the defaults.

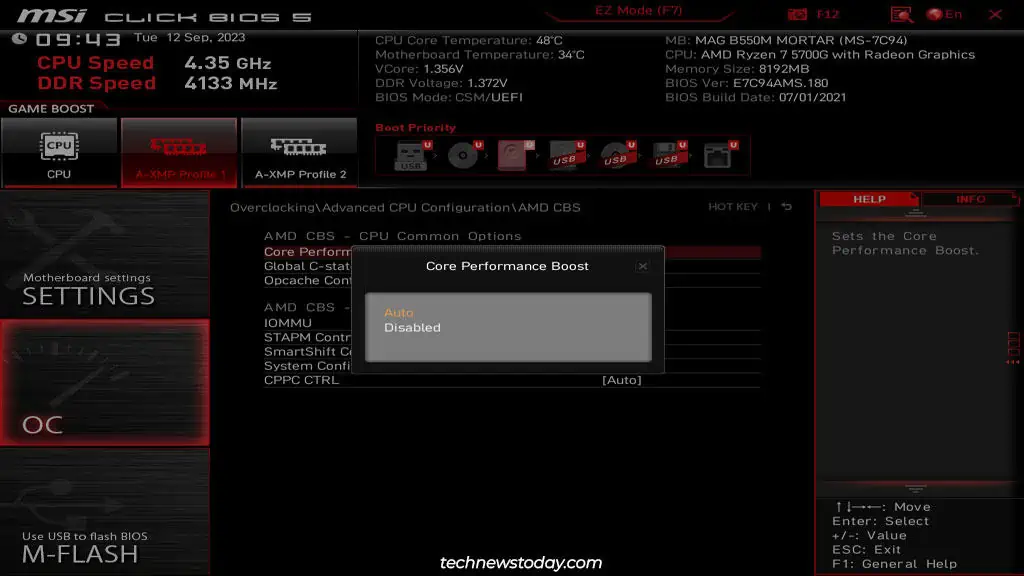
- Now, go to Overclocking (OC) > Advanced CPU Configuration > AMD CBS.
- Set Core Performance Boost to Auto. This will allow the system to increase the CPU clock speed if the temperature and power supply stats are valid.

- Finally, press F10 to save these changes and exit the BIOS.
- After you boot to Windows, you can use Task Manager or tools like CPU-Z or HWiNFO to monitor the CPU performance. You should also perform some stress tests (Cinebench, Prime95, 3DMark, etc.) to find what speeds the system can maintain at max load.

Intel Turbo Boost Technology
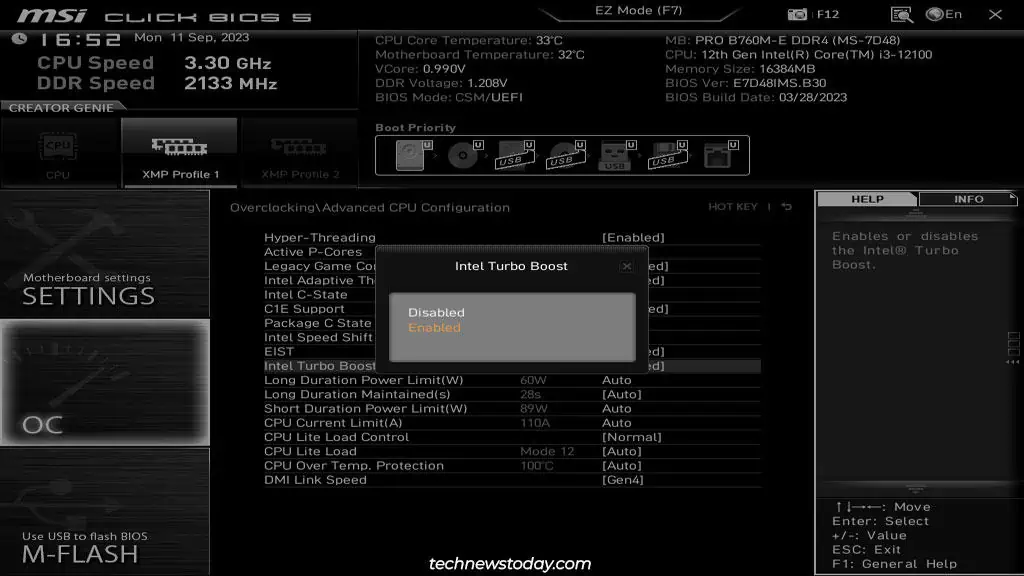
Turbo Boost is basically Intel’s auto-OC technology. This feature analyzes data related to the CPU workload, temperature, power consumption, etc., and automatically increases the clock speed as required. You can verify that this feature is enabled in your MSI BIOS with the following steps:
- Turn on or restart your system and repeatedly press the Del key at boot. This should get you into the MSI BIOS.
- Press F7 (if required) to switch to Advanced Mode.
- Go to Overclocking (OC) > Advanced CPU Configuration.

- Look for Intel Turbo Boost or a similarly named option. Set it to Enabled.

- Press F10 and select Yes to save the changes and exit.
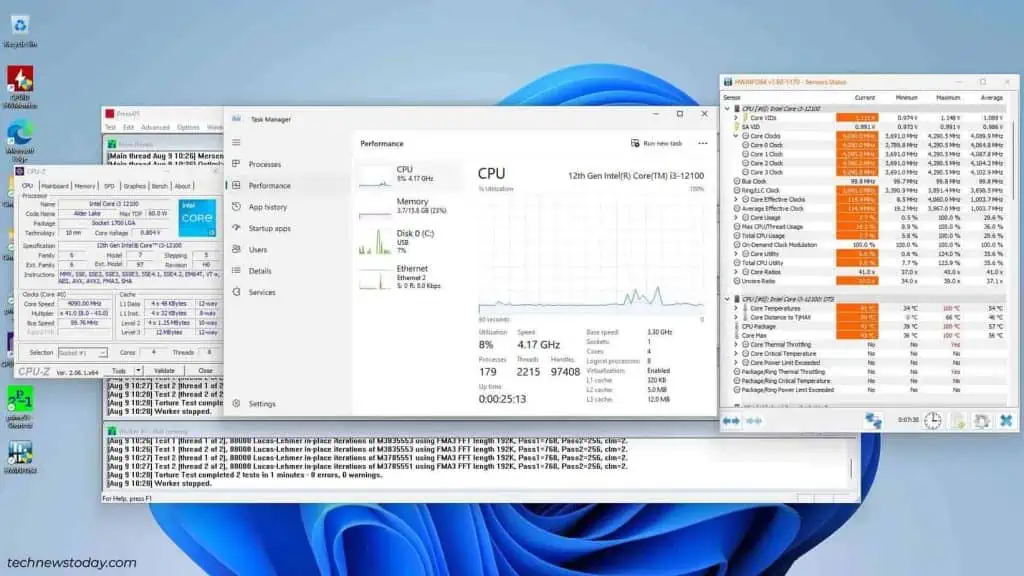
- After rebooting, you should use tools like Cinebench, Prime95, 3DMark, etc. to perform some stress tests. Concurrently, you should also have the Task Manager and tools like CPU-Z and HWiNFO open to monitor the CPU stats.

XMP Profiles & MSI Memory Try It
While the CPU OC features are often pre-enabled, the memory profiles for your RAM modules are disabled by default. Unless you’ve toggled these on before, the modules are most likely running at a low JEDEC standard like 2133 MHz.
The easiest way to run the modules at the advertised speeds is by enabling XMP profiles. These are OC profiles pretested by the manufacturer. Your RAM modules will come with 1-2 XMP profiles.
To Enable XMP profiles,
- Press the BIOS key (Del) at the boot to enter the MSI BIOS.
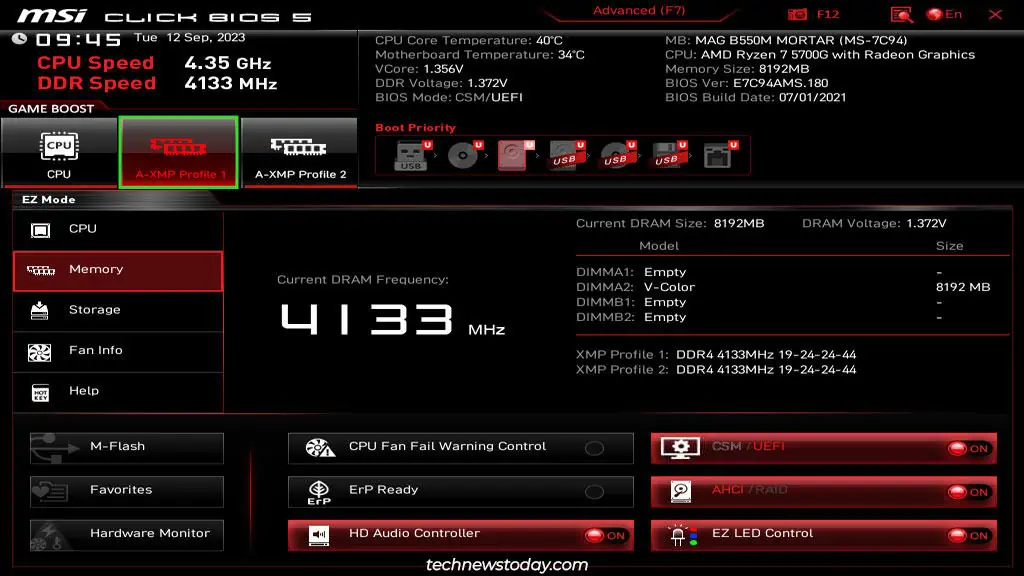
- You can enable an XMP profile in EZ Mode. Open the Memory tab to check the frequency and timings set by the profile.

- Or, you can press F7 to switch to Advanced Mode.
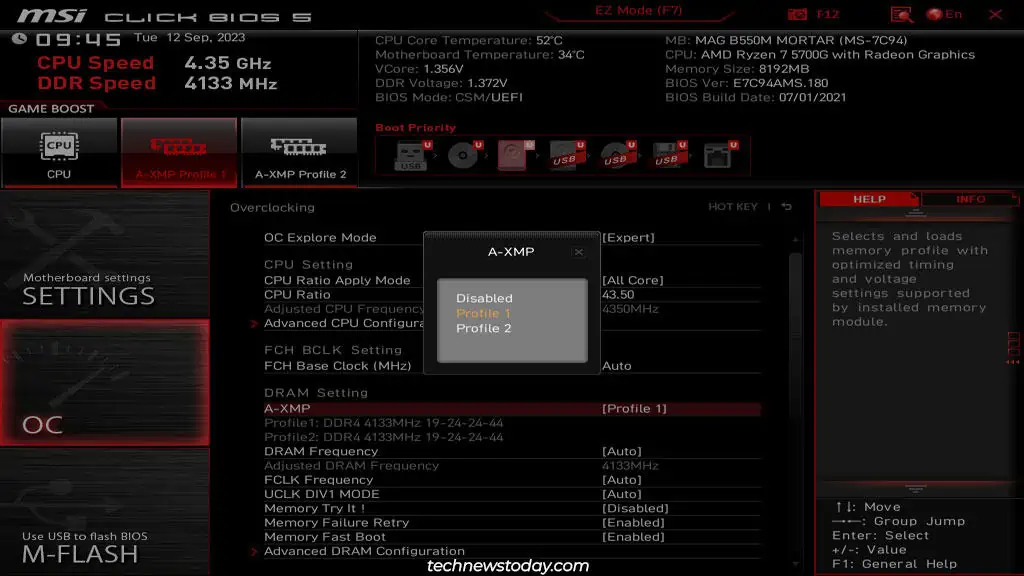
- Go to the Overclocking (OC) tab and enable an XMP/A-XMP profile.

- Finally, press F10 to save the changes and exit.
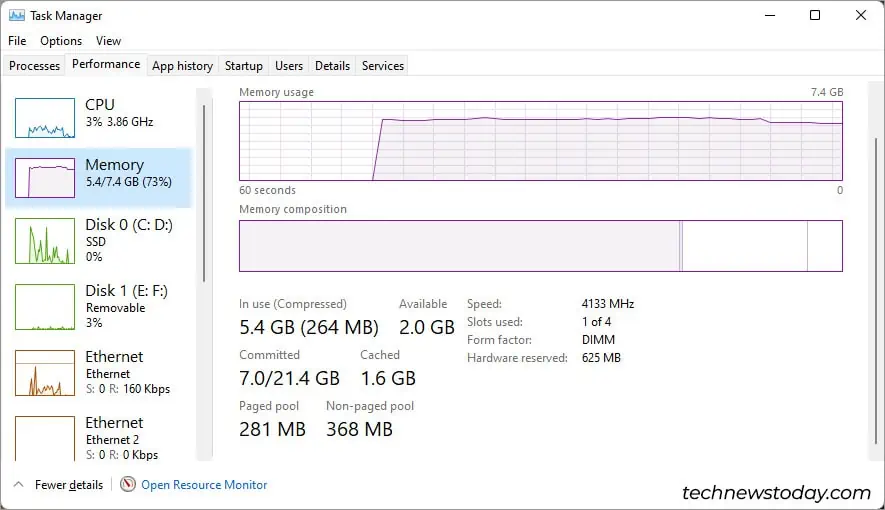
- After booting to Windows, you can use Task Manager or tools like CPU-Z to verify your updated RAM speed.

Manual Overclocking in MSI BIOS
The auto OC methods covered above will be better suited for most users. But there are some scenarios where manual overclocking is the better option:
- You aren’t content with the performance boost from auto OC and want to push your components harder.
- You have an older system that doesn’t fully support auto OC.
- Auto OC is supplying unnecessarily high voltage to the components, resulting in high temperatures.
If any of these points apply to you, you can follow the steps below to overclock your CPU in the MSI BIOS manually.
Note: I’ll focus on the CPU for this article but we have another detailed article on overclocking the RAM if you need a guide for that. And if you’re trying to overclock your GPU, you can’t do that from the BIOS. You’ll need to use programs like MSI Afterburner instead.
Before You Begin
When overclocking, the goal is to use the highest frequency with the lowest possible voltage. Here’s a quick overview of the process:
- You’ll start with the base clock and increase the frequency in small increments (100 MHz or lower).
- Each time you increase the frequency, you’ll stress test the system to verify that it’s stable with the current overclock.
- After raising the frequency a few times, your system will crash during the stress test. At this point, you’ll slightly increase the voltage (0.05V or lower) to try to stabilize your system.
- After the system passes the stress test, you’ll repeat steps 1-3. You can’t indefinitely increase the voltage (keep it under 1.35-1.4V), so you’ll find your system’s limits soon enough.
This seems simple enough, but the default auto OC and power-related settings can mess with your manual overclock. So, let’s take a step-by-step look at the process from the start now.
Establishing A Baseline
First, launch HWiNFO or a similar tool and note the average clock speed, voltage, and temperature. You can also use your preferred stress testing tool and note these values during max load. I generally use Cinebench R15/R23, 3DMark Time Spy, or Prime95.
This baseline will give you an idea of how far you may be able to push your CPU, and what frequencies it can handle with what voltages.
Now, head back to the Overclocking tab in the MSI BIOS and configure the following settings:
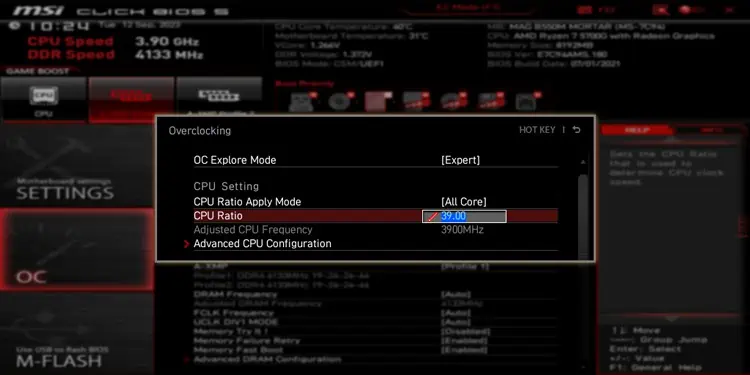
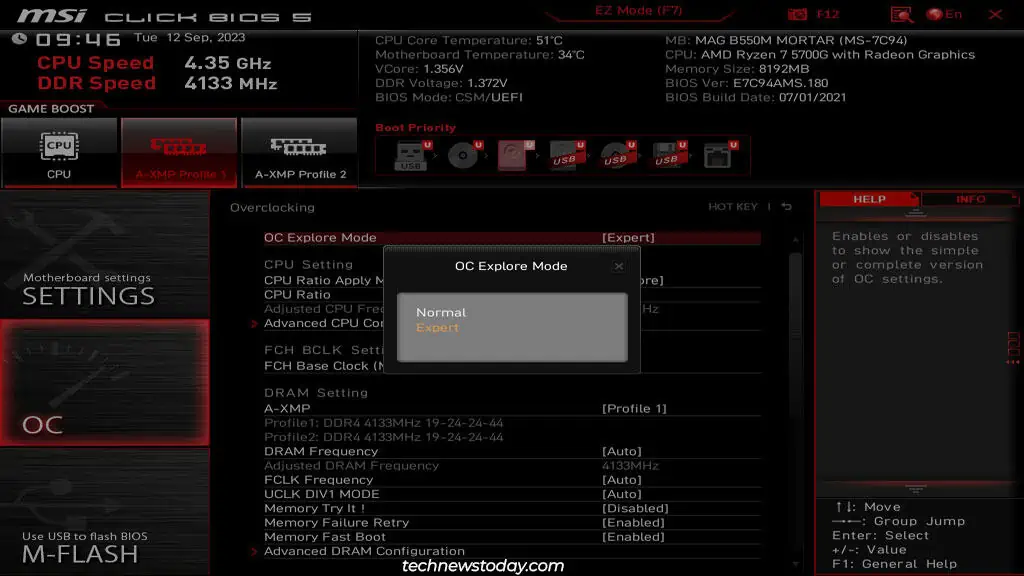
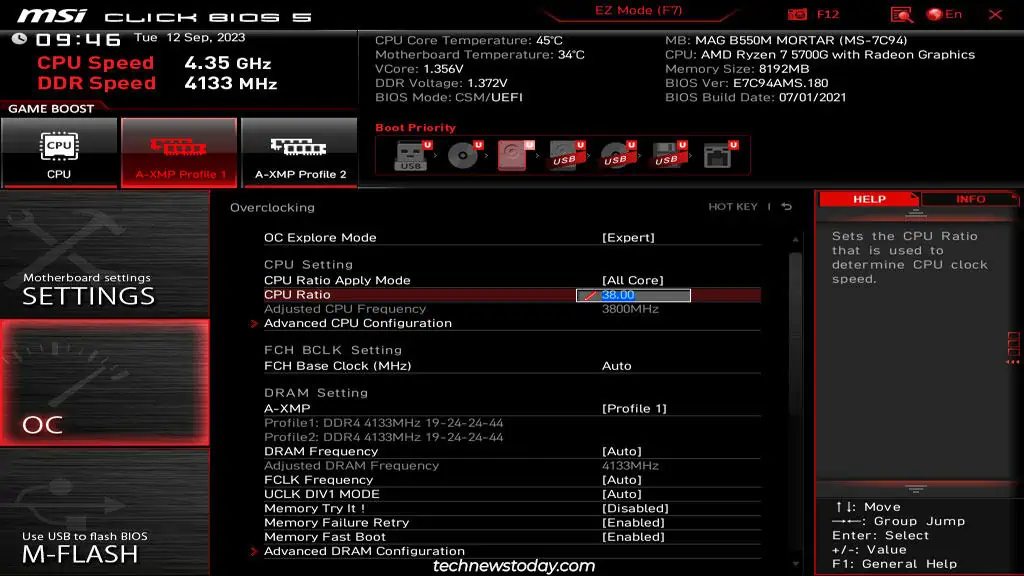
- Set the OC Explore Mode to Expert. This will allow us to configure the CPU Voltage settings.

- Use the CPU Multiplier to set the frequency to your base clock. In my case, I’ve manually set it to 3.8 GHz instead of leaving it to Auto.

- If the option is present, set the CPU Ratio Mode to Fixed Mode.
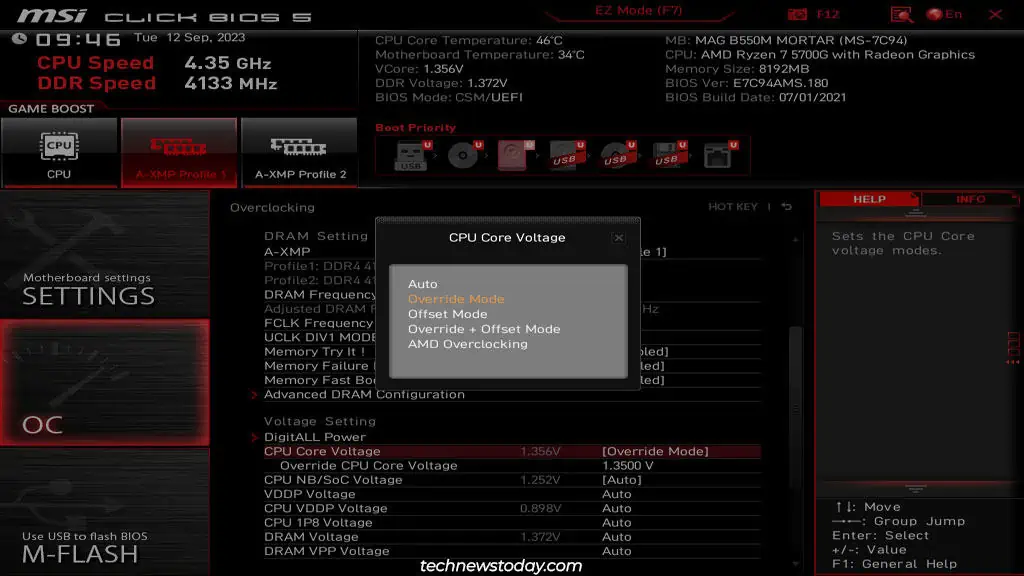
- Go back and set CPU Core Voltage to Override Mode.

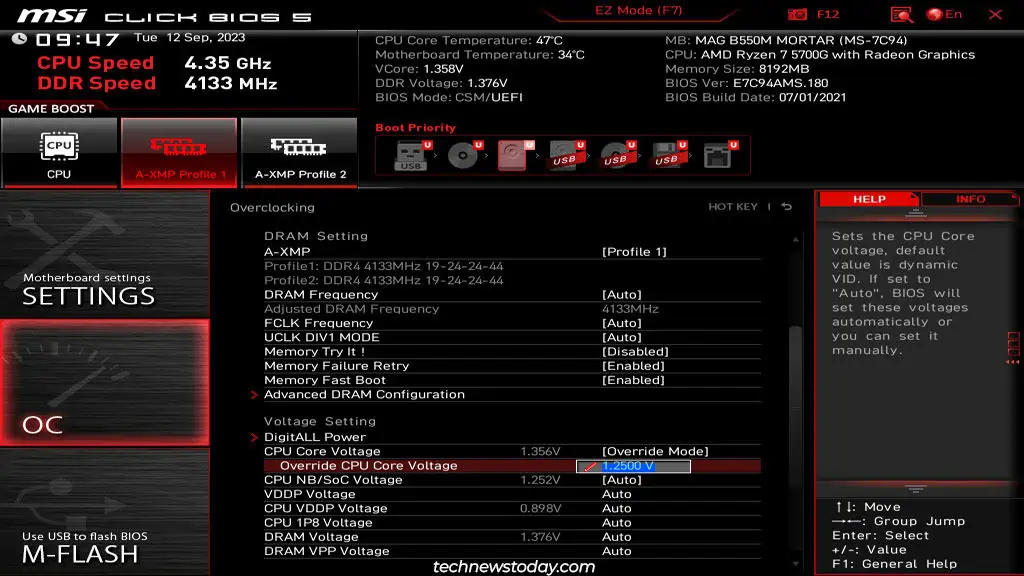
- Check your average voltage data from earlier to determine a starting voltage. In my case, I’ve used 1.25V for my starting frequency of 3800 MHz. Just try not to go above 1.3V for your starting voltage.

- Press F10 to save the changes and reboot. Your MSI BIOS is now ready for manual overclocking.
Increasing the CPU Frequency
Your CPU’s frequency is calculated by multiplying the base clock speed (BCLK) and the CPU ratio/core multiplier. For instance, my Ryzen 5700G’s base clock speed is 3.8 GHz. This is calculated like so:
BCLK * Multiplier = Frequency
100MHz * 38 = 3800MHz or 3.8GHz
To increase your CPU frequency, you raise the multiplier by 1 or less. So, I could increase the multiplier to 38.5 or 39 to increase the frequency to 3850 MHz or 3900 MHz respectively.
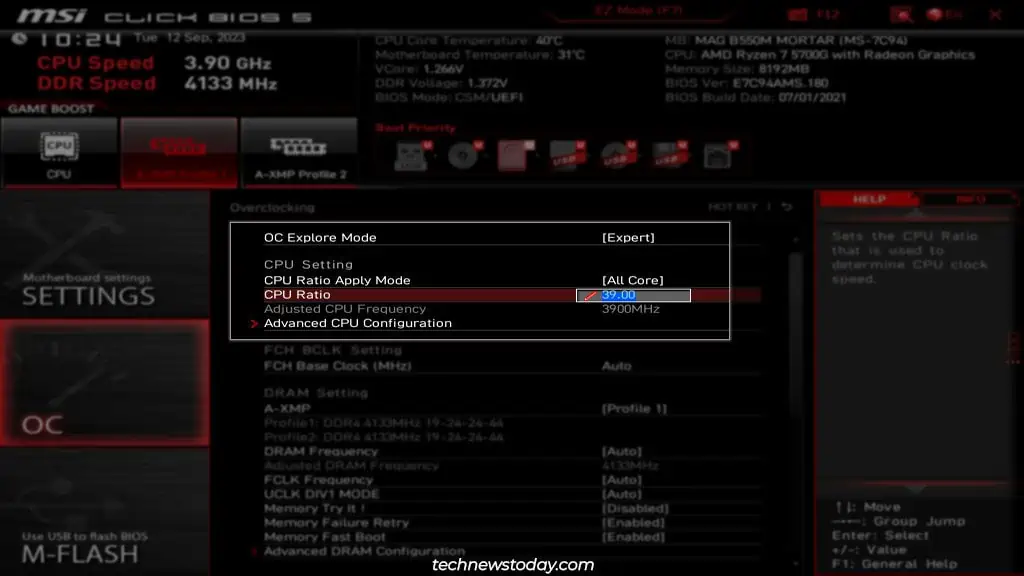
You can also change the BCLK to increase your frequency, but this is not recommended. Doing so will affect not just the CPU but your RAM and PCIe lanes as well.
A while back, our team changed the BCLK to get a Ryzen 5 2600 to 3.8 GHz. The system constantly failed to boot to Windows. Later, we reset the BCLK to 100 and set a multiplier of 38 to get to 3.8 GHz. This time, the same frequency worked fine because we took the correct approach.
Anyway, moving on. Increase the multiplier to raise the frequency slightly, then press F10 to save the changes and exit the BIOS.
Checking System Stability
After you reboot to Windows, launch CPU-Z and HWiNFO and monitor your CPU state (clock, voltage, temperature).
You’ve applied a slight overclock (100 MHz or lower), so it’s time to test this. Use Cinebench or any other tool that you prefer to verify system stability.
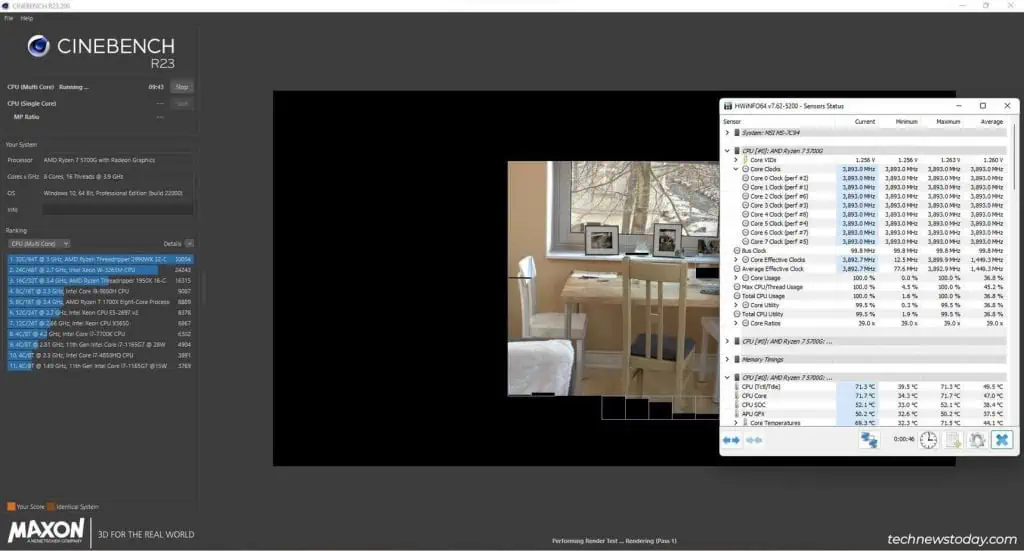
If the system is stable, go back to the BIOS, slightly increase frequency, and test again. Keep repeating this until your system becomes unresponsive during the stress test.
Adjusting the CPU Voltage
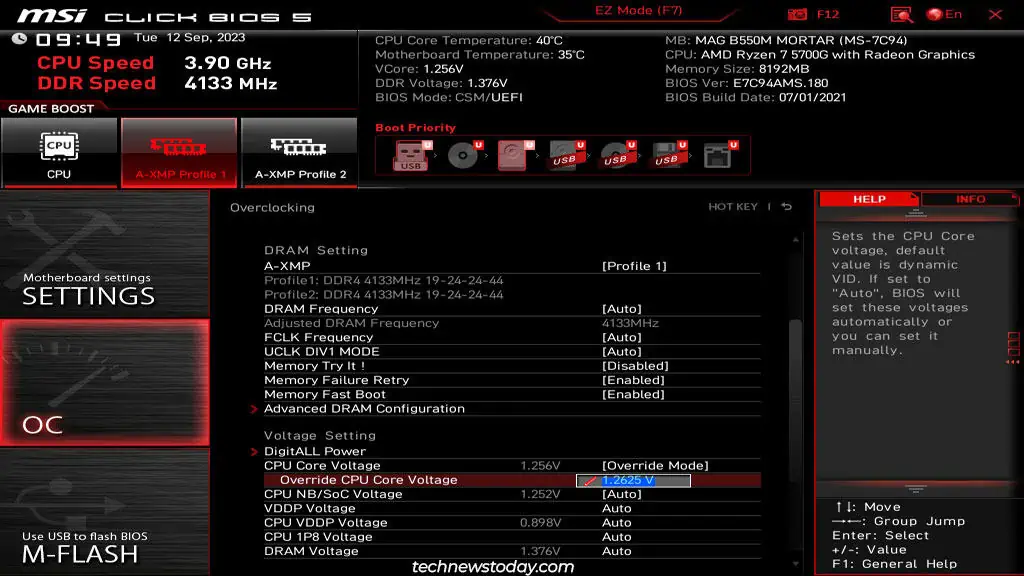
As the system was unable to pass the stress test with the current overclock, it’s time to slightly increase the voltage (0.05V or less at a time).
- Change the CPU Core Voltage setting like earlier to do this.

- Now, press F10 to save this overclock and reboot.
- Monitor the CPU stats and stress test to check stability as you’ve been doing so far.
If your system is stable, you can get back to increasing the frequency. If it doesn’t pass the stress test, repeat the steps from this section again to further increase the voltage.
Voltage Limits & CPU Temperature
As I mentioned earlier, you can’t just indefinitely increase the CPU voltage. From a component lifespan perspective, you shouldn’t go above 1.4V. If you want to stay on the safe side, you should ideally stay under 1.35V. That’ll let you achieve a decent overclock while also being a safe voltage level.
Additionally, you must also monitor the CPU temperature throughout the entire overclocking process.
- On most systems, the temperature shouldn’t go above 40°C when idle. And it should stay under 60°C during normal use.
- It may get up to 85-100°C during stress testing. Any higher is not good even for stress tests.
- The temps should be around under 85°C during real-world CPU-intensive usage. If they’re getting any higher, you should consider improving your cooling as such high temperatures can reduce your components’ lifespan.
The temperature can also bottleneck the overclock sometimes. I actually had to deal with this when overclocking one of our Gigabyte systems. As we had the stock cooler on that system, the temperature would skyrocket and cause any stress tests to fail.
After we cleaned the system and upgraded the cooler, I was able to get an even higher overclock while mostly keeping the temps under 80°C. So, if you’re facing any thermal throttling or similar issues, make sure your cooling setup isn’t holding you back.
At this point, you should have a decent standard overclock. If you want to fine-tune the overclock further, you should look into setting per core frequency and voltages and find the ideal LLC mode for your setup. You could also plot a custom aggressive fan curve to personalize the fan behavior and improve cooling.
On the other hand, if you’re unhappy with the current overclock, you can use the OC profiles feature to switch back to the default state. You can also set all the settings to Auto again, load the default BIOS settings, or reset the BIOS using your preferred method.

