When we insert a 3.5mm audio jack on the computer, by default, the computer sends all the audio data from the 3.5mm port to the headphone. So, if there is an issue with either the headphone itself or the audio driver, we will not get any output from the headphone.
However, in this article, we have listed a few solutions to help you fix the issue you have with the audio output device. So, without further ado, let us get onto it.
Why is My Computer Not Recognizing Headphones?
We first need to know what can cause a computer to stop recognizing the output device so that we can come up with a solution. Here is the list of things that can cause a computer to not recognize headphones.
- Physical damage in cables or headphone
- Computer 3.5mm port damaged
- Outdated driver or windows
- Desired output devices not selected or disabled
- Physical scroll or switches on a headphone
- Loose front panel connectors
- The dust settled on port
How to Know if the Computer Recognizes the Headphone?
The easy way to determine if the computer detects headphones is by playing a sound. However, this may not always work because even when we connect the headphone to the computer. We will not get any output if the default device is set to the output device other than the headphone.
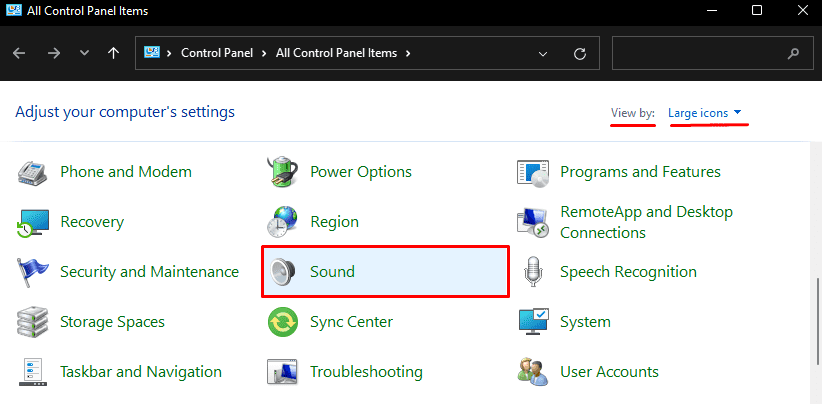
Another easy way to know if the computer has detected the headphone is from the Sound settings from Control Panel. You can follow these steps to find out whether it is connected.
- Press the Windows Key and open the Control Panel.
- Make sure that View by is set to Large icons and click on Sounds.

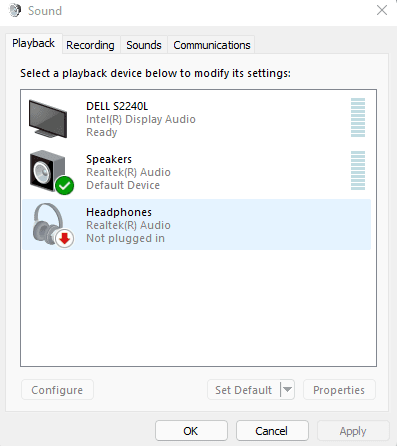
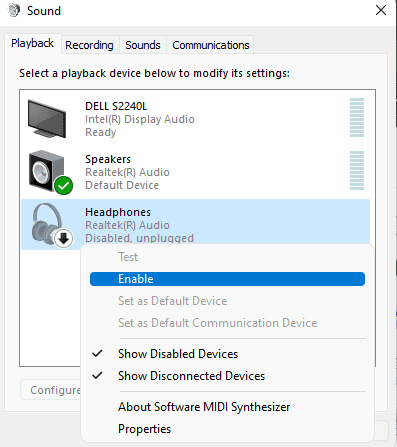
- On the Playback tab, you will see the list of all the audio output devices.

In this list, if it says headphone, if it indicates Not plugged in, your computer is not detecting a headphone. However, if it says Disabled, the computer recognizes the device but does not use it.
How to Fix a Computer Not Recognizing Headphones?
Before we start, we should know whether the problem is with the computer’s audio driver or the headphone itself. If the computer recognizes the device but does not play output, the issue is most likely with the computer drivers or sound settings.
However, if the computer does not detect the headphone, it is probably because of physical damages to some component.
Another way to check whether the issue is a computer or physical damage, try inserting the device on another computer. If it works, it means that there is some problem with the computer’s driver or sound settings. Finally, if we still cannot pick the audio after changing the computer, the headphone probably has some physical damage.
Here is a list of solutions you can try if the computer is not detecting headphones.
Enable Output Devices
Sometimes, a computer may not detect headphones because some settings allow them to be hidden unless they are enabled. If, for some reason, the headphone is disabled, they might be hidden, and it may seem that the computer is not detecting them.
You can follow these steps to enable the headphone.
- Open Control Panel.
- Set View by as Large icons and click on Sound
- Click on the Playback tab to see all enabled audio output devices.
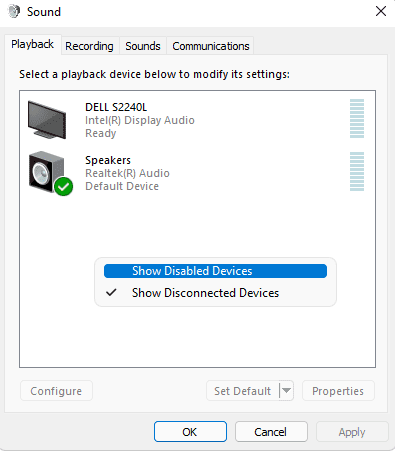
- To see the devices that are disabled, right-click on the empty space and check Show Disabled Devices.

- Once we see these devices, right-click on them and click on Enable.

- Apply the settings and click on OK.
Now try playing audio to check if the headphone gives an output.
Run Audio Troubleshooter
The troubleshooter is a great feature that Windows provides to pinpoint any error with a device. The troubleshooter will try its best to find and fix the problem you face. If it cannot fix the error, the troubleshooter will show you what is causing the issue with the headphone.
Follow these steps to run the Audio Troubleshooter on Windows 11.
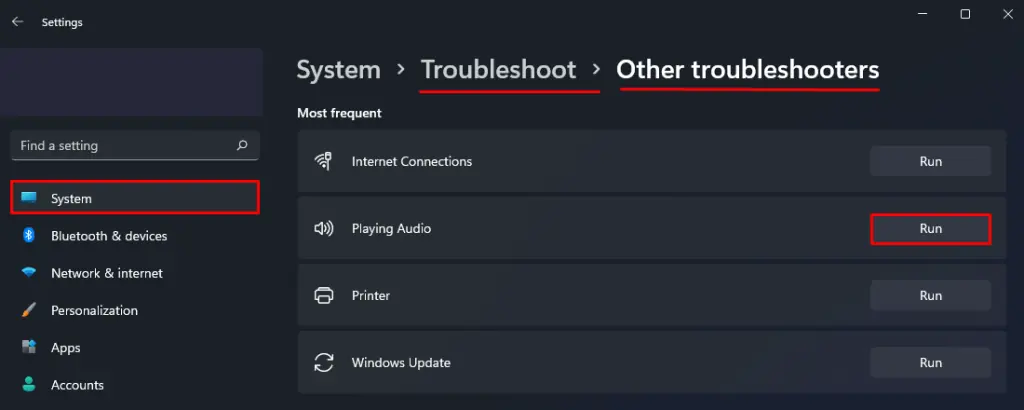
- Press the Windows key and go to Settings.
- Click on System, and on the right panel, click on Troubleshoot.
- Click on Other troubleshooters.
- Now, run the Playing Audio troubleshooter.

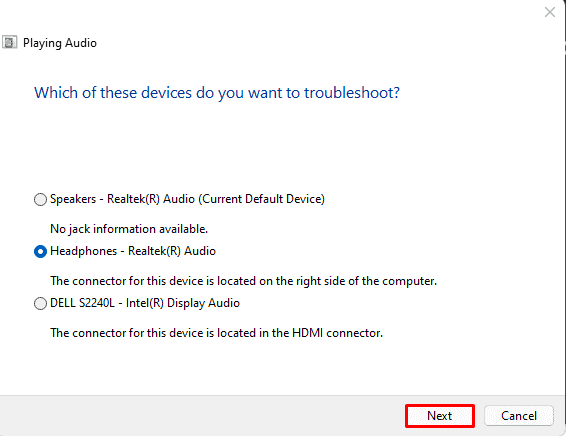
- Select the device which is causing the issue, i.e., Headphones then, click Next.

- The troubleshooter will run and identify problem with the computers audio.
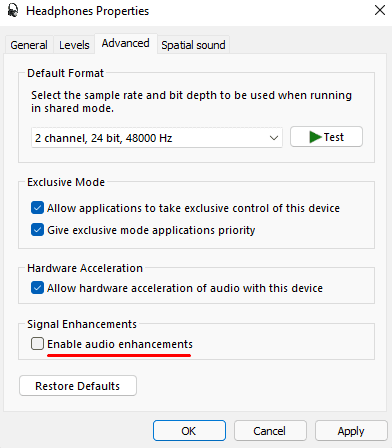
- It may prompt you to Turn off Sound Effect and Enhancement. If it does, select Yes, Open Audio Enhancement.
- Here, Under Advanced tab, we can disable any audio enhancement by unchecking Enable audio enhancements.

- Click Apply, then OK.
The troubleshooting may or may not display the same message as above. The troubleshooting steps will also vary according to the type of issue you face.
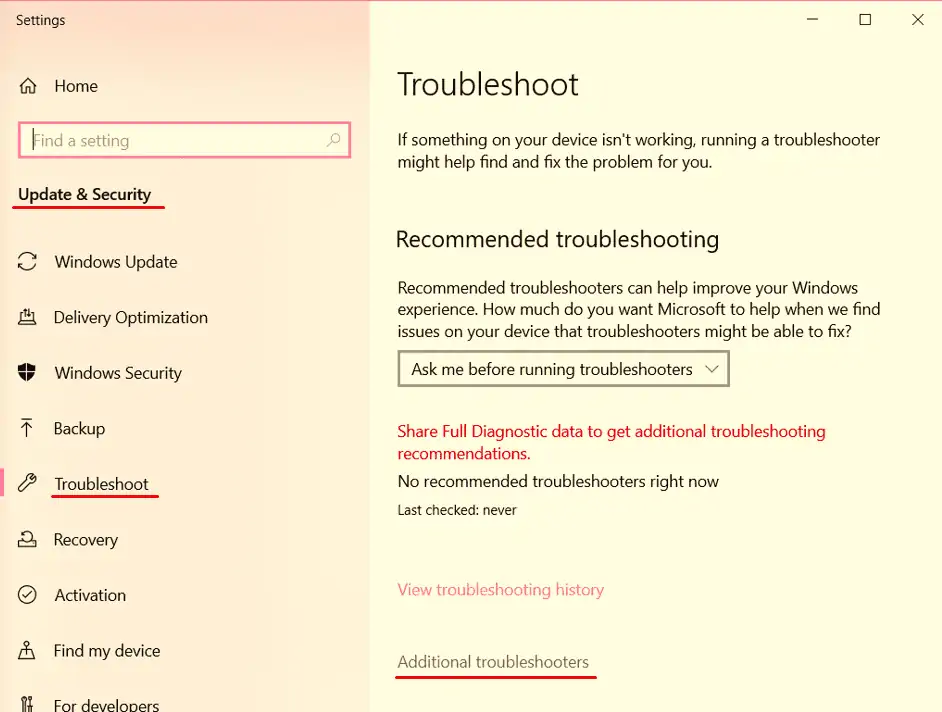
To open Troubleshooter settings on Windows 10, you can follow these steps.
- Press the Windows + I key.
- Go to Update & Security > Troubleshoot > Additional Troubleshooters.

- Here, run Playing Audio Troubleshooter.
Set Default Audio Device
The computer needs an output source to send the audio data. If the computer is connected to multiple audio devices, it might be possible that it is using a different source to send the audio data. We can check this from the sound settings.
You can follow these steps to check your output source.
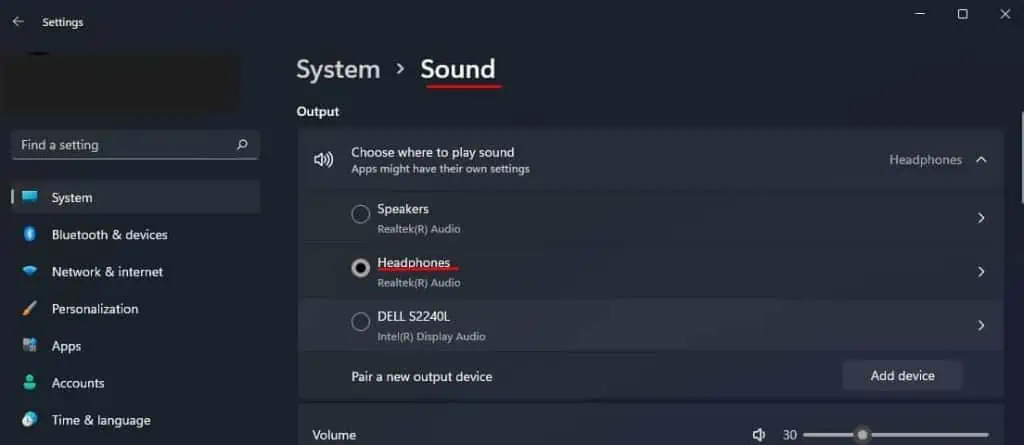
- Press the Windows Key and go to Settings.
- On the Right panel, click on Sound.
- Under Output, you will see the list of all output audio devices.
- Check on the device, the headphone, from which you want to hear the audio.

The headphones need to be connected for the system to display them as an audio output. If the computer does not display headphones, try another fix.
Now, play a sound from the computer to see if it fixes the issue. If this fix work on detecting the headphone, try making it a default audio output device. When we set a device as default, the computer will automatically use said device once it is connected.
To set a default audio device, you can follow these steps.
- Open the Control Panel.
- Make sure that View by is set to Large icons and click on Sounds.
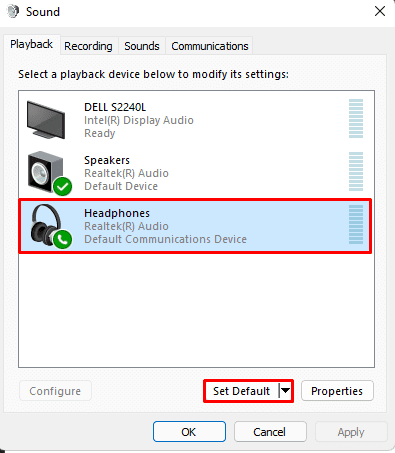
- Under Playback tab, you will see the list of all the audio output devices connected to the computer.
- Here, select the Headphone and click on Set Default.

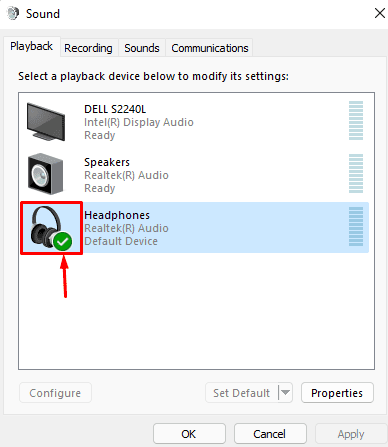
- You will see a green tick mark under the headphone icon once you set it to default.

- Click Apply, then OK.
Change Default Format
The sound format can also be responsible for computer not being able to play sound through a headphone. Sometimes due to reason unknown, sound format may be changed which will stop the computer from giving an audio output to the headphone.
Follow these steps to change the sound format.
- Open Control Panel and set View by as Large icons.
- Under the Playback tab, click on Headphones then click on Properties.
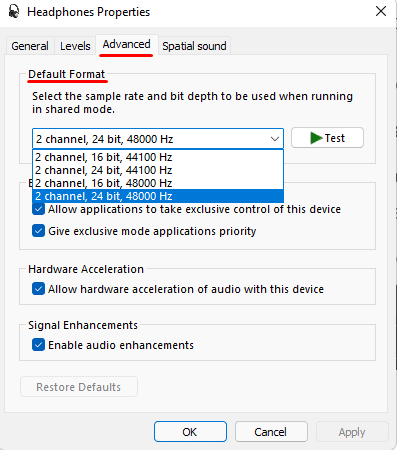
- Go to Advanced tab, under Default Format, change the item from the drop-down menu and click Test.

- Test all the items from the drop-down list until the headphone responds with a sound output.
Update/Roll Back Audio Driver
An outdated driver will cause many issues as the Operating System uses a driver to control a device. So, when a driver is not up-to-date, its driver will start to malfunction sooner or later. Therefore, it is always a good idea to keep a driver up-to-date.
To update the audio driver, press the Windows key + X and open Device Manager. Now, expand audio input and outputs. When headphones are connected and enabled, you will see a list item named Headphone. Right-click on it and select the Update Driver. Click on Search automatically for drivers. 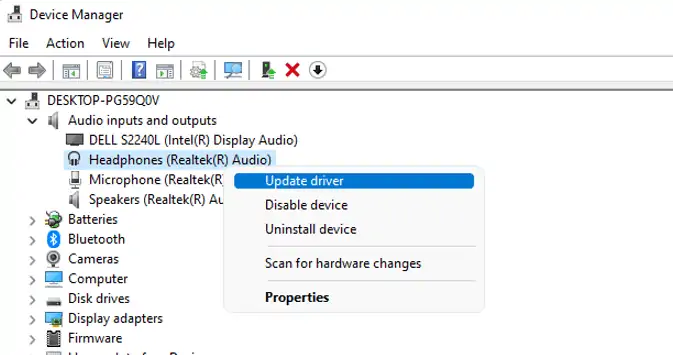
Once all process is complete, restart your computer.
We also recommend updating all the list items inside Audio input and outputs.
Once these are updated, expand the Sound, video, and game controllers. Right-click on Realtek Audio (this may be different according to manufacturer) and select Update Driver.
Sometimes, an audio update may also cause the issue. So, if you start having problems with audio, like not recognizing headphones after a Windows update, we can roll back the update to the previous version.
To roll back a driver update, you can follow these steps.
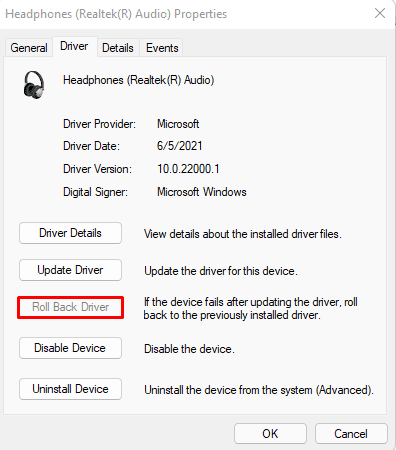
- Right-click on the driver you want to roll back, then select Properties.
- Go to the Driver tab.
- Here, click on Roll Back Driver.

- Once this process is complete, restart your computer.
If none of these work, we can try uninstalling and reinstalling the device. To remove the driver:
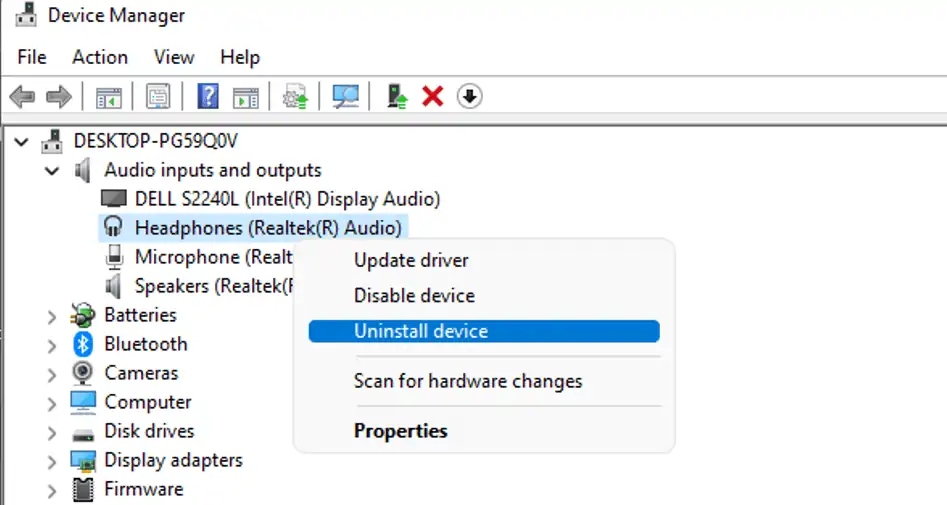
- Right-click on the driver you want to uninstall.
- Click on Uninstall Device.

- Restart your computer.
After the restart, the OS will automatically reinstall the driver.
You may also need to update/roll back/reinstall the USB driver if you use headphones with a USB port. We can find this driver when we expand Universal Serial Bus controllers and USB Connector Managers.
Update Windows
We will stumble upon many problems if we delay our Windows update, including an issue with the computer not recognizing headphones. Follow these steps to Update your Windows.
- Press the Windows Key + I to open Settings.
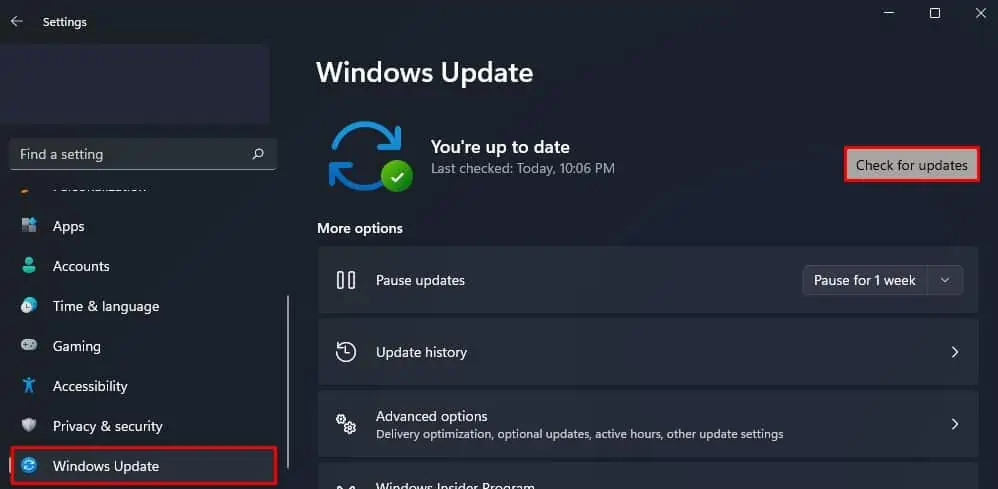
- Scroll down and click on Windows Update (Security & Update > Windows Update in Windows 10).

- Here, Click on Check for updates or Install now if you have pending updates.
- Restart your computer once the download or installation is complete.
Disable Front Panel Jack Detection and Enable Multi-stream Mode
If the computer you are using has a Realtek HD audio manager, a setting named front panel jack detection may be stopping it from detecting headphones. You can follow these steps to disable it.
- Expand the System tray and right-click on Realtek HD Audio Manager.
- Select Sound Manager.
- Under Speakers, click on the folder icon on the right side.
- Check Disable front panel jack detection.
Another Realtek HD audio manager setting that may stop a computer from detecting a headphone is the Multi-stream mode. Due to unknown reasons, disabling this setting will cause the issue that we currently face. you can follow these steps to enable Multi-stream mode.
- Open Control Panel and set View by as Category.
- Here, click on Hardware and Sound.
- Select Realtek HD Audio Manager.
- Click on Device advanced settings and check Multi-Stream mode.
- Click OK.
Now restart your computer to see if the headphone gives an audio output.
Damaged Volume Scroll
Some headphones will have a physical scroll that controls the volume. This scroll may be located in one of the headphone cups or on the cable itself. When this physical component is damaged, it may stop the headphone from functioning. So, although it may seem connected, you will not receive any output.
To fix a damaged volume scroll, you will need to take the headphone to a local electronic repair shop.
Replace Cable
Physical damage to cable may also stop your computer from detecting your headphone. If your headphone has a cable that you can detach, we can try replacing these cable to check if it fixes the issue.
However, if both microphone and audio output are attached to the headphone, you will need a 3.5mm connector that supports a microphone data transfer. Check the jack for three black lines to see if the 3.5mm jack supports microphone data transfer. If the jack has two black stripes, it does not transfer data coming from the microphone.
Clean Dust Settled on port
Obstacles like dust particles may get settled on the 3.5mm port. Although there needs to be a lot of dust to stop the connection 3.5mm jack and port, it can happen. So, try blowing all the dust settled inside the port. If it does not work, try using dry cotton swabs to clean them.

