Connecting two computers with Ethernet forms a local network. The lack of a router means there’s no access to other networks, but the local network still has various useful applications. The most common one being the ability to access, modify, and share resources between the two systems.
As long as network discovery is enabled, plugging in the Ethernet cables is often all that’s needed to connect Windows machines. Connecting Windows and Mac, or Windows and Linux, however, can get confusing. As such, we’ve detailed the steps to use Ethernet to connect and share files between various systems in this article.
How to Connect Two Computers With Ethernet
Physically connecting two computers with Ethernet is simple enough; you just plug the cord into the Ethernet ports on both computers. Certain Mac models don’t have Ethernet ports, though, in which case, you’ll need a USB to Ethernet adapter. Additionally, you can also connect two or more computers with a Switch.
Regardless of the physical connection method, you’ll need to configure some basic networking settings before the computers can communicate with each other. When setting the Static IP as instructed in the sections below, use the following values:
First Machine: IP 192.168.1.1, Subnet 255.255.255.0
Second Machine: IP 192.168.1.2, Subnet 255.255.255.0
On Windows
Here are the steps for Windows systems:
- Press Win + R, type
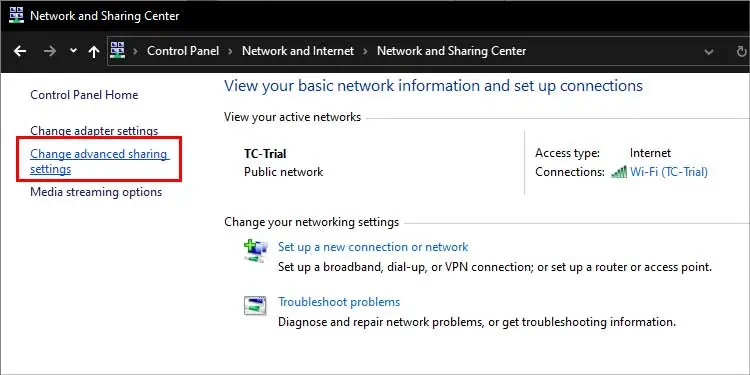
control, and press Enter. - Go to Network & Internet > Network and Sharing Center > Change advanced sharing settings.

- Expand the current profile section, enable the Network Discovery and File Sharing options and save the changes.

- If the computers don’t connect with the above steps, you’ll also have to set a Static IP manually. In such cases, press Win + R, type
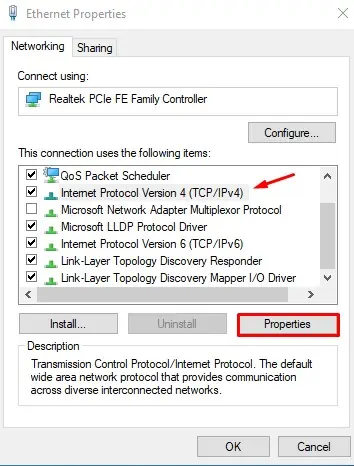
ncpa.cpl, and press Enter. - Right-click the Ethernet connection and select Properties.
- Select Internet Protocol Version 4 (TCP/IPv4) and click on Properties.

- Select the Use the following IP Address option and assign the IP manually.
On Mac
Here are the steps to set a Static IP on Mac:
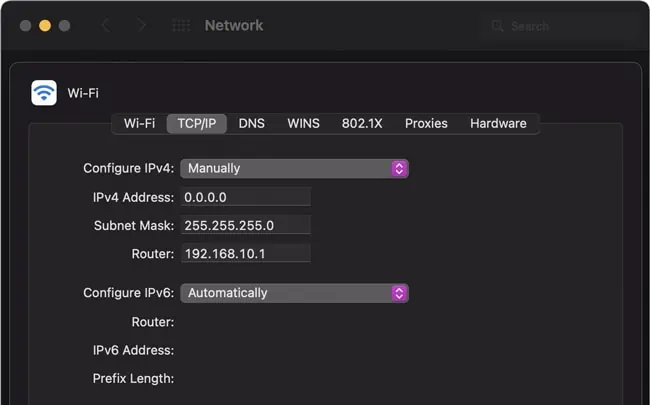
- Click on the Apple logo and select System Preferences > Network.
- Select your network from the left pane and click on Advanced.
- Select Configure IPv4 Manually, assign your IP address, and press OK.

On Ubuntu
Here are the steps to set a Static IP on Ubuntu:
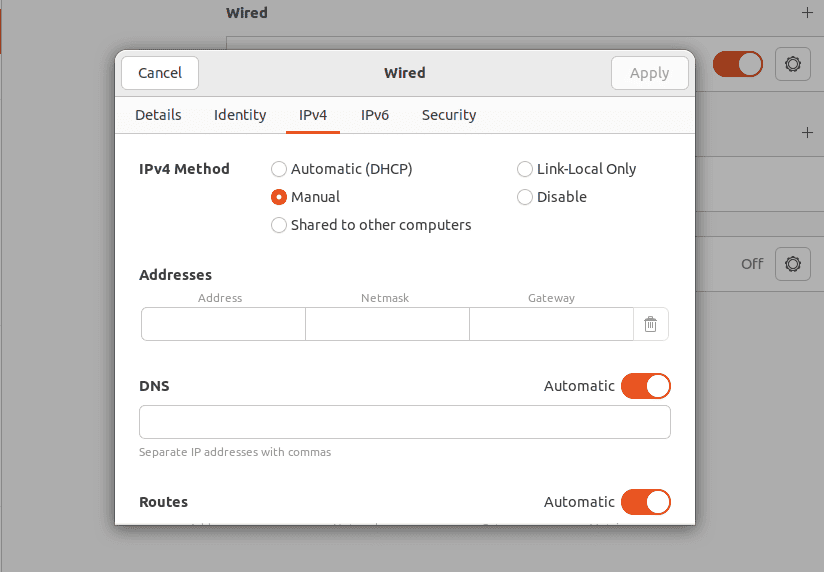
- Right-click the network icon from the top-right.
- Select your WiFi / Ethernet connection and click on the Settings cog.
- Switch to the IPv4 tab and change the method to Manual.

- Input the IP Address, Netmask, Gateway, and DNS and click on Apply.
Transferring Files Between Two Computers
After configuring the network discovery and file sharing settings on the two computers, you can follow the steps listed below to share files.
Windows and Windows
Here’s how to transfer files between two Windows computers with Ethernet:
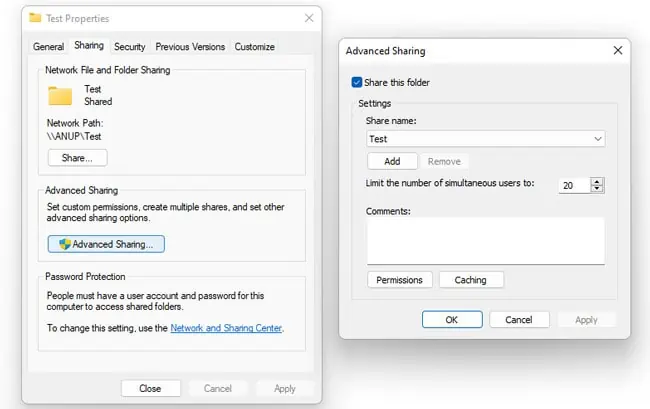
- Right-click the folder or drive you’re trying to share and select Properties.
- Go to the Sharing tab and click on Advanced Sharing.
- Enable the Share this folder option and press OK.

- The folder’s network path should be displayed in the Sharing tab now. You can use this path to map the folder as a network drive on the second PC, or you can simply access it via File Explorer > Network.
Windows and Mac
Here’s how to transfer files from Windows to Mac with Ethernet:
- Follow the steps from the section above to share the folder from Windows.
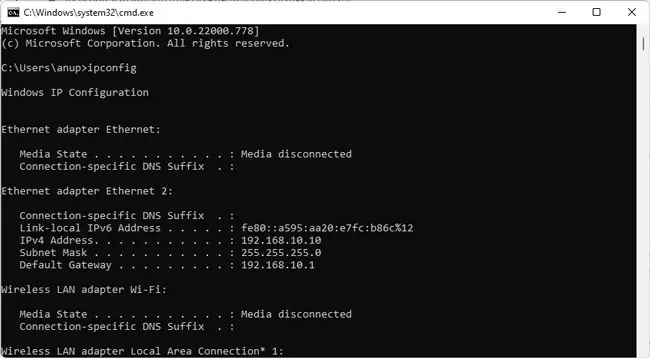
- Type
ipconfigin a Command Prompt window and note the Ethernet adapter’s IPv4 address.
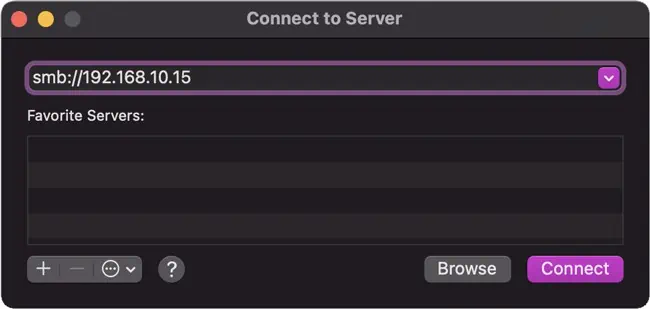
- On the Mac, select Go > Connect to server.
- Enter
smb://IPand replace IP with the value from Step 2.
- Press Connect, enter the Windows account’s login credentials, and press Connect again.
- After you select the volume to mount, you’ll be able to access it via the Finder.
If you want to transfer files from Mac to Windows instead, here’s what you should do:
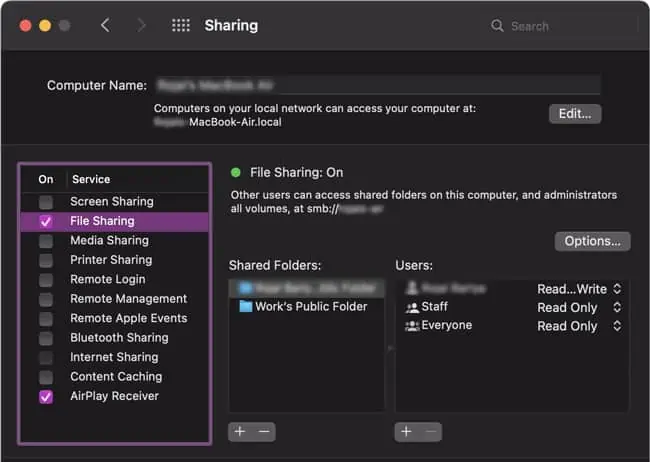
- Click on the Apple menu and select System Preferences > Sharing.
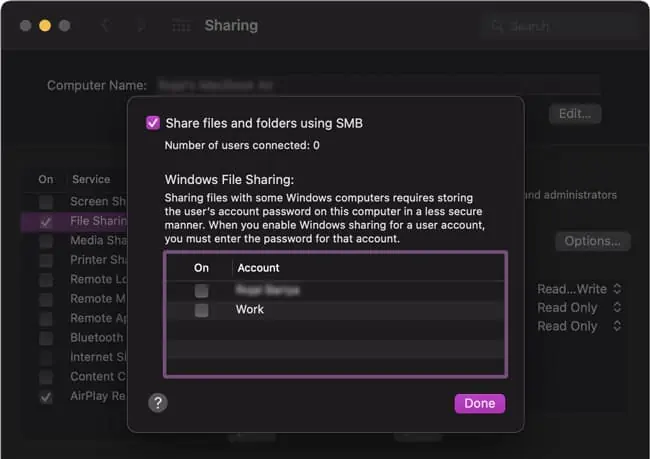
- Enable the File Sharing tick box, note the Mac’s IP, and click on Options.

- Select the Share files and folders using SMB option.
- Select the account you’ll use to log in from the Windows PC, enter the password, and press Done.

- Under Shared Folders, press the Add (+) button.
- Browse and select the folders to share and press Add.
- On the Windows system, go to File Explorer > Network. You’ll be able to connect to the Mac from here.
Windows and Linux
You can use the Server Message Block (SMB) protocol, which is built into most Linux distros, to transfer files between Windows and Linux. Here are the steps to do so on Ubuntu:
- Check the steps from the Windows and Windows section above to share the folder from Windows.
- If you want to share folders from Ubuntu as well, you can right-click the folder and go to Properties > Sharing.
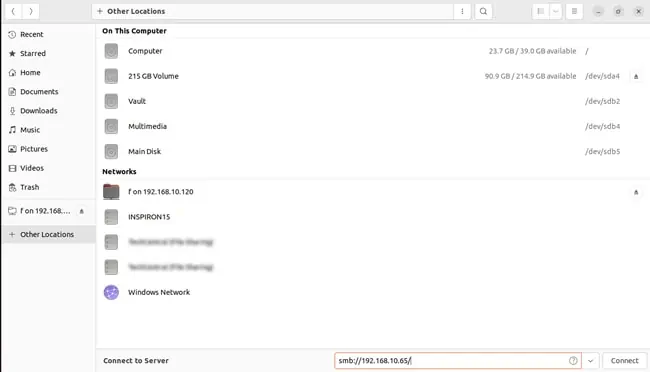
- Open the Nautilus File Browser and click on + Other Locations.
- If the Windows computer doesn’t automatically show up here, manually connect to it by entering its IP in the Connect to server section.

- Enter the Windows account’s login credentials and press Connect.
- Similarly, on Windows, go to File Explorer > Network. Double-click the Linux PC and enter the Linux account’s login credentials to access the shared files.


