The Compatibility Support Module (CSM) is a mode within the Unified Extensible Firmware Interface (UEFI) that offers legacy BIOS compatibility. This is the ultimate solution when you’re trying to boot your OS from an MBR-partitioned drive that requires legacy BIOS features.
When enabled, it provides BIOS functions that are omitted in the UEFI mode. While most modern systems are pre-built with UEFI, you require legacy BIOS if you wish to install an older OS or reduce its bitness (for example, 64-bit to 32-bit).
If your UEFI BIOS doesn’t have the CSM option, you might find other terms like Legacy Support or Legacy + UEFI modes. Both are synonymous with CSM and perform the same task. But how is CSM different from UEFI? This comprehensive guide should help you learn about their technical differences.
Basics to BIOS and UEFI
BIOS (Basic Input/Output System) is firmware stored on a ROM chip that is responsible for starting the computer once you press the power button. It consists of codes that perform the POST operation and carries out the basic functions that run your computer.
Once you turn on your PC, the motherboard powers up and checks whether all the hardware components are working flawlessly (this is called POST). During this process, you should see some messages or visual changes on the screen before the OS boots up. In case there’s an error, the OS won’t boot, and you’ll encounter an error or hear a POST beep (if enabled).
After POST, BIOS loads the necessary drivers, checks for the valid MBR (Master Boot Record), and then loads the bootstrap code into the RAM. Finally, the bootloader loads the operating system files and hands over the control to the OS.
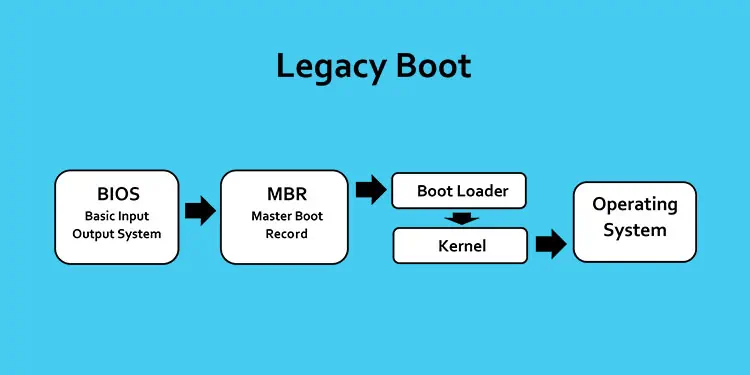
You may opt for Legacy BIOS if you’re not worried about memory protection, paging, virtual memory, and more. It has many limitations—maximum disk capacity of just 2.2 TB, allows running multiple OS without changing any BIOS settings (a major security issue), and slower boot time.
To overcome these problems, EFI was introduced in the 1990s. After its last version EFI 1.10, the name was subsequently changed to UEFI in the early 2000s.
Unlike the legacy BIOS that stores the initialization data in the firmware, UEFI keeps it in the .efi file inside the EFI system partition of a GPT drive. While it does the same job as BIOS, they differ in terms of various factors, including partition scheme, user interface, boot speed, security, compatibility, and more.
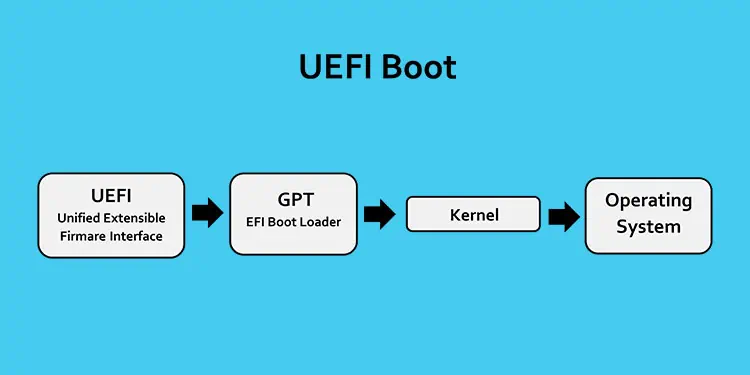
Well, UEFI can support a drive capacity of up to 9.7 ZB and are also incredibly faster in comparison to the legacy BIOS. Additionally, it offers the Secure Boot feature which works by verifying the state of the boot chain. This prevents your PC from unauthorized booting.
While the Legacy BIOS could only operate in 32-bit, the newer UEFI can run on both 32-bit and 64-bit. Also, it has introduced enhancing features like better GUI, fast booting, efficient power and system management, etc.
Despite these benefits, you may still require Legacy BIOS if you want to run an older OS that doesn’t support UEFI. For this purpose, some UEFI-based systems offer a feature called CSM, which I shall discuss in detail later.
We have already compiled a detailed guide on the differences between Legacy and UEFI BIOS. For your comfort, I have included the basic differences that you should know:
| Factors | Legacy | UEFI |
| Partition Scheme | MBR | GPT |
| Maximum Storage | 2.2 TB | 9.7 ZB |
| User Interface | Only Keyboard support | Mouse and Keyboard support |
| Boot Speed | Slow | Fast |
| Security Features | Limited | Integration of TPM and Secure Boot |
| Hardware Compatibility | Supports older devices | Supports newer devices |
| OS Compatibility | Older Windows versions (upto Windows 10 supported) | Newer Windows versions (from Vista onwards) |
What is CSM?
Now that you’re aware of both Legacy and UEFI BIOS, it’s going to be easy to understand CSM (Compatibility Support Module). To put it simply, this is not a separate BIOS interface but a feature within the UEFI that allows you to boot in legacy mode.
In modern systems that incorporate UEFI, it should be disabled by default. If you’re installing Windows Vista or later, you can leave this as it is. However, if you want to set up Windows 7 or an earlier version on a GPT drive, it’s essential to enable CSM to provide Int10 support.
The CSM feature adds backward functionality to EFI such that traditional legacy BIOS can be used. Here, you’re simply creating a BIOS environment in UEFI such that it becomes compatible with older hardware and operating systems.
As mentioned earlier, we use CSM for two primary reasons—to install an older OS that doesn’t support UEFI or to install one with a different bit. Besides, I also recommend using CSM if you find bugs in the firmware or you frequently swap MBR-partitioned drives.
An important thing to note when enabling CSM is that some important UEFI features, like Secure Boot and Fast Boot get disabled. Clearly, your computer is going to be less secure, and the boot speed also decreases.
Differences Between CSM and UEFI
CSM and UEFI are both boot modes that you can find on your BIOS settings. Most users mistake CSM as a separate interface, which is not true. It’s simply a feature within the UEFI settings that allows Legacy BIOS compatibility.
Sometimes, you might come across a separate “Legacy” option which is entirely different from CSM. This feature within the BIOS settings can let you change from UEFI to Legacy completely and vice versa.
In this section, I will discuss the differences between CSM and UEFI in terms of hardware and software compatibility, bitness support, partition scheme, storage capacity, boot speed, and security.
Compatibility
Some older hardware components might not be compatible with the latest UEFI BIOS. In such a case, enabling the CSM mode can help the devices supporting legacy functions to work in a UEFI system.
On the other hand, the UEFI mode only supports the latest hardware components. So, if you switch to CSM, certain UEFI-specific drivers might get disabled, preventing the related devices from functioning.
Likewise, the older operating systems might not run on the UEFI system and require legacy support. By simply enabling CSM, you can bypass such restrictions.
Bitness/Architecture Support
Just like Legacy BIOS, the CSM mode supports only 16-bit and 32-bit operating systems. Also, it has a memory addressing limit of only up to 1 MB.
On the flip side, UEFI mode can support both 32-bit and 64-bit (Long Mode) operating systems but can’t operate in 16-bit. Unlike the former, it can handle advanced memory addressing relating to 64-bit systems. For that reason, it supports larger memory spaces providing enhanced performance and system stability.
Partition Scheme
Since CSM emulates the behavior of the legacy BIOS, it is associated with the MBR partition scheme. It uses a 32-bit partition table with a maximum of four primary partitions (or three primary partitions with one extended).
On the other side, UEFI is associated with the GPT partition scheme. It uses a 64-bit partition table and can support up to 128 primary partitions. This provides greater scalability and flexibility in terms of storage, which I shall discuss next.
To learn more about MBR and GPT, here’s our detailed guide that should help you out.
Storage Capacity
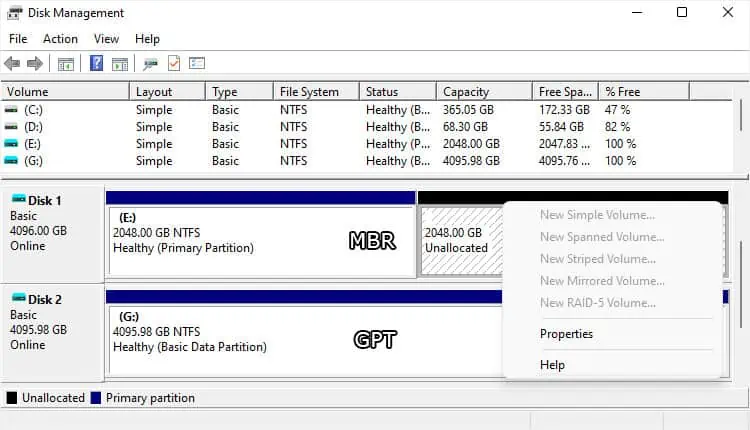
MBR has a limited disk capacity of up to 2.2 TB due to the 32-bit architecture. For this reason, if you have enabled CSM from the BIOS interface and are trying to utilize a larger drive, the remaining space remains unallocated. For instance, if you have a 5 TB SSD, you’ll have to give up 2.8 TB storage.
This is one of the main reasons I advise switching to GPT-based UEFI. It has a maximum disk capacity of 9.7 ZB, which is indeed a huge number. This overcomes the limitation of MBR-based CSM as it can utilize the 64-bit architecture.
Boot Speed
Whether it’s Legacy BIOS or UEFI with CSM enabled, the boot process is quite slow. This happens because of compatibility checks, OpROM initialization, and different other legacy BIOS functions.
However, the UEFI mode has a faster boot speed as it can directly call the EFI bootloader. This is also due to optimized boot protocols, pre-boot drivers, and additional features, including the Fast Boot.
Security
Lastly, the UEFI mode includes advanced security features like Secure Boot and Trusted Platform Module (TPM), along with other standards and protocols.
Secure Boot makes sure only the cryptographically verified UEFI binaries get executed. Likewise, TPM provides hardware-based security and even provides additional features like secure storage, secure key generation, secure credential management, and more.
Once you enable CSM, most of these features become unavailable. The reason is quite simple—legacy BIOS supports quite a limited number of security options. Thus, if you really want to use these features, you should disable CSM and start using the UEFI mode.
Note: When you switch from UEFI to CSM mode, the user interface remains the same. If you are expecting to get the traditional BIOS screen, this won’t happen. Instead, only certain UEFI features get hidden.
How to Enable or Disable CSM?
When you enable CSM, you’re basically switching from UEFI to Legacy. And when you disable it, you’ll switch back to UEFI.
Do note that this is just creating a new compatible BIOS environment to support legacy hardware and software components. Thus, even if you enable CSM on your current GPT partitioned drive, it will still boot without any problem.
Interestingly, you can even fix several CSM-related issues just by enabling/disabling the related option from BIOS.
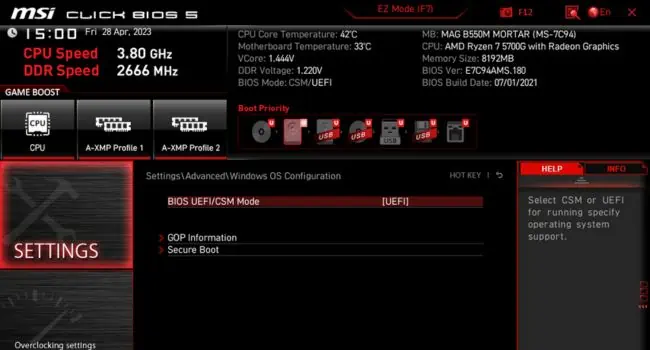
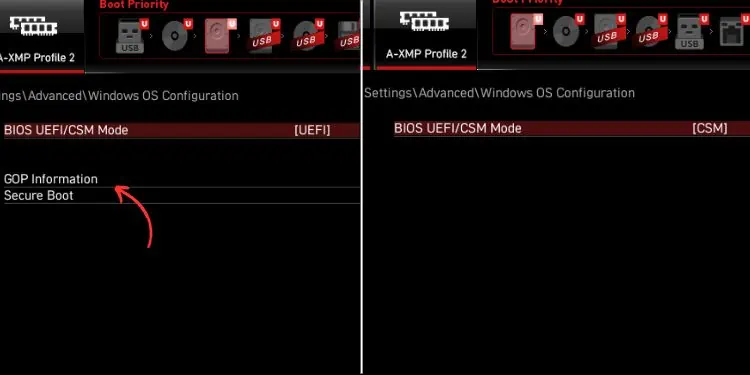
The procedure to configure CSM varies based on your motherboard/laptop model. For a quick demonstration, I’ll be doing it on an MSI motherboard. This should give you a basic idea of how to configure it. Below are the necessary steps you need to follow:
- First of all, restart your computer.
- During the startup, hit the key that launches the UEFI screen. This varies based on your laptop or motherboard. For MSI, I am going to press Del, which can still vary based on the motherboard’s model.
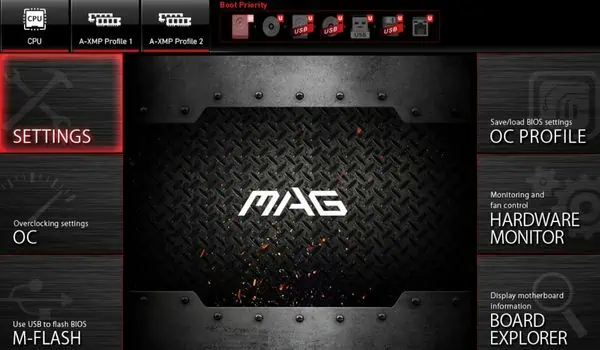
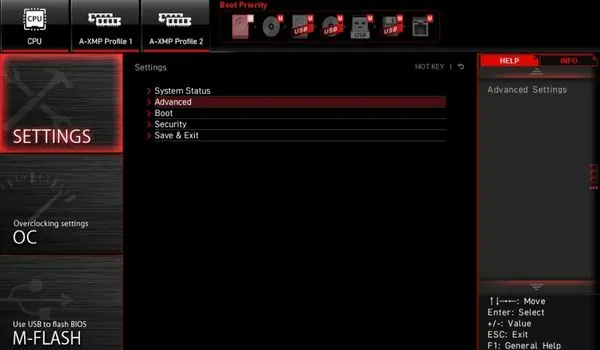
- Once you’re in the respective interface, open up Settings.

- Then, choose Advanced.

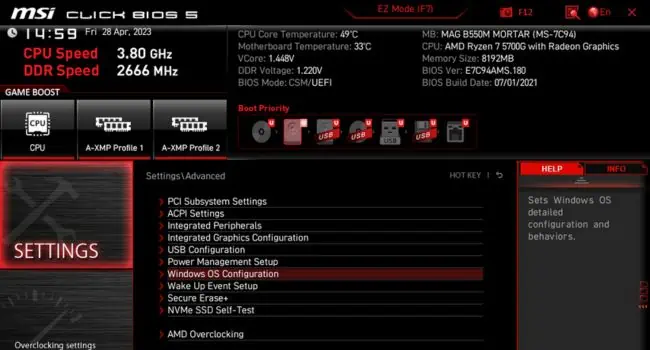
- Next, go to Windows OS Configuration.

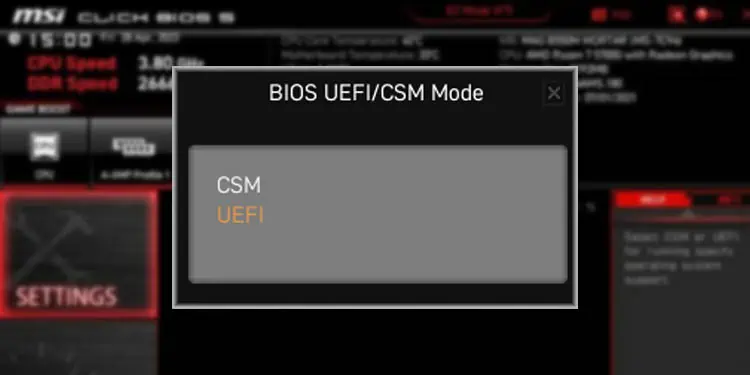
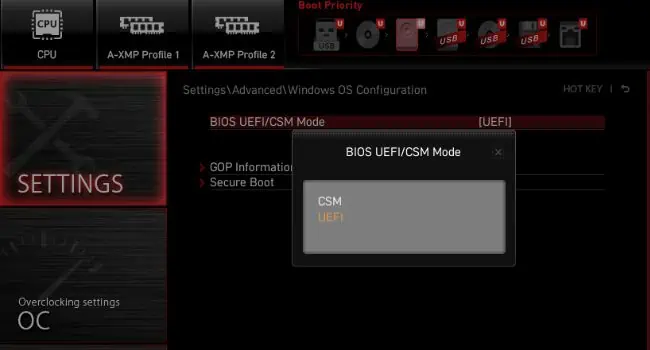
- Here, select BIOS UEFI/CSM Mode.

- In the new pop-up window, select CSM to enable it or choose UEFI to disable it.

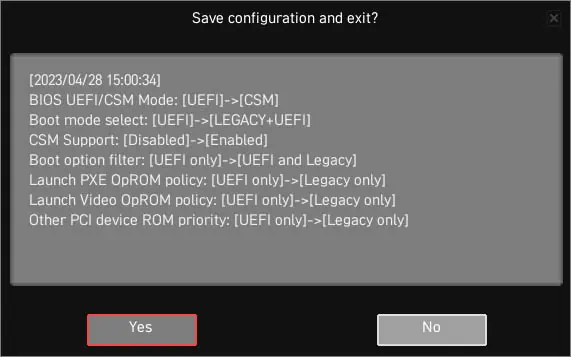
- Now, press F10 to save this setting and exit from the UEFI screen. Hit Yes to continue.

Final Comparison—CSM Vs UEFI
Without a doubt, everyone’s choice should be UEFI. But when you’re trying to use hardware or software components that only support legacy functionalities, you should opt for the Compatibility Support Module (CSM).
Hopefully, you have learned everything from this article regarding Legacy, CSM, and UEFI. For your comfort, I have included the summarized points below that should help you differentiate the two BIOS modes.
| Factors | CSM | UEFI |
| Hardware Compatibility | Switching to this mode can disable certain UEFI components that could create issues with newer hardware components | Doesn’t support older components that run on legacy functions |
| OS Compatibility | Supports older Windows versions, Linux distributions, and more | Only supports newer operating systems (Vista onwards) |
| Architecture Support | 16-bit and 32-bit | 32-bit and 64-bit |
| Partition Scheme | MBR | GPT |
| Maximum Disk Capacity | 2.2 TB | 9.7 ZB |
| Boot Speed | Slower due to compatibility checks, OpROM initialization, and other legacy BIOS functions | Faster as it can directly call the EFI bootloader |
| Security Features | Disables the UEFI security features when enabled | Secure Boot, TPM, and other standards and protocols |
| Interface | UEFI | UEFI but supports Legacy |

