So, you bought a docking station to set up extra screens for your system? That’s a good decision from your side as the docking station provides a practical and easy way to extend your desktop canvas. However, it’s a bother if the docking station fails to detect your monitor and leaves you bewildered.
A docking station, also known as a port replicator, allows you to connect multiple peripherals to your PC using just one PC port. So, it acts as a bridge between your system and those extra peripherals you plan to connect. Nevertheless, hardware and driver issues can sometimes influence docking stations to fail to recognize the connected monitors.
Hence, this guide is focused on fixing any issues regarding your docking station failing to detect your monitors. So, if you’re facing this problem, you’ve come to the right place. Without further ado, let’s dive straight into it!
Why Is My Docking Station Failing to Detect My Monitors?
- As mentioned above, hardware issues are often the cause of your docking stations failing to detect your monitor. So, considering this, all the factors affecting the docking station’s functionality are:
- Failure to meet the system requirements
- Hardware malfunctions
- Incompatible settings configuration
- Outdated drivers
- Outdated Windows build
How to Fix Docking Stations Not Detecting Monitors?
This issue of docking stations failing to detect monitors often occur after a power outage.
So, if there are no hardware malfunctions, the fixing processes should be pretty straightforward. Listed below are all the procedures you can follow to efficiently fix your issue. Be sure to try all the methods until one of them work for you.
Check Your Docking Station System Requirements
Not all docking stations are “universal.” That is, docking stations have their own system requirements that you should first check before diving into other fixes. If your system specs match the station’s requirements, then that’s that.
However, if it doesn’t, you should probably try to exchange it or buy a new dock.
Check if Your Hardware Devices Are Plugged in Correctly
As simple as it sounds, loose cables or incorrect connection configurations often fail to light up your extra screens. So, make sure that your monitors are plugged in correctly using the appropriate I/O connection method (HDMI, DisplayPort). Also, unplug all your cables and firmly plug them back on again.
Luckily, we here have a dedicated guide regarding how to correctly configure your monitors using a docking station. So, check it out!
Furthermore, ensure that there are no malfunctions with your monitors or with your docking station. So, separately connect the docking station and your monitors to another device (if possible) to test if they return a response or not.
Restart Both Docking Station and PC
Restarting your docking station as well as your computer is known to fix minor glitches causing them to feel incompatible. So, a new user session can see you fix your issue and effectively light up your extra monitor. For this,
- Turn off your PC.
- Remove the AC Adapter if you’re using a laptop.
- Disconnect the docking station from your PC.
- Unplug the docking station from your PC.
- Unplug your dock’s power cord.
- Unplug monitors from the dock.
- Hold the power button on your docking station for 3-4 seconds to reset it.
- Power up the docking station and connect it to your computer.
- Turn on your PC.
- Connect the monitors to the docking station.
Restart the Graphics Driver
A glitch within the graphics driver can influence your monitor to return back a black screen. So, it’s smart to restart your graphics driver, which itself is a very simple procedure.
All you need to do is press Win + Ctrl + Shift + B on your keyboard. This also helps you determine if your system is responsive or not, because pressing the aforementioned button configuration often returns a beep sound. So, if your system is responsive, you’ll hear a beep.
Check the Display Settings
An incomplete configuration in the display settings often causes the docking station to fail to detect the monitors. So, altering the display settings could fix your issue and provide you with an efficient outcome. Follow the steps shown below to do so:
- On your PC, right-click on the desktop screen.
- Select Display Settings.
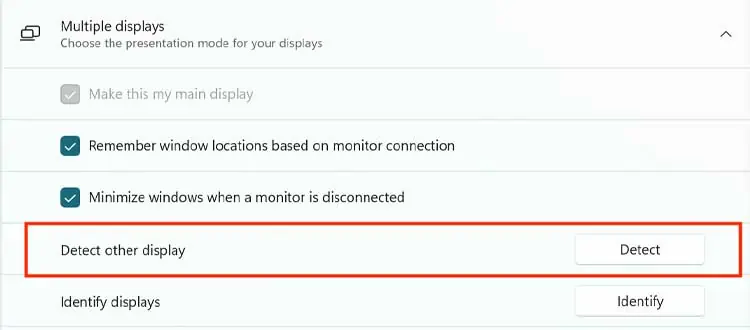
- Extend the Multiple displays tab.
- Click on Detect to request your PC to detect the connected screens.

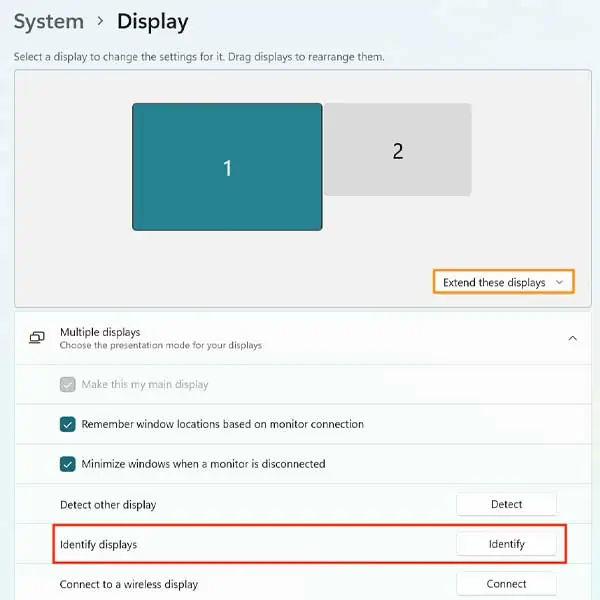
- From the drop-down menu, select either Duplicate or Extend as per your wish.
- Once your monitor lights up, click on Identify in the Display Settings window.

- Take a note of the number that pops up on your monitors and line these devices in the same order as the numbers on the screen.
Download the Latest Docking Station Drivers
The latest drivers built are required for your hardware to perform in the most efficient way. So, the same goes for the docking station drivers. The docking station driver tells your dock how to interact with your computer by communicating with its operating system.
Hence, if your docking station is unresponsive and not detecting the monitor, you should install the latest driver available. So, go to your device manufacturer’s website, search for your device along with its model number, and download the latest available driver.
Update Your Graphics Drivers
For your system to effectively interact with your graphic component, you’ll need the latest graphics driver available for your system. An outdated video driver often causes fails and corruption when a second screen is connected. Hence, updating the graphics driver could fix your issue. For this,
- Right-click on the Start menu.
- Select Device Manager.
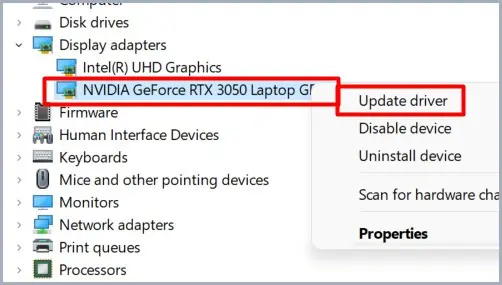
- Expand the Display Adapters section.
- Right-click on your graphics driver and select Update Driver

Install All Windows Updates
Installing all available Windows updates is often known to incorporate security patches and system compatibility fixes on your system. This usually smoothens the workflow in your computer and your monitor could be up and running in no time. So,
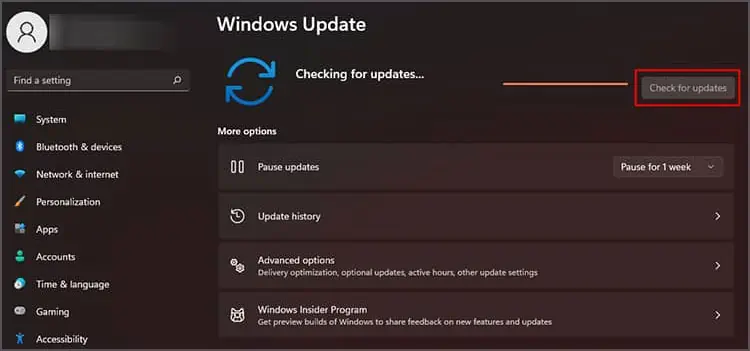
- Press Win + I to open the Settings app.
- Click on Update & Security.
- Select Check for Updates.

- If Windows returns a prompt of available updates, follow the on-screen procedures to update your system.
Uninstall Windows updates
Windows 11 has a feature that lets its users uninstall the latest Windows build directly via the settings app.
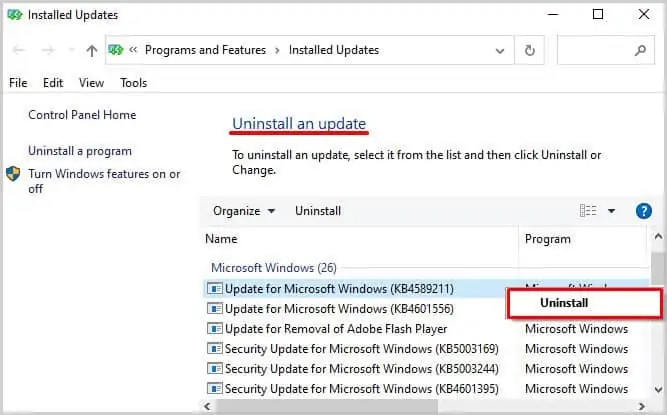
So, if the issue regarding the docking station failing to detect your monitor arose only after a recent Windows update, then uninstalling this update to go back to a previous one could fix your issue. The steps below show how you can do so:
- Press Win + I to open the Settings app.
- From the left panel, select Windows Update.
- Click on Update History.
- Now, select Uninstall Updates.
- On the new window youre sent to, right-click on the latest update and select Uninstall.

- Once the uninstallation process is complete, restart your computer.

