Usually, Window’s Disk Management utility is a great tool for managing the volumes in your drive. Still, it has some built-in limitations that can prevent you from executing your desired disk management operation.
Once I uninstalled Ubuntu from my dual-boot PC and then ran the Disk Management utility in Windows, expecting to recover the Linux volume and extend it to the C drive. However, the extend volume option was greyed out.
Worry not if you’ve also found yourself staring at greyed-out extend volume options. In this article, we deal with the reasons why you are having the problem and how to deal with each of them.
Why Extend Volume is Greyed Out
- There is a recovery volume between the volume you want to extend and an unallocated volume.
- There is no unallocated volume on the disk.
- No unallocated space to the right of the volume to be extended.
- Cannot excess 2 TB capacity in volumes formatted into MBR.
- Volume is not NTFS formatted.
How to Fix Extend Volume Greyed Out
If you find yourself unable to extend a volume because it has been greyed out, here are a few verified fixes that you can try to resolve this issue.
Use the Disk Management Utility to Create an Unallocated Volume
If all available disk space has been partitioned and allocated already, you will not be able to extend volume. You will first need to create an unallocated volume. This volume also needs to be immediately on the right of the volume that you are going to extend.
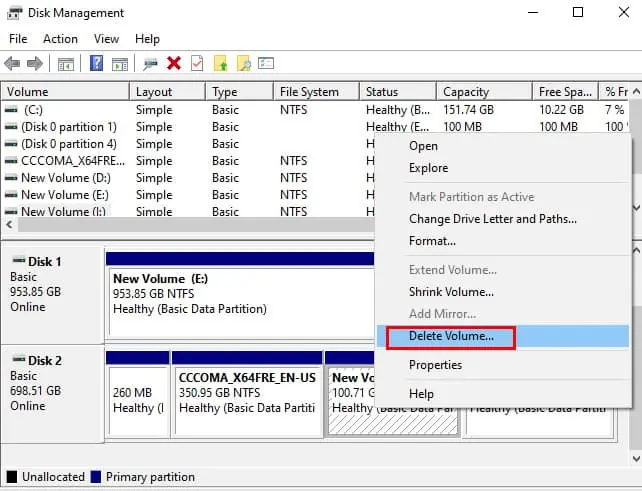
You can create an unallocated volume by either deleting or shrinking the volume to the right.
Please move or backup the important files and data in this volume first. Otherwise, you will lose all data in this volume once you delete it.
To Shrink and Extend Volume:
- Press Win + R and type
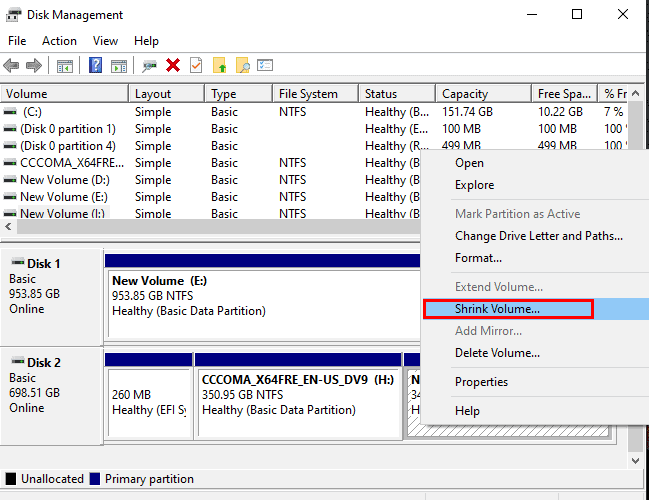
diskmgmt.mscto launch the Disk Management utility. - Right-click on the volume to the right of the volume you want to extend.
- Select Shrink Volume…

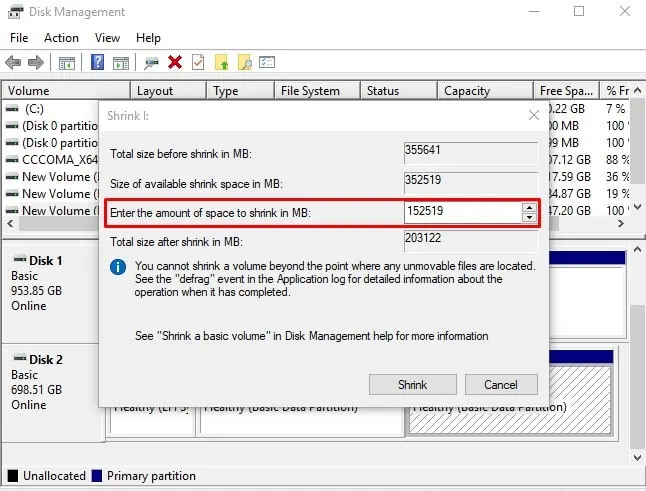
- Enter the amount of space you want the volume to shrink by. This amount should be in Megabytes. The amount you need to enter is the Total size before shrink minus the amount you need for extend volume. Please ensure sufficient disk space is available for this operation. Otherwise, move files and folders to a different drive.

- Click on Shrink.
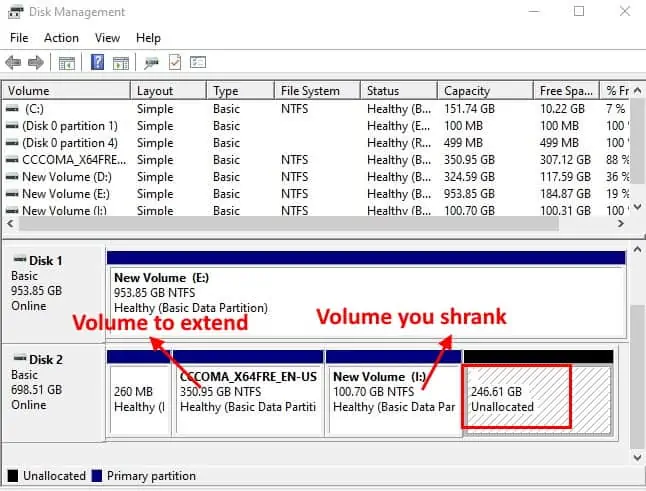
- The volume you just shrank now sits between your targeted extend volume and a newly created unallocated volume, which is not ideal. Thus, first right-click on the unallocated volume and select New Simple Volume…

- If there was any data in the volume you shrunk, you can copy them over to the new volume. Do this now.
- Next, select the volume you shrank, located just right of your target volume to extend.
- Right-click on it, and select Delete Volume… , then select Yes. This will create an unallocated volume to the right of your target volume that you want to extend.

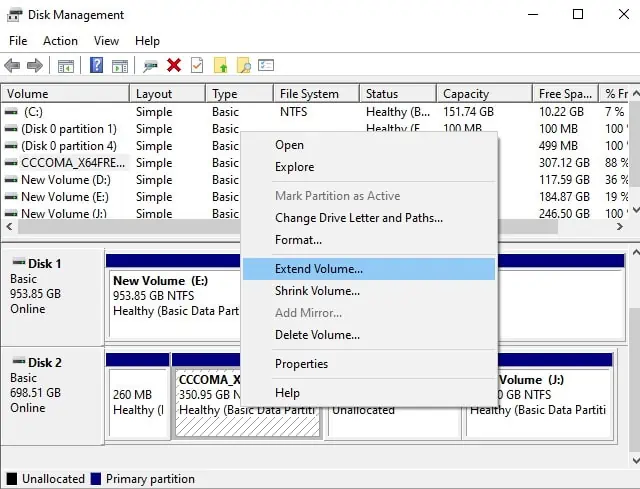
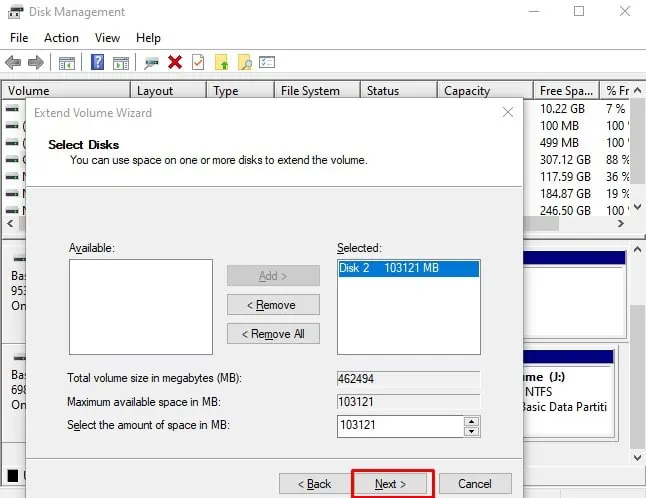
- Now right-click on the volume you want to extend, then select Extend Volume…, and click Next.

- Click Next, then Finish.
You will find that your volume has been extended by the desired amount.
To Delete and Extend Volume:
- Launch the Disk Management utility.
- Right-click on the volume on the right of the volume you need to extend.
- Select Delete Volume…, and click Yes. This will create a new Unallocated volume.
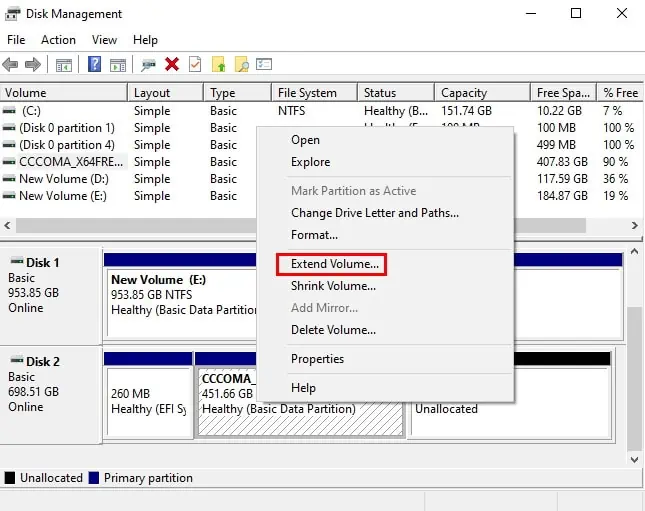
- Right-click on the volume you want to extend, then select Extend Volume…

- Click Next, then select the amount you want to extend the volume by. If you want to extend the entire unallocated volume, just click Next again.

- Click Finish.
Delete the Recovery Partition
You can often not extend your C drive even though you have prepared an unallocated volume because there is a Healthy Recovery Partition to the right of the C drive. The only way to extend the C drive from Disk Management in such a case is to delete the recovery partition.
However, you cannot delete the Recovery Partition from the Disk Management utility. You can use the elevated command prompt to perform this action.
- Press Win + R and type in
cmd, then press Ctrl + Shift + Enter to launch the elevated command prompt. - At the prompt, type in:
diskpartlist disksel disk 0list part
- This will list the types of partitions located in disk 0. Please take note of the partition number (n) that is of type Recovery.
- Now, enter the following commands:
sel part n(where, n = partition number of the recovery partition)delete partition overrideexit(exits diskpart tool)exit(exits command prompt) - Press Win + R and type in
diskmgmt.mscto launch the Disk Management utility. - Right-click on the C drive and select Extend Volume…
- Click Next, enter the amount you want to extend the volume by, then click Next again.
- Click Finish.
Use GParted Application to Extend Volume
You can also use GParted, a free and open-source third-party, to extend volume that was greyed out in the Disk Management utility.
You will need to make a bootable USB drive with GPart on it, then boot into GPart to extend or manage your volumes.
Make Bootable GParted USB
- Download GParted live iso/zip file from the official website.
- Extract/copy the iso/zip file’s contents into a FAT/FAT32 USB drive with at least 300 MB of free space. Make sure that the directory structure is intact.
- Press Win + E and navigate to the USB drive > utils.
- Navigate to the folder win32 if you are running a 32-bit Windows, otherwise go to win64 folder.
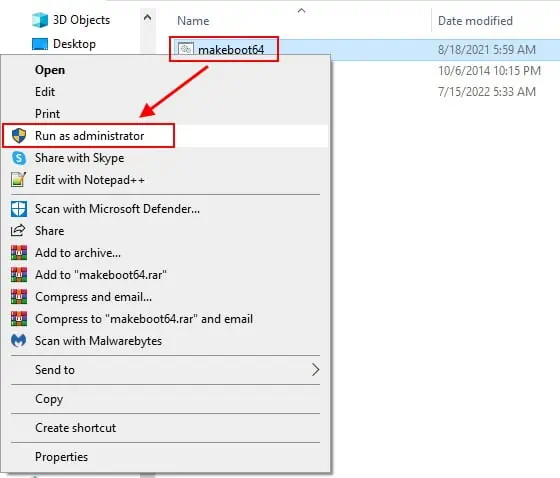
- Right click on
makeboot.bat(ormakeboot64.bat) batch file, and click Run as administrator.
- Follow the on-screen instructions.
Boot into GParted
- Restart your computer.
- Boot into BIOS and set USB drive to the top of boot priority.
- Save and exit BIOS.
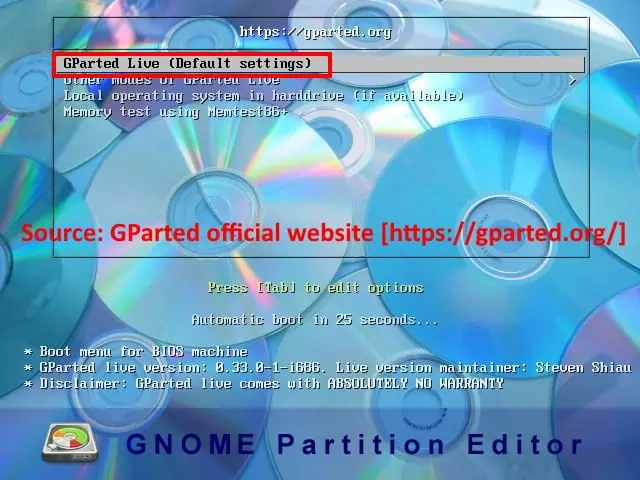
- Select GParted live as your bootloader.

- Select your Preferred language from the menu.
- The GParted tool will now start automatically.
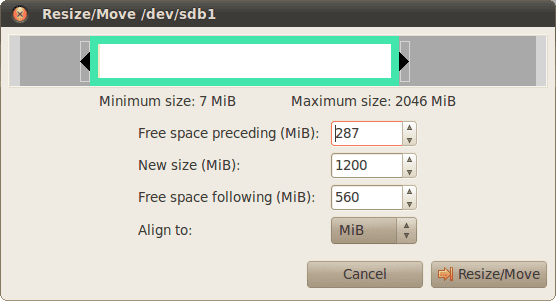
Right-click on the partition that you want to extend. Then select Resize/Move. - Use either the slider on the top, or use the boxes below to adjust partition size.

- Click Resize/Move, then click OK.
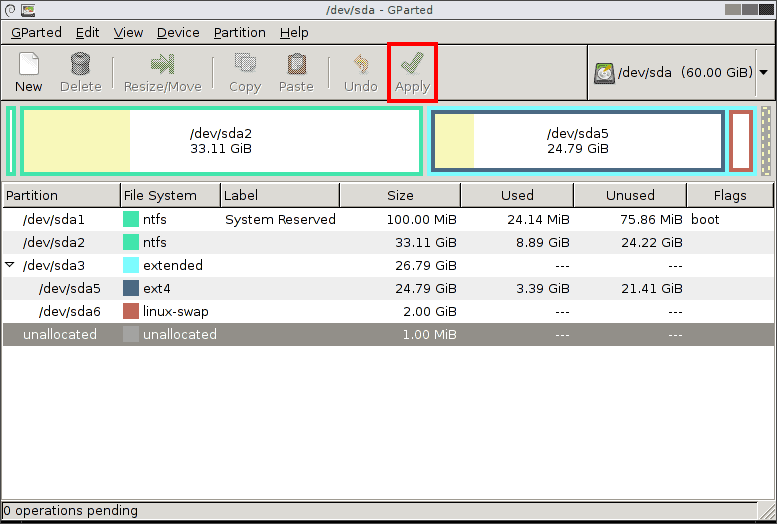
- Click on Apply All Operations check mark, located in the toolbar at the top.

- Select Apply and wait for the process to complete.
- Restart the computer and remove the bootable USB drive.
Extending a MBR Volume Larger than 2 TB
MBR, by design, cannot address volumes greater than 2 TB in size. That is to say, suppose you have a 4 TB drive but you happened to format it into MBR partition style. You will be unable to see more than 2 TB of that drive in Windows, and you will not be able to extend it from Disk Manager either.
To solve this issue, you must first convert the MBR partition into GPT format. Fortunately, Windows provides an MBR2GPT conversion tool that allows for this conversion without data loss.
- Press Win + R, type in
cmd, then press Ctrl + Shift + Enter to launch the elevated command prompt. - At the prompt, type:
diskpartlist disk(take note of the disk number (n) that has been MBR formatted and is 2 TB in size. If you have only one disk installed, this will be number 0).exit(this will exit diskpart tool, however you will still be in the command prompt).mbr2gpt /convert /disk:n /allowFullOS(here, n is the disk number you noted earlier).exit
Now that your MBR disk has been converted to GPT, you can now extend your volume by using the Disk Management utility.
- Launch the Disk Management utility.
- Right-click on the target drive, then select Extend Volume…
- Enter the amount by which to extend volume and click Next, or simply select Next to extend the entire unallocated volume.
- Click Finish.

