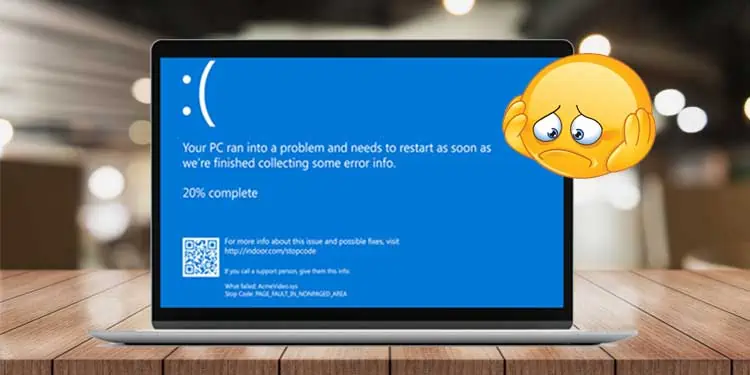
BSOD, or Blue Screen of Death is a way of protecting your OS and Data by Windows from further damages. Windows show BSOD as a result of your system crash. It stops any program that you are using and forces the system to restart.
BSOD generally occurs if your system’s hardware is not capable of running the programs in the designed way. This can also happen because of insufficient power, faulty programs, incompatible updates, or an unstable Operating system.
I am no stranger to this problem either. You can fix this within a few minutes without any hassle. Hence, I have compiled the most useful fixes to solve the issue of BSOD in your computer.
What Causes BSOD Error?
If you are a regular Microsoft Windows user, then you must be familiar with BSOD. It has not magically appeared only in Windows 11. It has been a quite common issue for a long time.
When the important operating system files get damaged, the software cannot properly handshake with the hardware. As a result, the hardware can cause the entire system to shut down or be ruined. To prevent more glitches, Windows generates the Blue Screen error message causing the software or the hardware to stop.
There are multiple other causes for BSOD to appear on your computer. First, let’s go through some of the reasons that cause BSOD in our PC before moving to their fixes:
Most Frequent BSOD Errors in Windows 11
Although BSOD errors are pretty common in all versions of Windows, Windows 11 seem to have some specific new ones. Users have reported that BSOD is appearing after they install new updates in the system. Some of the common BSOD errors in Windows 11 are as follows:
- APC_INDEX_MISMATCH: After the release of the KB5013943 update, BSOD errors relating to drivers and antivirus software started to appear.
- PFN_LIST_CORRUPT: Gamers experienced this error relating to RAM issues when trying to load the game online.
- STORE_DATA_STRUCTURE_CORRUPTION: It occurs when there is either problem in your RAM or you are under-voting or overclocking your system.
- SESSION_INITIALIZATION_FAILED: It occurs when
smss.exefile goes missing on your PC.
How to Fix Blue Screen of Death in Windows 11
Earlier, BSOD, or Stop Error, was known as Black Screen of Death in Windows 11 as the error message was shown on the black screen. However, Microsoft reverted it back to the original blue screen in the later updates.
It might take a bit longer for Windows 11 to completely optimise and completely get rid of the BSOD errors. Till then, you would have to take care of your computer and apply the fixes to solve the problem.
Now, let’s dive deeper into the fixes for these BSODs and solve the problem right away.
Identify Error Code or Stop Code
The first and foremost thing to do when you get a BSOD is to look at the Stop code. The code is displayed at the bottom of the screen in the form “0x00000000” or “CRITICAL_PROCESS_DIED”. Nowadays, you can even see a barcode on the side.
The error code gives you hints about what might have happened that crashed your system. Even better, you can copy the stop code and search it in the Microsoft forum. You will find all the info about the issues and its solution. This is the best way to rectify the problem. In the case of a barcode, you can scan the code and you will be redirected to the forum automatically.
However, sometimes, the system automatically restarts after the BSOD appears and you might not be able to identify the code. To solve this, you need to turn off the automatic restart. Let’s see the way to do it.
- Press Windows + ‘X’ and select “Settings.”
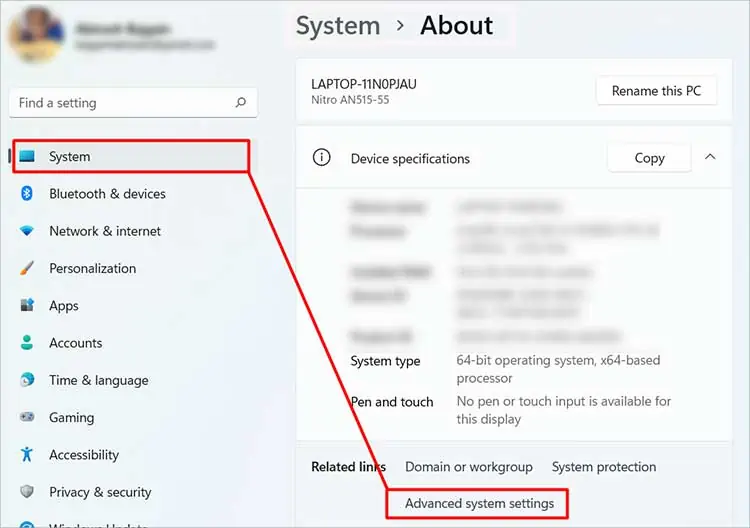
- Under the “System” tab, scroll down to select “About.”
- Find “Advanced System Settings” and click on it.

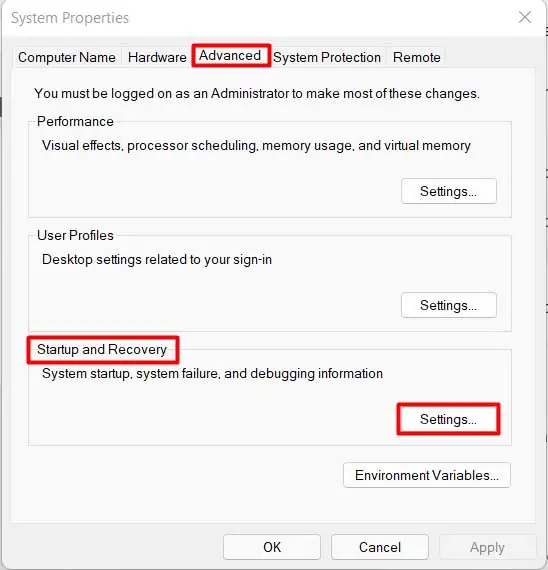
- Find the “Startup and Recovery” option towards the end of the “Advanced” tab.
- Click on “Settings” in it.

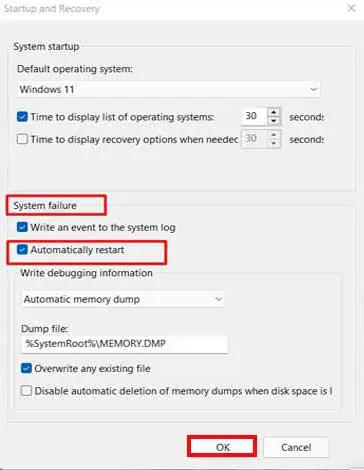
- In the window, you will find the “System Failure” subheading.
- Uncheck the “Automatically Restart” option.

- You now can manually restart if the bluescreen appears after this.
Remove Any Additional Hardware
Sometimes your computer cannot properly run other hardware installed on it. For instance, Bluetooth mouse, keyboard, speaker, or USB requires the driver to be installed in the system. Or, malware in the USB might have crashed your system.
If you feel that the problem started after you began to use a particular device, remove the additional hardware from the system. You should examine if the problem is still there.
Check Memory Dump Files
When you get any Blue Screen error on your computer, the system saves the details about the error in the memory dump. If you were not able to get more information about the error through the stop code, you can check the dump files.
Let’s go through the process of checking the dump files in the minidump.
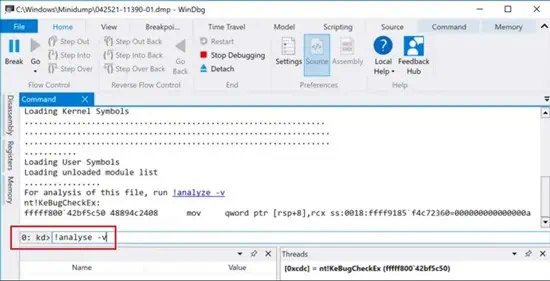
- To open minidump files, you need to first install WinDbg software.
- Go to the “Search” icon at the bottom of your desktop and search “WinDbg.”
- Find “WinDbg Preview” and Right-click on it to select “Run as Administrator.”
- Press “Ctrl + ‘D’ “ and search for
%windir%\Minidump. - Open the minidump file and Find a command prompt at the bottom of the window.
- Run
!analyze -vcommand.
- Find the Module name for the error.
- You will see the “probably caused by” section mentioning the reason.
Rectify the issue that produced the Blue screen error. You can also run Driver Verifier to see if any driver glitches are causing the problem. Driver Verifier exerts additional stress on the hardware drivers to find any abnormal functioning in them.
You can then check the minidump file after the Driver Verifier finds an error.
Update System Drivers
Your computer requires driver software to operate the hardware installed within the system. If these drivers are outdated or do not support the devices, then the system will malfunction. Sometimes, the problem becomes so big that your system won’t be able to handle the regular tasks and a BSOD will appear.
Hence, you have to update them regularly to make sure bug-free drivers are installed on your PC. You can follow these steps to update the drivers.
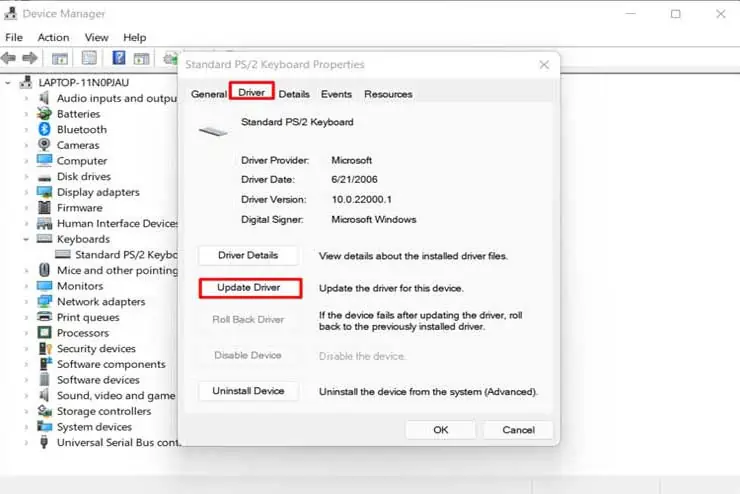
- Press Windows + ‘X’ to open a dialog box and select “Device Manager.”
- Choose the hardware whose driver you would like to update and Double-Click on it.
- Go to the “Driver” tab.
- Click on “Update Driver” towards the bottom.

- Choose “Search Automatically for Drivers.”
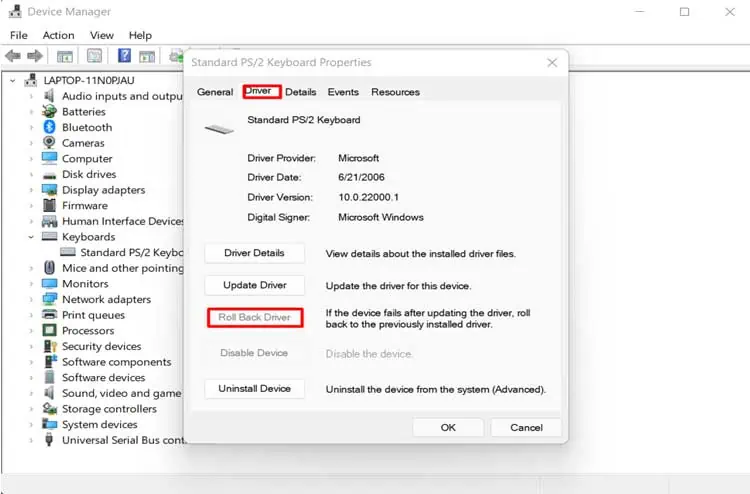
- Sometimes, the installed update could have bugs or not compatible with your hardware. You can also Roll-back the recent driver update installation.
- Follow the instructions up to “Step 4.”
- Click on “Roll Back Driver.”

Notice whether the blue screen still appears.
Perform System Update
It is always a good habit to update your computer. Microsoft frequently sends updates to improve its software and remove any bugs present in earlier versions. Windows 11 is a new OS and it surely has its fair share of issues. Microsoft has announced they will fix the BSOD issue in later updates.
Normally, Windows have automatic updates turned on and you must have received the new updates as scheduled. However, if you have turned automatic updates off, then the glitch in the earlier software might have malfunctioned your system. You can try the following steps to manually update your computer.
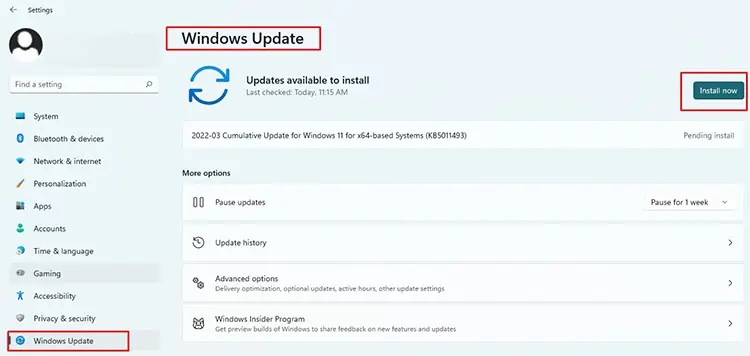
- Press Windows + ‘X’ and choose “Settings.”
- At the bottom of the window, find “Windows Update.”
- Check for Updates and if available, download them.
- Click “Install now” to install after the download completes.

Hop on to the next step if the Blue Screen problem still troubles you.
Delete the Specific Update
As I mentioned earlier, many users started receiving BSOD errors after they updated their PC from automatic updates. If the BSOD began appearing in your system right after you installed the updates, then you can follow the instruction to delete that specific update.
- Go to “Windows Update” as mentioned above.
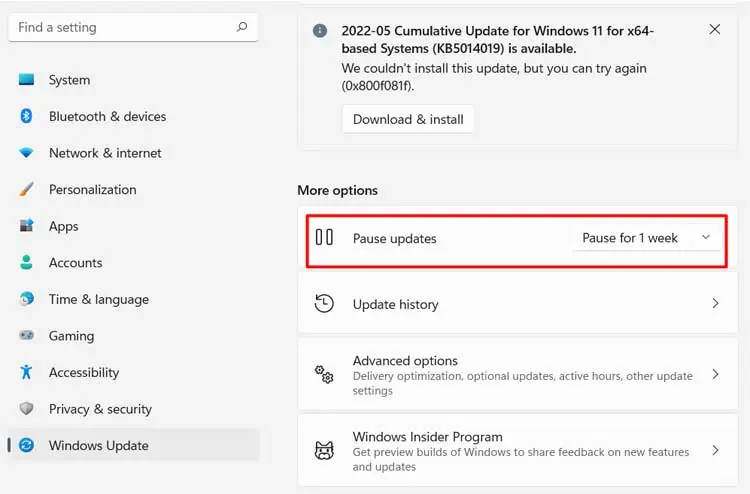
- Click on “Pause Updates.”

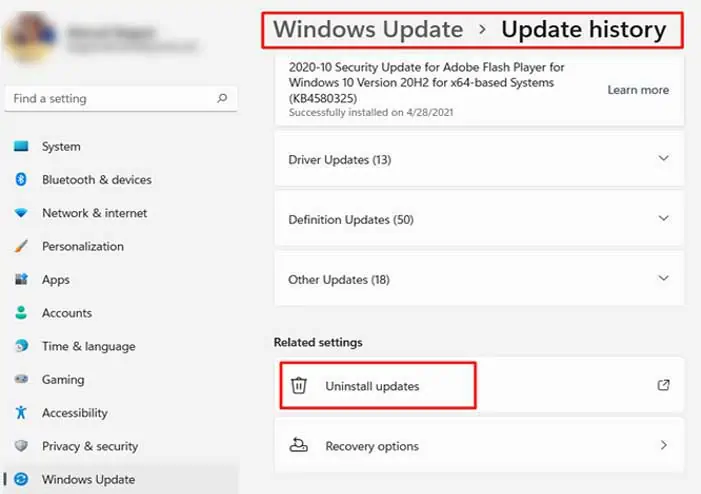
- Then, click on “Update history.”

- Scroll to the bottom of the page. Go to “Uninstall Updates.”

- Click on the recent update or the update that caused the issue.
- Click “Uninstall.”

See if the BSOD still appears.
Remove Damaged Setup Files
I bet you are not untouched by an error in the middle of downloading files. The problem can be an internet connection, slow server, or faulty software. Here, if the downloaded files are setup or installation files and they get damaged, then your whole computer is at risk. This file can corrupt the system files and cause BSOD.
The best option here is to reinstall the files. But before that, make sure you have removed the faulty ones. Follow the instructions below to clean up the damaged setup programs.
- At the bottom of your desktop, click on the “Search” icon.
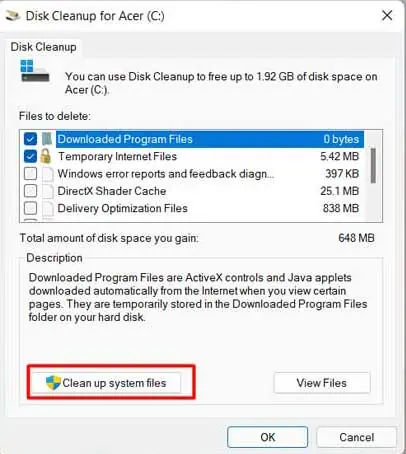
- Search “Disk Cleanup” and click on the program.
- Choose the drive you would like to clean. I recommend all the drives where you usually install the programs.
- At the bottom of the window, click on “Clean up system files.”

- Select the drive again and Click “Ok.”
- Your drive will be cleaned. Redownload and reinstall the file.
Check whether the BSOD occurs again.
Update Power Setting to High Performance
We tend to use our computer in power-saving mode to save battery or prevent heating our system. However, sometimes, the hardware and drivers might not receive enough power to function in a continuous run.
This can cause the hardware to fail and the system can show BSOD. You can easily run your system in high performance to prevent this.
Please follow the instruction given below.
- Open “Control Panel” from “Search” icon.
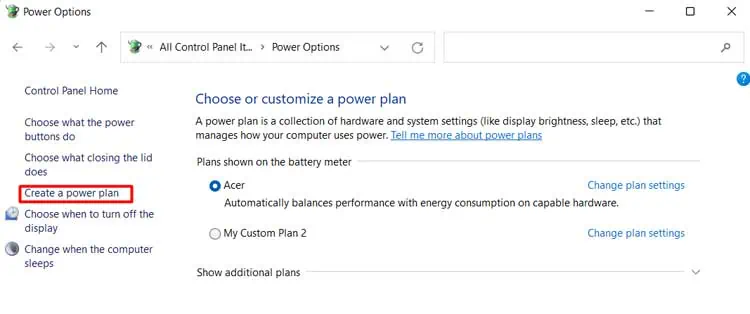
- Search “Power Option” in Control Panel and click on it.

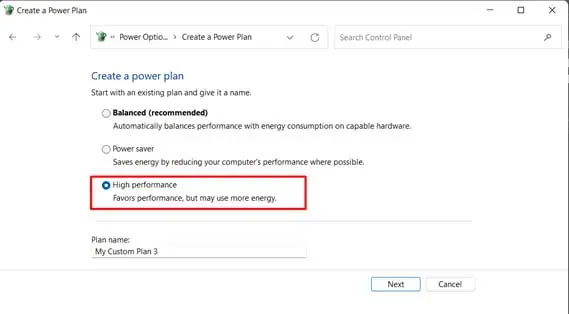
- Select “Create a power plan” on the right panel.

- Choose “High Performance” and click “Next.”

- Click “Create.”
- You can also change selective power settings.
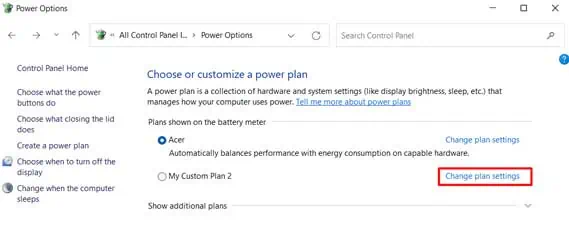
- Click on “Change plan settings” at the side of your chosen power plan.

- Look for “Change advanced power settings”.
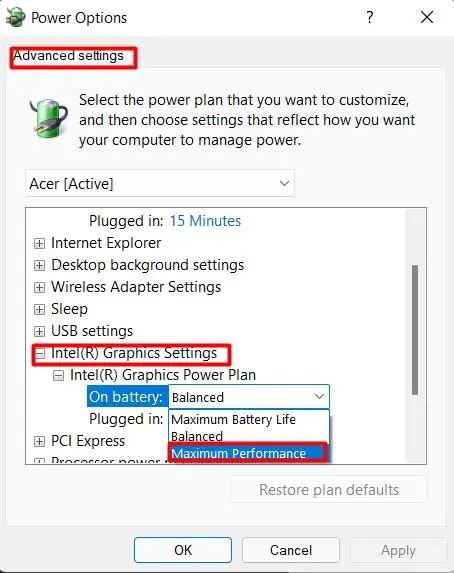
- Find “Intel(R) Graphics Settings” or a similar driver.
- Select “Intel(R) Graphics Power Plan” and update both options to “Maximum performance.”

- Do this for all other drivers and click “Ok.”
Disable Fast Startup
Microsoft provides a feature to boot your computer quickly known as Fast Boot or Fast Startup. In this mode, the system stops all the applications. But it preserves the programs and drivers required to run it. The computer does not have to load system files in the next startup hence it boots quickly.
As the system files are not closed completely, they might malfunction sometimes causing BSOD.
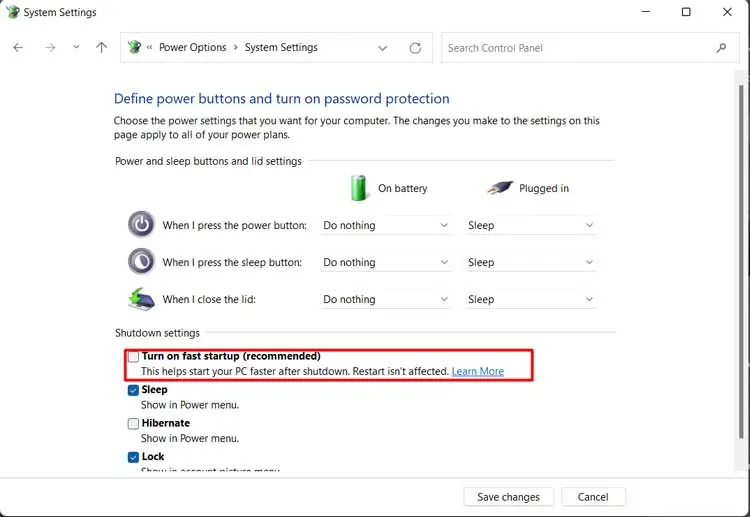
You can disable Fast startup to prevent the error by following ways.
- Open “Control Panel”.
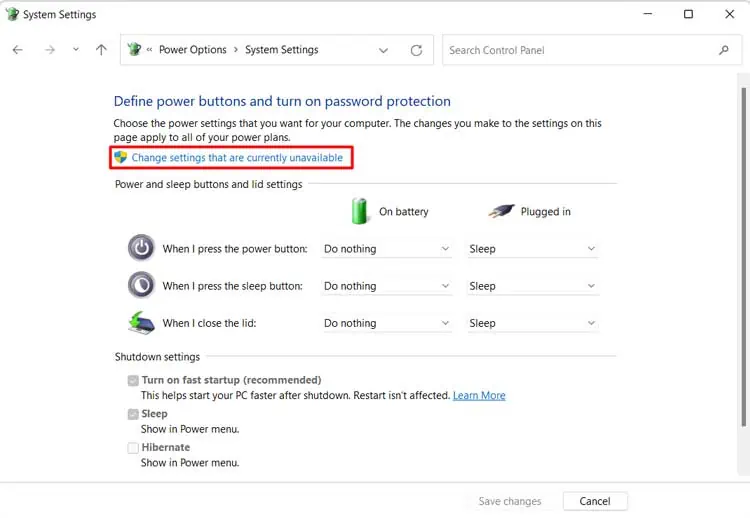
- Search “Power Option” and select “Choose what closing the lid does.”
- Find “Change settings that are currently unavailable” at the top and click on it.

- Uncheck “Turn on fast startup (recommended).”

- Restart your system.
Notice if the problem occurs again.
Open Your Computer in Safe Mode
Every computer has a safe mode option where the system only uses the program and hardware necessary to load the computer. It ignores all other additional programs that you have installed.
Opening your computer in Safe Mode is exactly not a fix but it creates a path to perform other diagnostics. Furthermore, if the computer runs normally in safe mode, then your hardware does not have any problems. It means some software is hindering your system from functioning smoothly.
Let’s look at the process of opening the computer in Safe Mode.
- Press the “Windows” button and go to the “Power” menu at the bottom.
- Hold the “Shift” key and click on “Restart”.
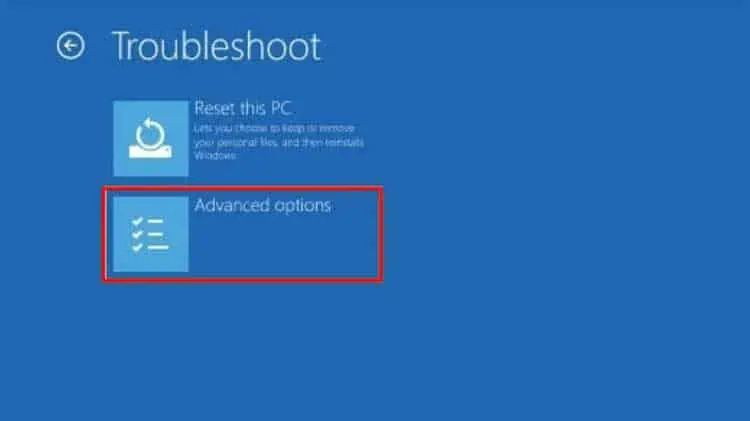
- You will see Recovery options in the next start.
- Select “Troubleshoot” and then “Advanced Options.”

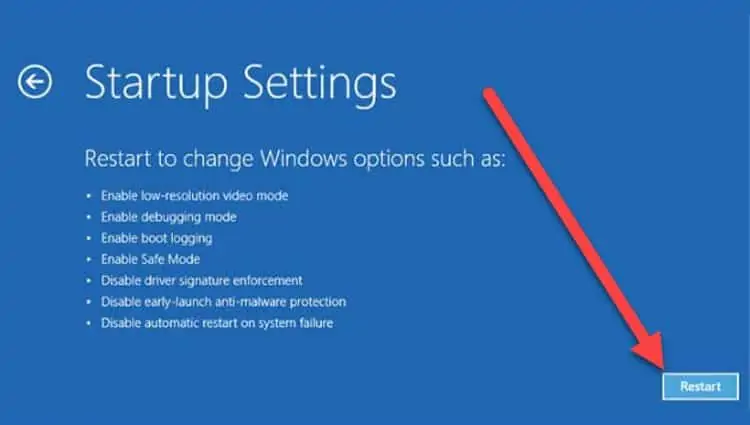
- Choose “Startup Settings” and Click “Restart.”

- After your PC restarts, you will find several options.
- Press 4 or F4 to open the system in Safe Mode.

As mentioned earlier, if BSOD does not appear in safe mode, you can assume that your hardware is safe. You just have to troubleshoot the software errors.
Run Memory Diagnostics Tool
Memory Diagnostics Tool is a very handy tool to use to rectify any issues software or hardware-related. It tests your RAM functionality and sees if the problem or BSOD is occurring due to RAM, Motherboard, or any hardware failure.
You can run Windows Memory Diagnostics in the following ways:
- While your PC is in Safe Mode, press “Windows + ‘R’ ” to open the “Run” dialog box.
- Search “
mdsched” and Click “Ok.” - Click on “Restart now and check for problems” to test for RAM errors.

- Your system will restart and upon restart, a diagnostic test will run. It will show if you have any errors in your Memory.
If it shows some bigger issues in the RAM, then it is better to replace it. However, before spending money on it, Let’s go through some ways to fix the memory errors.
Run SFC and DISM Scan
Using SFC Scanner is one of the best ways to fix memory issues as well as other system errors. Furthermore, the DISM scan along with the SFC scan can fix the situation in an even better way. You have to run both scans in Safe Mode. Here is the way to perform the operation.
- Go to the “Search” icon at the bottom of the windows and search “Command”.
- Right-click on the “Command Prompt” option and click “Run as Administrator.”
- In the prompt, type “
sfc /scannow” by removing the quotation. - Press “Enter.” The scan will run and fix your errors if detected.

- After the error is completed, run the command prompt again.
- Type “
DISM /Online /Cleanup-image /RestoreHealth” without quotation. - Press “Enter.”

This will fix the damaged operating system files. It is always better to run the scan multiple times to ensure every glitch is addressed. Inspect if the Blue Screen problem still persists.
Perform Clean Boot of Your PC
Sometimes, the best way to repair a system is to restart it. But, restarting normally might not do any miracle in such a serious issue. Hence, you can try to clean boot your computer.
Clean Boot closes all the programs running in the background. It might close the program that is causing the glitch.
Here is the way to perform Clean Boot on your PC.
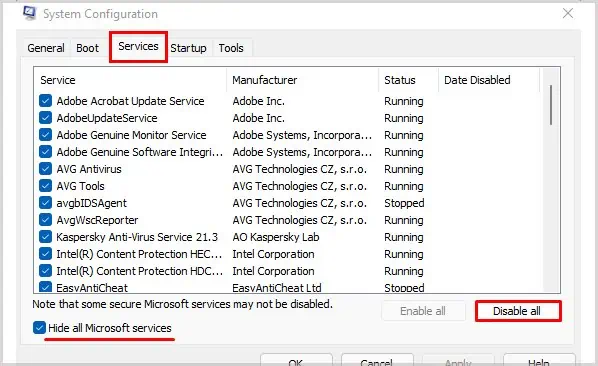
- Press Windows + ‘R’ to open the “Run” dialog box.
- Search “
msconfig” - Look for the “Services” tab.
- At the bottom, click on “Hide all Microsoft Services” and then click “Disable All.”

- Apply the Changes and Open “Task Manager” using the “Ctrl + Shift + Esc” button.
- Look for the “Startup” tab.
- Now, disable all the programs from the list by right-clicking on them.

- Restart your system.
Check if the problem occurs again. If the problem is fixed, then start the programs one by one to find the damaged one.
Remove Unnecessary or Heavy Software
We often tend to install programs, use them for short periods and move on from them. But some of the programs might be using the system’s resources in the background. Similarly, some games or software are so heavy that a normal PC cannot withstand their requirements.
They can also be an issue for BSOD if they are using higher computer resources. Uninstalling these programs can help significantly not only to solve the problem but also make your system much faster.
You can find the way to remove programs from your PC below:
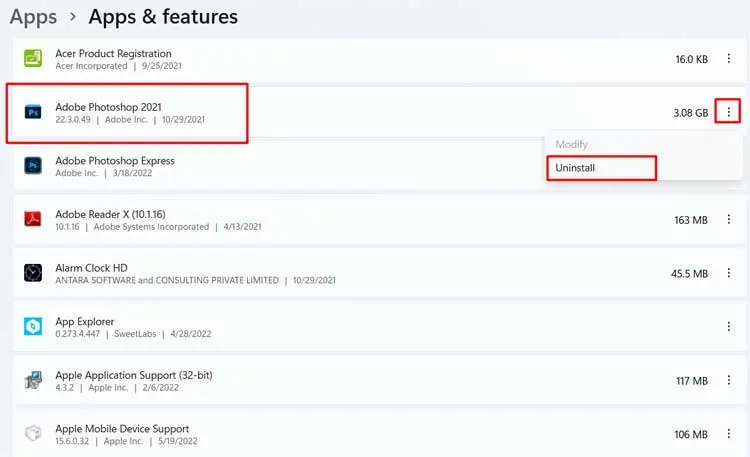
- Go to the “Search” icon at the bottom of the window.
- Search “Add or Remove Programs.” Click on it.
- Now, Click on the three dots to the right of the screen and select “Uninstall.”

- You will find the program removed.
Notice whether the problem is still appearing.
Change BIOS Settings to Default
If you love playing with CPU speed and often overclock or under-volt your computer, then you might be interfering with the normal working of your PC. Overclocking or running your computer at a higher clock speed usually requires a higher voltage. Too much Overclocking might make the system unstable.
Similarly, if you under-volt too much to reduce temperature, your PC might not get enough juice to run.
The system might show a BSOD error if the computer malfunctioned due to this reason. You can change BIOS settings to default to fix this error. Let’s look at the way to do it.
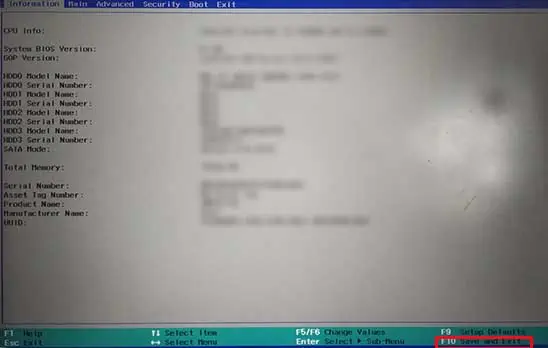
- Turn your system off.
- Press the “Power” button and repeatedly press “F2” or F”12″ depending on the PC.
- The BIOS page will open. Look at the shortcut keys at the bottom.
- Find the one with the “Load Defaults” option and press the assigned key.

- Save the settings and restart your computer.

Check if the issue still persists.
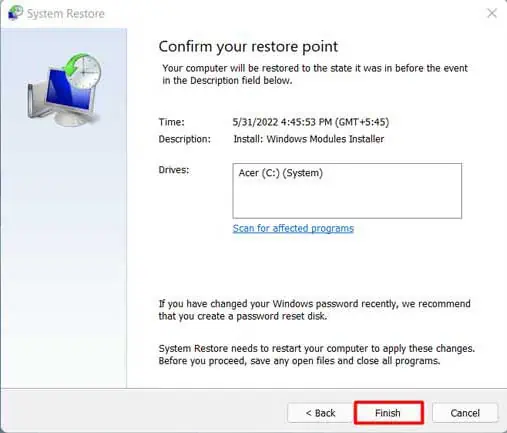
System Restore
If the Blue Screen Problem still appears even after trying all of the above solutions, then you can restore your system to the last healthier point. If the problem is not the hardware, then system restore is the best solution.
Your computer creates several states or points whenever you install some software or drivers. System Restore can help you to take your PC back to those states. If you know that at some point your system was healthy, you can choose that state to restore.
Let’s go through the process of restoring your system.
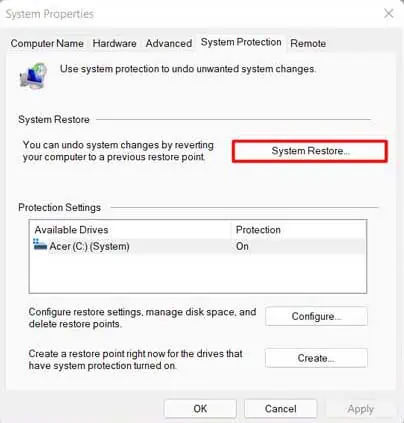
- Click on the “Search” icon at the bottom of Windows.
- Search “System Restore.” Select “Create a Restore Point.”
- Find the “System Restore” option in the opened window and select it.

- You can also search “
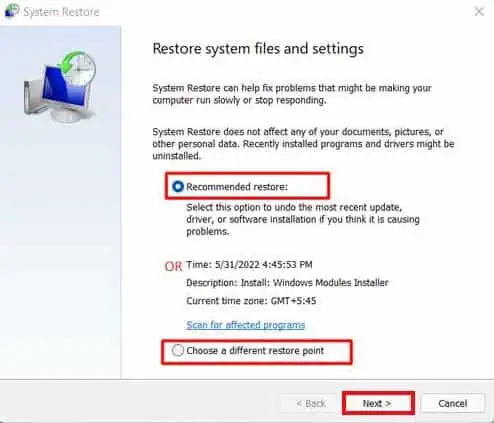
rstrui” after opening the “Run” command. - Choose either Recommended restore point or a different restore point.

- Click “Next” and then “Finish.”

- Your PC will be restored to the selected time.
See if restoring your PC solves the Blue Screen Problem.
Reinstall or Repair Windows
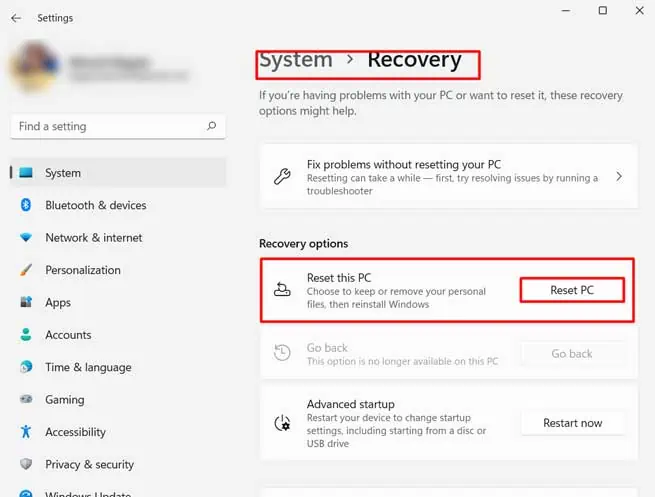
If System Restore does not do the job, then probably your operating system files have some irreparable damage. In such a scenario, the last resort to solve software-based BSOD errors is to reinstall or repair the operating system.
Reinstalling Windows can be an intimidating task. But no worries, I will guide you through a simpler way to do it in Windows 11.
- Press Windows + ‘X’ and choose “Settings.”
- Look for the “Recovery” option and select it.
- Choose “Reset this PC.”

- Choose either “Keep my files” or “Remove everything”. If the BSOD is giving you lots of trouble, then I recommend backing up your files and selecting “Remove Everything.”

- Click on “Local Reinstall” and Click “Reset.”

Windows 11 will be reinstalled in your system. You can also follow other ways to refer to reinstalling the operating system. You will find the method well explained in our comprehensive guide to reinstall Windows 11.
If the problem persists after changing your operating system, then the problem might be in your hardware. I advise you to take your PC to the nearest service point and rectify the Blue Screen issue.
Other Fixes
Other than the fixes, it is always a good practice to clean your PC at a regular interval. The dust accumulated inside the system can give extra load to the hardware such as the CPU and graphics card. This might even be the reason for the BSOD.
Perform a thorough cleaning of your PC with a blower carefully. If you have a laptop and you are an expert in opening things apart, you can disassemble and clean it. If you are an expert in breaking, kindly reach out to the nearest service point for cleaning.
You also should conduct a regular virus scan on your computer. You may use either a pro Antivirus software or inbuilt Windows Defender for it.
Lastly, check the connections to your computer such as hardware cables and wires within the motherboard. Loose connections are yet another source of headaches.

