Microphones are a must for any video conference, recording, or streaming activities on your computer. However, sometimes your computer may fail to detect a microphone device even when your headphones or speakers are working properly. This issue can happen to standalone microphones, but it usually occurs on a headset’s microphone.
Usually, some improper settings are responsible, which you can debug easily. However, your microphone may also be damaged in some cases, for which there’s no other choice than to replace it.
Causes for Computer Not Detecting Microphone
Here are the potential causes for your computer not detecting a microphone:
- Misconfigured settings.
- Driver issues.
- Audio service not running.
- Lack of microphone permission.
How to Fix Computer Not Detecting Microphone?
Before you begin, make sure you have the latest version of your OS build. Then, restart your PC and check if it detects the microphone. If it doesn’t, try applying the possible solutions we have mentioned below:
Troubleshoot Hardware Issues
First, you need to perform some preliminary troubleshooting steps to determine whether the problem is with your microphone device or the system. Here’s what you need to do:
- Reconnect the headset or the microphone to your PC and check if it works.
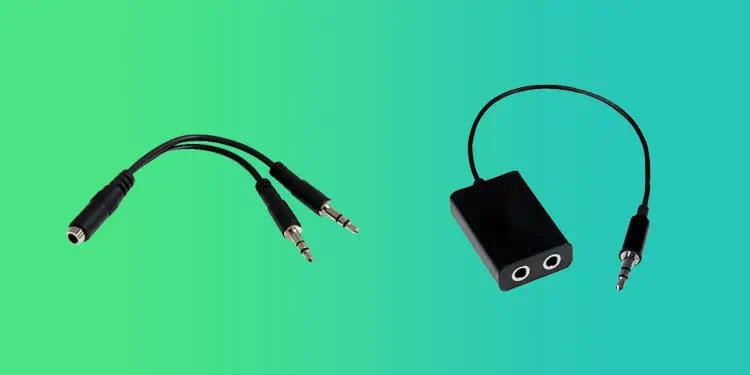
- Some computers have separate audio ports for input and output. You need to insert your headset connectors accordingly in such cases. If the headset has a joined connector, you need to use a splitter to connect it.
- Similarly, if your computer only has a single port, but your headset contains two connectors, you need to use a joiner.

- Connect the headset or microphone to another computer or a mobile device and see if it works. Make sure other microphones are working on the other system before doing so.
- Connect another headset/mic to your PC and check as well (try using a device from a different company).
- Try changing the ports as well.
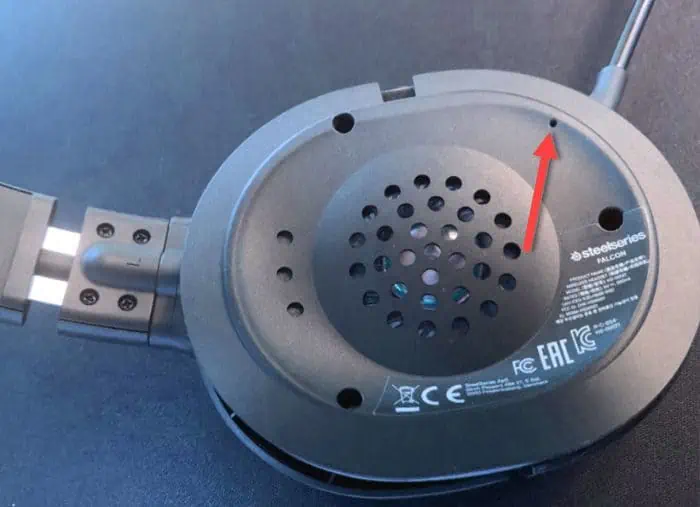
- Check the device for reset or power on/off buttons and press them. You may need to press the reset button for a few seconds.

- If the microphone is detachable, try using a different microphone on the headset or using the microphone directly on your computer.
- If you are using a USB or Bluetooth microphone/headset, you can also try connecting other USB or Bluetooth devices to your PC.
- Check the microphone’s official website for any compatibility issues with your system.
If the problem is with your device, you likely need a replacement. If the warranty still holds, try taking it to the seller and see if they can repair it.
If the mic is not working only on your system, go through the successive solutions.
Check Microphone Settings
It is possible to disable or mute a microphone from the sound settings on your computer. It’s better to check such options in case your computer is actually detecting your microphone, but you can’t use it due to the improper settings.
Here’s how you can do so:
On Windows
- Open Run by pressing Win + R.
- Enter
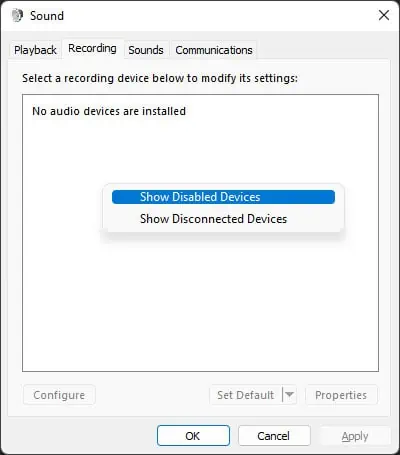
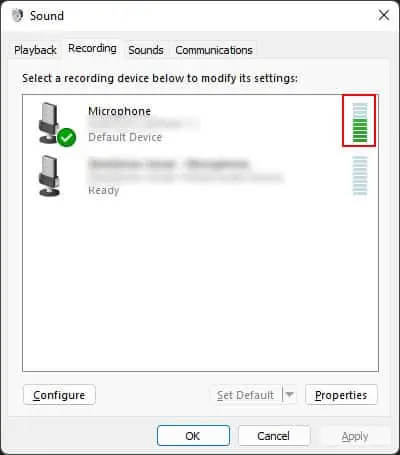
mmsys.cplto open Sound Options. - Go to the Recording tab.
- Search for your microphone device.
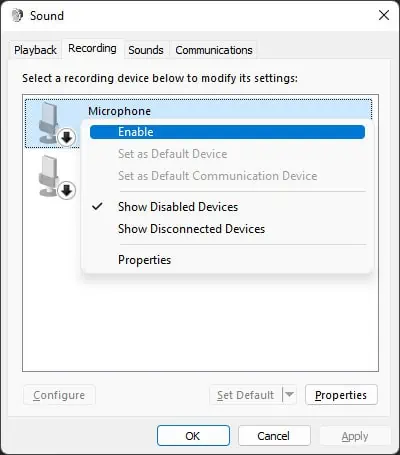
- If it’s not there, right-click on any device or an empty area.
- If Show Disabled Devices has a tick mark, your computer is not detecting your microphone, so you should move on to other solutions.
- Otherwise, click Show Disabled Devices to enable the option.

- If your microphone shows up as disabled, right-click on it and select Enable. Otherwise, as before, your computer hasn’t detected it at all.

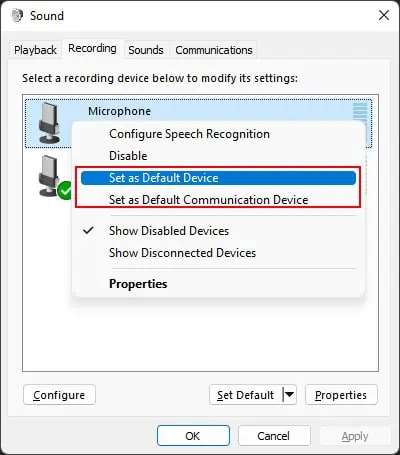
- Then, right-click on the mic and select the following options (if available):
- Set as Default Device
- Set as Default Communication Device

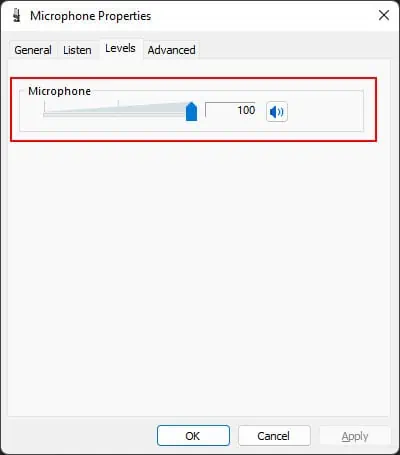
- Now, double-click on it to access the microphone properties.
- Go to the Levels tab and set the volume to a reasonable value.
- Also, the button next to the volume should not show mute. If it does, click on it to toggle the setting.

- Click OK twice to save the changes you made.
On Mac
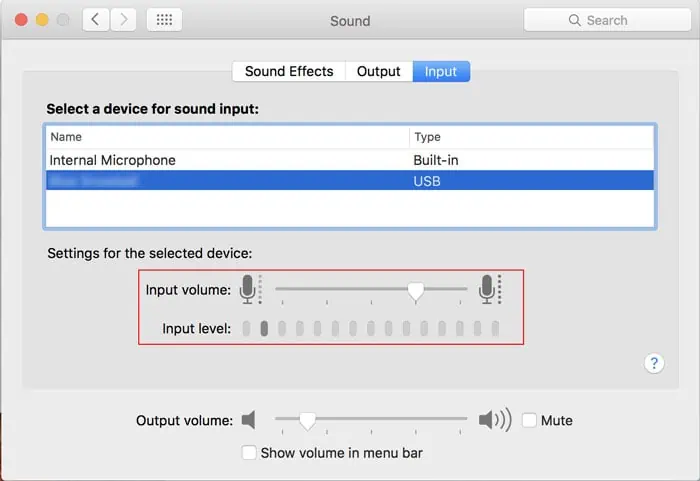
- Click on the Apple icon and go to System Preferences.
- Select Sound and head over to the Input tab.
- Click on your microphone to set it as the current default audio input device and set its volume and level to a reasonable value.

Use Audio Device as Headset, Not Headphone
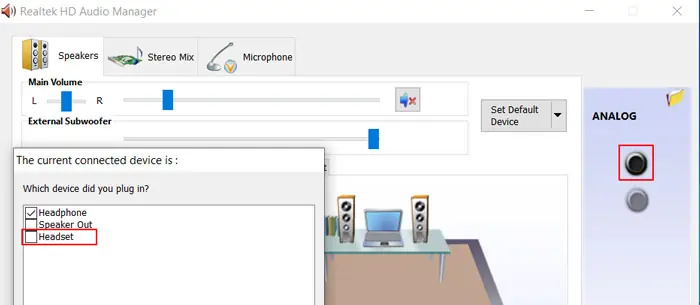
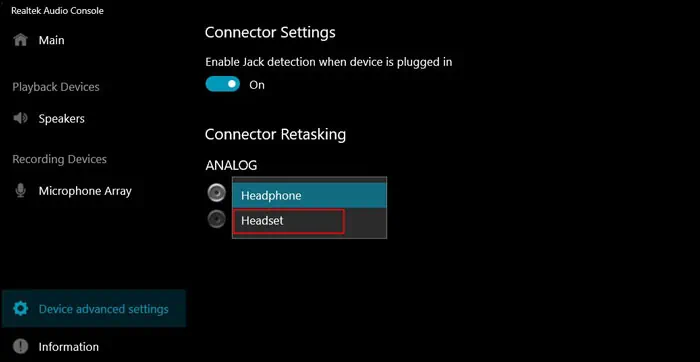
This issue can also occur if you have a Realtek audio device if the system is recognizing your headset as headphone, not a headset. You need to fix this issue from the Realtek Audio Manager or Console using the following steps:
- Search for
Realtekon the Search bar (Win + S) - Open the Realtek Audio Console or the Realtek HD Audio Manager.
- On the Audio Manager, double-click on the circle under Analog and set the current device to Headset.

- On the Audio Console,
- Click on Device advanced settings
- Under Analog, set the first option to Headset.

Run Audio Troubleshooter (Windows)
Windows contains dedicated troubleshooters to check and fix minor issues on your system. One such troubleshooter is the Audio troubleshooter, which also checks mismatched settings and services and attempts to revert them if possible. So, it’s worth running the utility whenever you experience this error.
Here’s how you can run the audio troubleshooter:
- Open Run and enter
ms-settings:troubleshootto load Troubleshoot Settings. - Click on Additional troubleshooters (Windows 10) or Other troubleshooters (Windows 11).
- On Windows 10, select Playing Audio > Run this troubleshooter. On Windows 11, look for Playing Audio and click on Run next to it.
- Follow the given instructions.
Restart Windows Audio Service (Windows)
Windows also allows you to configure your services, especially their startup types. So it is possible for some services to not run when they should due to improper configuration.
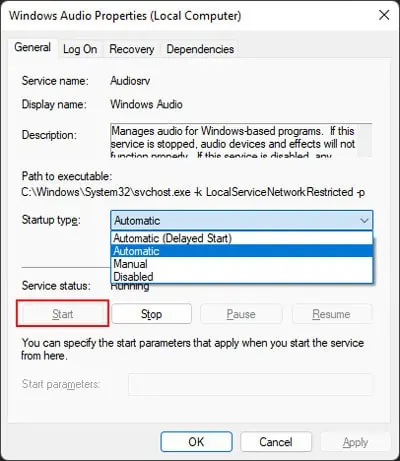
Your computer needs to be running the Windows Audio Service to use your microphone. If it’s not running, you must start it manually. If it is running, there might be some temporary issues with the process. Restarting the service should solve such issues.
Here’s what you need to do:
- Open Run and enter
services.mscto open Windows Service. - Search for Windows Audio Service and double-click on it.

- Set the Startup type to Automatic.
- If the service is not running, click on Start. Otherwise, click on Stop and then Start.

- Hit Apply and OK.
Windows Audio Service also depends on some other dependency services, which are:
- Remote Procedure Call (RPC)
- DCOM Server Process Launcher
- RPC Endpoint Mapper
- Windows Audio Endpoint Builder
So you need to make sure these services are running in the same way to be able to start the Audio Service.
Reset NVRAM (Mac)
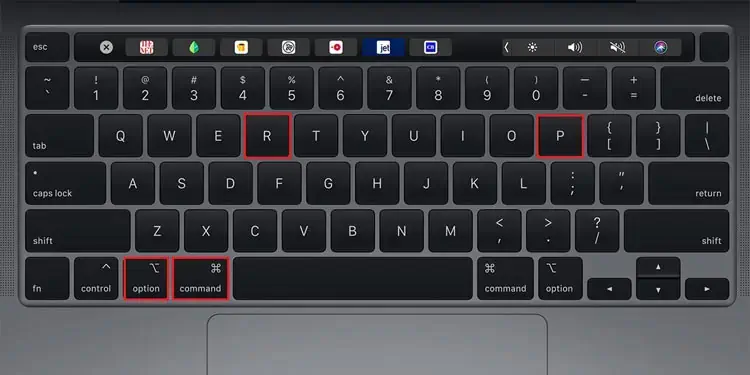
If you are encountering this issue on a Mac computer, another method you can try is to reset the Non-Volatile Random Access Memory (NVRAM). It stores system and profile data, which stays even after powering off the Mac. So your system can check the NVRAM and load the previous settings during the startup, including those for peripheral devices.
If some temporary issues prevent the computer from detecting your microphone, you can usually solve it by resetting the NVRAM. To do so:
On Intel Mac
- Shut down your computer.
- After that, press the power key.
- Once your computer makes a startup sound or the screen glows, immediately press Command + Option + P + R and hold the keys until your system fully boots.

On Apple Silicon Mac
You need to power off the Mac for about a minute to reset the NVRAM. On a Mac laptop, you also need to keep the lid closed for a minute.
Download Latest Headset or Microphone Drivers
Most headset or microphone devices use their own drivers for operating the devices. If any driver update contains some bugs, the later updates should fix the issue. So, we always recommend you update the drivers to the latest version to prevent any issues.
If you started encountering the error after a system or driver update, check official sources for compatibility issues or possible bugs. If the device manufacturer provides patches, install them as soon as possible. Or you can download the latest driver from the website and install it.
For third-party drivers, such as headset/microphone drivers, it’s better to directly update or install from official sources and not the device manager.
Update USB or Bluetooth Drivers
If you are using a USB or a Bluetooth headset/microphone, you should also make sure to update their drivers. If there are any issues with such drivers, your computer stops recognizing the device. Here’s how you can update them on Windows System:
- Open Run and enter
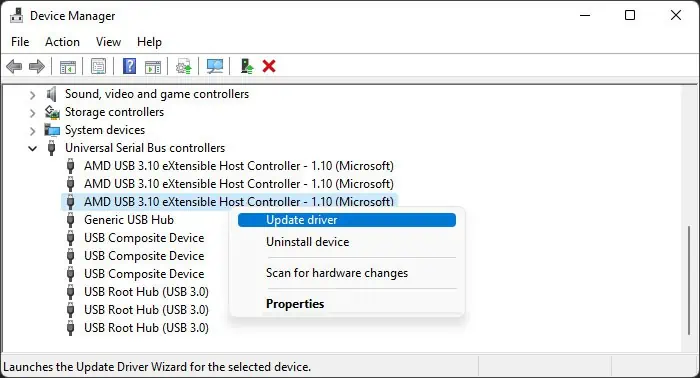
devmgmt.mscto open the Device Manager. - Expand Universal Serial Bus controllers or Bluetooth, depending on your device.
- Then,
- For USB, right-click on the USB Hubs and Host Controllers and select Update driver for each.

- For Bluetooth, right-click on your built-in Bluetooth device, such as Intel(R) Wireless Bluetooth(R), and select Update driver.
- For USB, right-click on the USB Hubs and Host Controllers and select Update driver for each.
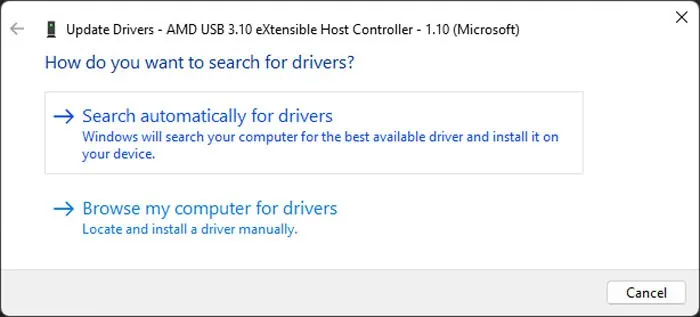
- Click on Search automatically for drivers.

On Mac, Apple bundles the driver updates together with the system updates. So, you need to update your OS to have the latest drivers.
Check Permissions
You should also check your Microphone permission settings and make sure that your system and apps have access to the device. Your computer still detects the microphone even when you restrict access. However, you may be thinking that the microphone is not being detected since you can’t use it.
Here’s how you can check and change your privacy settings:
On Windows
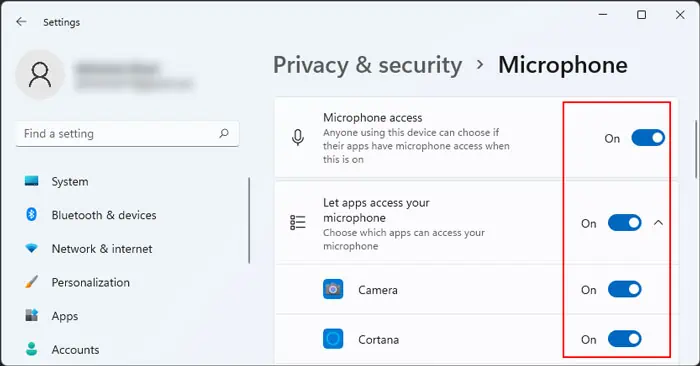
- Open Run and enter
ms-settings:privacy-microphoneto load the Microphone Privacy Settings. - Enable the switches for Microphone access and the apps you require.

On Mac
- Click on the Apple icon and go to System Preferences.
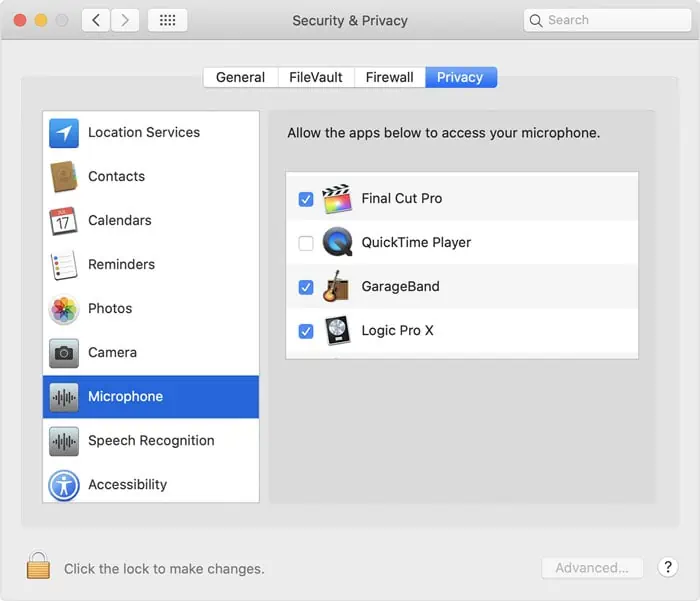
- Select Security & Privacy > Privacy > Microphone.

- Manage the app access to the microphone using the checkboxes next to the apps.
Check Application Settings
It is also possible that your application is not actually using the microphone as the audio input device. This scenario is easy to figure out by using your sound options.
- Open Run and enter
mmsys.cplto open Sound Options, and go to Recording. - Speak at your microphone and watch the volume bar next to the microphone to see if it’s working.

If your microphone is actually working, you need to check your application’s microphone or audio settings and ensure everything is in order. If you have trouble doing so, we recommend you visit the official websites.
