Whenever we encounter any internet connection issues, the first thing we try is to run the Internet Connection or Network Adapter troubleshooter. Oftentimes, the troubleshooter successfully resolves the issue, but sometimes it can’t.
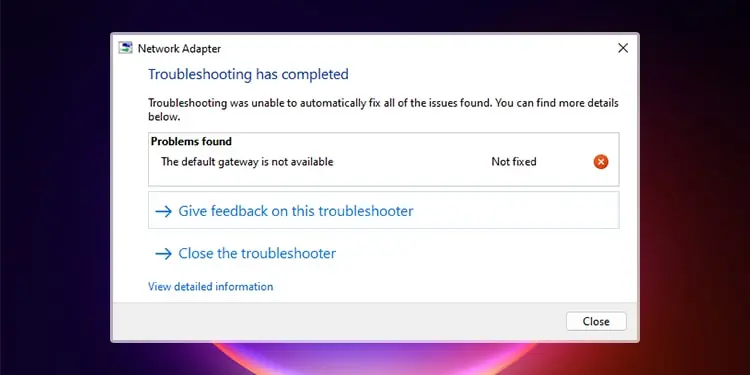
If you see the message “The default gateway is not available” with the “Not Fixed” status on the troubleshooter, it indicates that the network adapter on your computer could not find the IP address of the router (default gateway). Or it could not use the default gateway address saved on your system to connect to the router.
It can happen due to incorrect TCP/IP settings on your system or some issues with the router or your network drivers preventing any connection. Some third-party security software can also block connection to the router depending on their firewall settings.
Restart the Router
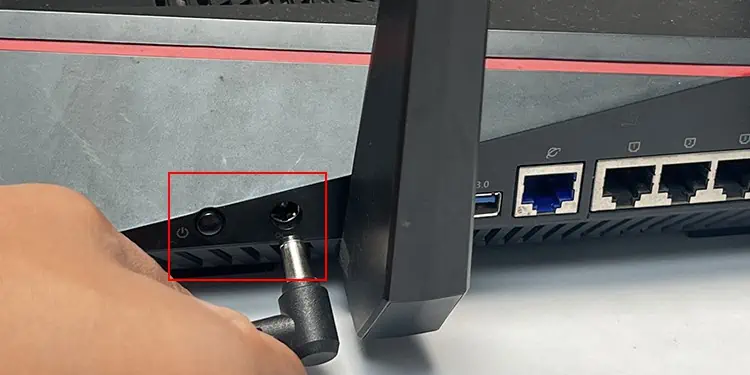
If the internet doesn’t work on any device while connecting to the same router, or your computer shows the above error only with this router’s network, restarting the router is the first thing you should do. It will take care of any temporary issues with this device and refreshes it so it can initiate a fresh connection with your computer.
- Press the on/off button on the router if it has such a button.
- Remove the power supply from the router.

- Wait for 20 seconds and replug the power cable.
- Then, press the on/off button if necessary.
Reset Network Settings
Sometimes, the DHCP server may not issue the proper IP settings to your device. Or there may be other issues with your network settings that are preventing your computer from communicating with the router.
In such cases, you need to reset all the network settings to set the default network configuration on your computer. Doing so will also make the DHCP reissue the IP settings.
- Open Run.
- Type
cmdand press Ctrl + Shift + Enter to open the Elevated Command Prompt. - Type the following commands and press Enter after each:
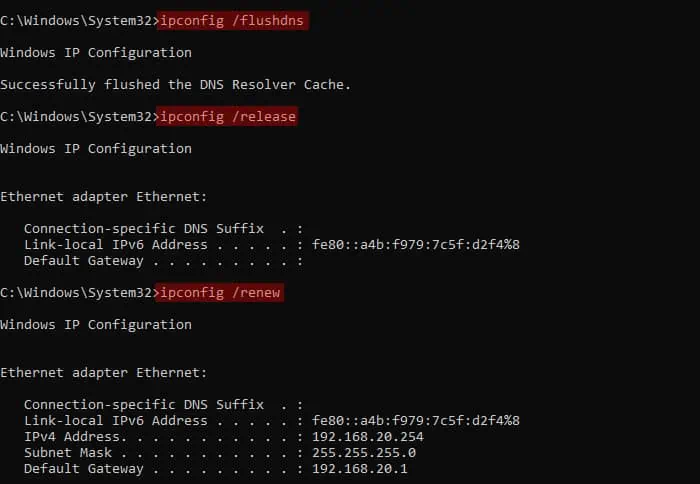
- ipconfig /flushdns
- ipconfig /release
- ipconfig /renew

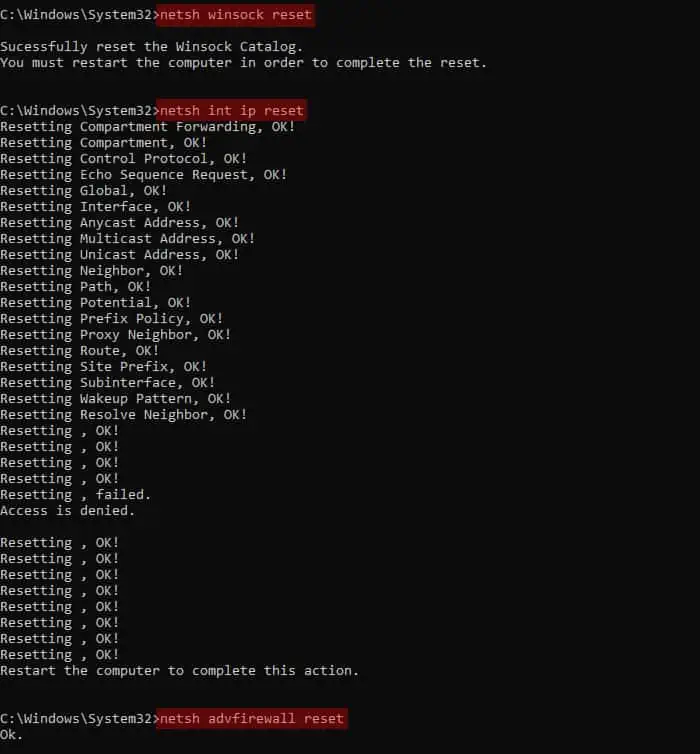
- netsh winsock reset
- netsh int ip reset
- netsh advfirewall reset (Keep in mind that it will also reset all the firewall rules you ever set up manually)

- Restart your computer.
Check Firewall Settings on Your Antivirus
If you use any third-party antivirus or firewall application, it is possible that some firewall settings on the app are blocking the connection with the router. You can temporarily disable the security software and see if the internet works now.
If yes, you need to go through the application’s settings and look for any inconsistencies. You can also reset the settings and see if it helps.
If you can’t find exactly what setting is causing the issue, it’s better to disable or uninstall the antivirus application altogether. Windows already comes with very nice security software, Windows Security or Windows Defender. So third-party ones are not exactly necessary.
Check Power Management Settings
Windows comes with power management settings that suspend power on your Ethernet or Wi-Fi adapter when it’s idle or your computer is in power-saving mode. Usually, the network connection should become active as soon as you try using it. But the adapter may not come out of the sleep state in some situations.
You may be able to resolve this issue by disconnecting and reconnecting the network connection or the Ethernet cable in some cases. However, if you don’t need to preserve every little bit of power possible on your computer, you can disable the power conservation settings altogether to prevent such issues.
- Open Run.
- Type
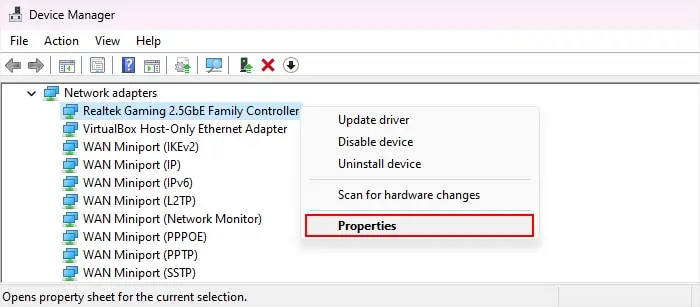
devmgmt.mscand press Enter to open the Device Manager. - Expand Network adapters and look for your network device. Wi-Fi devices should show WLAN or Wireless or something similar whereas Ethernet devices may show Family Controllers.
- Right-click on the device and select Properties.

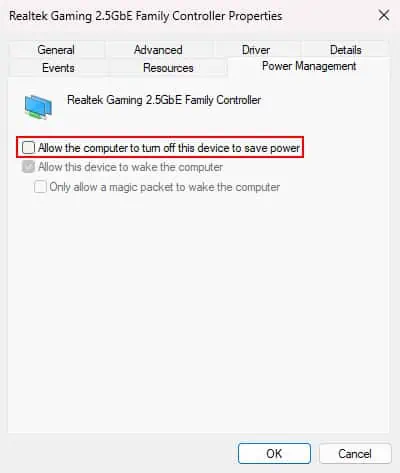
- Go to the Power Management tab.
- Uncheck Allow the computer to turn off this device to save power and click OK.

- Then, open Run again.
- Type
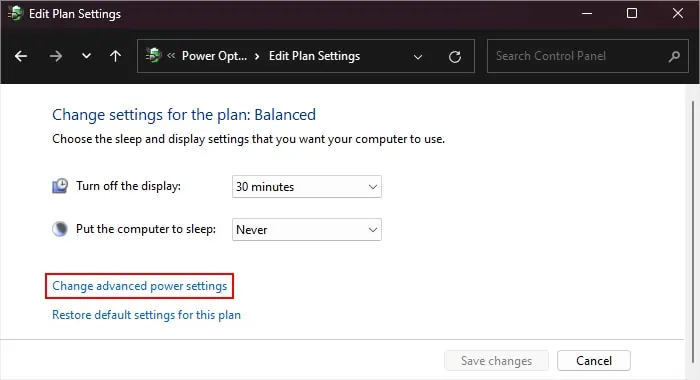
powercfg.cpland press Enter to open Power Options. - Go to Change Plan Settings next to the current power plan and select Change Advanced Power Settings.

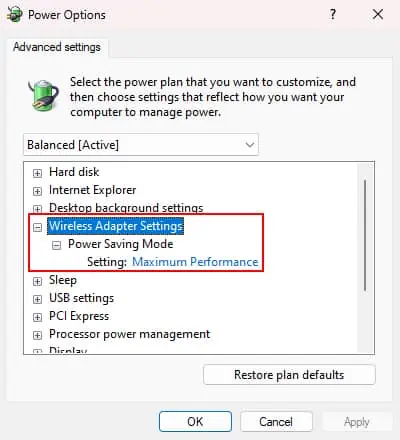
- Expand Wireless Adapter Settings and then Power Saving Mode.
- Set Setting or On Battery and Plugged In to Maximum Performance.

- Click OK and then restart your computer.
Update or Reinstall Network Driver
This issue can also occur due to incompatibility between the network adapter and the current network driver. You can try updating the driver to a compatible one from within your computer in such cases.
- Open the Device Manager (
devmgmt.mscon Run). - Expand Network Adapters and look for your network device.
- Right-click on it and select Update driver.
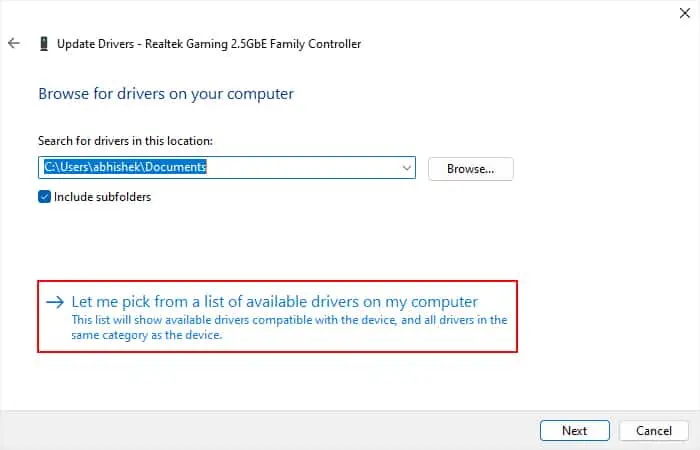
- Go to Browse my computer for drivers and then Let me pick from a list of available drivers on my computer.

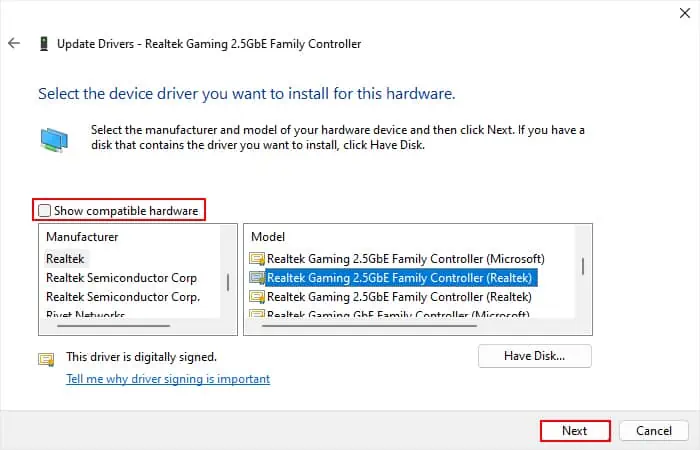
- Select another driver from the list and then click Next.
- If all the drivers on the list don’t work or the list only contains one driver,
- Uncheck Show compatible hardware.
- Select the device manufacturer from the left pane.
- Try choosing another similar driver on the right pane and click Next. For instance, if the previous one was Broadcom 802.11g, try switching it to Broadcom 802.11n.

You can also try downloading and installing the network driver from your motherboard or your laptop’s official website.
If updating the driver does not work, some other driver issues may be causing the error. You need to reinstall the driver to take care of any such errors.
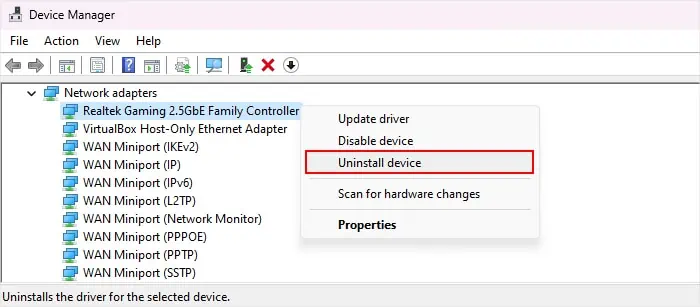
- Open the Device Manager.
- Expand Network adapters and look for your network device.
- Right-click on it and select Uninstall device > Uninstall.

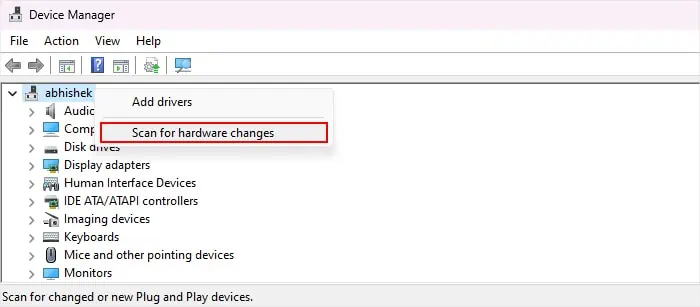
- Then, right-click on the computer name at the top of the device list and choose Scan for hardware changes. The network device that you uninstalled should show up.

Set Static IP Address
If your computer did not have the proper IP settings and resetting the network settings did not help, you need to manually set the IP and DNS address on your system.
- First, you need to check the current IP settings.
- Open Run.
- Type
cmdand press Enter to open Command Prompt. - Type
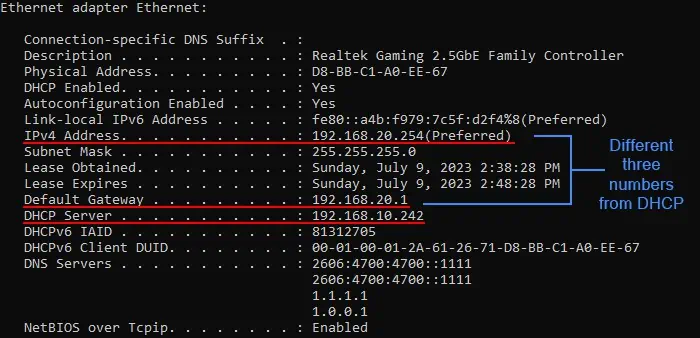
ipconfig /alland press Enter. - Under your current network (Ethernet or Wi-Fi), check the values of the Default Gateway and DHCP Server address. Also, note if the Default Gateway has a different value than the one that is on your router sticker or if it is not consistent with the DHCP address.

- If the Default Gateway you saw on the
ipconfig /allcommand is not the same as the address you see on the routers’s sticker, or you can’t use it on a web browser to access the router portal, it is incorrect.
In such cases, you need to get or note the correct address. If the router does not come with a sticker containing the IP, you can find this information on official sources.
- Then, open Run again.
- Type
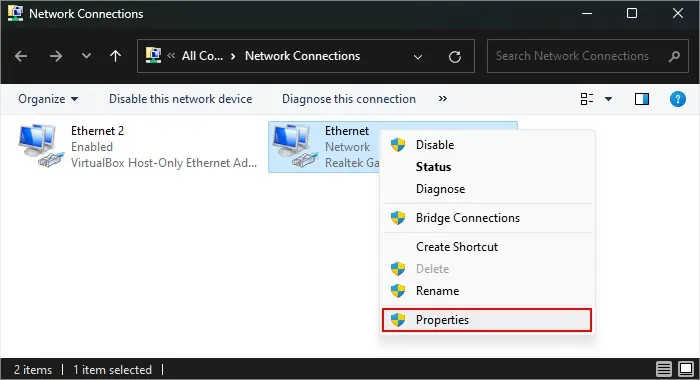
ncpa.cpland press Enter to open Network Connections. - Right-click on your network (Wi-Fi or Ethernet) and select Properties.

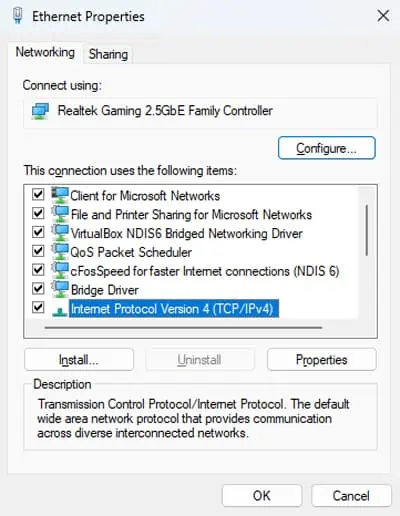
- Double-click on Internet Protocol Version 4 (TCP/IPv4).

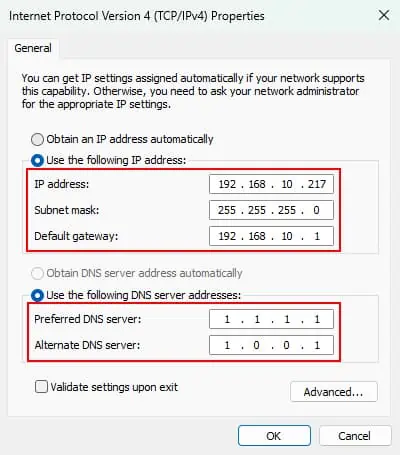
- Click Use the following IP address.
- Use the correct Gateway address of the router (after confirming with the sticker or official sources) on the Default Gateway fields.
- Enter the same first three numbers of the Default Gateway on the IP address field as well.
- Then, set the third number to be anything between 1 and 255. I recommend using a random number somewhere in the middle to the latter half.
It represents the host address of the device. All the devices connected to the network have different IP addresses, with the same network address (usually the first three numbers on Class C Address) and different host addresses. So, it needs to be a number that is not already used. - Click on the Subnet mask field, it should automatically fill itself.
- Set the Preferred and Alternate DNS server to any reliable public DNS server, like,
- Google:
8.8.8.8and8.8.4.4 - Cloudflare:
1.1.1.1and1.0.0.1
- Google:
- Click OK > OK.
- If the internet still doesn’t work, the router may already have allocated the host address to some other device. So, you will need to keep changing the last number of the IP address until you get to an unused value, in which case the internet should work.
Reset the Router
If you were able to determine that the problem is not with your computer, but the router and the above methods did not help, you should perform a hard reset on the router.
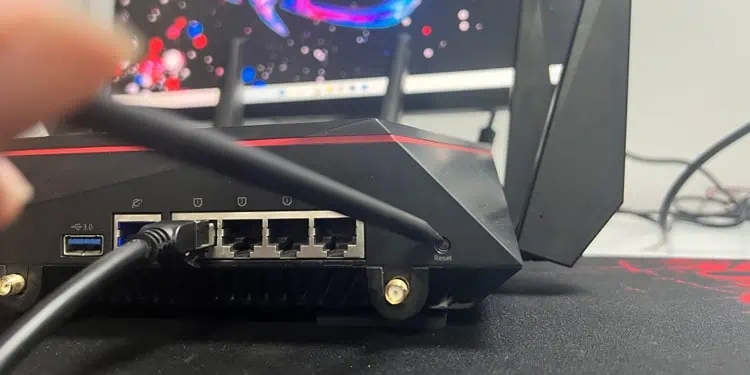
Unlike a restart, this process refreshes the router back to the factory state with the default configuration. So it will take care of most issues with the router. However, keep in mind that you will need to configure the router again from its portal to set it up.
The router should have a small reset pinhole near the ports. You need to use a pin to press and hold the button inside the hole for a few seconds to perform the reset.
Contact Your ISP
If you were not able to resolve the issue using the above methods, your only option now is to contact the ISP and seek their help. They will either provide you with some directions that you can follow or send a technician to look at the issue in your location.
Very rarely, the router may need a Firmware update. However, most routers that experience this issue with outdated firmware are provided by the ISP themselves. So, it’s better to contact your ISP anyway instead of performing the firmware update yourself. It is a delicate process and you run the risk of bricking the router.
