Dual monitors offers extra screen space and can enhance multitasking. While its setup is effortless, you could be left frustrated if your PC doesn’t detect them.
You may encounter one of these scenarios – both displays do not work, the secondary monitor is not detected, or the primary screen goes black. It could be a result of incompatible hardware, incorrect display configuration, or corrupted drivers.
Whatever the cause, you need to first ensure both monitors are getting enough power and there’s no loose connection. Also, we recommend restarting the graphics drivers (Ctrl + Shift + Windows + B), updating Windows, and rebooting the computer to see if these resolve your issue.
Before You Begin
Ensure your single monitor setup is working. In most methods below, you may require disconnecting your secondary display.
Now, check whether both monitor drivers are installed on your computer. This can be easily done from Device Manager, and here’s how:
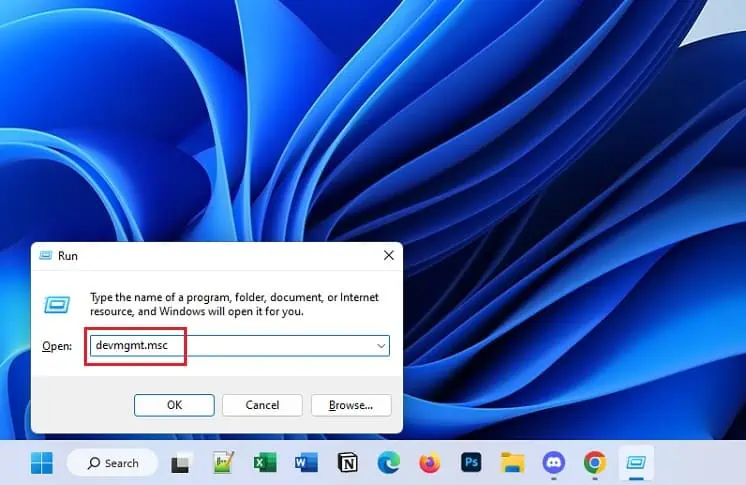
- Use the Windows + R hotkey to open the Run interface.
- Here, type
devmgmt.mscand hit the Ok button.
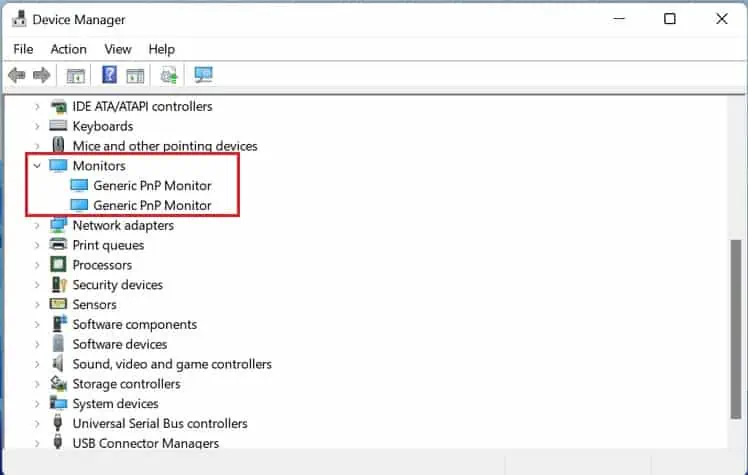
- Expand the Monitors option, and see if both the device drivers are present.

If you only notice one, this could mean there’s an issue with the connection. Reconnect the video cables to your PC or dock. Try switching the primary and secondary monitors, this method could work for some users.
In some older displays, the Plug and Play feature may not work. So, you can try force-detecting the secondary display:
- Press Windows + I to open the Settings application.
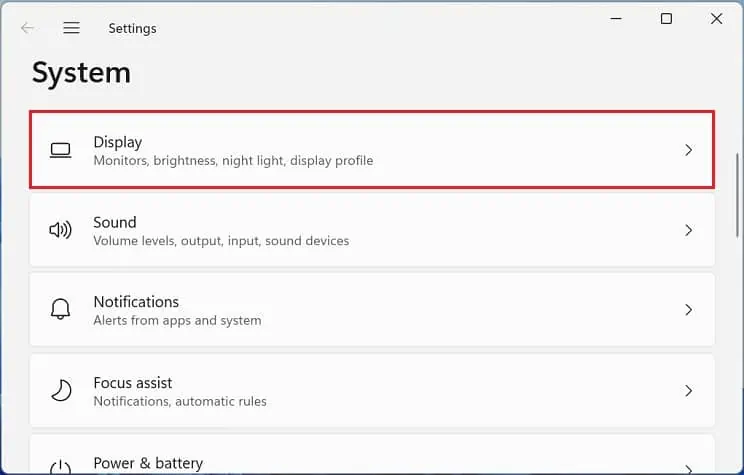
- Next, navigate to System > Display.

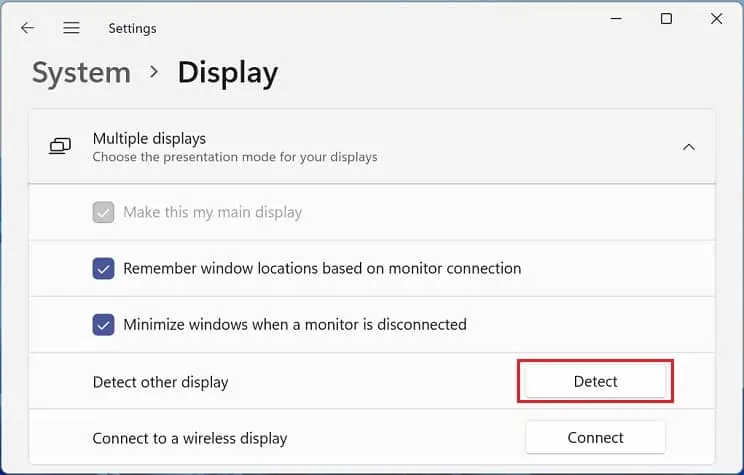
- From the Scale & Layout section, expand Multiple Displays.
- Now, press the Detect button.

If you get the message, “We didn’t find another display.”, some other problems are troubling you, which we will discuss below.
Check Compatibility
Even if force detecting the display didn’t help, there might be issues with how you’ve connected the dual monitors. The setup should work if you’ve used individual video cables or adapters to connect monitors to the GPU ports.
However, if you’ve daisy-chained the monitors, ensure that both displays have a DisplayPort 1.2 or Thunderbolt input port. Also, the primary screen requires an output port with MST feature. Connecting other video cables will simply result in a black screen on your secondary display.
Likewise, your computer requires a DisplayPort over USB-C (3.1) port if you’ve connected to a docking station. If incompatible, it may not detect the device, along with the two monitors attached to the dock.
Adjust Projection Settings
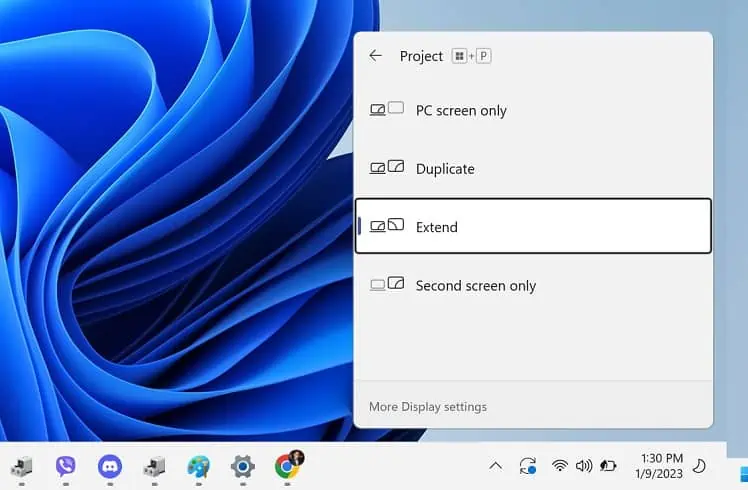
If you’ve set the projection option to PC Screen Only, your secondary monitor will probably show a No Signal error. On the other hand, setting it to Second Screen Only will make the primary screen black. Here’s a quick workaround to this problem:
- Press Windows + P, and the Project interface should pop up on the bottom-right part of the screen.
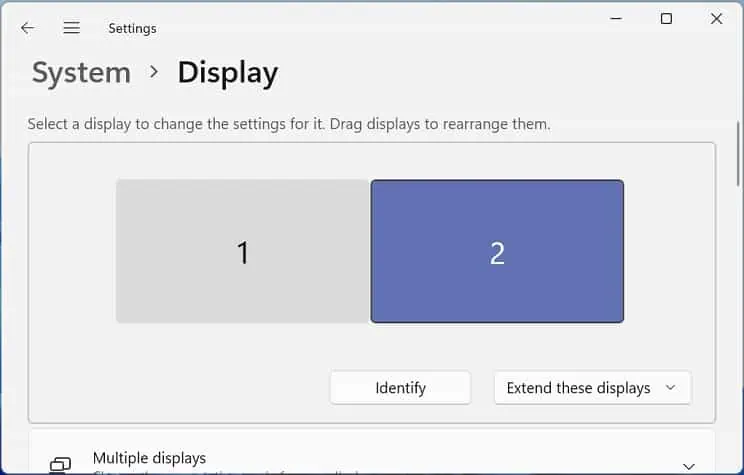
- Choose one of the two options – Duplicate (to mirror the PC content) or Extend (to create an extended workspace).

- In a second, your monitor should flash, and you’ll be able to enjoy the dual monitor setup.
Additional Tip:
Sometimes, the issue persists even if you’ve set the projection option as desired. In such a case, most Windows users have fixed the problem by choosing a different option first and then selecting the desired one.
For example, if you want to extend the display, choose Duplicate first. Then, relaunch the Project settings window, and set it to Extend.
Configure Settings in GPU Software
Incorrectly configured multi-monitor settings in the GPU’s proprietary software may lead to unexpected issues. Some bugs and glitches may also have disabled either of the displays.
If you have two NVIDIA GPUs, it’s essential that you configure the SLI settings. Similarly, AMD users need to set up Eyefinity to use dual monitors.
NVIDIA Control Panel
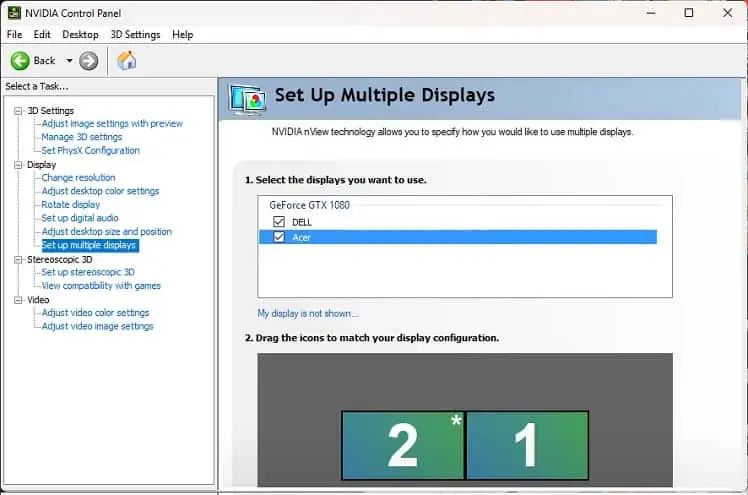
Reportedly, most NVIDIA users have encountered issues while setting up multiple monitors. Firstly, ensure you’ve selected both displays in the control panel:
- Click on the Windows icon on the taskbar, search for NVIDIA Control Panel, and launch it.
- In the left pane, expand Display and navigate to Set up multiple displays.
- Move to the right pane, and under ‘Select the displays you want to use’, check both the connected monitors.

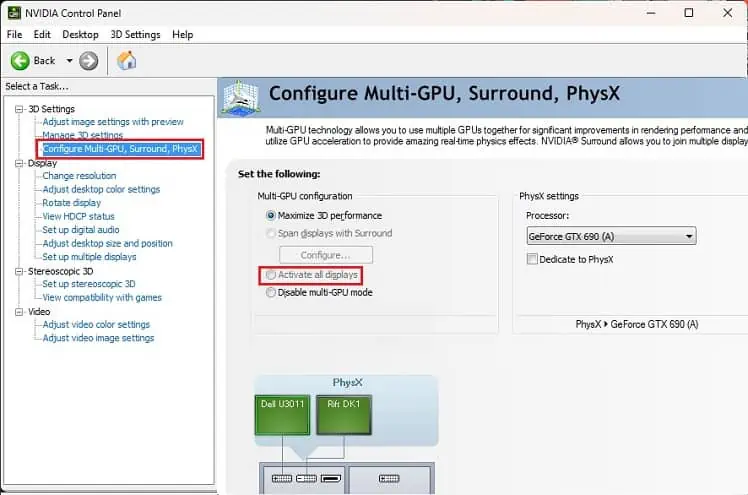
If you have installed two graphics cards and connected the monitors in separate ports, the multi-GPU (SLI setting) needs to be configured. Follow the below instructions on how to do just that:
- In the NVIDIA Control Panel, expand 3D Settings from the left pane.
- Then, select the Configure SLI, Surround, PhysX option and move to the right pane.
- Under SLI Configuration, choose Active all displays.

- Finally, check whether the dual monitors are now detected.
AMD Sofware: Adrenalin Edition
As with the NVIDIA GPU, AMD has the Eyefinity feature to allow a multi-monitor setup. Below is a simple guide on how to set it up:
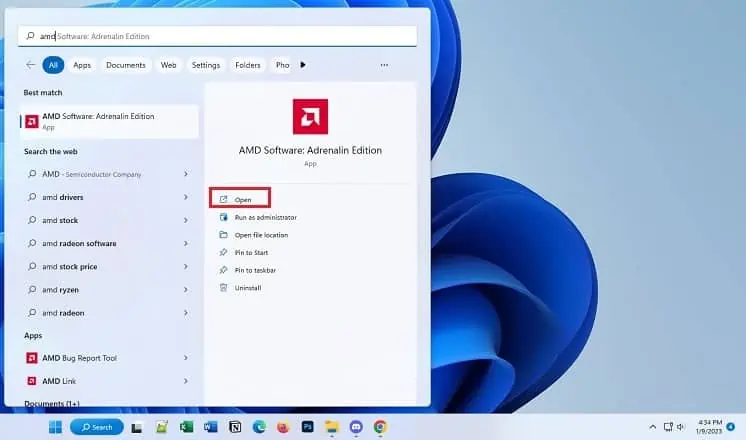
- From the Start Menu, search and open the AMD Sofware: Adrenalin Edition.

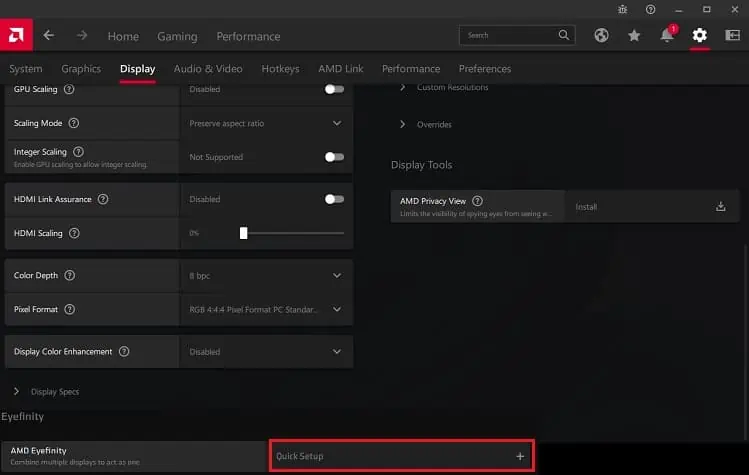
- Next, find and select the settings icon from the top-right section.
- Then, navigate to the Display tab.
- From the Eyefinity section, expand the AMD Eyefinity drop-down, and pick Quick Setup.

- Follow the on-screen instructions to complete the setup.
- Now, reboot your PC while the monitors are connected.
Intel Graphics Command Center
Some bugs or glitches in the Intel Graphics Command Center might disable your primary or secondary monitor. In such cases, you’ll have to enable it manually:
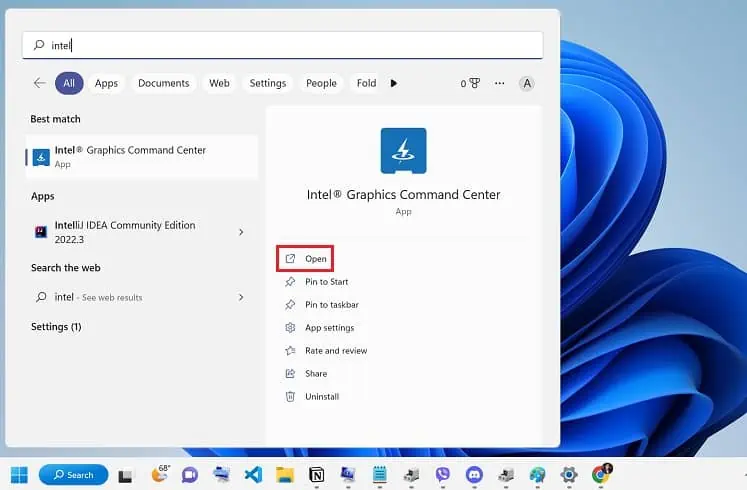
- Open Intel Graphics Command Center from the Start Menu.

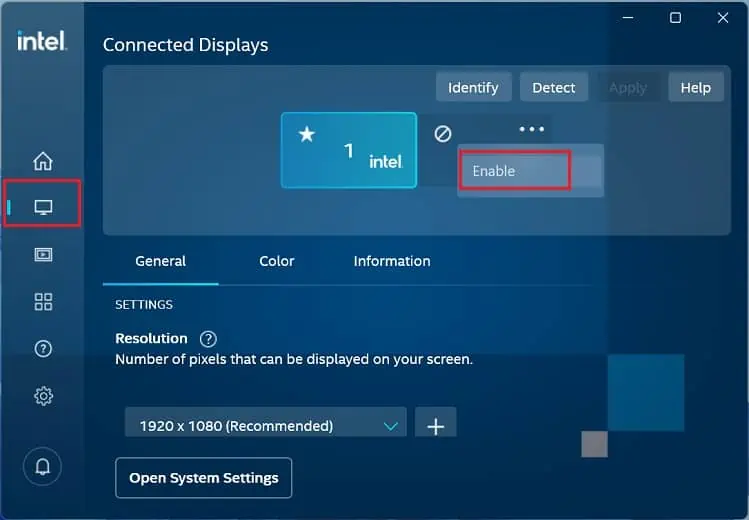
- From the left pane, select the display icon.
- You’ll notice that the undetected screen has a disabled icon. Right-click anywhere on the box and choose Enable.

- The computer should now detect the monitor. Then, you can change the projection option to Extended, as discussed earlier.
Tweak BIOS Settings
By default, some systems automatically disable the integrated graphics once a discrete graphics card is detected. Plugging in the video cables to the dedicated GPU should fix the problem. However, you’ll need to enable the former if you want them connected to the integrated graphics:
- Firstly, restart your system. Before the PC boots into Windows, press the dedicated key to get to the BIOS interface. Depending on your motherboard, this may be Del, F2, Esc, etc.
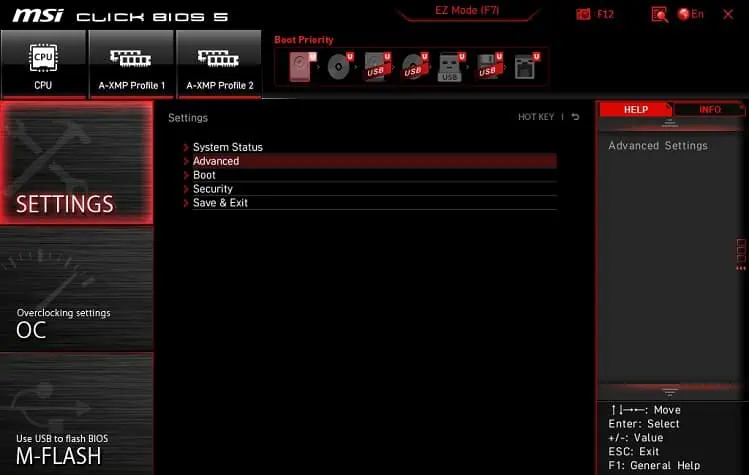
- Move to Settings > Advanced.

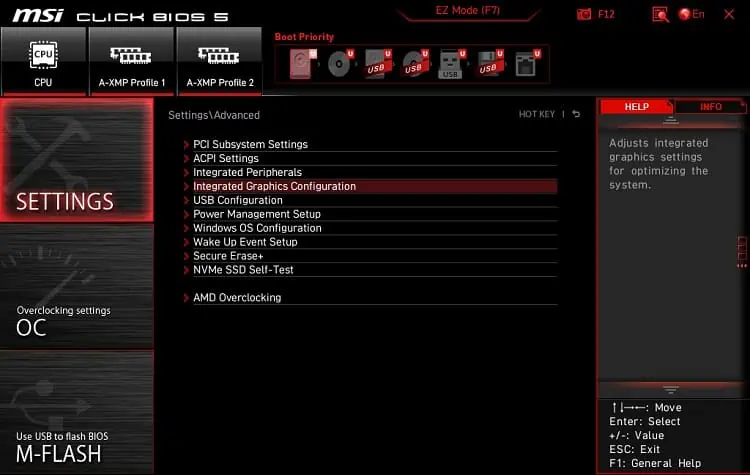
- Here, navigate to Integrated Graphics Configuration.

- Now, set the Initial Output Display option to Enabled.
- Save the changes and reboot your PC. The dual monitor should now be detected even if you’ve plugged in the video cables to the onboard GPU ports.
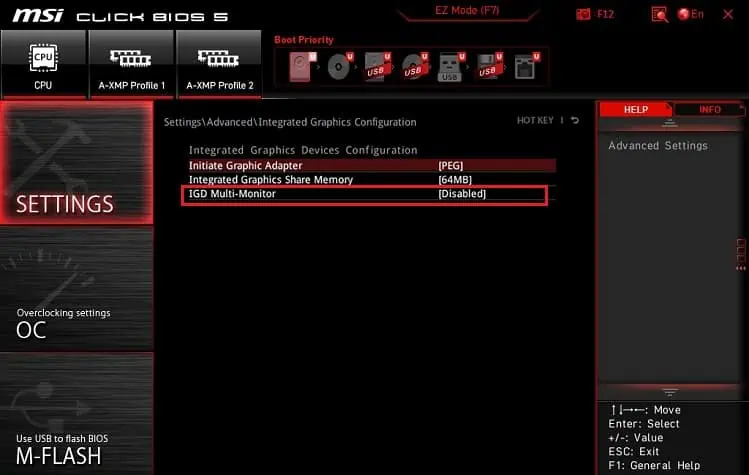
Some Intel systems require enabling the IGD Multi-Monitor setting to set up dual, triple, or multiple displays. Kindly go through the below steps on how to do just that:
- Restart your PC and get into the BIOS menu.
- Now, switch to Settings > Advanced > Integrated Graphics Configuration.
- Finally, set the IGD Multi-Monitor option to Enabled.

- Save this setting and reboot the computer. Now, the dual monitors should be detected.
Tweak Display Settings
Whenever connecting a secondary display, it tries to match the screen resolution and refresh rate of your primary monitor. However, if they do not sync with the GPU, you may stuck with a black screen. Therefore, it’s important that you use the recommended display settings so that the dual monitors get detected:
- Firstly, open the Settings app using the Windows + I hotkey.
- Next, move to System > Display.
- Select the problematic monitor. For demonstration, we’ve selected our second screen here.

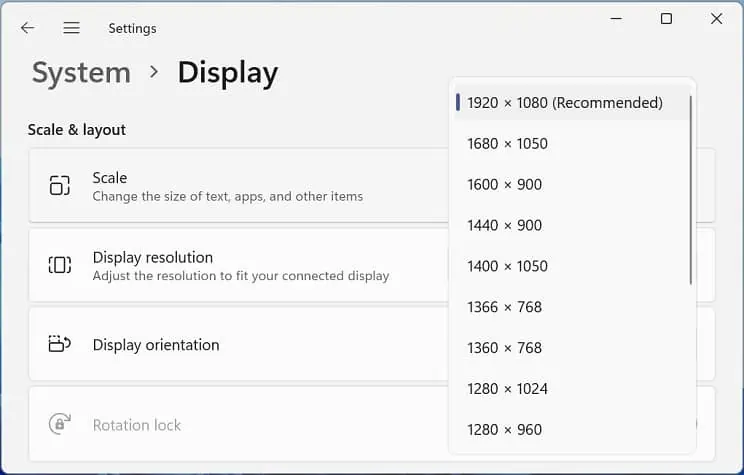
- Move to the Scale & Layout section and expand the Display resolution drop-down.
- Now, choose the recommended option. You may opt for higher ones if they support it.

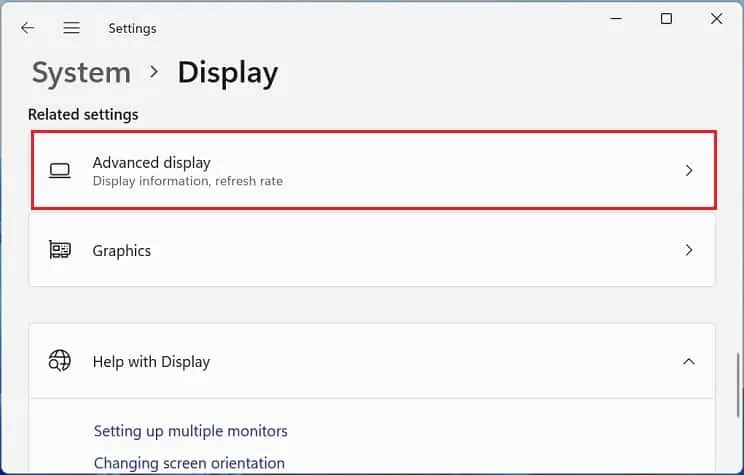
- Then, get to the Related settings section and select Advanced Display.

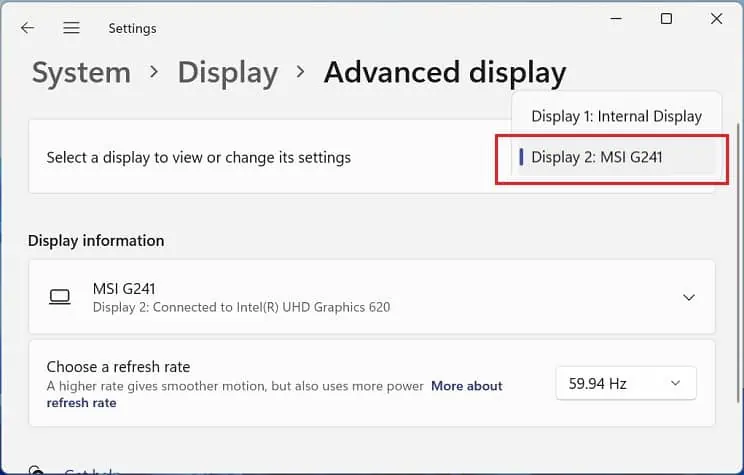
- From the drop-down, select your problematic monitor.

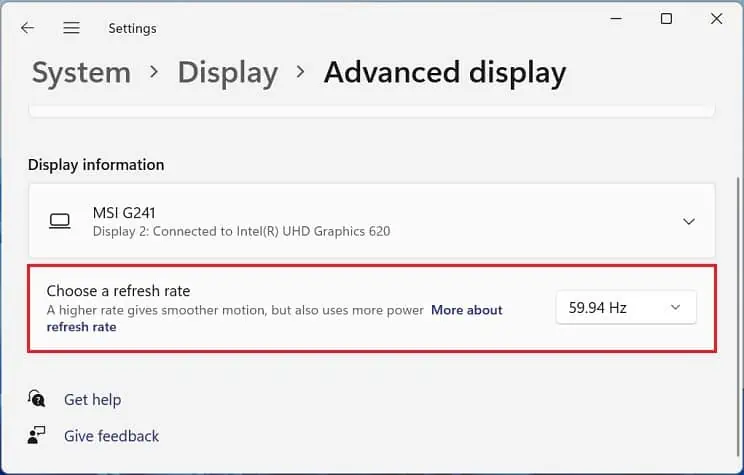
- Get to the Choose a refresh rate section and select the GPU’s highest-supported Hz.

Clear External Display Cache
Sometimes, a corrupted external display cache can lead to unexpected issues when connecting multiple monitors. Resetting this registry often solves this problem.
Caution: Making changes to the registry may lead to fatal errors. So, we highly recommend backing it up before moving forward.
- In the Run interface, execute the following command to launch Registry Editor:
regedit.exe
- Once the User Account Control dialogue box pops up, press Yes to continue.
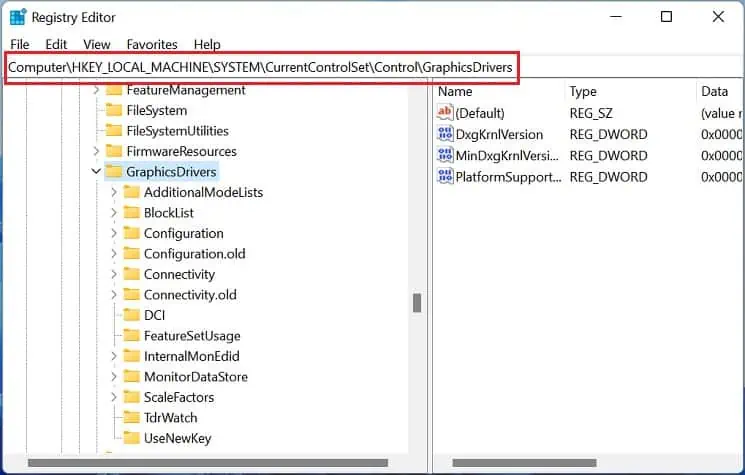
- Next, copy and paste the following path into the address bar:
Computer\HKEY_LOCAL_MACHINE\SYSTEM\CurrentControlSet\Control\GraphicsDrivers\
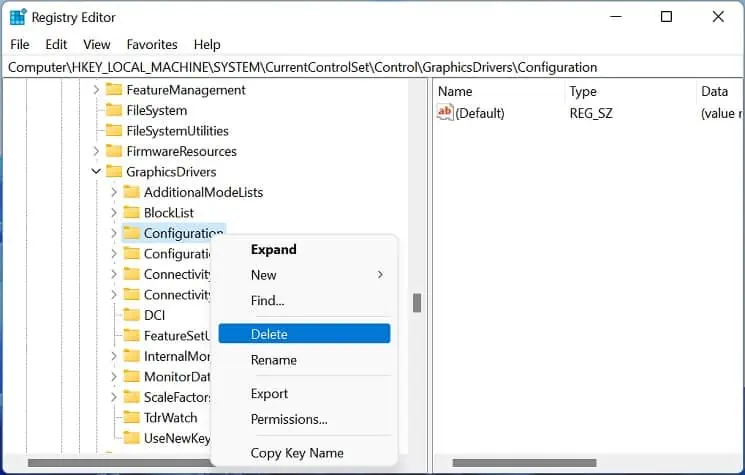
- Right-click on Configuration, and choose Delete.

- Repeat the process for the Connectivity and Scale Factors.

- Then, reconnect your monitors, and restart your computer. Once the PC starts, your problem should be solved.
Fix Problematic Device Drivers
The connected monitors work with your system’s GPU to render images. Whether you have single, dual, or multiple displays, any complications with the related device drivers may cause the PC to not detect your screens.
If this is a new monitor or you had recently updated your graphics card, try to scan for hardware changes first to see if this fixes your issue:
- First, open Device Manager from the Start Menu.
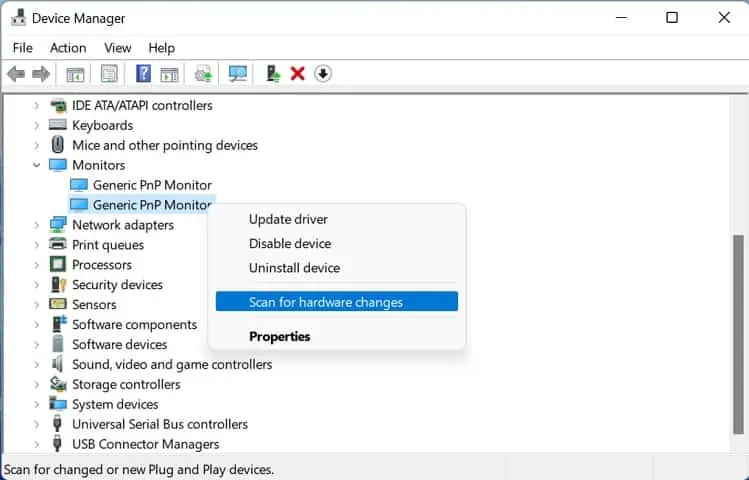
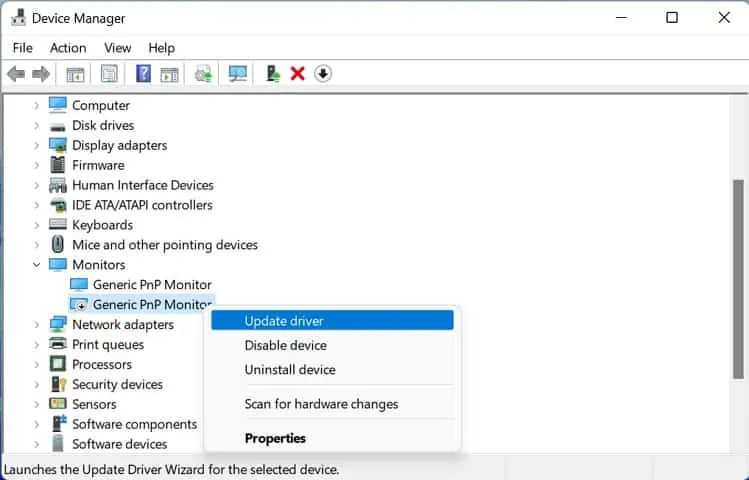
- Expand Monitors and right-click on the one which is not working/detecting.
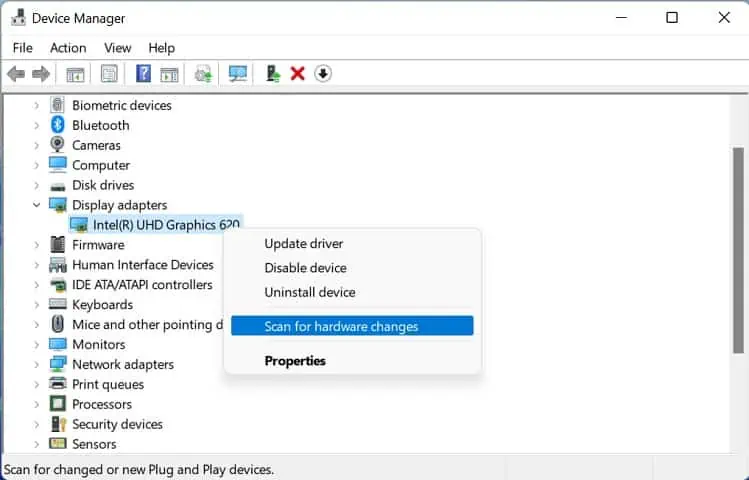
- Pick the Scan for hardware changes option.

- Repeat the process for your graphics driver.

The Device Manager utility will reload to scan for potential changes and fix the problem. But if this didn’t help,
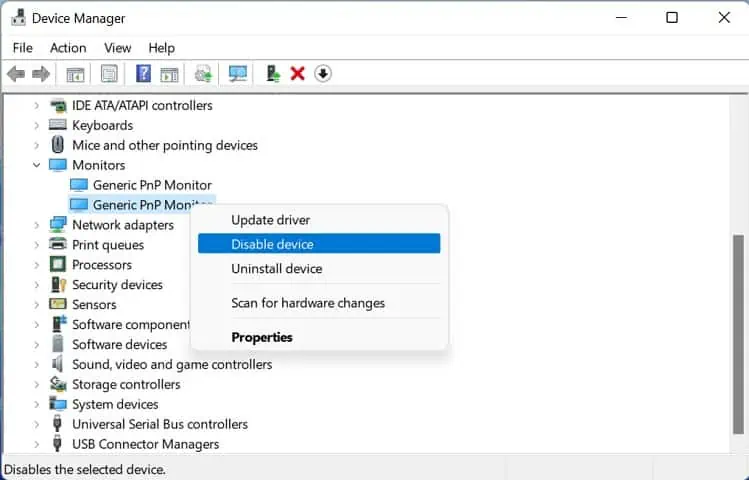
- Right-click on the problematic monitor driver and choose Disable device.

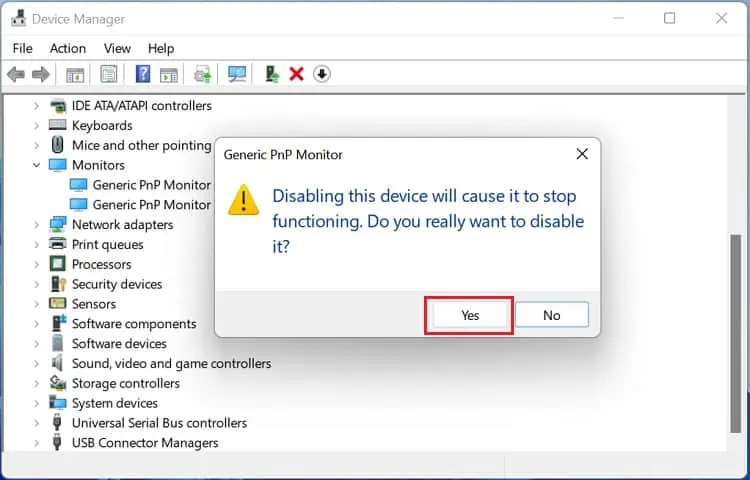
- Press Yes to confirm your action.

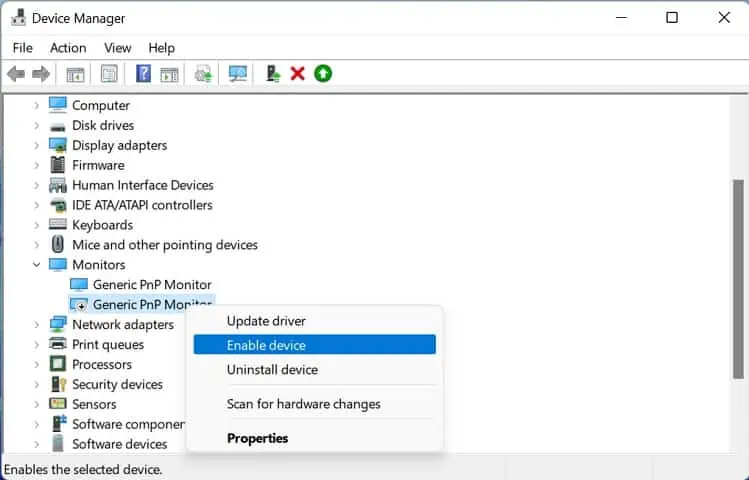
- Now, right-click on the driver again, and enable it.

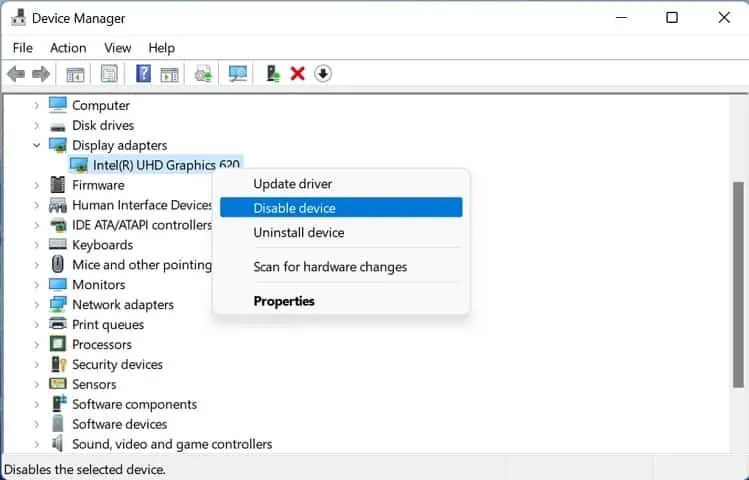
- Repeat the process for your display driver.

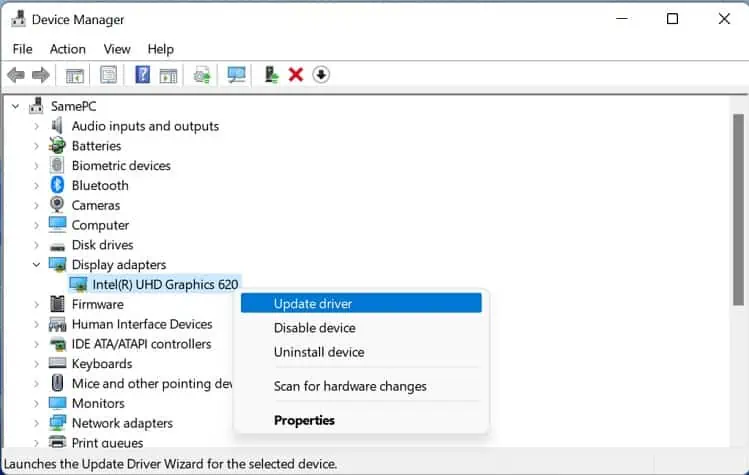
- If reenabling drivers didn’t help, right-click on the monitor driver again. This time, pick the Update driver option.

- Next, select Search automatically for drivers.

- Also, update your graphics driver following the same steps.

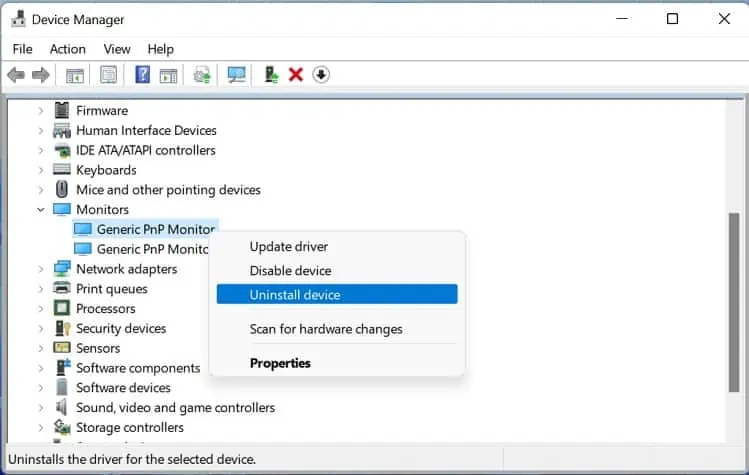
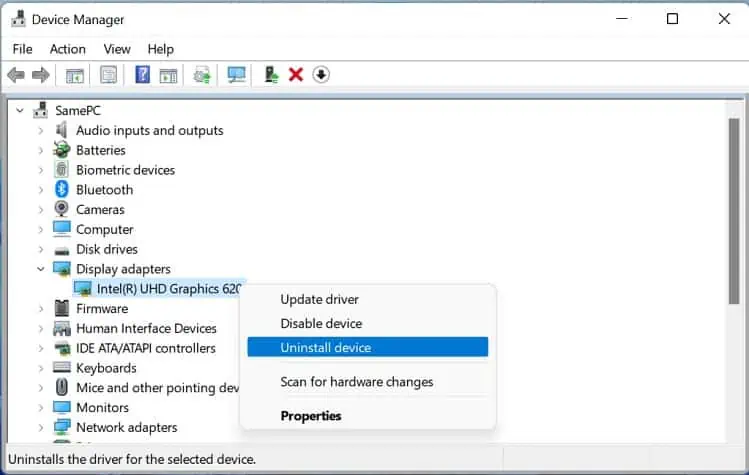
- If the best versions were installed already, get back to the monitor driver, right-click on it, and pick Uninstall device.

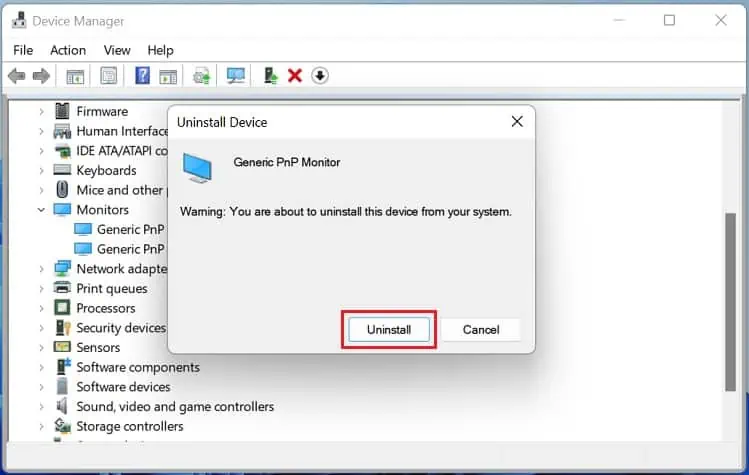
- Then, hit the Uninstall button.

- Restart your computer to reinstall the monitor drivers.
- Also, reinstall the graphics driver using the same steps to see if this detects the dual monitors.

Sometimes, corrupted driver updates can also lead to the same problem. In that case, you can try rolling back the monitor and display drivers:
- Open Device Manager and double-click on the problematic monitor.
- Switch to the Driver tab and hit the Roll Back Driver button.

- In the new dialogue box, pick a reason and hit Yes.
- If this didn’t do the trick, repeat the process to roll back your display drivers.
If none of these helped, we recommend installing the related graphics and monitor drivers from the manufacturer’s official website.
Run Hardware and Devices Troubleshooter
If you’re still unable to identify the cause, we recommend running the Hardware and Device troubleshooter. This will check for possible issues with all the hardware and ensure that they are correctly installed on your PC:
- Open the Run dialogue box and execute the below command to launch the troubleshooter:
msdt.exe -id DeviceDiagnostic
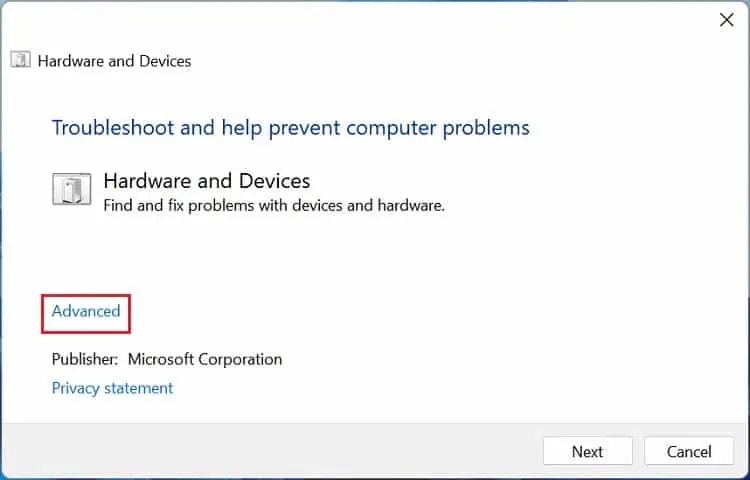
- Next, press the Advanced option.

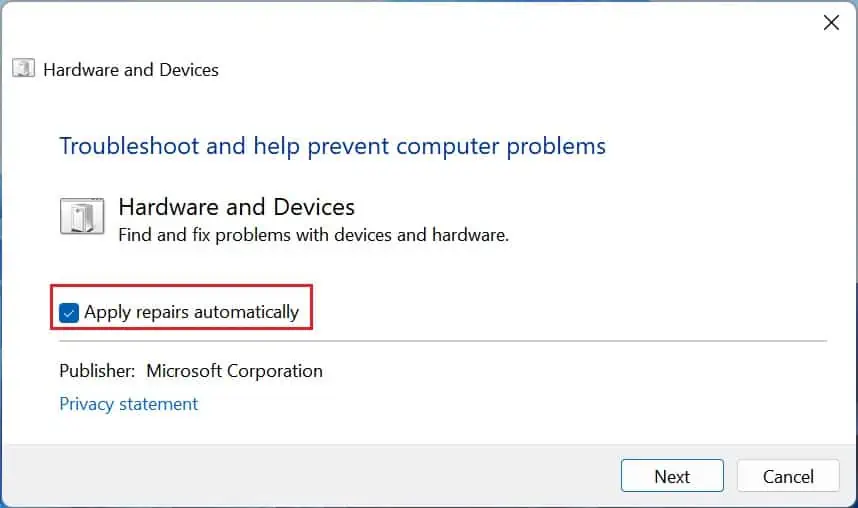
- Check the Apply repairs automatically option and hit Next.

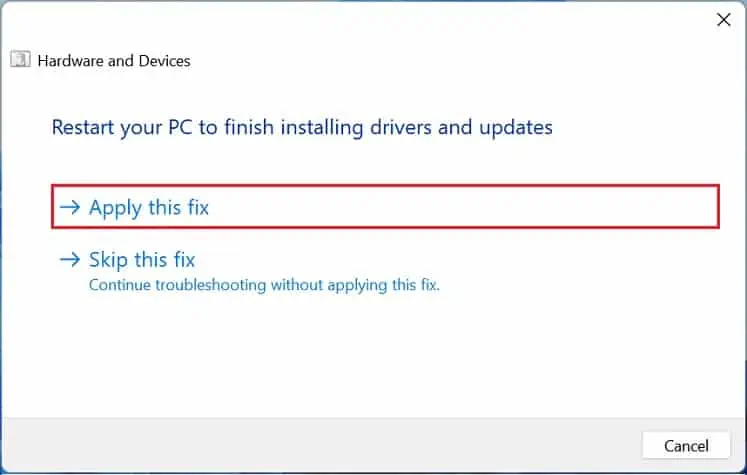
- Choose Apply this fix option to restart your PC. Once Windows boots, the troubleshooting should fix all the hardware-related issues.


