If your voice leaves the chat, check your PC and game settings for a few moments. It can be easy to fix the Fornite mic not working error.
You may find the problem in all platforms, but you must ensure it only affects Fortnite. Otherwise, it’s a broader error. For example, on PlayStation, you may have muted the audio; on Xbox, you may need to change privacy settings.
The problem can be more common on Windows. If you’re using a new mic, you may have trouble setting it up. However, we’re taking a deep look into every potential issue we could find affecting consoles and Windows PCs.
What Causes Fortnite Mic Not Working Error
We’re looking at the error on all Fortnite platforms: Nintendo Switch, Xbox One / Xbox Series, PS4, PS5, and Windows.
Some platforms have specific errors (namely Windows and Xbox consoles). Others share the same causes, such as wrong configurations.
In any case, here’re the possible causes:
- The Epic Games servers are down.
- On Windows, you may have the wrong settings for the mic.
- Your Windows is outdated, or the audio drivers are out of date. It causes compatibility issues.
- On Windows (Epic Games launcher), the game may be corrupted.
- The in-game voice chat settings are blocking your chat.
- You have the wrong configurations on Fortnite. You can switch between Party Channel and Game Channel in-game and may be on the wrong chat.
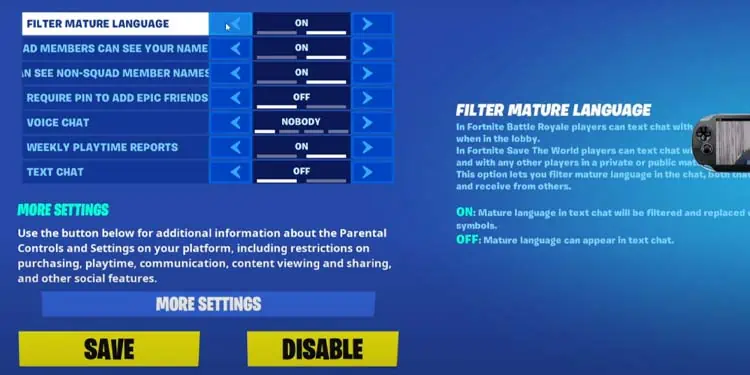
- The Parental Control settings in-game are blocking the chat. If your account has these controls, you must contact your parents or guardian to change the settings.
- Also, on Xbox, you may need to change your privacy settings to enable party chat. Additionally, you may need to change the privacy settings to allow cross-play.
- A full cache (temporary files dump) may corrupt the game on Xbox and PlayStation consoles. It would help if you cleaned it to play.
- The DNS configuration is blocking the chat. This happens on Nintendo, Xbox, PlayStation, and Windows. It occurs because the DNS you’re getting from your IPS doesn’t connect the devices with Fortnite’s IPs.
- On your router, the UPnP setting is off. Alternatively, it has the wrong NAT configuration.
If you pinpoint the cause of your problem, you can go straight to the solution you need.
How to Fix Fortnite Mic Not Working?
We’re going through a list of fixes for the Fortnite mic on the various platforms where you’d find the error.
Feel free to test them or jump straight to the one you think you need.
Wait Until the Server Is Up Again
Before you change anything, you should check the server status. On this website, expand the Fortnite bracket -it even has a “Voice chat” category.”
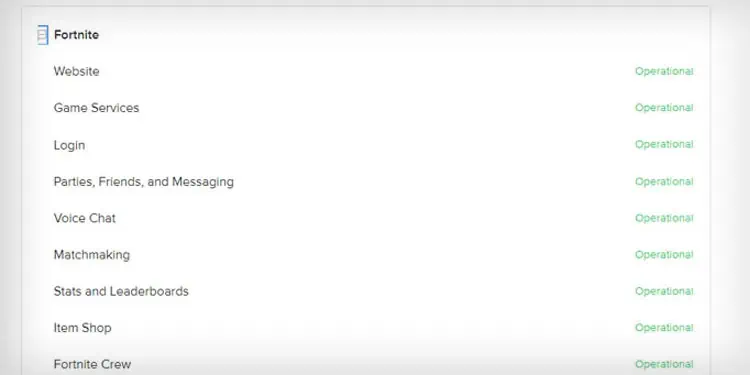
If the server is down, you’ll have to wait until it’s up. There’s nothing else you can do. Often, the server is down for maintenance or random errors.
Similarly, if notable bugs affect the voice chat, you may need some extra steps. Fortnite’s developers recommend checking the community board to see if there’s something wrong.
Set up Your Mic on Windows
If you’re playing on Windows, you must check two key configurations: your mic should be the default input, and the privacy settings should allow Fortnite to use the mic.
Let’s start by making it your default input:
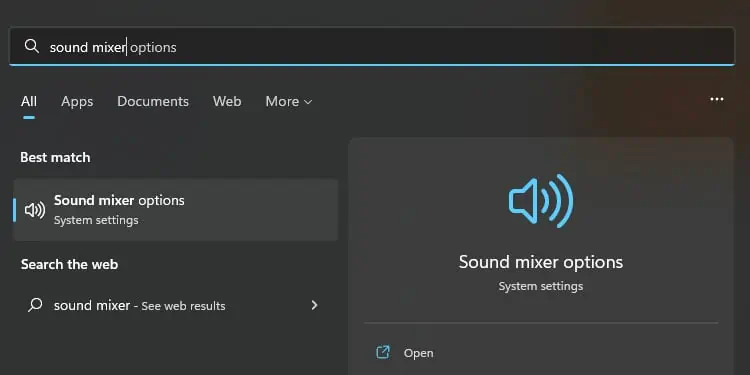
- Type “sound mixer” on the Windows search bar.
- Open “Sound mixer options.”

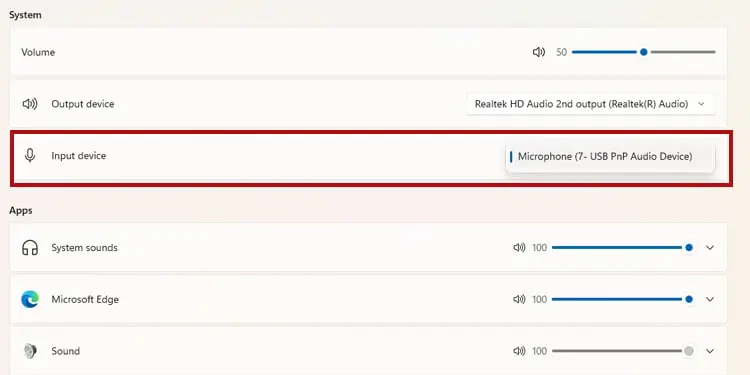
- Go to the “Input device” bracket and select your mic on the drop-down menu. That should make it your default input device.

- Go back to the “Sound” menu.
- Click on “All sound devices.”
- Select your mic once again.
- Ensure it is ON (you should see a “Don’t allow” button). Here, make sure it has volume and test it.

Now, let’s configure the mic’s privacy:
- Press the Windows key and go to Settings.
- Select Privacy & security.
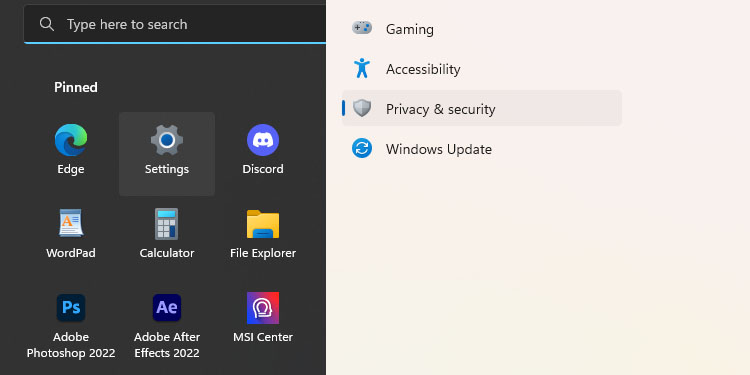
- On the App permissions, select your microphone.
- Enable “Microphone access.”
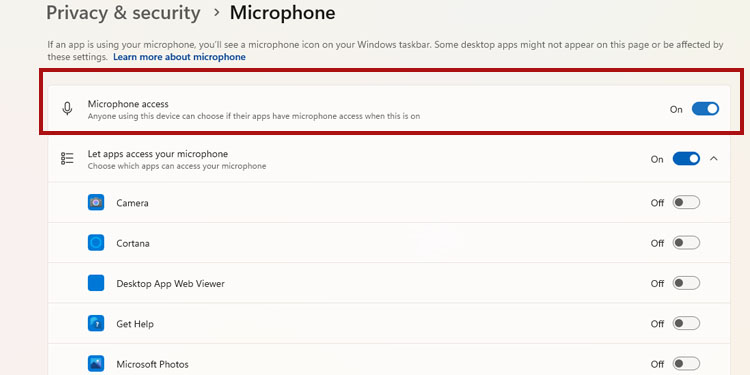
- On the app list below, enable Fortnite so it can use your mic as well.
Update Windows and Drivers
It would be best if you also kept your Windows PC up to date to play online correctly. That means updating the operating system, the GPU, and the mic’s driver if needed.
Let’s start with Windows:
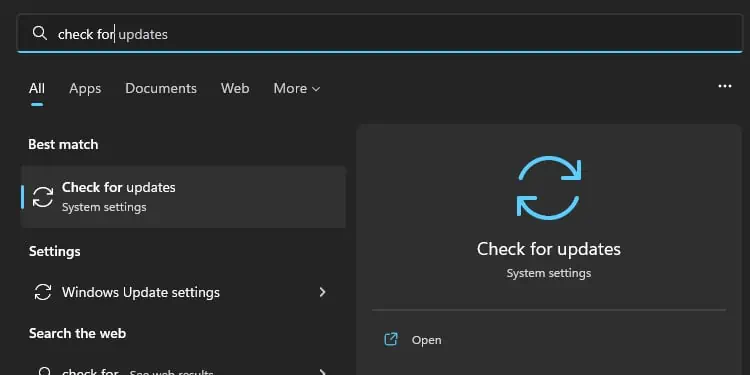
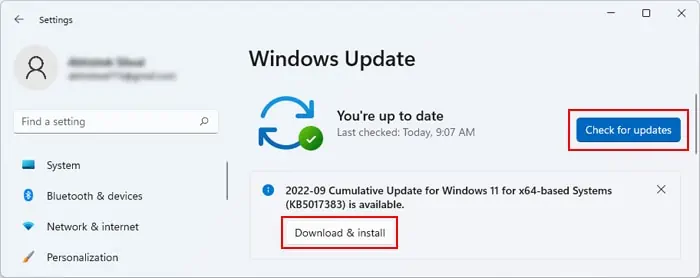
- Click the Windows key and type “check for updates” on the search bar.
- Select Check for updates.

- Click on “Check for updates.” Alternatively, click on “Download and install updates.”
- If the process finds an update, select “Download and install.”

- The update will download in the background. Once it’s done, it will ask for a reboot to install.
Next, let’s update your GPU via the Device Manager:
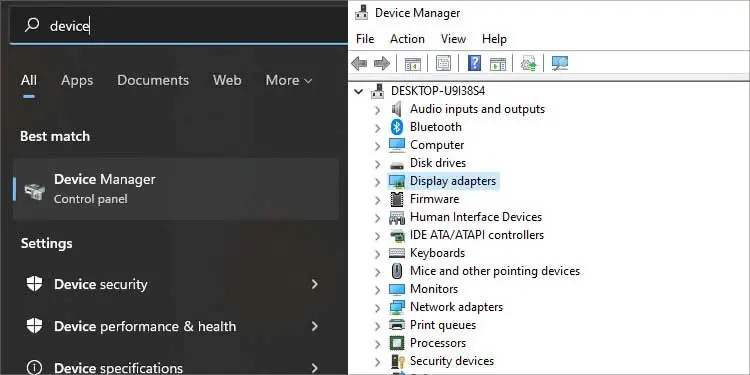
- Press the Windows key and type “device manager” on the search bar.
- Open “Device Manager.”

- Left-click “Display Adapters” to expand the bracket.
- Right-click your GPU (an NVIDIA or an AMD card. You may also be playing Fortnite on an Intel HD integrated GPU).
- Select “Update driver.”

- Select Search automatically for drivers. If the system finds an update, it will let you know.
Alternatively, you can use the proprietary AMD or NVIDIA software to update the GPU. On the AMD software, you’ll find the update option on the home page; on Nvidia’s software, you will find the update option on the Driver tab.
Lastly, let’s update the mic’s driver on the Device Manager:
- Go back to the Device manager.
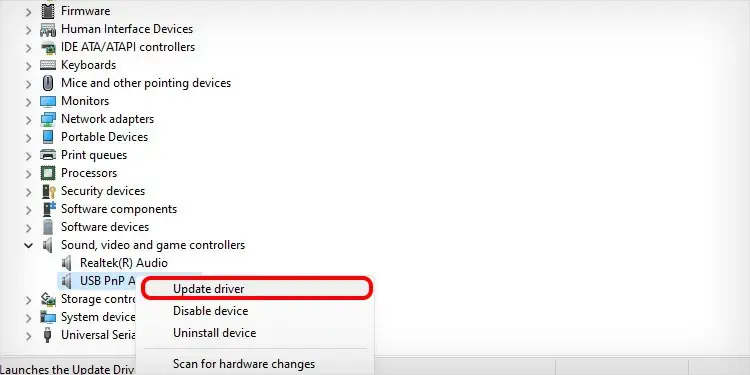
- Expand “Sound, video, and game controllers.”
- Right-click your mic.
- Select Update driver.

- Select Search automatically for drivers. If there’s a driver available, Windows will let you know.
Verify and Update the Game on the Epic Games Launcher (Windows)
You can use Epic Game’s tools to verify the game and repair the potential corruption:
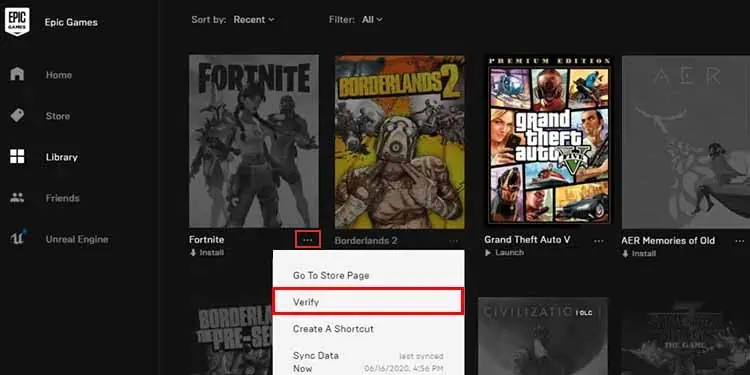
- Open the Epic Games launcher on your PC.
- Go to Library.

- Click the three-dots icon on the game.
- Select “Verify” on the drop-down menu.

If the launcher finds any problems, it will re-download what it needs. Additionally, you must keep the game up to date.
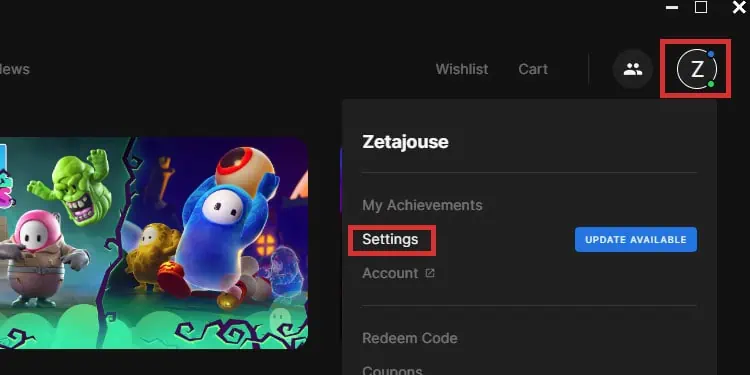
- On the Epic Games launcher, click on your profile and select Settings.

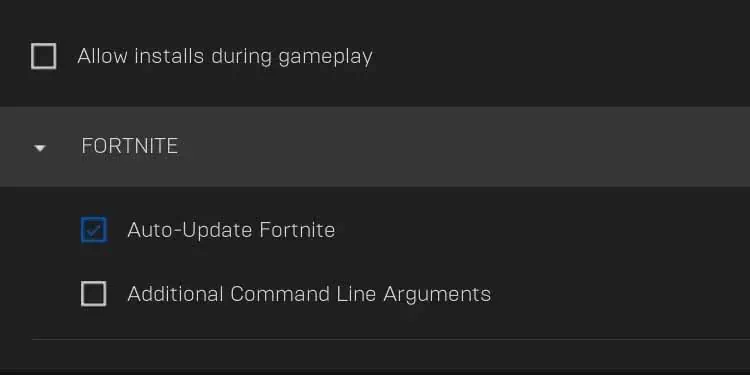
- Scroll down to Fortnite, and enable Auto-Update Fortnite.

- Afterward, restart the launcher, and see if it prompts a Fortnite update.
Lastly, update the launcher as well:
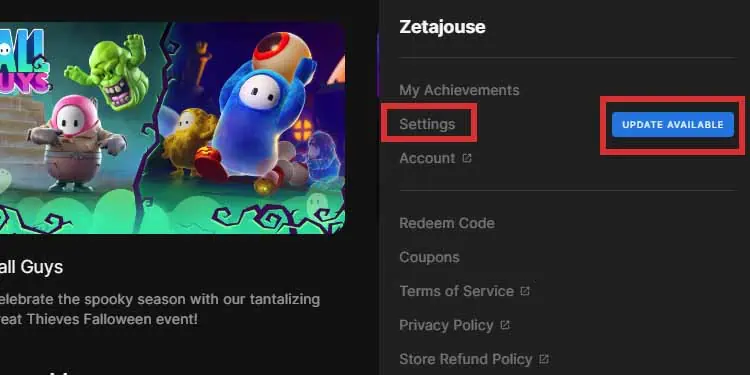
- Click your profile icon at the top-right again.
- Next to “Settings,” you may see an “Update available” button. If there is, click it to update the game.

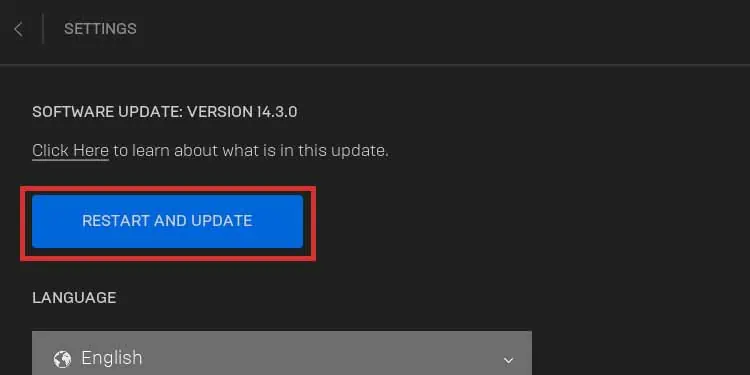
- Then, click on “Restart and Update.”

Afterward, test if the Fortnite mic is working again.
Configure the In-Game Audio Settings
There’s a chance your mic is not working on Fortnite because of minor bugs, so restart the game before configuring the in-game settings.
Then, open it up, and we’ll review the basic audio settings you need. These configurations will help you, regardless of the device you’re using to play.
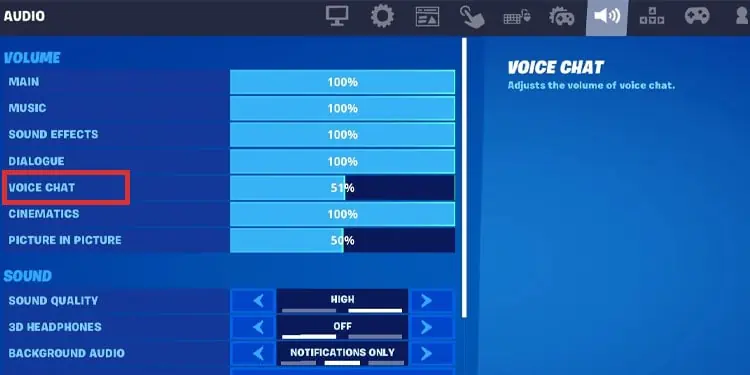
- Make sure your game’s volume is okay. Check the audio tab on Settings to raise Voice Chat above 50%.

- Check your internet connection speed. You can go to this page to check the speed. If it’s below 5Mb/s, the voice chat may be unresponsive.
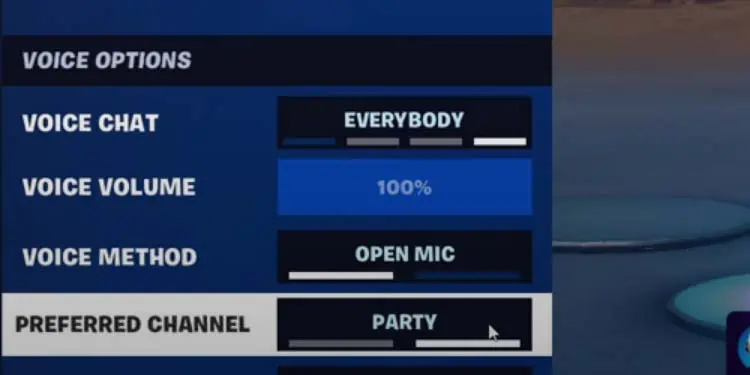
Make sure you’re using the proper channel. On Fortnite, you can swap between Party Channel and Game Channel. The Party channel connects the players on your squad.
Here’s how to check this particular setting:
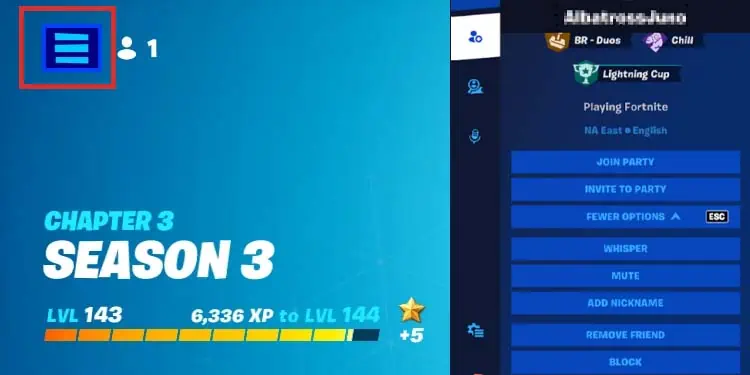
- On the Lobby, expand the menu:
- Go to the second tab (top to bottom). Here, you can individually mute members in the channel.

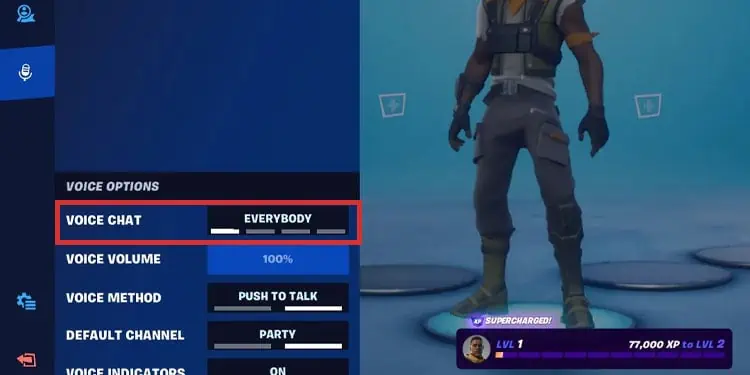
- Lastly, on the Voice Chat tab, you can select the people you can talk to and hear on the chat: everyone, friends & teammates, friends, or nobody (disable the voice chat).

- Check below on the “Default” or “Preferred” channel, and select the one you prefer (Party or Game).

- Additionally, make sure “Voice Volume” is above 50%.
If you’re below 18 years old (which the game determines on the birth date you selected on the game), it will block the party chat. If it’s the case, you need to follow these steps:
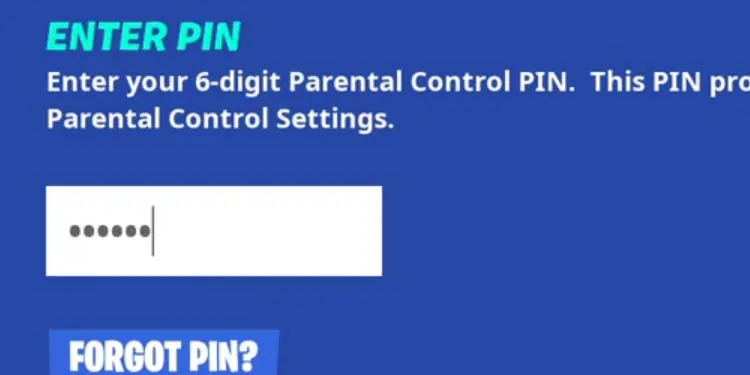
- Select “Go to Parental Controls” and type the Parental Control Pin.

- Enter a special settings menu to customize your chat and other privacy features.

Lastly, you can’t use Fortnite’s chat on Xbox and PlayStation if you’re already using either an Xbox chat or a PlayStation chat. You’d need to leave these chats to enter Fortnite’s option.
Change the Privacy Settings on Xbox One or Xbox Series
If you play Fortnite on Xbox consoles, perhaps your privacy settings are blocking the chat.
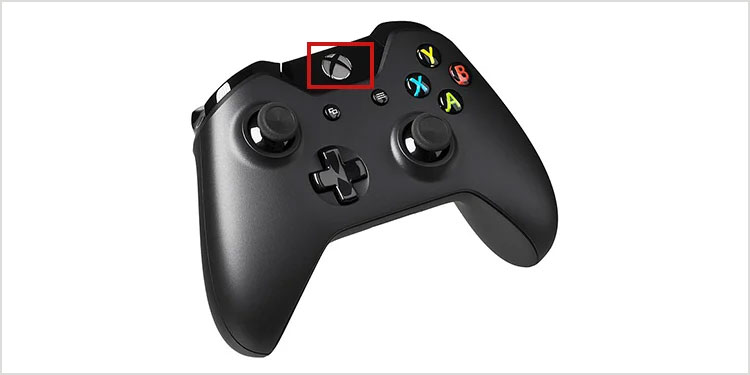
- Press the Xbox button on the controller.
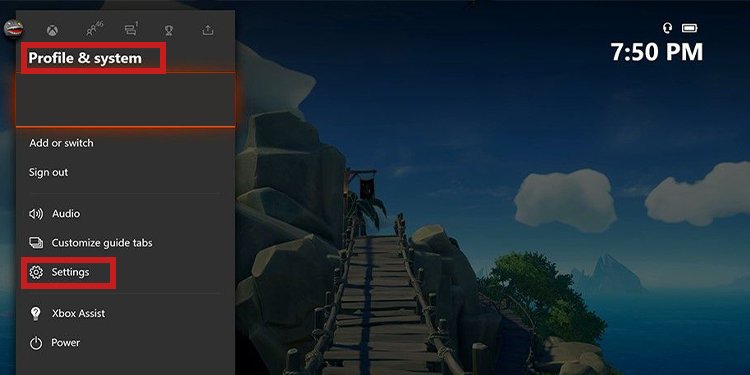
- Go to profile & system.
- Go to Settings.
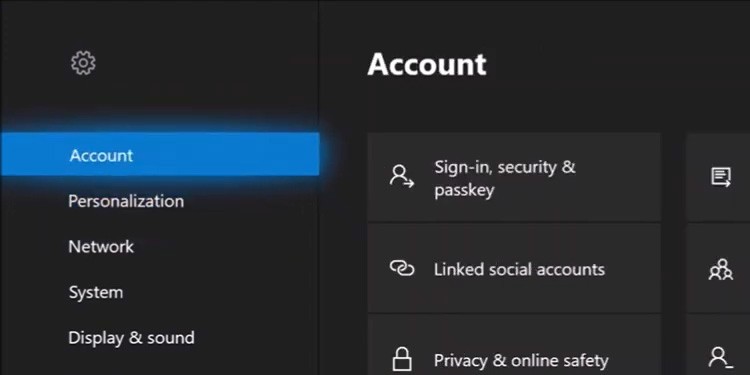
- Select Account.
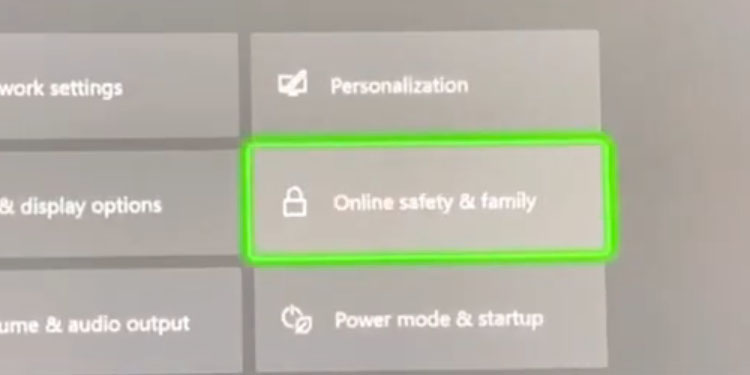
- Select Online Safe & Family on the right.
- Select Privacy & online safety.
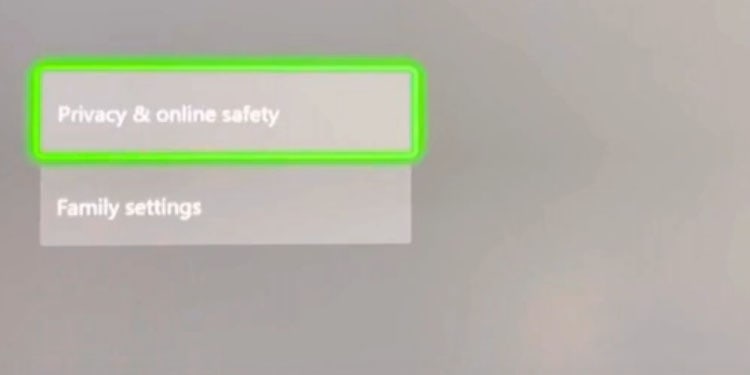
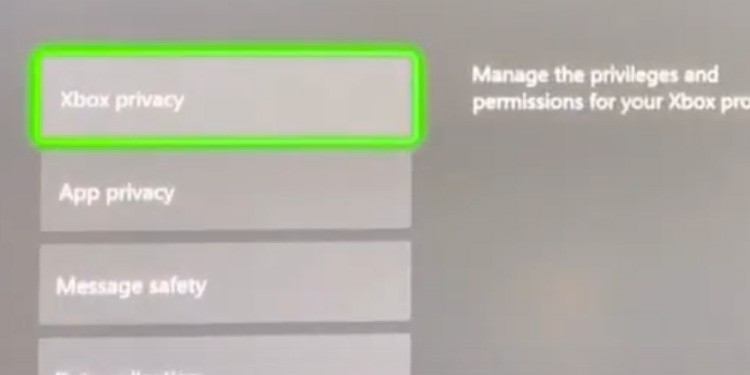
- Go to Xbox Privacy.
- Go to View Details & Customize.
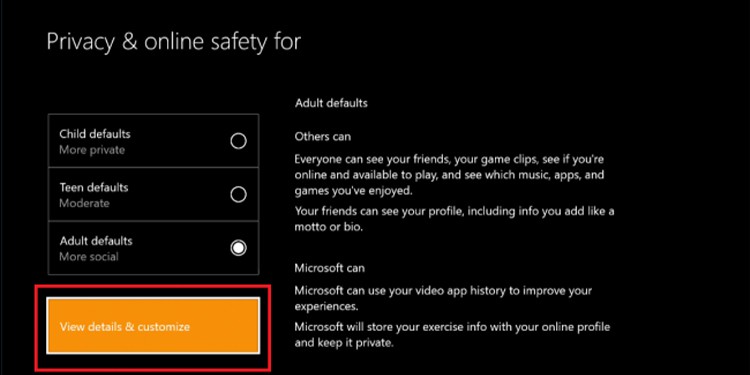
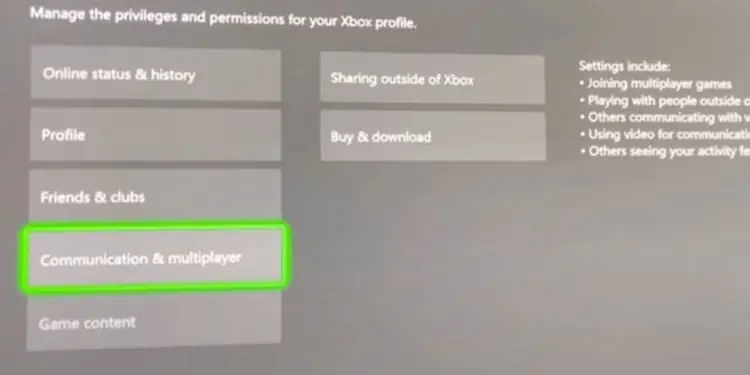
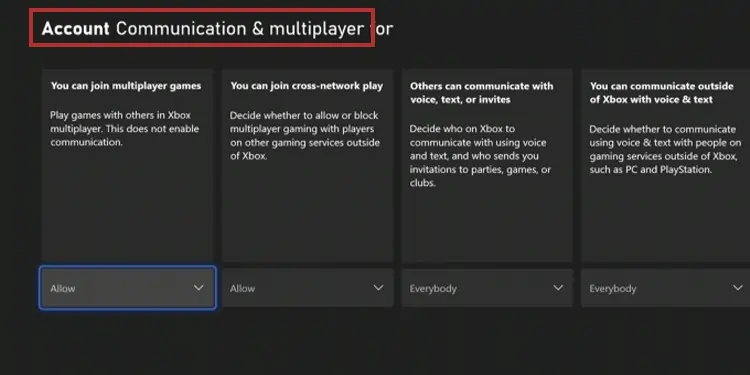
- All of the available privacy options are in various sub-menus. You need to go to “Communications & multiplayer.”

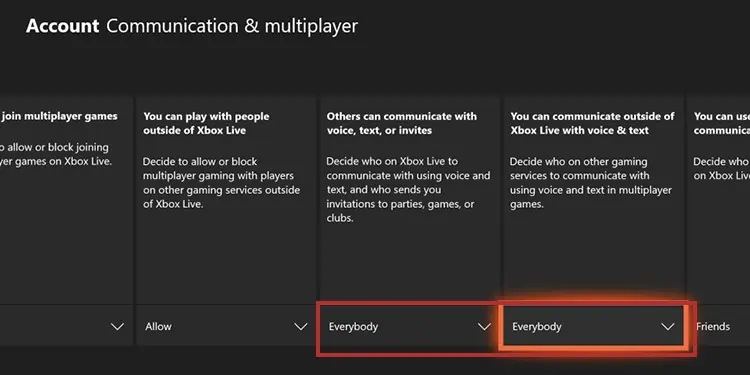
- In specific, you have to change these settings to enable party chats on Xbox:
- “Others can communicate with voice, text, or invites”: set to Everybody or Friends.
- “You can communicate outside of Xbox Live with voice & text.” set to Everybody or Friends.

- On the same menu, choose the following options.
- “You can join multiplayer games:” set to Allow.
- “You can join the cross-network play.” set to Allow.

If these options were different, they were the reason why the Fortnite mic didn’t work. However, you probably can’t change these settings if you’re a minor.
The solution is to ask the family manager of your Xbox (perhaps your father) to change these settings for you. You can check this guide for further information.
Clear Cache
The cache is a temporary file dump: the console uses these files to open regular items faster, but the folder becomes overwhelming over time. So, it would be good to erase it once in a while. There’re two methods to do it on Xbox, and we recommend doing both.
Both the PS4 and the PS5 generate a cache to store files they use regularly. It helps the system open common tasks faster.
So, here’s how to clean the cache on both Xbox and PS consoles:
On Xbox
- Press the Xbox button.
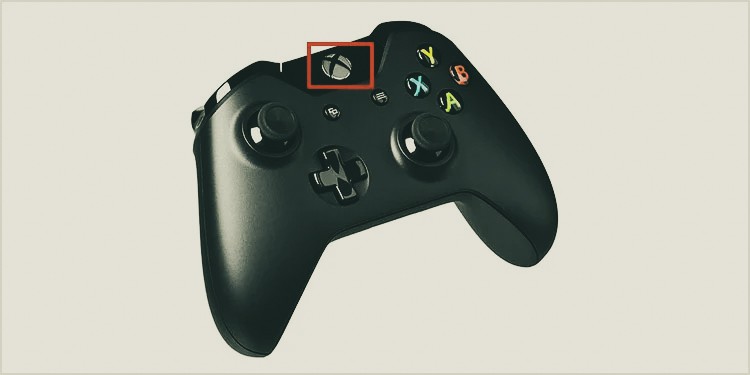
- Select profile & system.
- Select Settings.
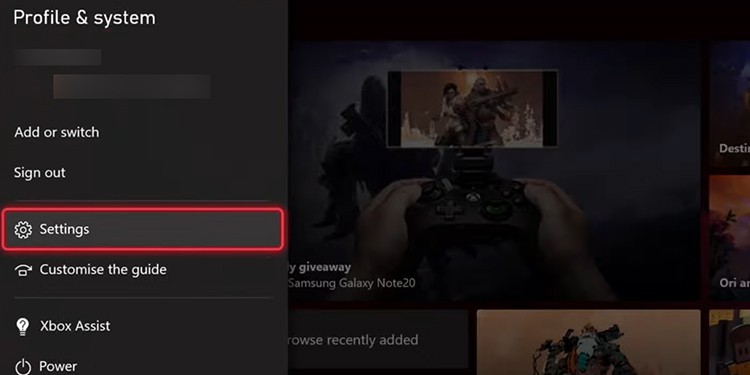
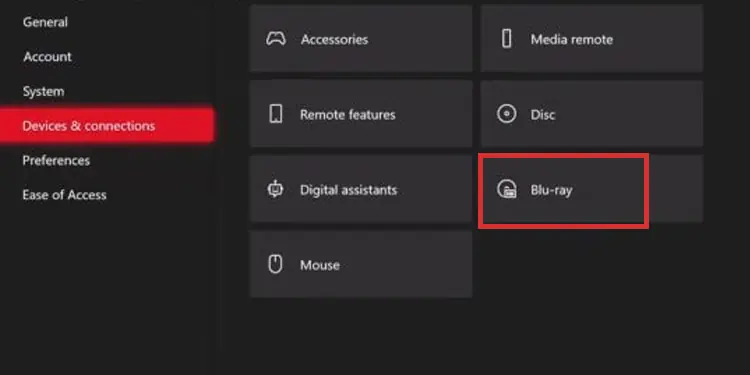
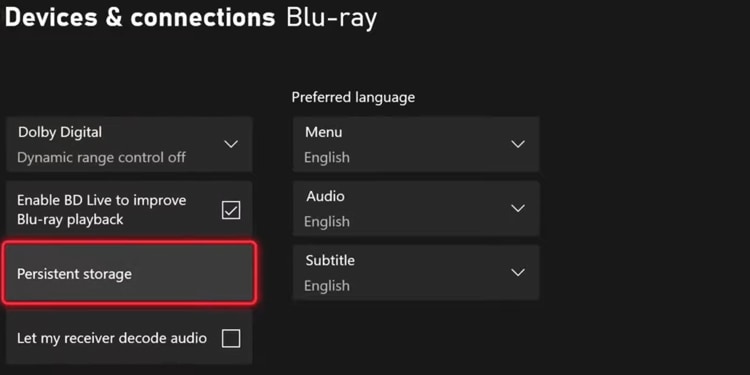
- Go to Devices & connections.
- Go to Blu-ray.

- Select Persistent Storage.
- Select Clear Persistent Storage.
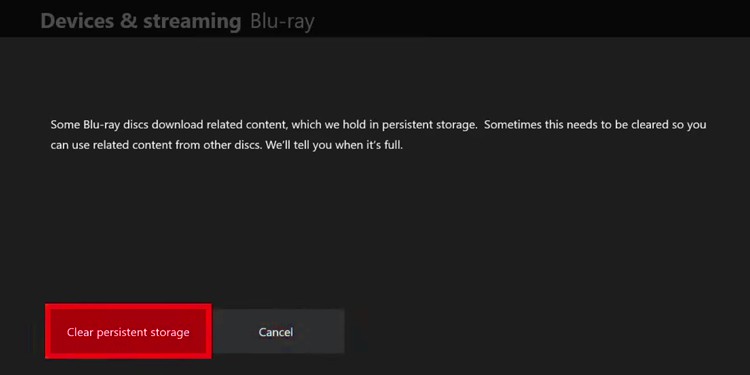
Next, power cycle the console. A power cycle is a soft reset that cleans the console’s cache and helps delete random software and power-related errors.
- Press and hold the power button on the console, so it shuts off.
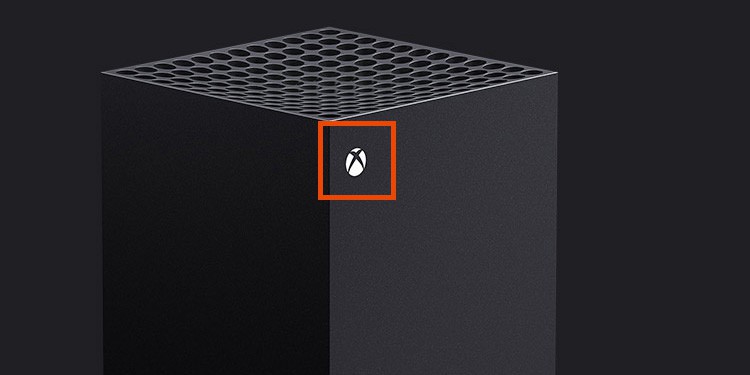
- Unplug all of its cables and peripherals.
- Press and hold the power button on the console again to drain the remaining power.
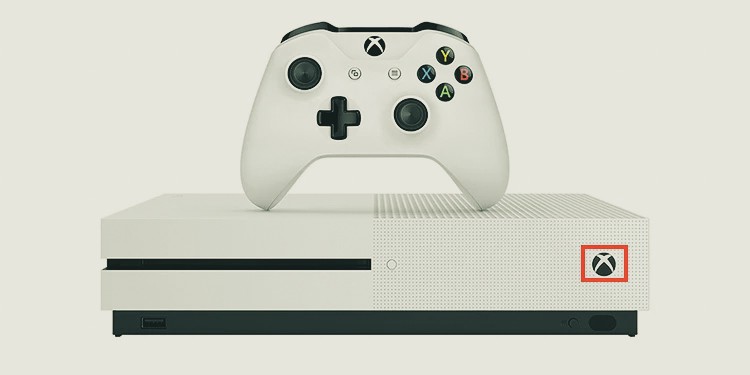
- Repeat the step above three times in the spawn of 5 minutes.
- Plug back cables and peripherals.
- Turn the console on.
Now, you can try playing Fortnite again. Additionally, the console should feel faster.
On PS4/PS5
- Shut down the console entirely by pressing and holding its power button.
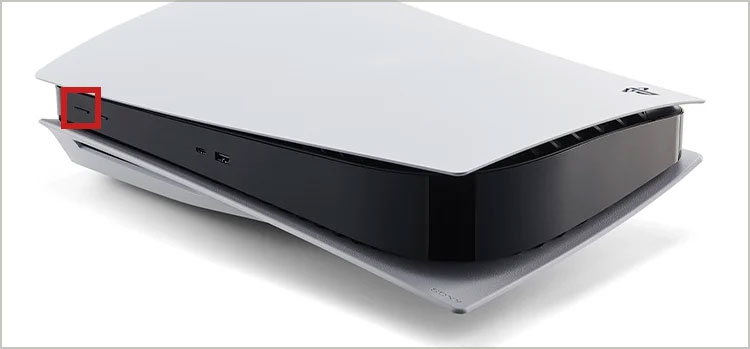
- Press and hold the power button again for seven seconds. You will hear two beeps. The second beep indicates the console is engaged in its Safe Mode troubleshooter.
- When you see the screen in the picture below, connect the controller via the USB cable to the console.
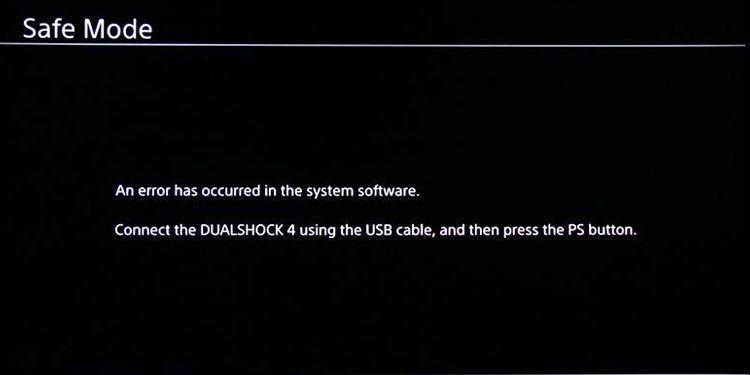
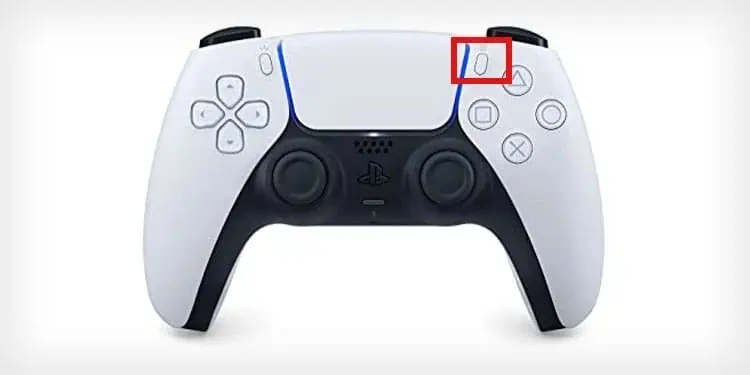
- Press the PS button on the controller.
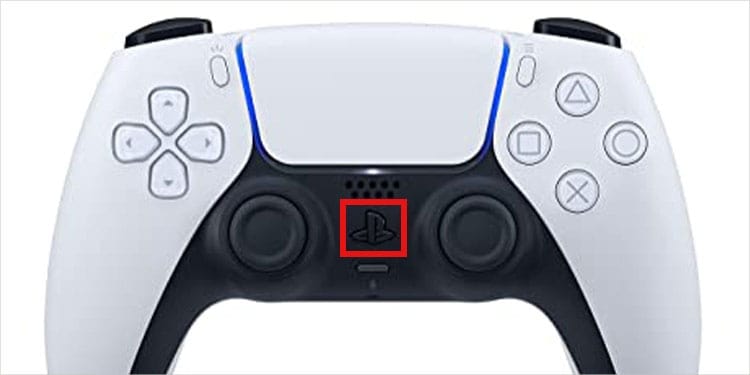
- Select Clear Cache & Rebuilt Database. You may see it as “Rebuild Database” only, which will clear the cache.
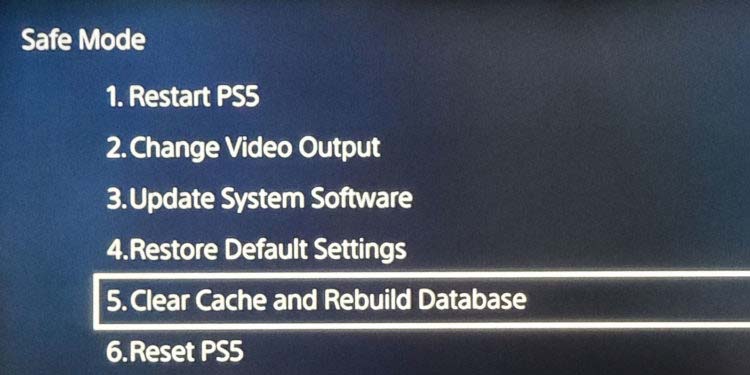
- Wait until the process is completed.
Change the DNS
DNS Stands for Dynamic Name System. It’s a Service that Translates Ip Numbers Into Web Pages and Server Names. so, the better it is, the faster it can connect you to a server or a page, i.e., Fortnite’s Servers.
Your internet service provider grants the DNS to the devices on your network are using. However, you can use a public solution (from tech companies like Cloudflare and Google) to improve the speed.
This solution is in case your connection is too slow, which makes the party chat unreliable. We’re sharing the steps for PS4, PS5, Xbox One, Xbox Series, Nintendo Switch, and Windows.
On PS4
- Go to Settings.

- Go to Network.
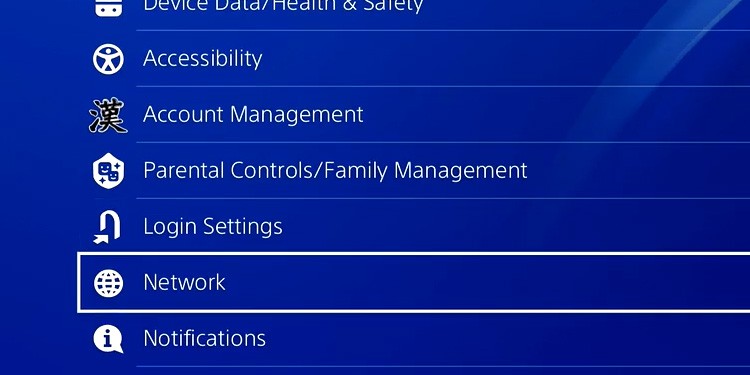
- Go to Set Up Internet Connection.
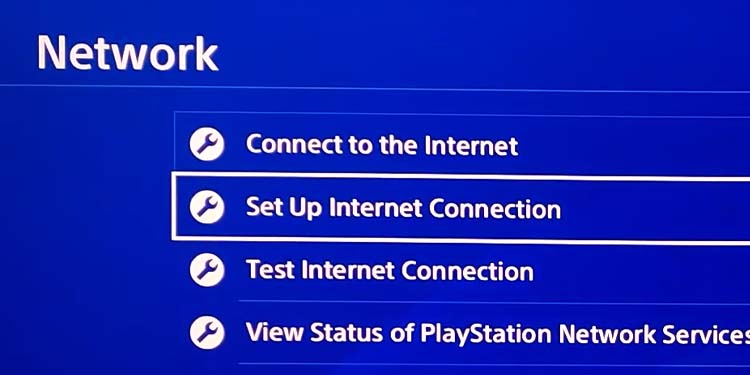
- Select Wi-Fi or Lan Cable, depending on your network. If you must, type the password.
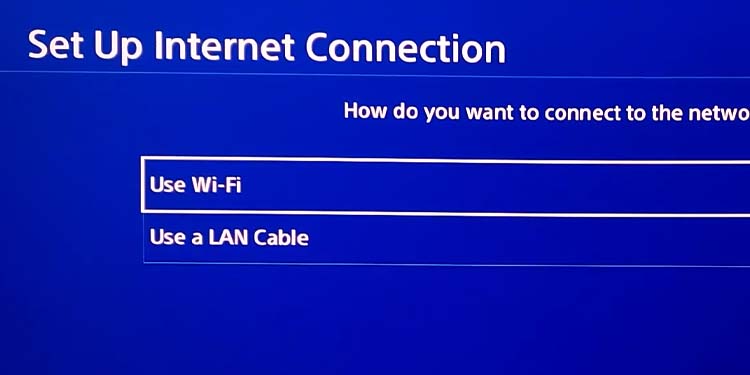
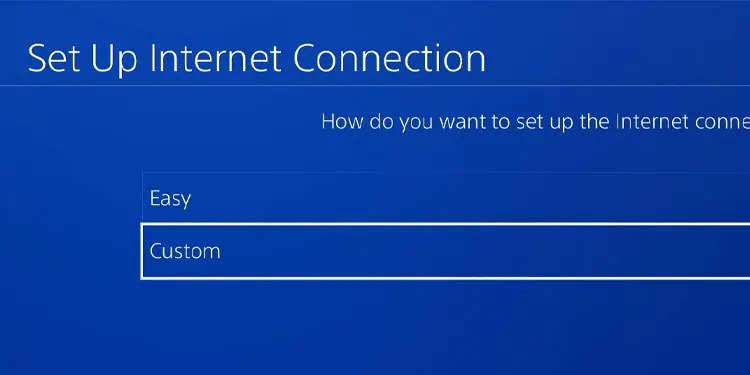
- Select Custom on “How do you want to set up an internet connection?”

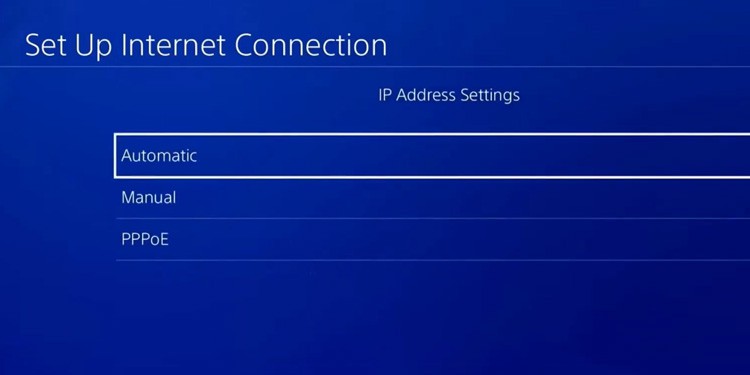
- Select Automatic on IP Address Settings.
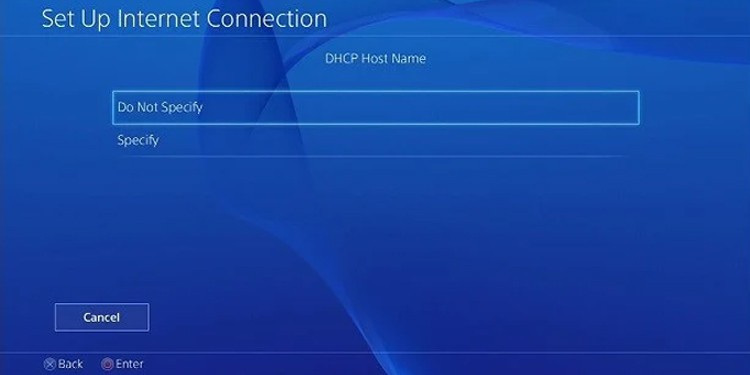
- Select “Do Not Specify” on “DHCP Host Name.”
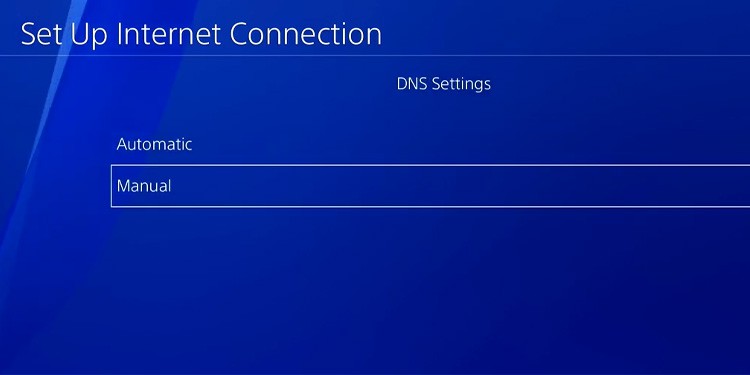
- On DNS Settings, select Manual.
- We’ve picked Google’s DNS address:
Primary: 8.8.8.8
Secondary: 8.8.4.4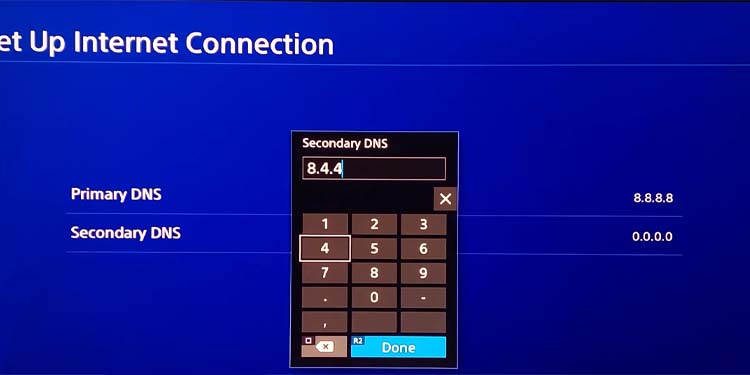
- Select Next to finish.
On PS5
- Go to Settings.
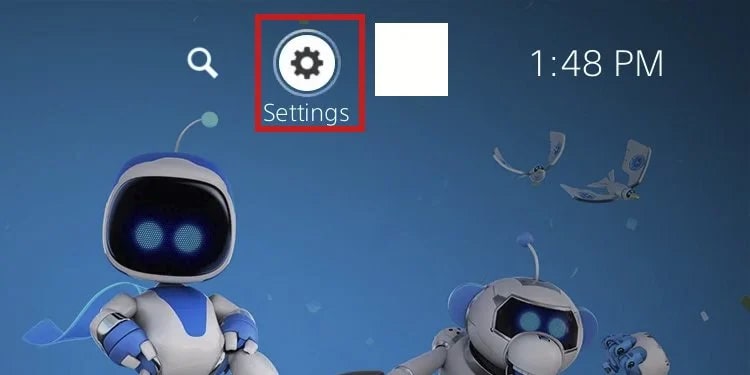
- Select Network.
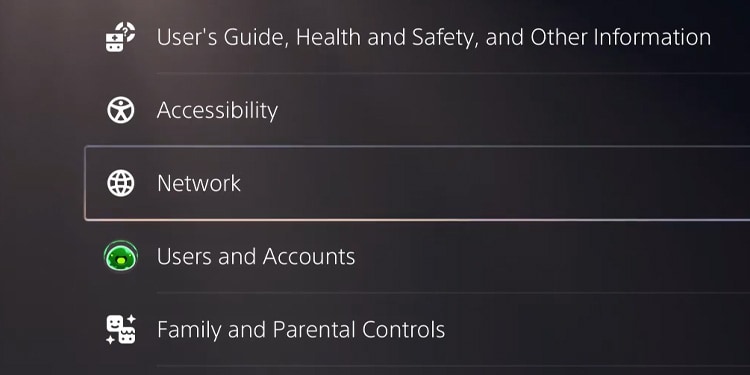
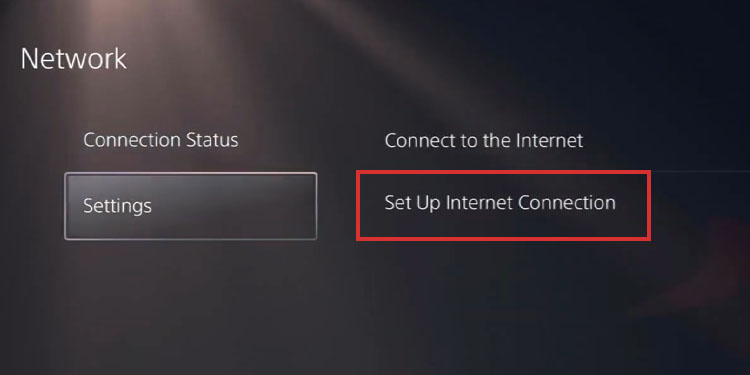
- Select Settings
- Select Set Up Internet Connection.
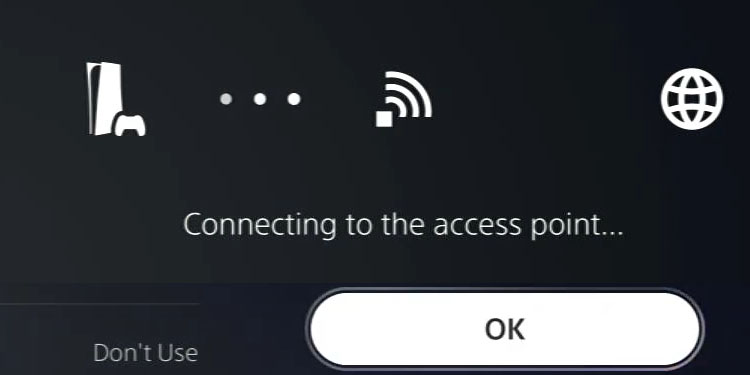
- Choose the network you’re using (Wi-Fi or LAN). Then, type the password (if you must).
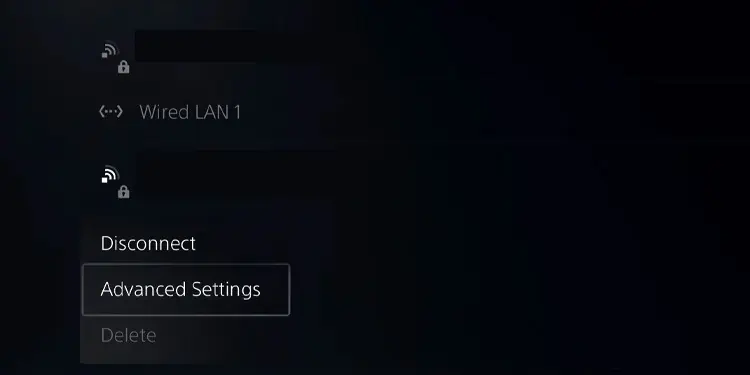
- Hover over to your network and press the controller’s options button.

- Select Advanced Settings.

- Go to Primary and Secondary DNS to type Google’s public DNS address.
Primary: 8.8.8.8
Secondary: 8.8.4.4 - Press OK to confirm.
On Xbox One/Xbox Series
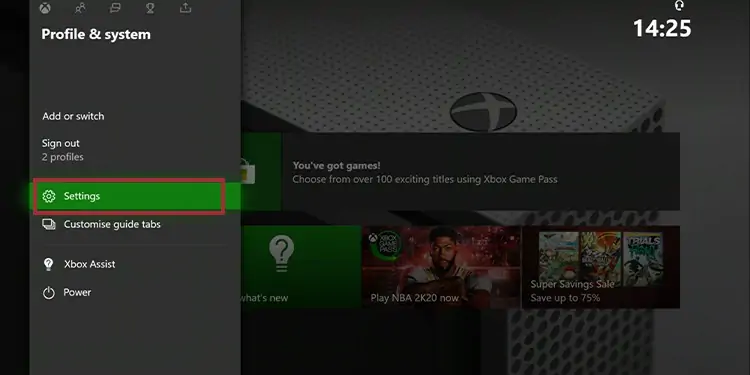
- Press the Xbox button on the controller
- Go to profile & system.
- Go to Settings.

- Go to General.
- Go to Network settings on the right.
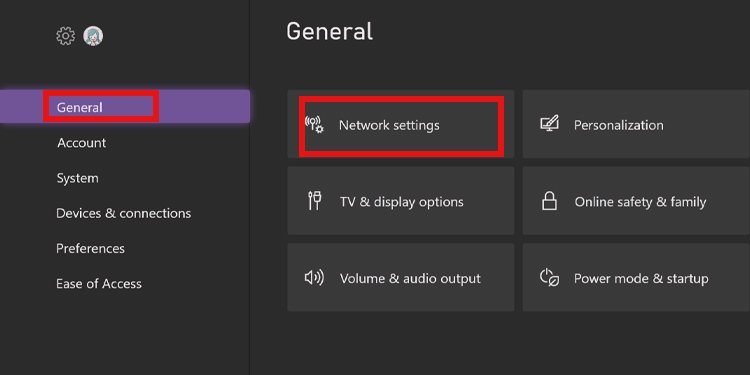
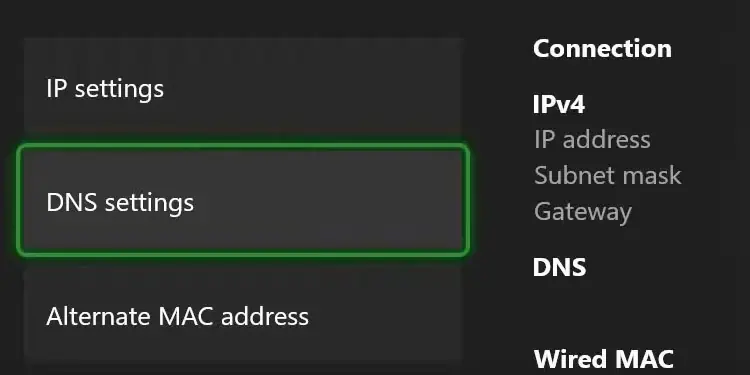
- Open Advanced settings.
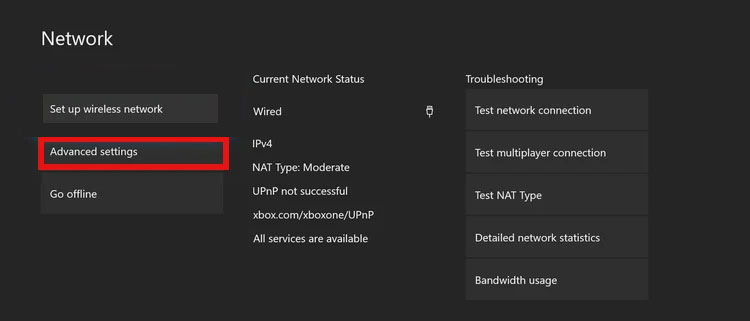
- Go to DNS settings.

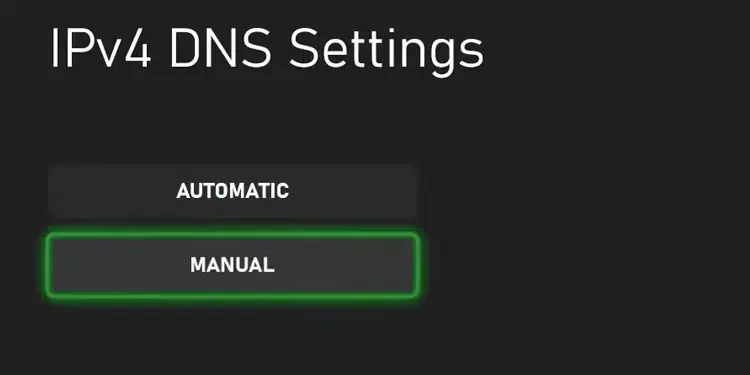
- Select Manual.

- Add a public DNS. For Xbox consoles, we recommend using Google’s DNS address:
Primary: 8.8.8.8
Secondary: 8.8.4.4 - Retry if your Fornite mic starts working.
On Nintendo Switch
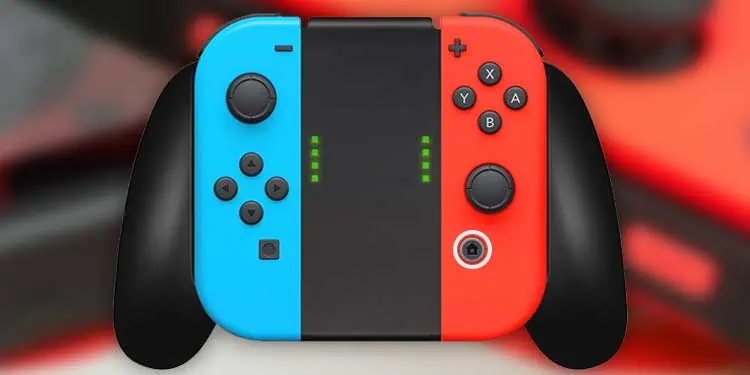
- Tab the Home button on the controller.

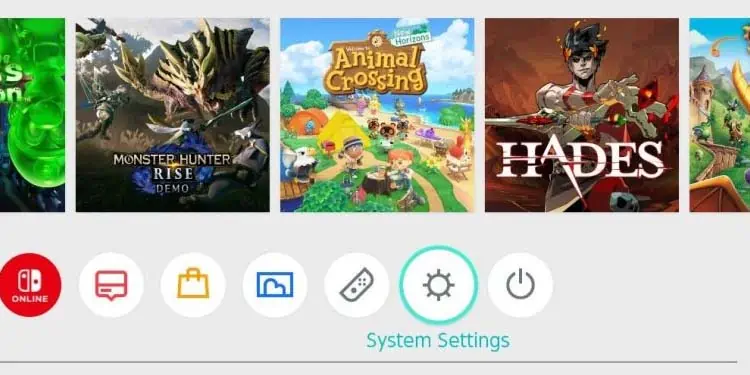
- Go to Settings.

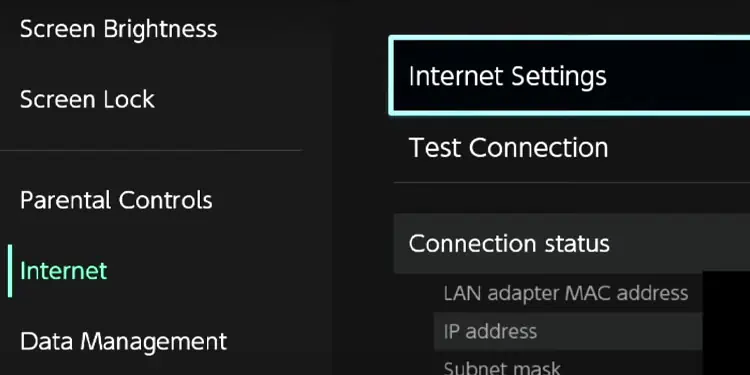
- Go to Internet.
- Select Internet Settings.

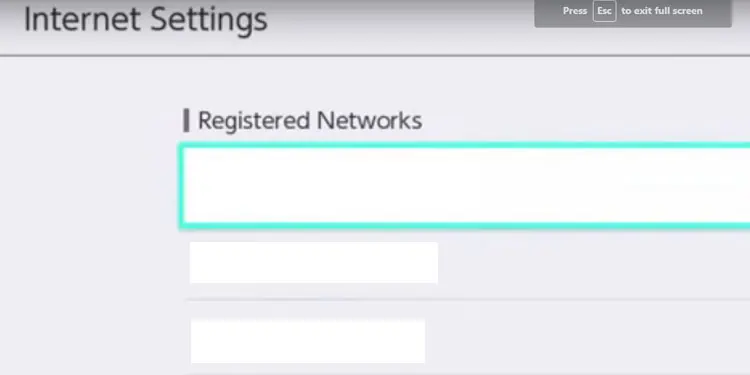
- Select your network.

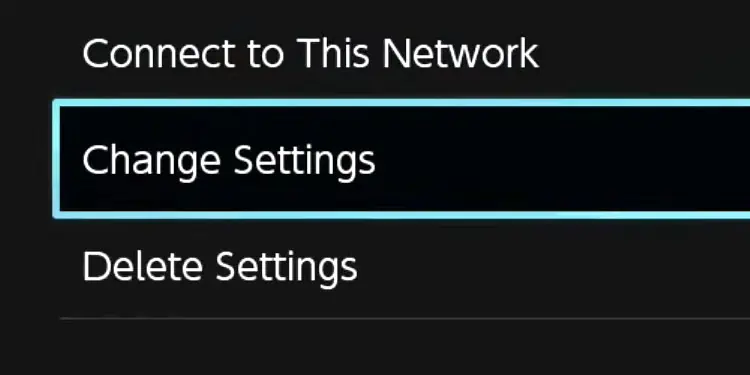
- Select Change Settings.

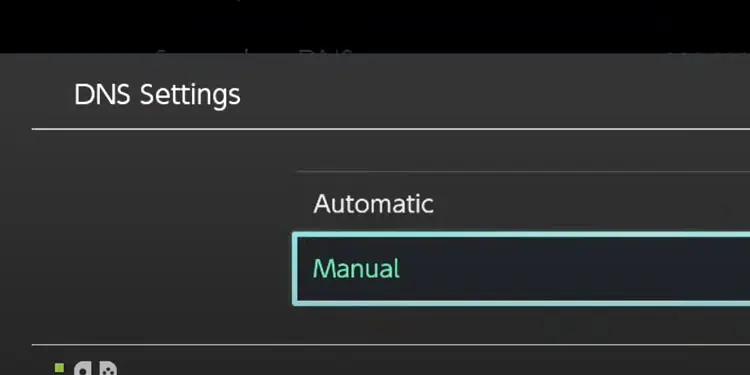
- Select DNS > Manual.

- Type the following Google’s DNS Address:
Primary: 8.8.8.8
Secondary: 8.8.4.4 - Check if your mic starts working.
On Windows 10
- Type Control Panel on the search bar and open Control Panel.

- Select Network and Internet on the left-side menu.
- Select Network and Sharing Center.
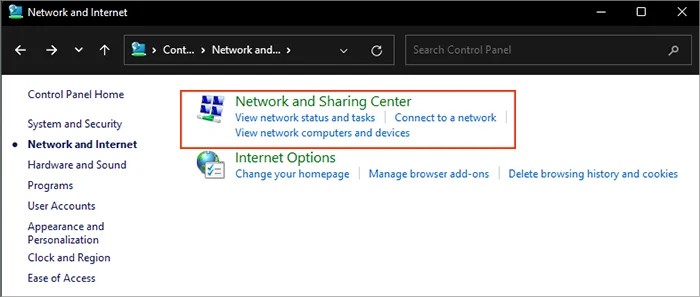
- Click on “Change adapter settings” on the left.
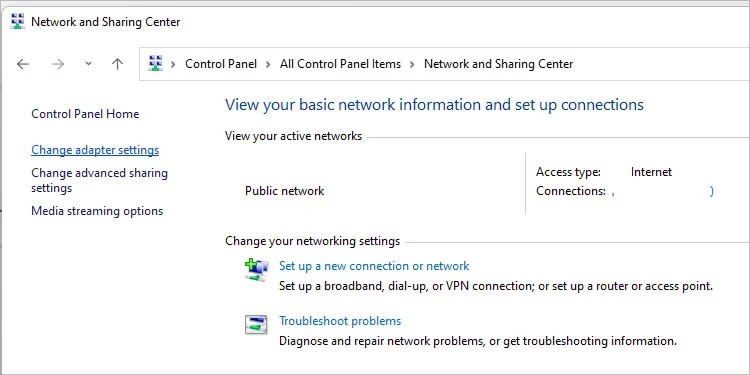
- Right-click your network and click Properties.
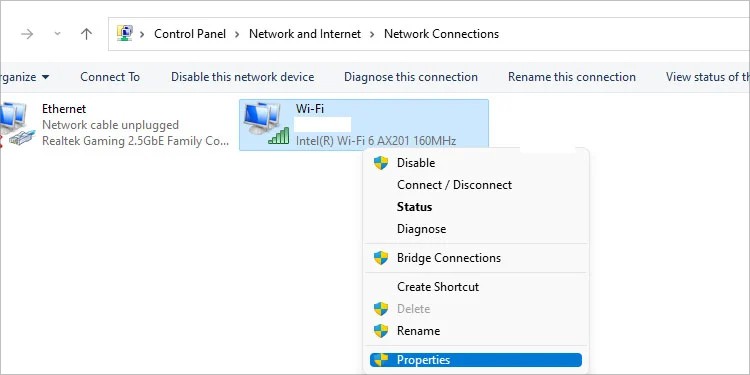
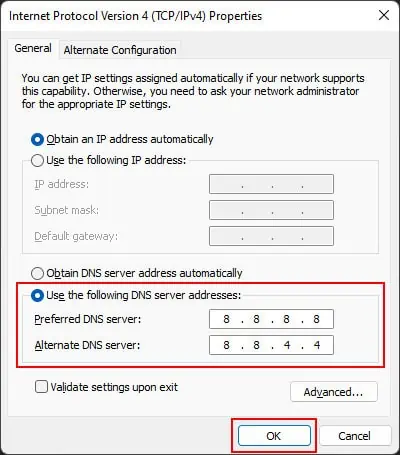
- Double-click “Internet Protocol Version 4 (TCP/IPv4).”
- Check “Use the following DNS address.”
- Type Google’s public DNS address:
Primary: 8.8.8.8
Secondary: 8.8.4.4
Port Forward the Router
The last part of the troubleshooter is port forwarding the router. This process will bypass the NAT configuration on the console, its built-in security feature.
Look at the table below:
| NAT Type | Open | Moderate | Strict |
|---|---|---|---|
| Open (type 1 or “A”) | Yes | Yes | Yes |
| Moderate (type 2 or “B”) | Yes | Yes | No |
| Strict (type 3 or “C”) | Yes | No | No |
First off, check if the NAT type on your console is correct. It should be either Open or Moderate, and you can check it by testing the internet connection on the console’s internet menu.
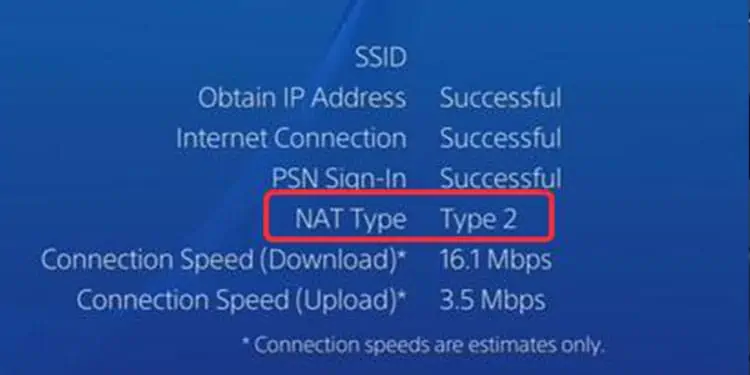
If the NAT type is a “Strict” configuration, you’ll know you have to change it. There’s no easy way to check on a PC, but port forwarding the PC is simple.
By the way, port forwarding means telling a device to work on a specific port to allow full online communication.
On Windows 10/11
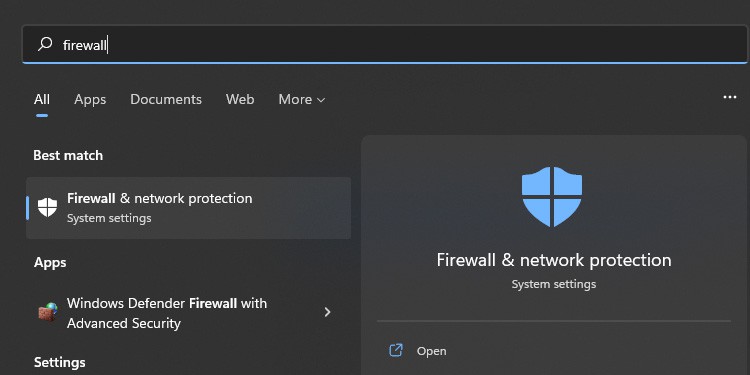
- Click the Windows icon and type “Firewall.”
- Open “Firewall & network protection.”
- Select Advanced Settings.
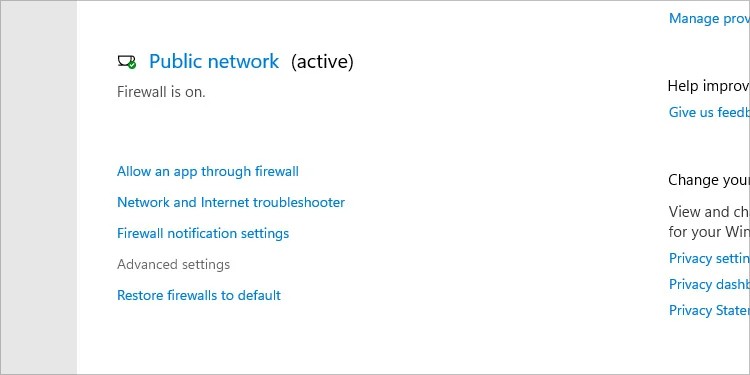
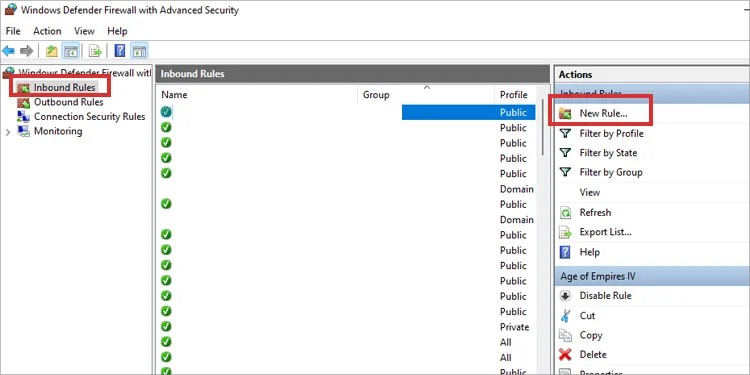
- On the left, click on Inbound Rules. On the right, select New Rule.
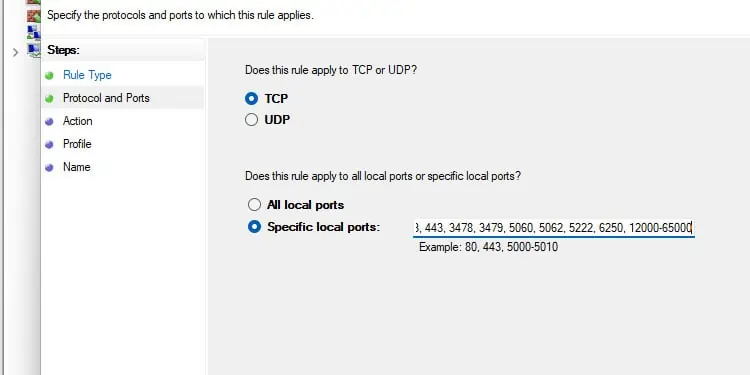
- On Rule Type, check Port.
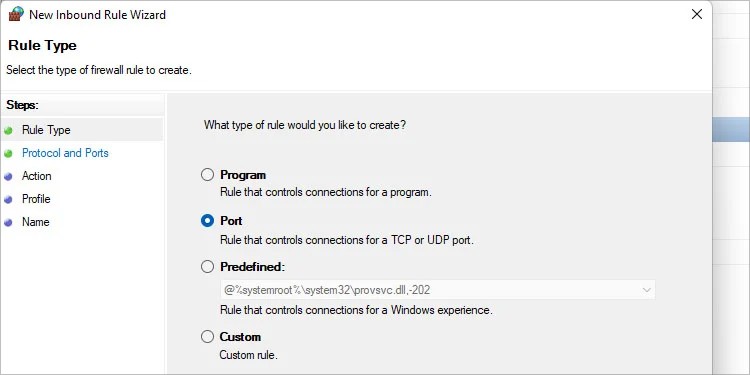
- The ports you need for Fortnite are 80, 433, 443, 3478, 3479, 5060, 5062, 5222, 6250, 12000-65000. Copy and paste those numbers and check “Specific local ports.” Also, check TPC.

- Click Next.
- Check “Allow the connection.”
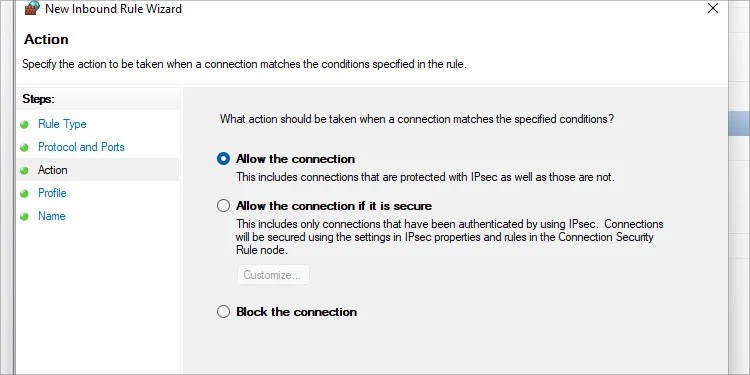
- Click Next again.
- Leave the Profile menu as is.
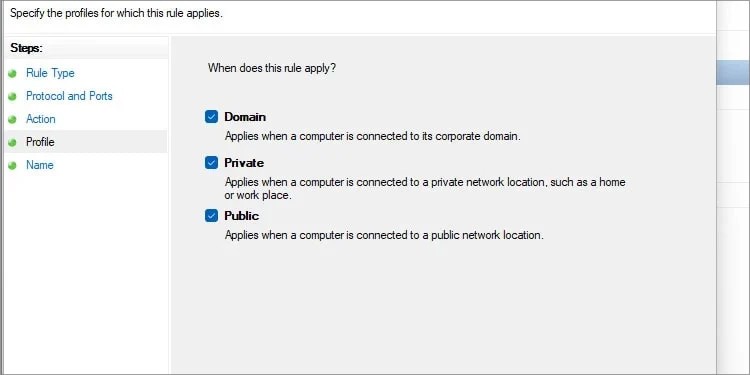
- Click Next.
- If you wish, type a name for the new server on the last page and select Finish to confirm.
On Console
The process to change NAT type is complex on consoles. However, it will solve any UPnP issues. You can check our separate guide on how to change NAT on PS4/PS5.
Follow these steps to port forward on your console:
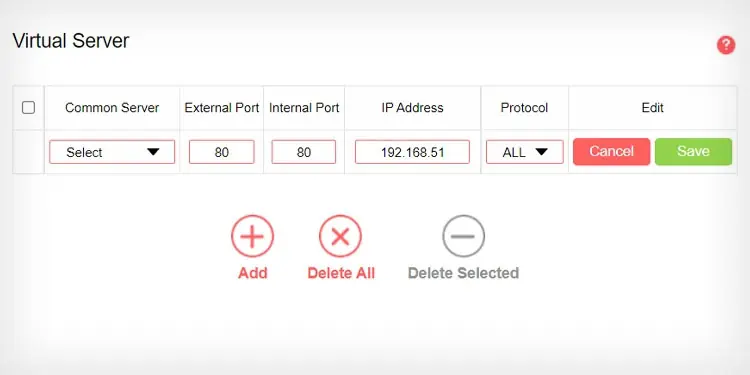
- Add a static IP address to your console
- Go to your router’s admin page
- Enable UPnP
- Find the port forwarding bracket
- Add the ports you need and type your console’s static IP address on the bar.

But if you follow the guide, these are the ports you need to type.
| PS4 | TCP: 433, 1935, 3478-3480, 5222 UDP: 3074, 3478-3479 |
| PS5 | TCP: 433, 1935, 3478-3480, 5222 UDP: 3074, 3478-3479 |
| Nintendo Switch | TCP: 433, 5222, 6667, 12400, 28910, 29900-29901, 29920 UDP: 1-65535 |
| Xbox One | TCP: 433, 3074, 5222 UDP: 88, 500, 3074, 3544, 4500 |
| Xbox Series X/S | TCP: 433, 3074, 5222 UDP: 88, 500, 3074, 3544, 4500 |

