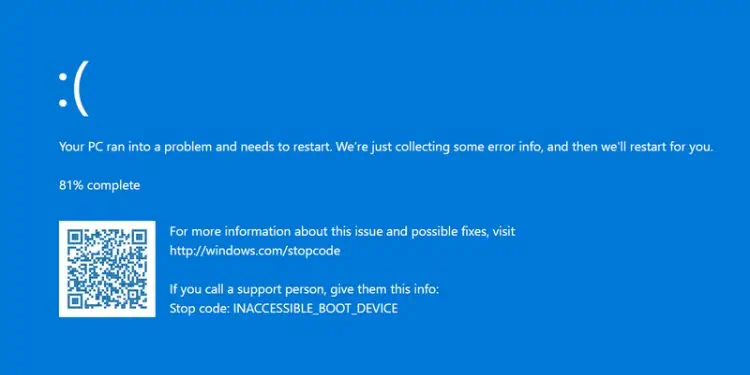
The “Inaccessible Boot Device” BSOD error is more prominent with users who recently updated their Windows or performed a clean installation to upgrade the OS. Sometimes, it is accompanied by a 0x0000007B stop code which indicates faults with your storage device.
While the root cause for every user is different, you’re likely facing the issue due to incompatibility, corrupted boot sectors/disk, problematic system files, or even a faulty hardware component.
Looking at the community forums, it seems to be quite a problematic error as some users were even stuck with the issue for months! But you do not have to worry as this comprehensive guide should help you fix it.
Basic Troubleshooting Tips
If you’re getting the “Inaccessible Boot Device” error for the first time, let’s start with some basic troubleshooting that can sometimes solve it. In case you’ve already tried them, you may move ahead with the major fixes below.
- Hard restart and power discharge: This includes pressing the power button for 3 to 5 seconds until the device turns off and removing it from the power source. Now, disconnect all the USB-attached peripherals and press the power button for at least 10 seconds again.
This should discharge the remaining capacitors and possibly fix the related issues that exist with your hardware components. - Check for connectivity issues: If you recently replaced or added a new hard drive, loose connections can also lead to this error. Suppose the SATA cable you’re connecting to is damaged or the connection is loose, causing frequent disconnections. This can lead the OS not to detect your drive and sometimes trigger the blue screen of death.
- Automatic Repair: If you wait for the PC to restart, you’re likely going to encounter the BSOD again. Let this run two to three times which should trigger the built-in Windows Automatic Repair. In some cases, this has helped solve the problem.
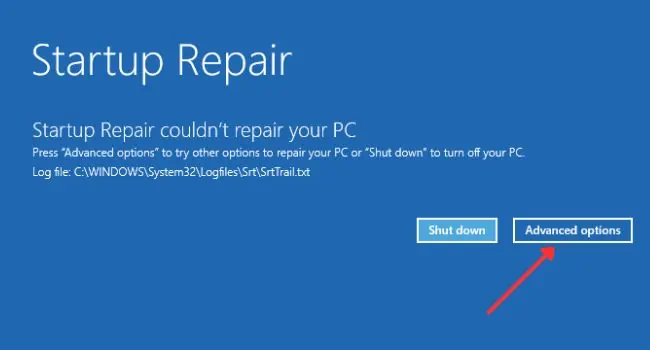
But if you’re getting the “Automatic Repair couldn’t repair your PC” error, press the Advanced options button to enter the recovery environment and proceed with the major fixes below.
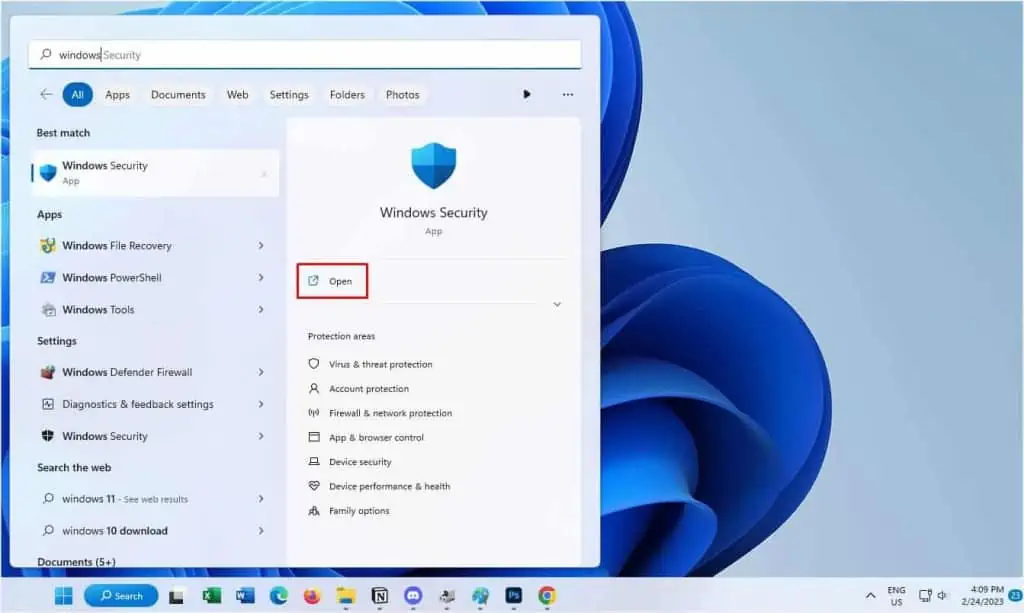
Do not press the Restart button, or you’ll get stuck in the Automatic Repair to BSOD loop. - Perform Virus Scan: Some users were reportedly able to boot into Windows but were troubled by frequent BSOD. This is probably due to malware infection in the integral parts of their storage drive. A simple workaround to this problem is to perform a full scan the next time your PC starts. You may use Virus & threat protection in Windows Security.
Verify Your Boot Device
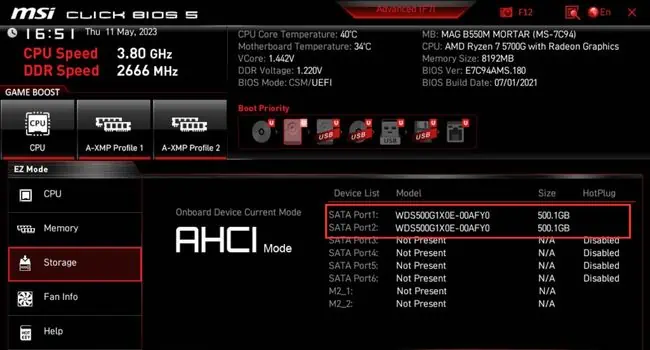
Let’s start the advanced troubleshooting by confirming whether the storage device is detected by your system. First, check this on your BIOS/UEFI interface:
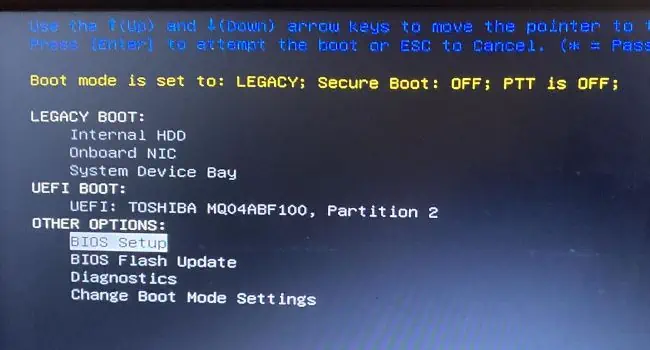
- Force restart your computer and wait for the manufacturer logo to display on the monitor.

- Repeatedly hit the BIOS key to access the related settings.
- Once you’re in the BIOS/UEFI interface, get to the Storage section and identify whether your device is listed there.

- If you do not see your HDD/SSD here, you’ll need to reinstall it. It’s a good idea to check your motherboard’s user manual. In some cases, you require connecting the SATA cable to a specific port.
Even though the BIOS detects your storage drive, there are cases when Windows might not recognize it. Here are the Microsoft-recommended instructions that you need to follow:
- In the Automatic repair screen, press the Advanced options button to continue.

- You’ll now be taken to the recovery environment. If you’re unable to get to the Windows RE, you’ll require a Windows recovery media. Insert this on your PC, and in the setup screen, select Repair your computer.
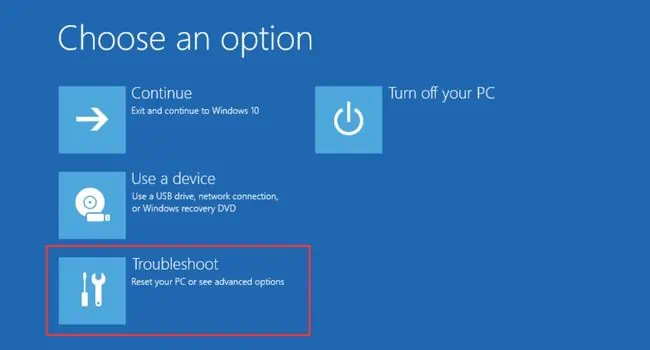
- Once you’re in the Choose an Option window, tap the Troubleshoot option.

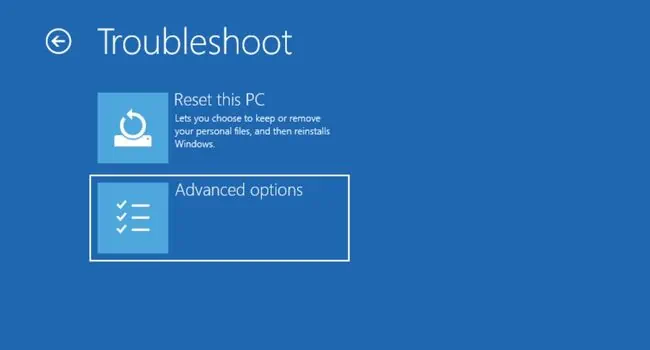
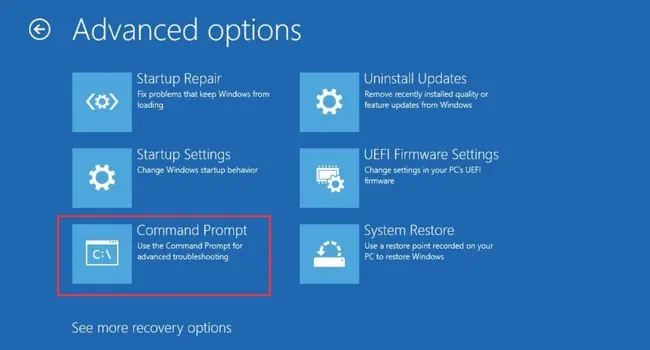
- Next, choose Advanced options.

- Finally, pick the Command Prompt option.

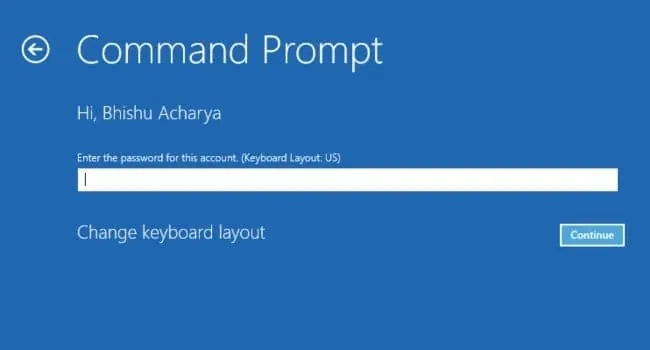
- For users who have set up a Microsoft account on their PC, choose your account and enter its correct password to open up the CLI.

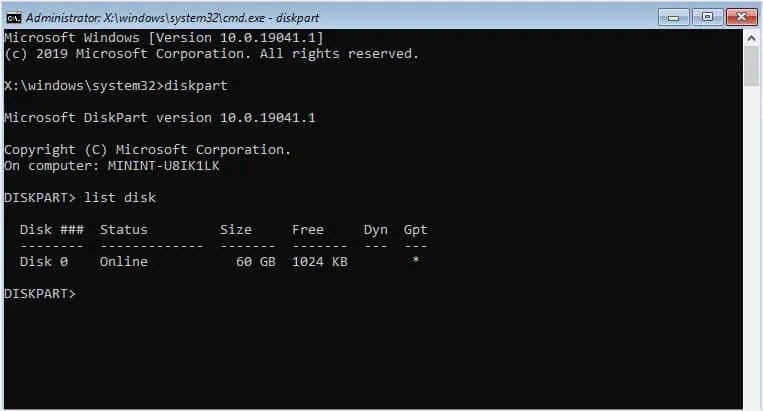
- In the prompt, execute the
diskpartcommand. - Once the Dispart utility starts, enter the
list diskcommand to verify if your storage device is listed.
- If you do not find it here, shut down your PC and reconnect it. Even if this doesn’t help, your hard drive might have gone corrupted or isn’t compatible with your current setup.
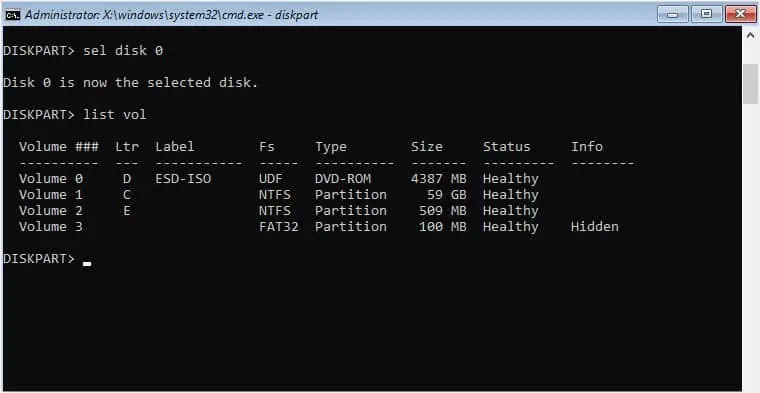
- Now, select your current disk using the
sel disk <disk_number>command. - Then, execute the
list volcommand to list all the partitions inside the disk.
- Here, identify your boot partition. In case it’s not listed, try reconnecting the drive and repeat the steps.
Configure Storage Controller Mode
Unless your system isn’t very old, I’m pretty sure you’re using a SATA hard drive (or probably an NVMe SSD). One of the primary reasons for the “Inaccessible boot device” is compatibility issues between the drive and its SATA controller.
However, if you’ve enabled PATA in the BIOS and you’re trying to use a SATA HDD/SSD, it’s quite obvious that your system can’t access the boot device. Follow the simple steps below to fix this:
- Force shut down your computer and turn it back on.
- Before Windows boots up, use the BIOS key to enter the dedicated interface.
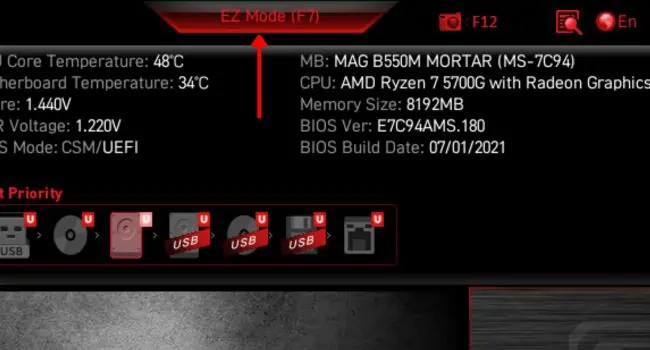
- As demonstrated below, get to the EZ-Mode. You may hit the F7 or a pre-defined key based on your motherboard.

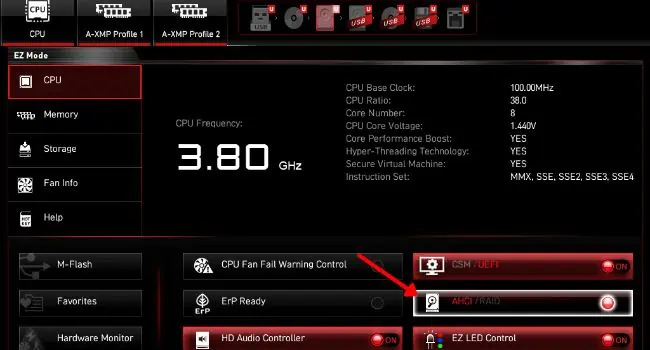
- Find AHCI/RAID/IDE option and set it to AHCI if you have a SATA hard drive. But if you own a relatively older PATA HDD, it’s recommended to set the option to IDE.

- Now, save the BIOS settings and exit.

- Once your computer restarts, check if the BSOD persists.
Fix Memory Integrity Issue
Certainly, this BSOD error is not a minor problem as it seems to affect most Dell users who have tried the Windows 11 22H2 upgrade.
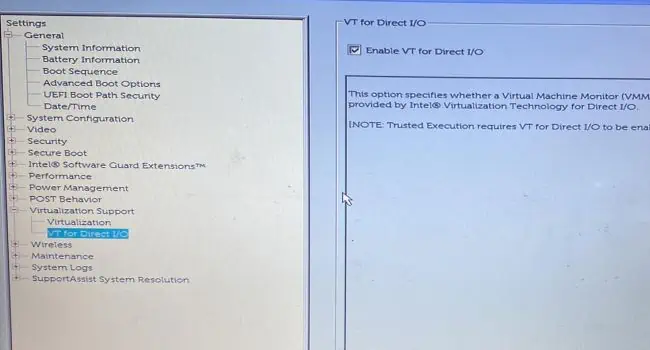
Moreover, some are experiencing the same problem when rebooting their devices after enabling the Memory Integrity feature. This seems to be a bug and can be fixed by disabling VT for Direct I/O.
If you’re also a Dell user who is in a similar situation, here’s what you need to do:
- First, hard reboot your Dell laptop/PC and use the BIOS menu key to access the interface.

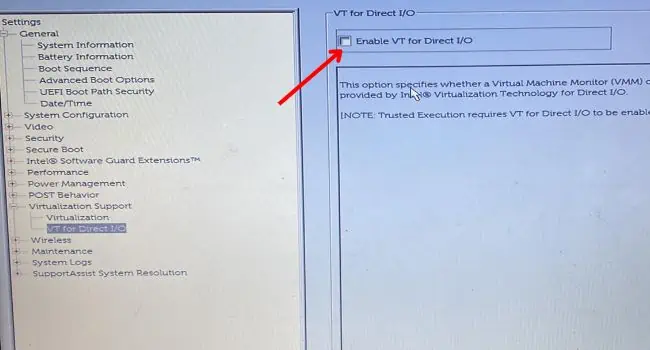
- From the left pane, expand Virtualization Support and choose VT for Direct I/O.

- Switch to the right pane and uncheck the Enable VT for Direct I/O option.

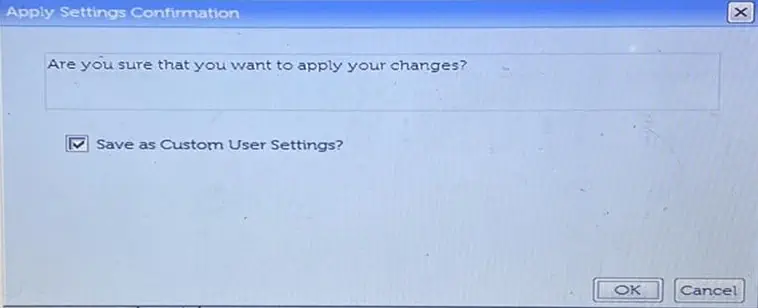
- Then, press the Apply button to save the settings.
- In the Apply Settings Confirmation prompt, press Ok.

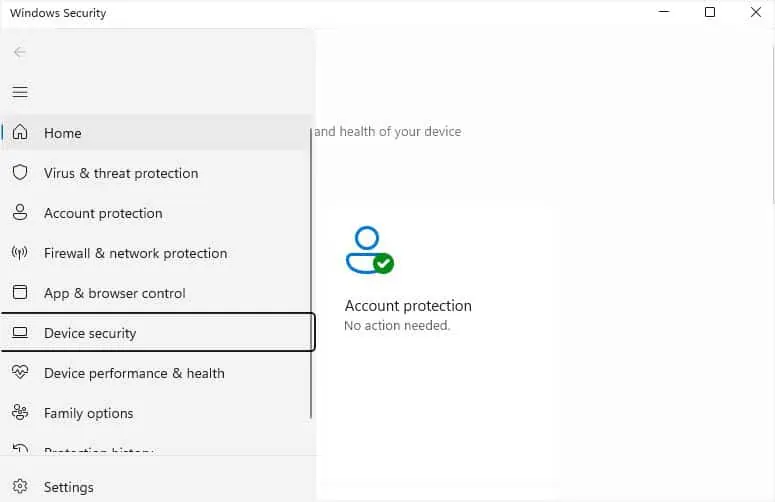
- Now, reboot your Dell computer, and once you log in to Windows, open Windows Security.

- Select Device Security from the left pane.

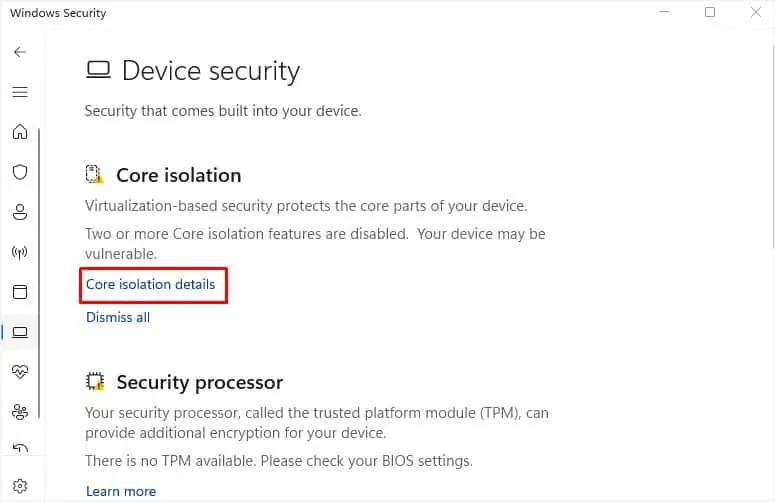
- From the Core Isolation section, click on Core Isolation details.

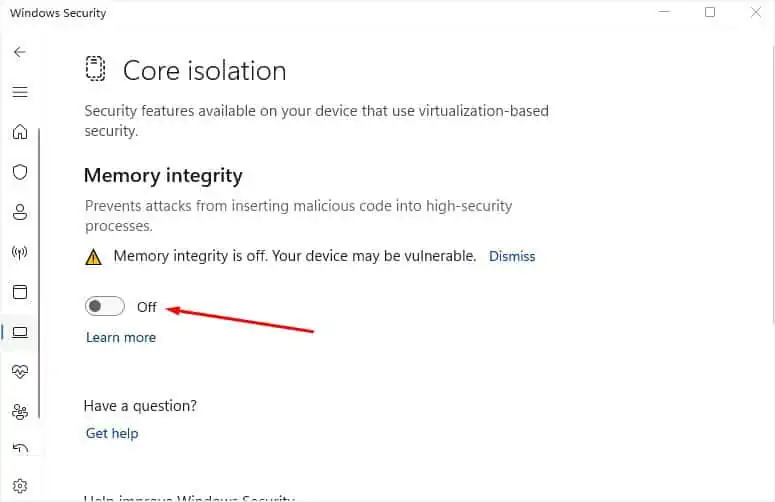
- Now, turn on the Memory Integration feature.

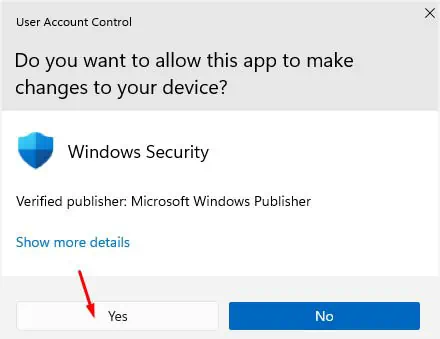
- Hit Yes in the User Account Control Prompt to confirm your action.

- Reboot your Dell laptop/PC to apply the new Windows Security settings. Now, you should see that the BSOD error is resolved.
Note: If the above step didn’t help, disable Memory Integrity and wait for the manufacturer to patch the issue.
Repair Boot Sector
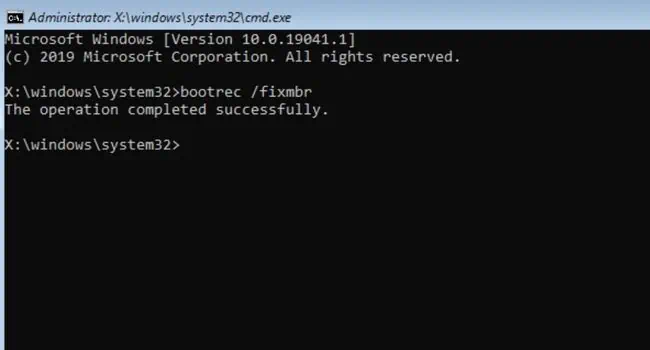
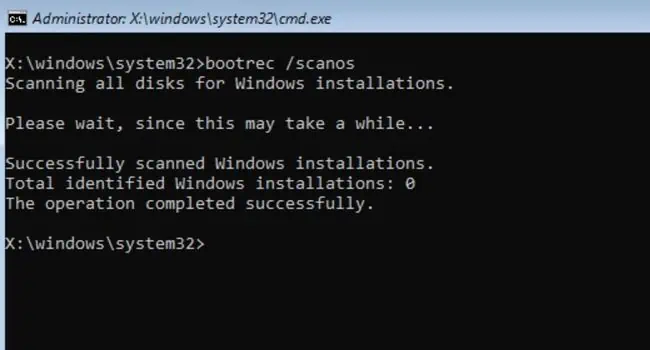
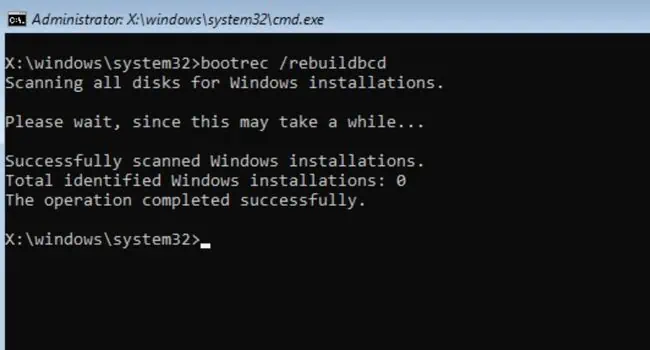
When the Windows bootloader gets corrupted or the BCD files go missing, it can possibly lead to the “Inaccessible Boot Device” BSOD error. Fortunately, it’s possible to repair the boot sector and completely rebuild the BCD to fix this problem.
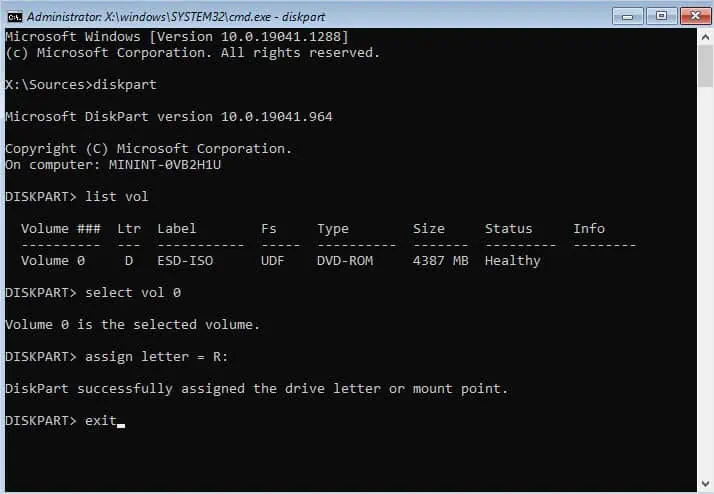
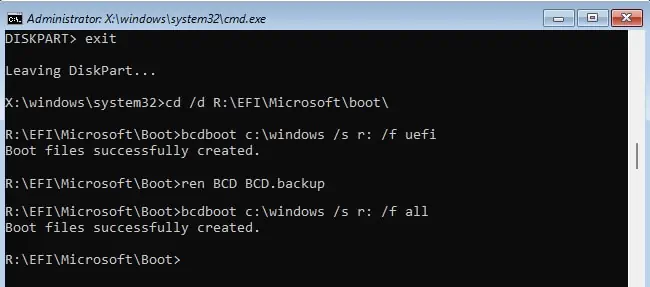
Do note that the steps vary depending on your storage device partition. In this section, I’ve included the necessary commands you need to execute for both MBR and GPT drives. Make sure you enter the Command Prompt interface in the Windows RE before proceeding forward.
On MBR
bootrec /fixmbr
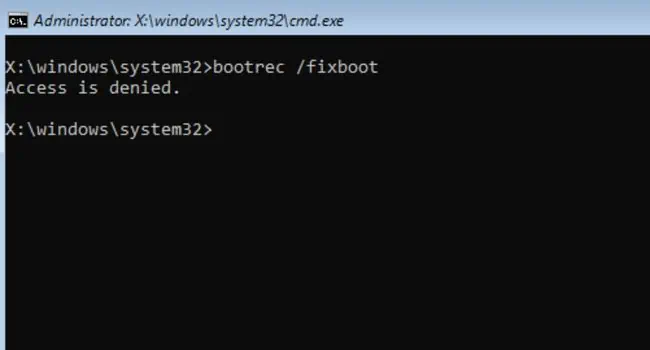
bootrec /fixboot
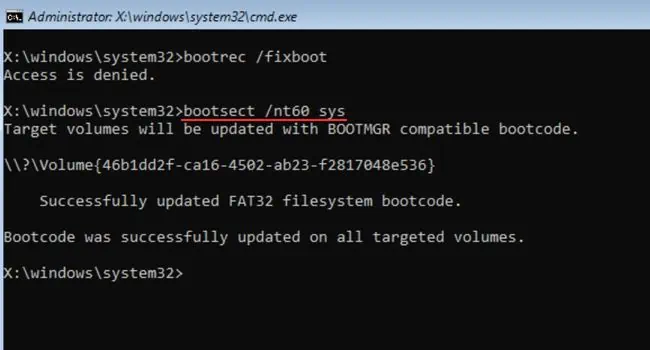
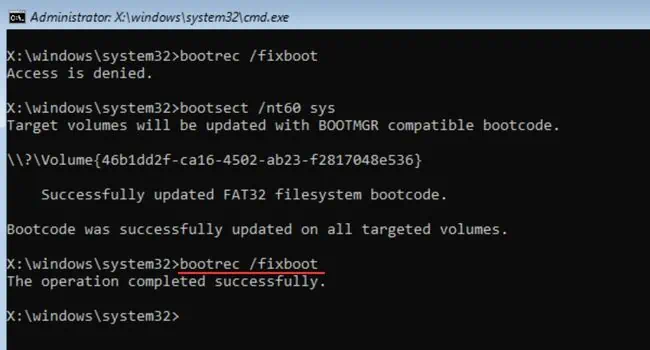
bootsect /nt60 sysorbootsect /nt60 all(if you encounter the ‘Access is denied‘error)
bootrec /fixboot
bootrec /scanos
bootrec /rebuildbcd
On GPT
diskpartselect volume <volume number containing the EFI system partition>assign letter = <any letter>:exit
cd /d <mount letter>:\EFI\Microsoft\Boot\bcdboot <drive letter>:\Windows /s <mount letter>: /f UEFIren BCD BCD.backupbcdboot <drive_letter>:\Windows /s <mount_letter>: /f ALL
Try Starting Your Computer in Safe Mode
Windows Safe Mode feature lets you know whether there’s an issue with your basic drivers, registry values, and the operating system as a whole. If you get the BSOD error when trying to start your computer in safe mode, know that there’s an issue with the Windows or its related settings.
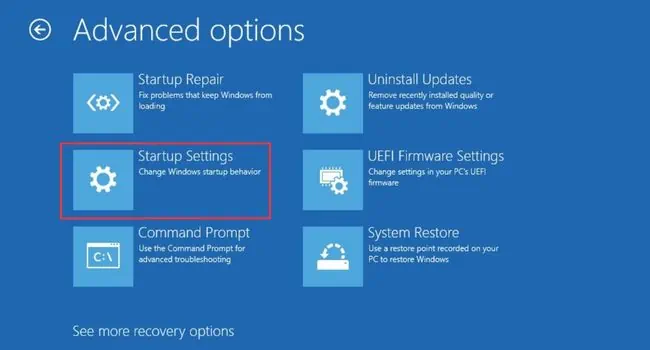
- First of all, start the recovery console window and go to Troubleshoot > Advanced options.
- Click on Startup Settings.

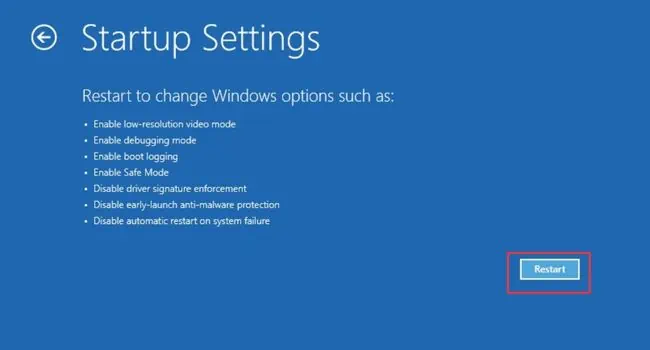
- Next, hit the Restart button and wait for the dedicated window to appear.

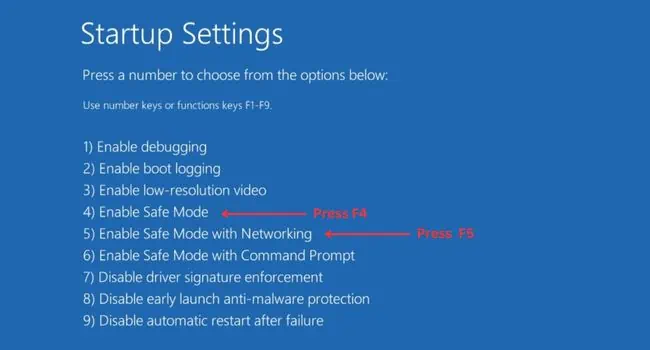
- Use F4 or F5 key to boot up in safe mode. The former will take you to one without networking while the latter will start the safe mode with networking available.

Revert Pending Windows Update Packages
In case you got the BSOD issue after a failed Windows update or upgrade, there might be pending packages, which can later lead to blue screen errors. By reverting these pending packages, it’s possible to resolve the conflicts and hence fix the infinite BSOD loop.
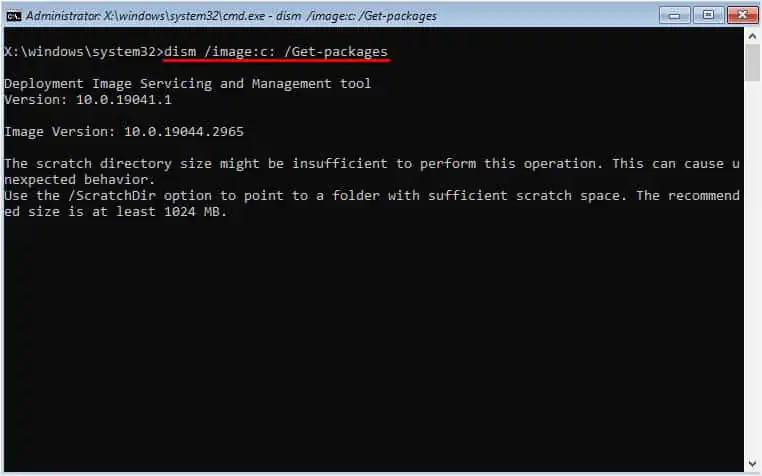
- In the Windows Recovery Environment, launch Command Prompt.
- Type the following to check for packages with their installation dates:
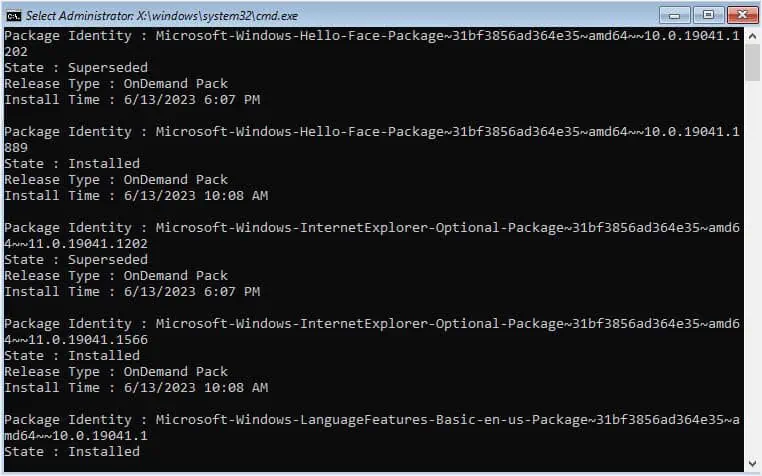
DISM /Image:<boot drive>: /Get-Packages
- Hit enter and you’ll get a list of packages with their State, Release Type, and Install Time. You can identify the recently installed package based on the Install Time field.

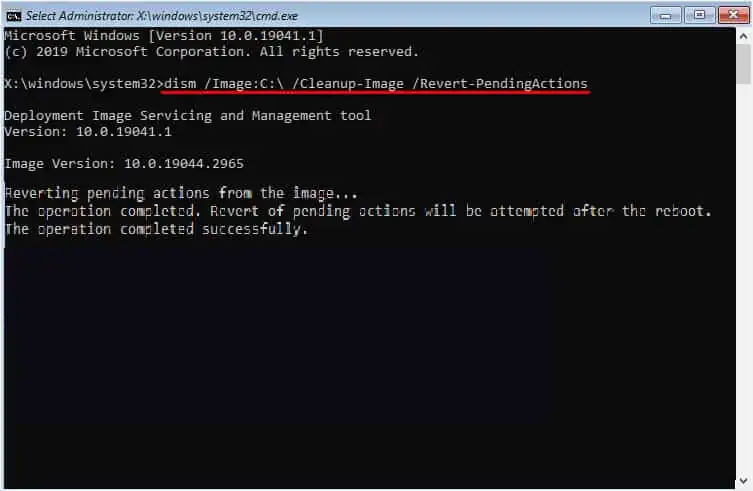
- Run the following command to revert the Install pending and Uninstall Pending packages:
DISM /Image:<system partition>:\ /Cleanup-Image /RevertPendingActions
Revert Registry Changes
Sometimes, reversing the pending Windows update package isn’t enough. In most cases, you need to revert the pending registry changes as well. This can help fix the corrupted registry entries related to the storage drive controllers
Important: Before moving on with the below steps, I highly advise keeping a backup of your current registry. This way, you can restore the registry in case anything goes wrong.
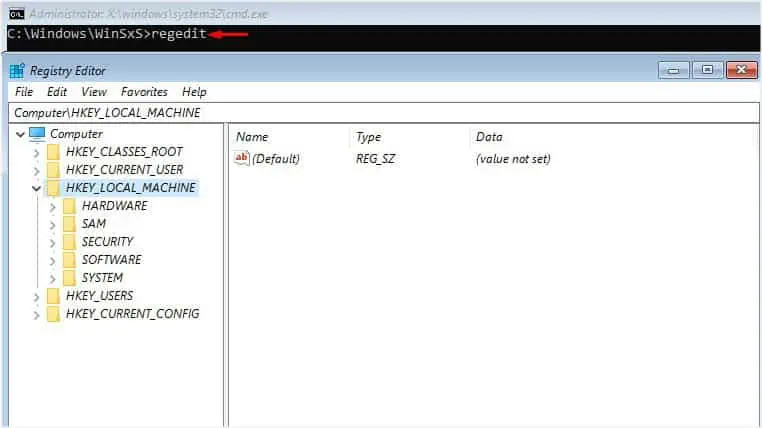
- Open Command Prompt in the recovery environment and execute the
regeditcommand to launch Registry Editor here.
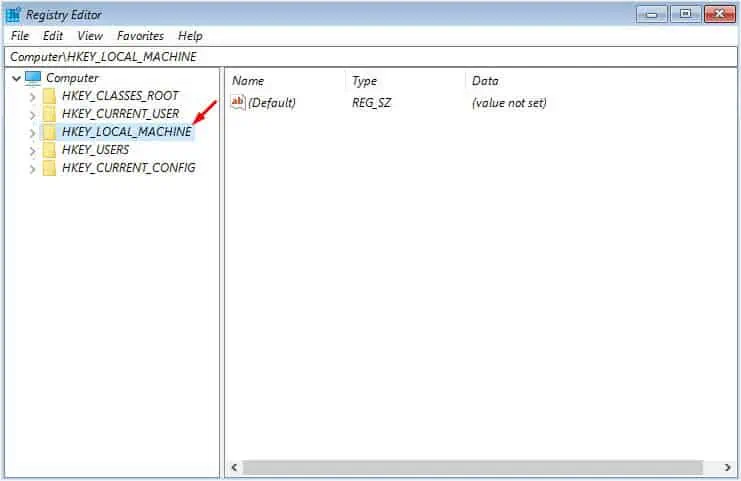
- From the left pane, select HKEY_LOCAL_MACHINE.

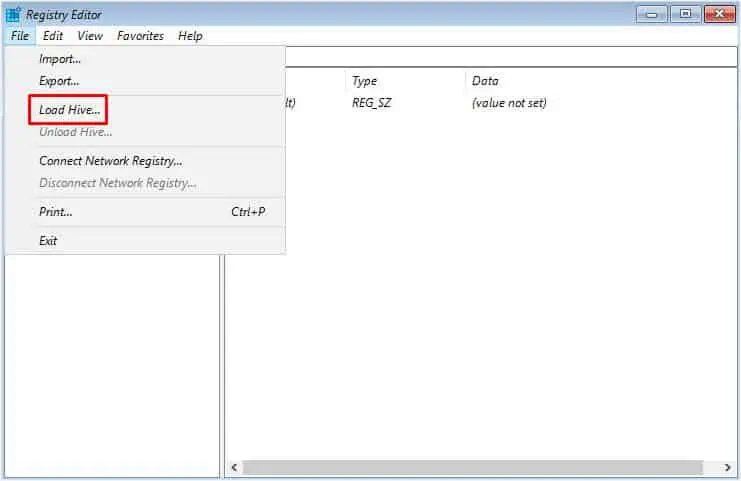
- Now, click on File and pick Load Hive.

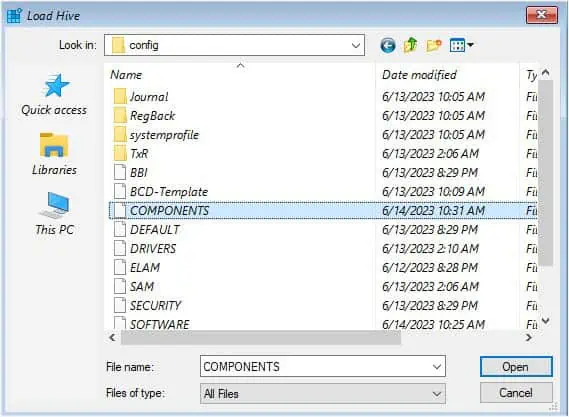
- Once the dedicated dialogue box opens up, navigate to your OS drive.
- Go to Windows > System32 > Config.
- Find the file named COMPONENTS and hit Open.

- This should open up a new prompt where you need to input
OfflineComponentHivein the Key Name field and press Ok.
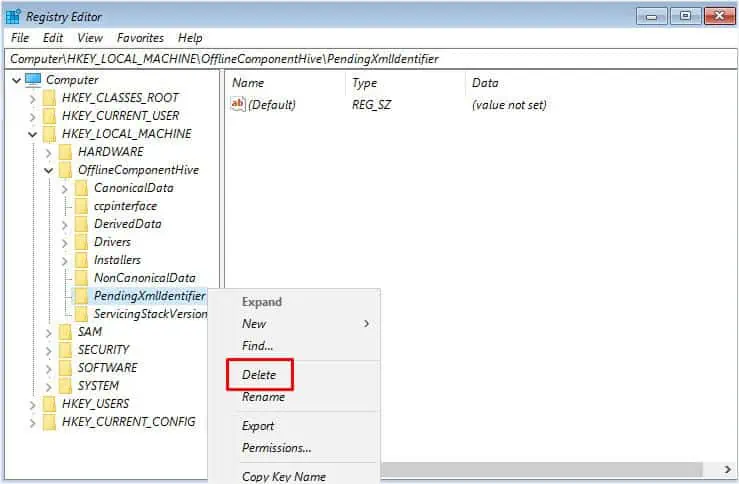
- Now, expand this hive and check if there exists PendingXmlIdentifier. If yes, create a backup of the key before deleting it.

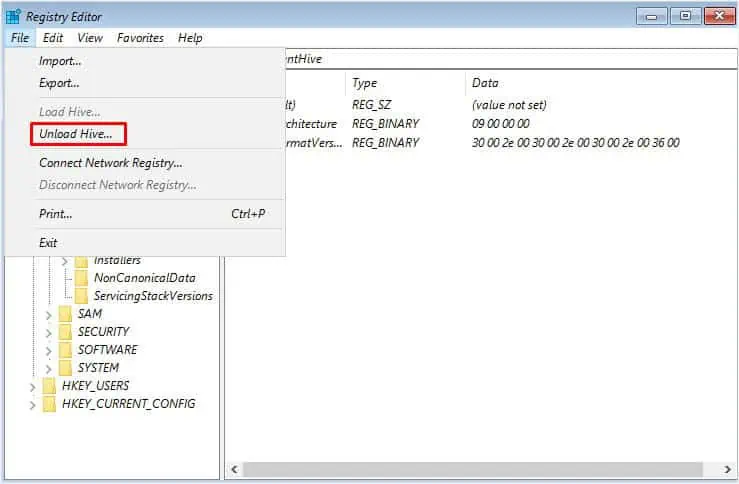
- Once that’s done, select OfflineComponentHive again. Then, navigate to File and pick Unload Hive.

- In the confirmation prompt, press Yes to confirm unloading all the current keys and subkeys.

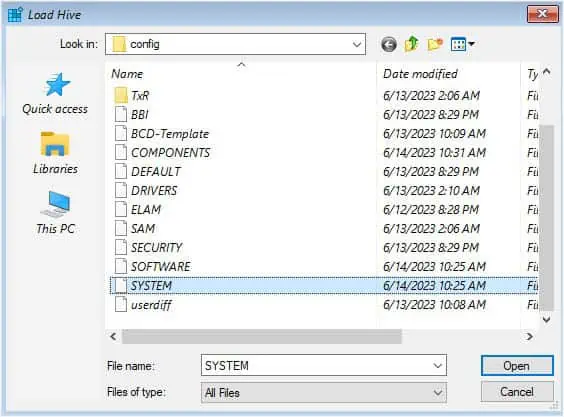
- Again, select HKEY_LOCAL_MACHINE and go to File > Load Hive.
- Get to the Config folder inside your OS drive and this time, open the SYSTEM file.

- In the Load Hive dialogue box, enter
OfflineSystemHivein the Key Name field and click Ok.
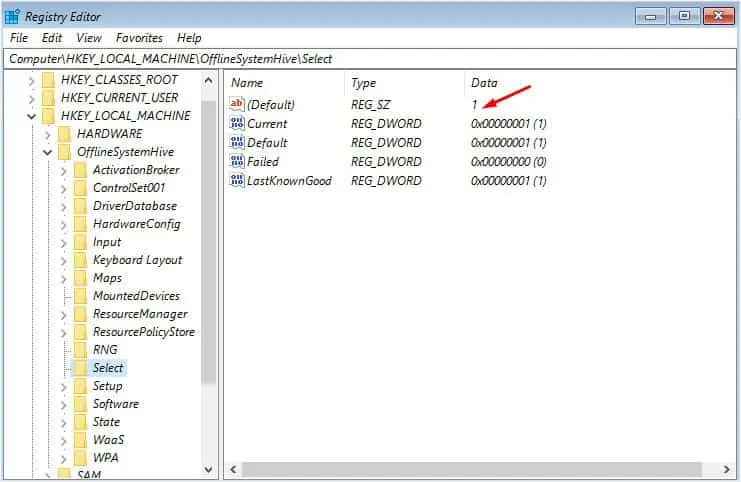
- Expand the hive and navigate to the Select key.
- Move to the right pane and check the Data field of the Default DWORD.

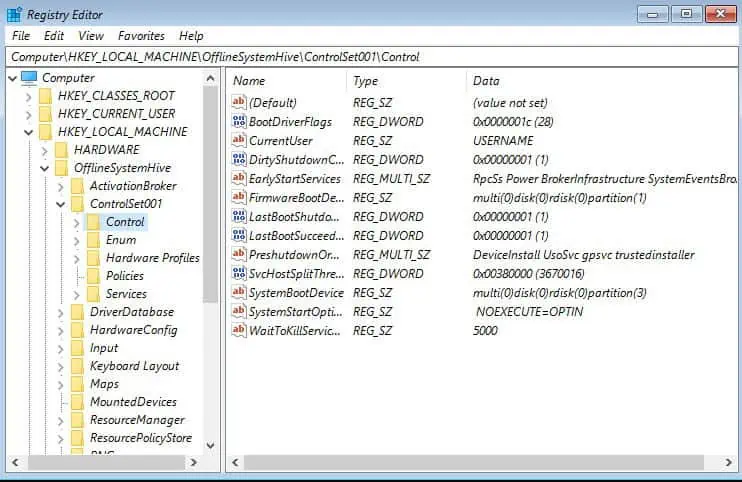
- Based on the value, get to the ControlSet[value] key. As demonstrated above, the value is 1. So, I move to ControlSet[001].
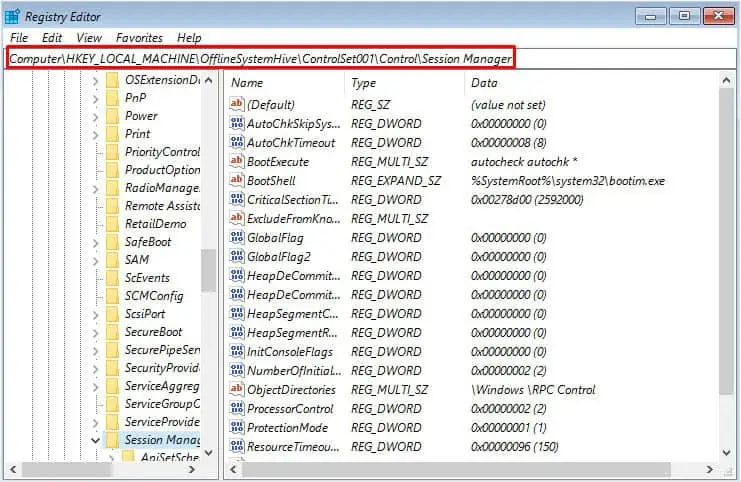
- Further, expand the key and move to Control > Session Manager.

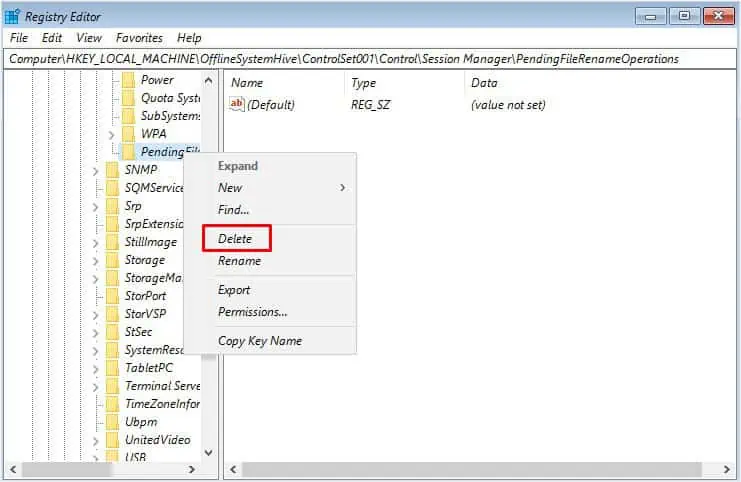
- Expand Session Manager as well and check if the PendingFileRenameOperations key is present. If yes, back up the hive and then delete the PendingFileRenameOperations key.

- Exit Command Prompt and hit Continue to start Windows and see if the BSOD error persists.

Verify Critical Services
It’s absolutely essential that certain services run correctly as they are critical during Windows startup. They help manage hardware configurations, power, file system, disk operations, disk partitions, mounting/dismounting volumes, volume snapshots, and more.
In case any service is missing in the registry, it might lead to BSOD with the Inaccessible Boot Device error or 0x0000007B stop code.
- Open Registry Editor via the Command Prompt in the Windows RE again.
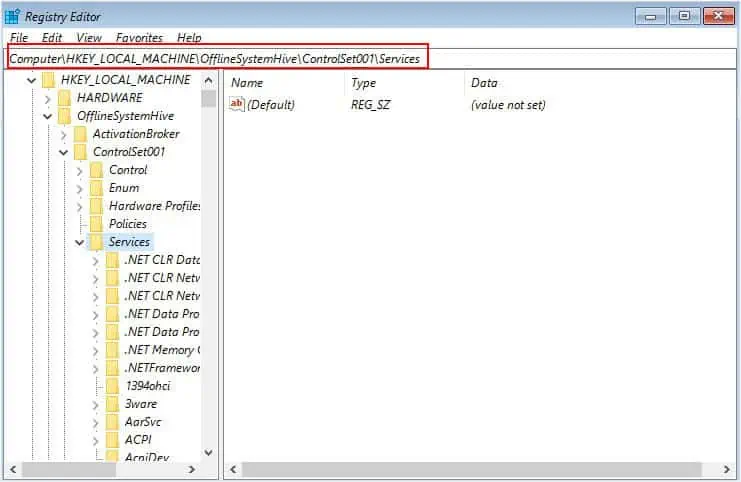
- Navigate to HKEY_LOCAL_MACHINE > OfflineSystemHive > ControlSet[value] > Services.

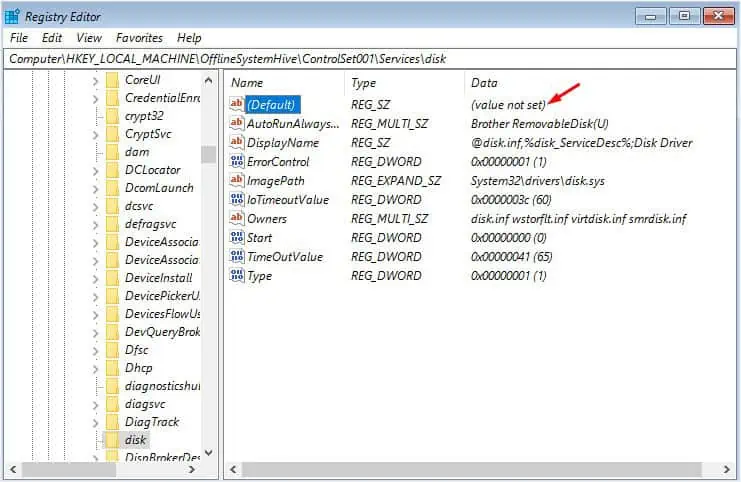
- Expand the key and check for these subkeys–ACPI, Disk, Partmgr, VolMgr, VolSnap, and Volume.
- Now, navigate to each of the keys and check the Default DWORD’s Data field.

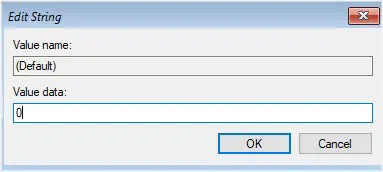
- If the value is not set, double-click on the Default DWORD, input
0, and press Ok.
- After doing so for all the aforementioned keys, reboot your computer and this should solve your problem.
Remove Upper and Lower Filter Drivers
Another common cause of this BSOD error is misbehaving, corrupted, or missing filter drivers related to the storage stack. They can interfere with the proper communication between the OS and storage devices. By simply removing these filter drivers can resolve the conflict and hence fix the “Inaccessible Boot Device” error:
- First, launch Registry Editor from the Command Prompt in the recovery console.
- Now, go to HLEY_LOCAL_MACHINE > OfflineSystemHive > ControlSet[value].
- Next, expand Control > Class.

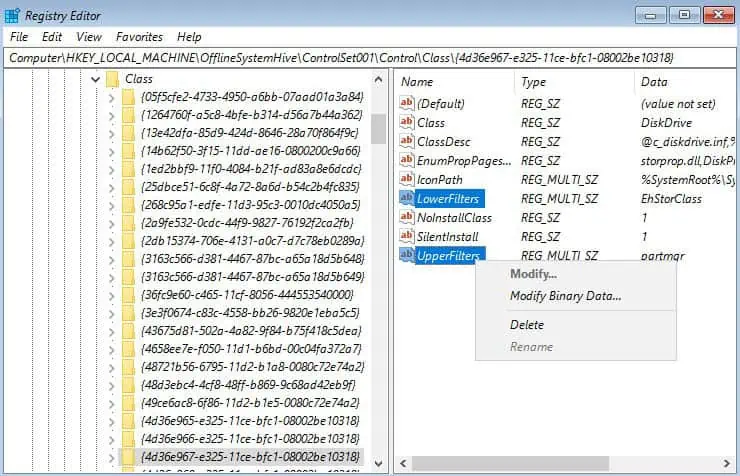
- Check each of the keys and verify if any of them consists of UpperFilters or LowerFilters with non-standard entries.
- Delete these drivers for every key. I have demonstrated for one of them below.

- In the Confirm Value Delete dialogue box, press Yes to confirm the deletion.

- Finally, reboot your PC and you should no longer meet with the “Inaccessible Boot Device” BSOD error.
Update or Reinstall Troublesome Device Drivers
If you were able to boot into Safe Mode earlier, you can update/reinstall the troublesome drivers. This can solve the compatibility issues that were responsible for triggering the Blue Screen of Death.
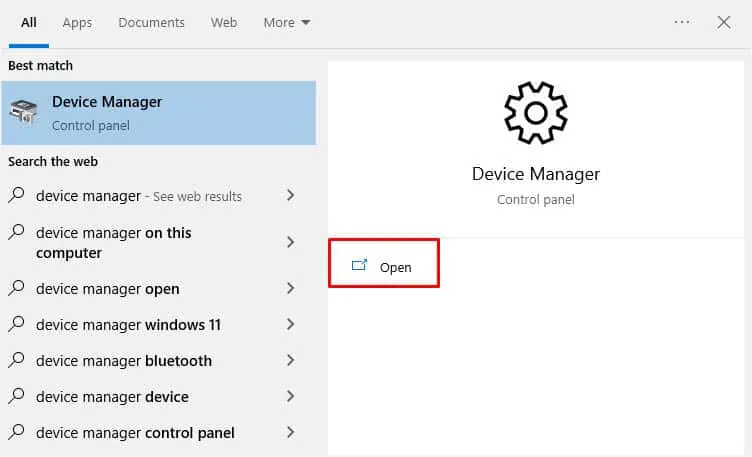
- In Safe Mode (with networking), open Device Manager from the Start Menu.

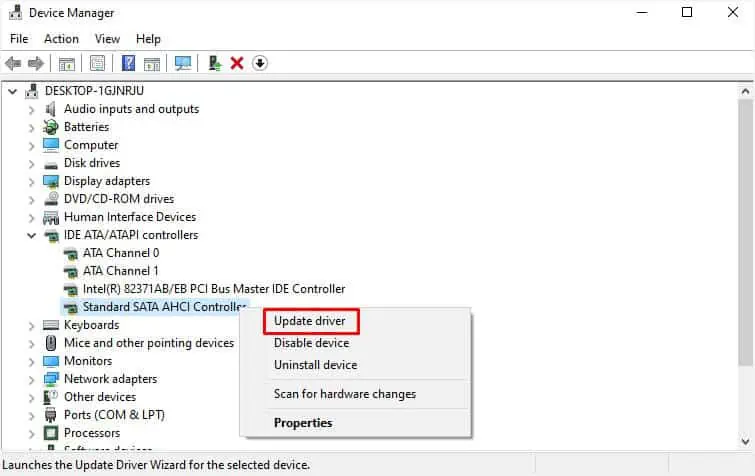
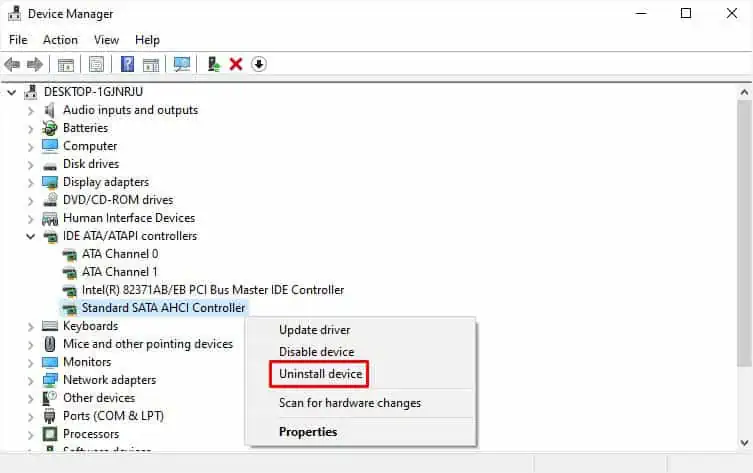
- Start by expanding the IDE ATA/ATAPI Controllers and right-click on the SATA AHCI Controller.
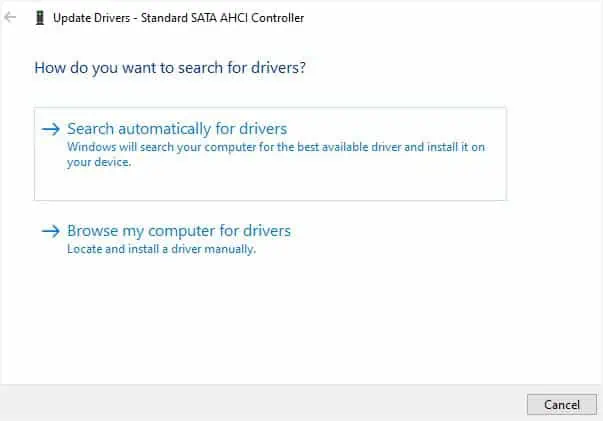
- Select Update Driver and this should pop up in the Update drivers console.

- Click on Search automatically for drivers. This should update the best storage drivers for your device.

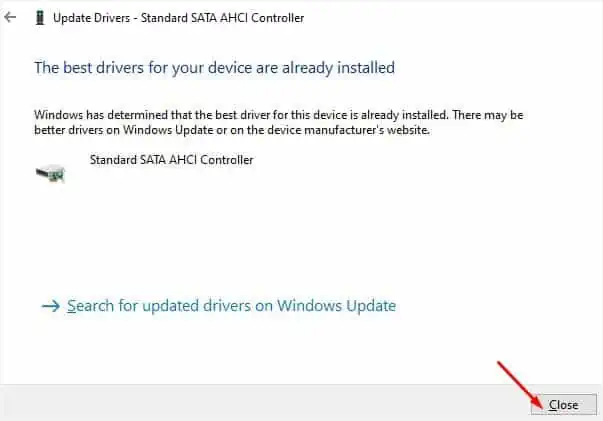
- If you instead got the “The best drivers for your device are already installed”, you may close the dialogue box and return to the Device Manager window.

- This time, choose Uninstall Device.

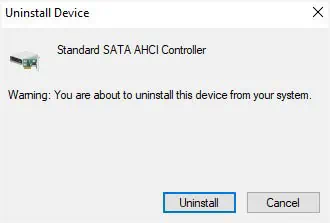
- In the confirmation prompt, click on Uninstall.

- Once the controller is removed, reboot your PC and this should solve the BSOD problem.
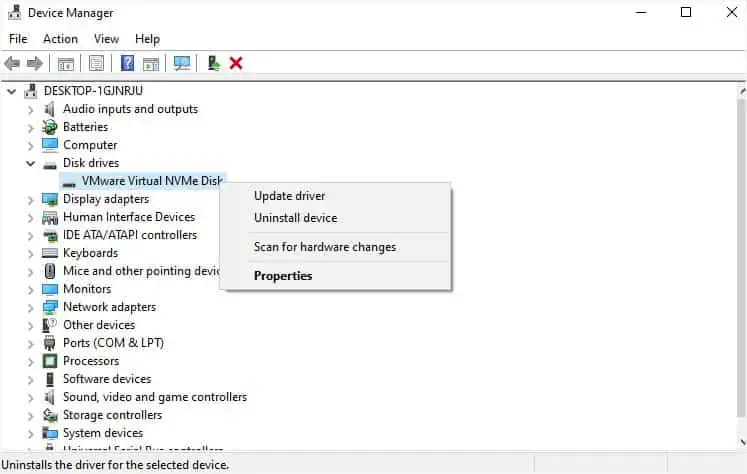
- Even if this didn’t help, open the Device Manager in Safe Mode again. This time, try updating and reinstalling your storage driver under Disk drives.

Additional Tip: If you got the BSOD after updating a certain device driver, I advise booting into safe mode and rolling them back. All you have to do is open the Properties window, switch to the Driver tab, and click on Roll Back Driver.
Run SFC and CHKDSK Commands
Corrupted system files and disk errors can also lead to the “Inaccessible Boot Device” BSOD error. To repair such corruption, employing SFC and CHKDSK commands would be the best idea.
You need to launch Command Prompt or Powershell window to run them. If you’re able to boot in Safe mode, you can do so from here. But if you can’t log in at all, you may launch the prompt from Windows Recovery Environment, as mentioned earlier.
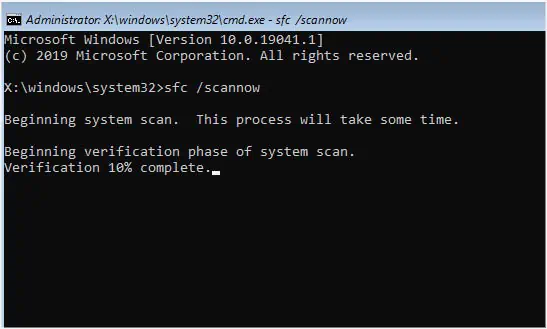
- Start by executing the below command to perform system files diagnosis:
sfc /scannow - Wait for the verification to complete.

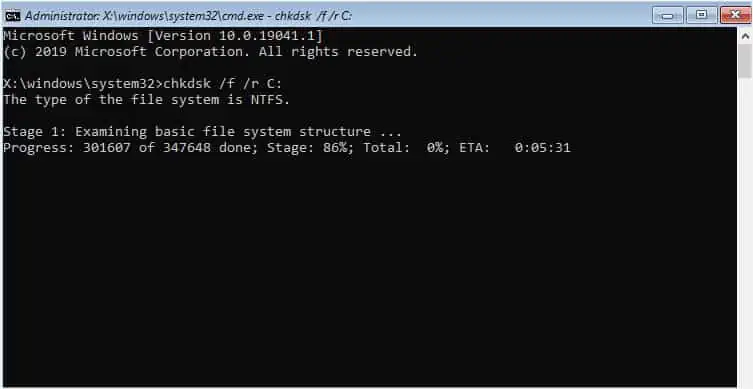
- If your Windows OS couldn’t find any integrated violations, run the following command to check your drive for sector-level corruption:
chkdsk/f /r <boot drive>:
- Finally, restart your PC so that the volume gets checked. The operating system should now be able to access your boot device.
Repair Startup Issues
Since this BSOD error is usually encountered during the startup process, there may be issues with the files that are responsible to boot your OS. In such a case, running a Startup Repair might fix it:
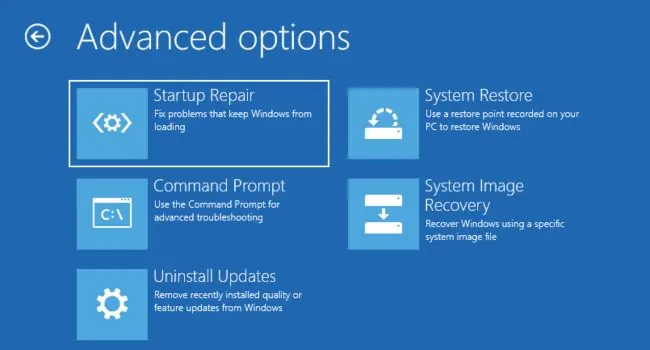
- Get to the advanced options in the Windows recovery console first.
- Once you’re here, find and tap the Startup Repair option.

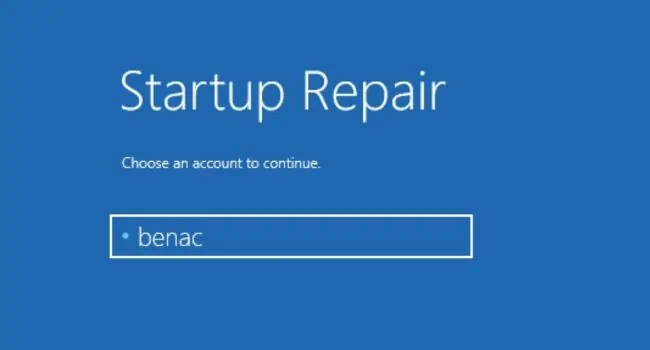
- Select your account and enter the right password to continue.

- Now, wait for the diagnosis to complete and let Windows attempt to fix possible startup problems with your system.

- If this was successful, your PC should restart without the BSOD. But if you get the “Startup repair couldn’t repair your PC”, click on the Advanced options button and proceed with the next solution below.

Uninstall Latest Windows Update
According to multiple Windows users, a corrupted update can also potentially cause the “Inaccessible Boot Device” BSOD error. This can happen when essential files go missing during the update or a related driver conflicts with the new one.
Usually, Microsoft releases a hotfix to solve such problems. So, you can uninstall the latest feature/quality update and wait for an official update for the time being. Here’s how you can do it from the Windows Recovery Environment:
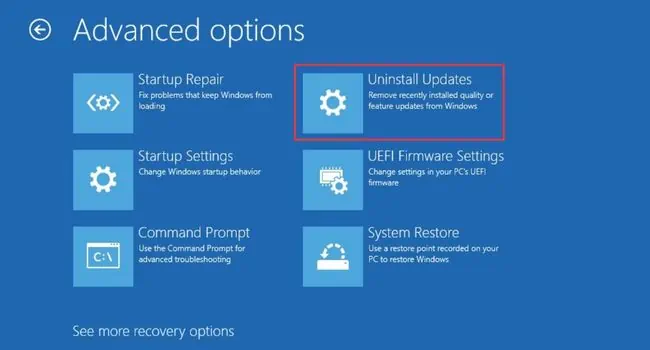
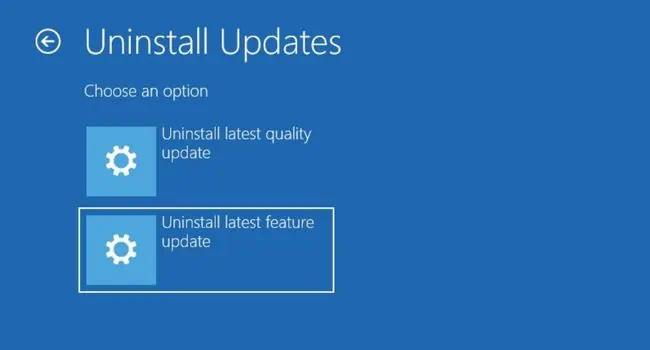
- In the Advanced Options window, select Uninstall Updates.

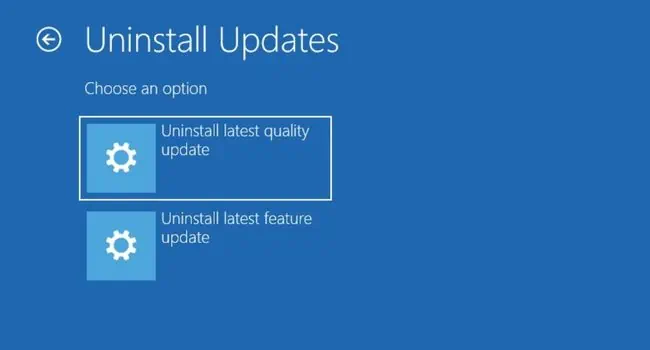
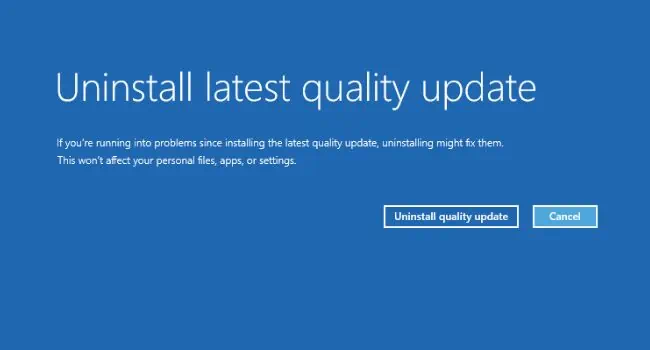
- Start with the first option–Uninstall latest quality update.

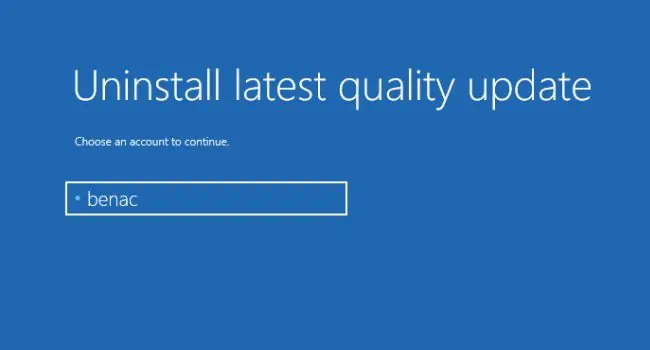
- Now, wait for the related page to open up. Then, choose your account and enter the correct password to continue.

- In the next screen, click on the Uninstall quality update button.

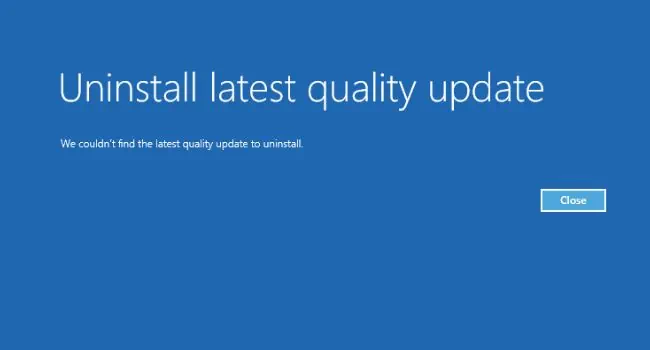
- If you hadn’t had a quality update in the past 35 days you’re likely going to get the “We couldn’t find the latest quality update to uninstall” message.

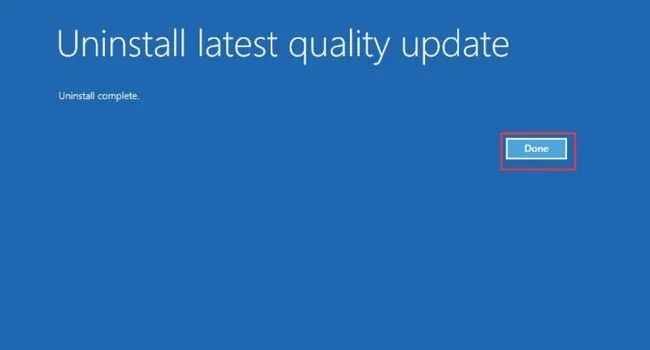
But if it worked for you, it should delete the latest update and boot the Windows normally. Press Done to continue.
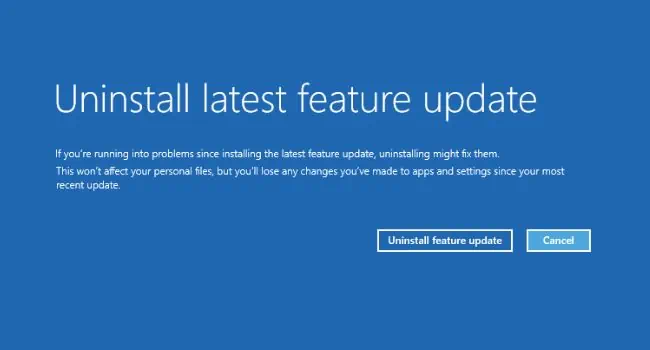
- In case you weren’t able to delete the latest quality update, get to the Uninstall Updates screen again. This time, pick Uninstall latest feature update.

- Next, hit the Uninstall feature update button and wait for it to complete.

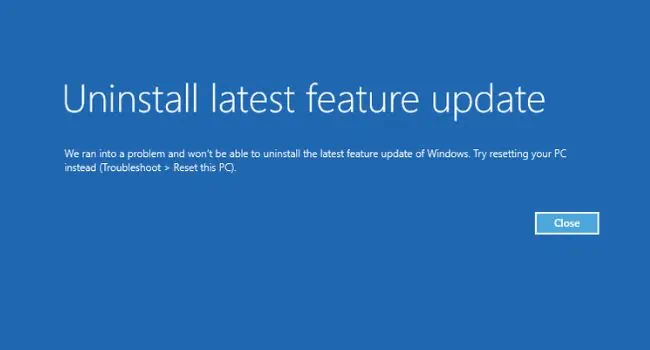
- If you got the problem screen as shown below, click on Close, and as recommended in the screen, proceed to reset your PC. But before that, do check out the two solutions below.

Windows System Restore
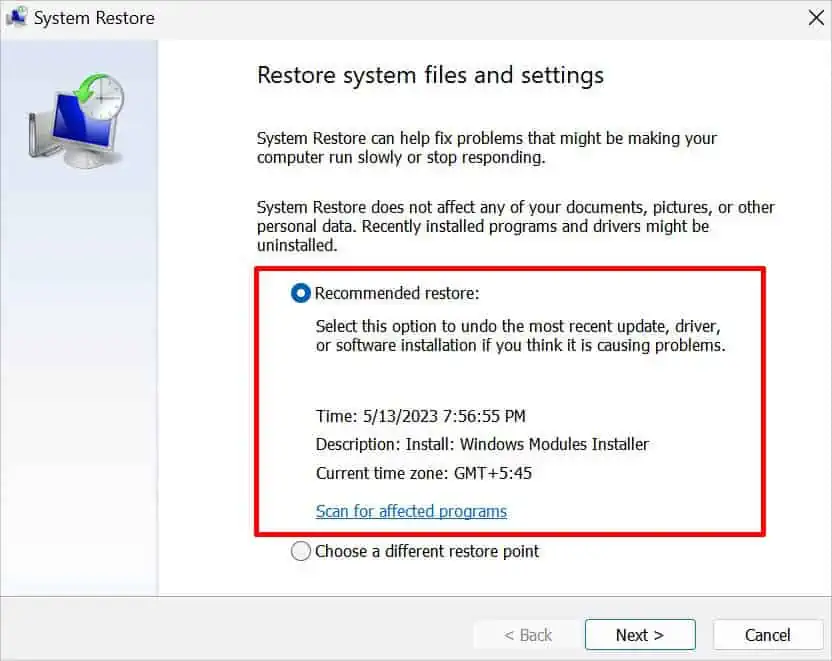
If the culprit really is a failed or corrupted Windows update, the built-in System Restore feature should come in handy. This will overwrite your current system and take it to a state that never experienced the BSOD. However, this feature becomes useless if you do not have a manual or automatic restore point.
- Boot up your PC in Windows Recovery Environment again.
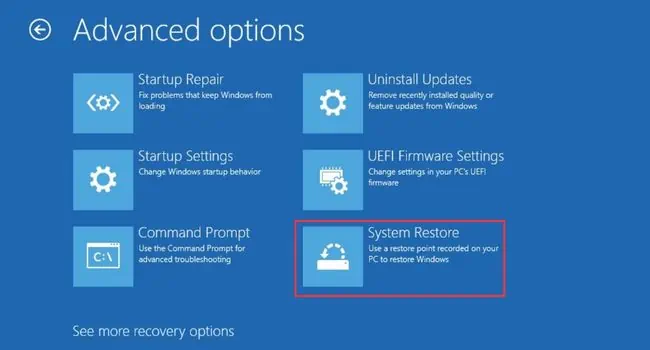
- Now, get to the Advanced options screen as described earlier and pick System Restore.

- Follow the on-screen instructions to select the restore point and start the system restore.

- Once this completes, your computer should reboot and the system state should be recovered without leading to BSOD.
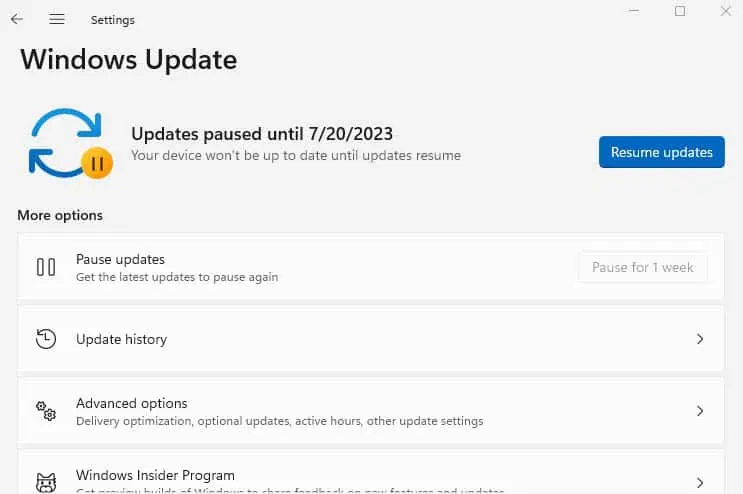
- If you were able to solve your problem, do not forget to pause the Windows updates. Otherwise, the same update gets installed and you might get back the BSOD too.

Reset and Update BIOS
Even corrupted BIOS and its misconfigured settings often lead to BSODs. Taking this into consideration, it’s a good idea to reset it to factory defaults. The steps to reset BIOS varies on different motherboards (both PCs and laptops).
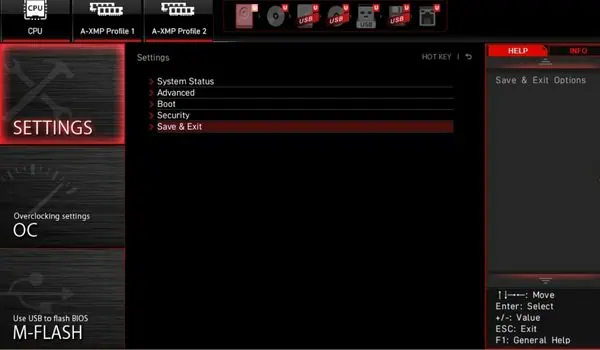
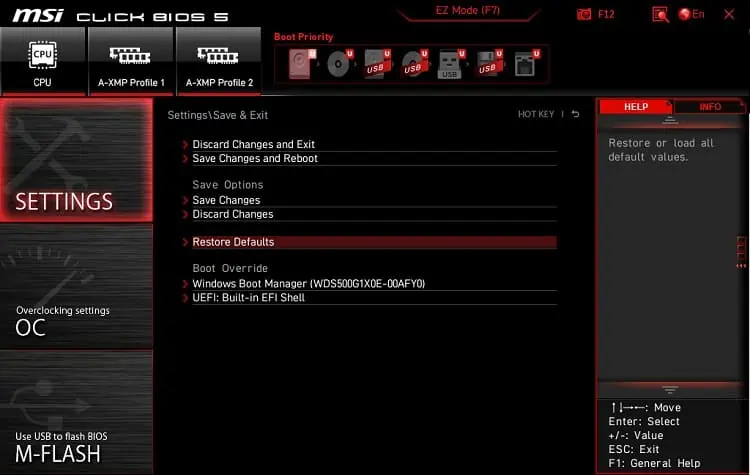
Here’s a general idea you can take from the demonstrated steps on MSI:
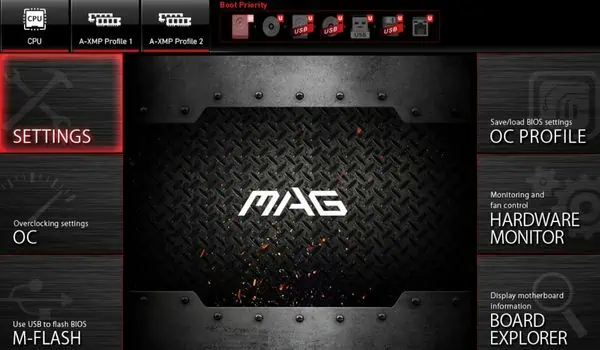
- Force reboot your computer and get to the BIOS screen using the dedicated key.
- From the home interface, pick Settings.

- Then, navigate to Save & Exit.

- Navigate to Restore Defaults.

- A confirmation message should pop up asking you whether to load optimized defaults. Press Yes to move forward.

- Once that’s done, save the changes and restart.
Another possible solution is to flash a new BIOS version. But if you got the BSOD after a recent update, I suggest reflashing using a working version. The following steps on MSI should give you a general idea of how you can do it. Once you update the BIOS, drive compatibility problems should be resolved.
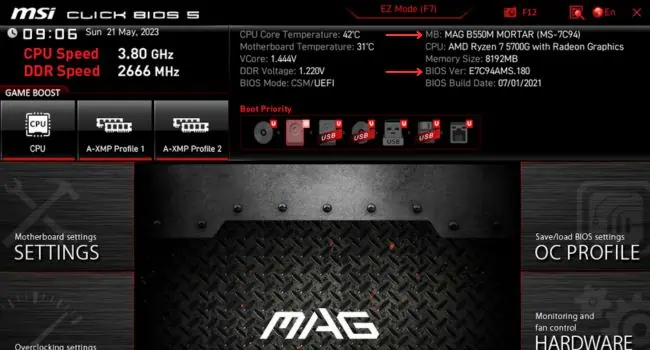
- First of all, get to your BIOS and check the currently installed version. Also, note your motherboard’s model if you’re unsure about it.

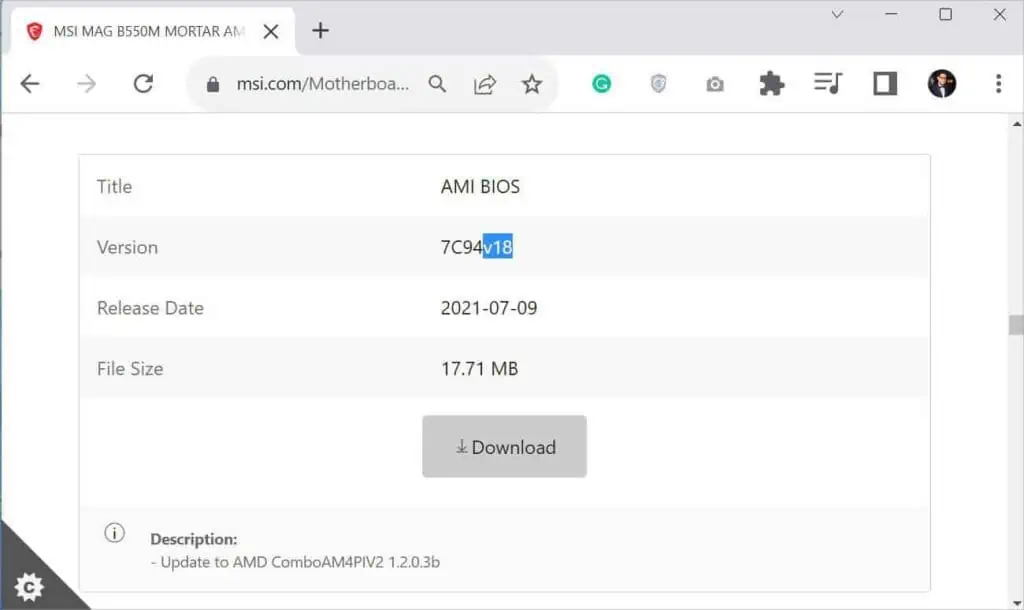
- Then, open your motherboard’s official driver page to download the compatible BIOS version.

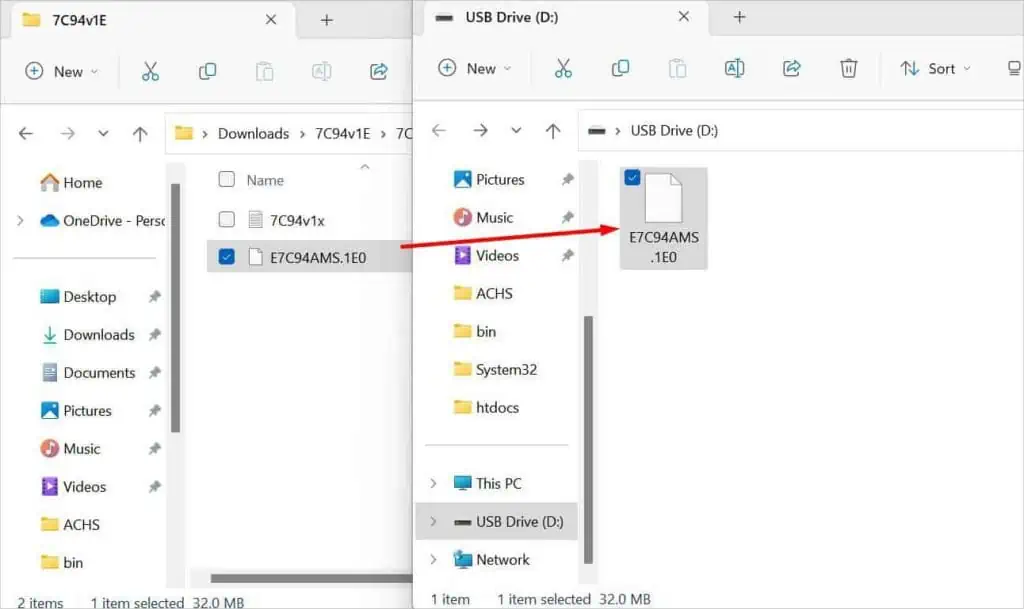
- Copy the file to a FAT32-formatted flash drive.

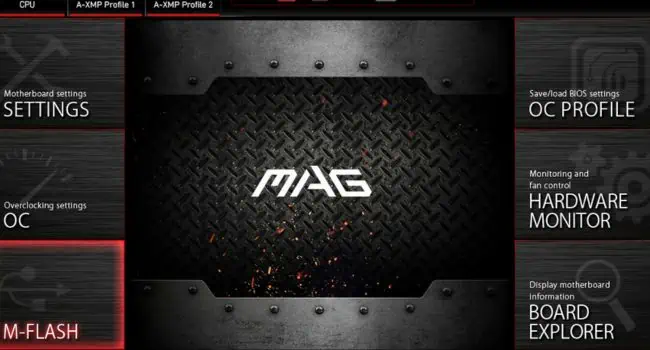
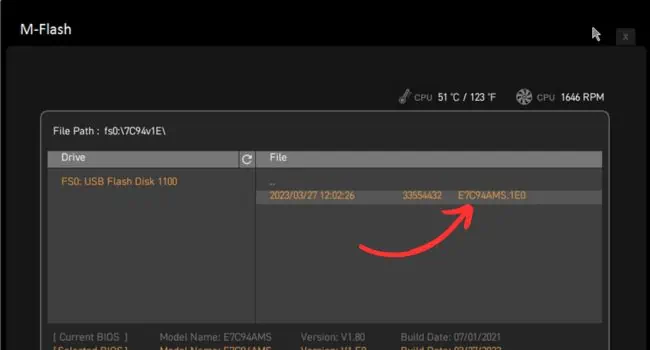
- On your primary PC, choose M-Flash from the first MSI BIOS screen.

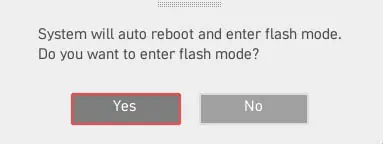
- Hit Yes in the prompt to continue.

- Now, insert the flash drive and the BIOS file should show up.
- Pick this BIOS file and click Yes to start the update.

- Once the process completes, enter BIOS again and validate the new version.
- Finally, restart your computer and check if the Blue Screen of Death persists.
Reset/Upgrade Your PC
I believe I have covered everything (from Microsoft-recommended to fixes that helped others) in this article. I understand how frustrating it is to be stuck in the Automatic Repair loop and encounter BSOD whenever starting Windows.
Even I had encountered this error once. Since I love tinkering with my Windows settings, I believe I misconfigured one of the registry values which led me to a never-ending loop of blue screen.
From my personal experience, the final optimum solution is to factory reset the computer. This helped me and should certainly work out for you as well.
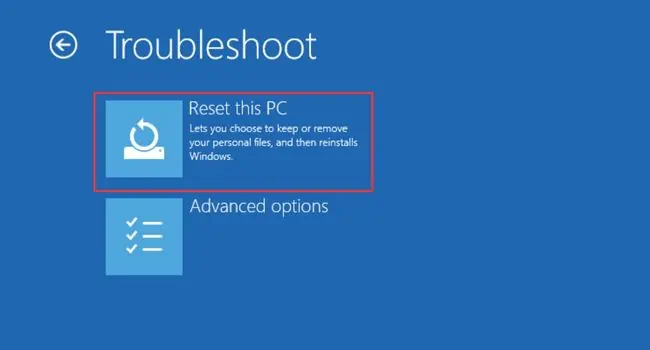
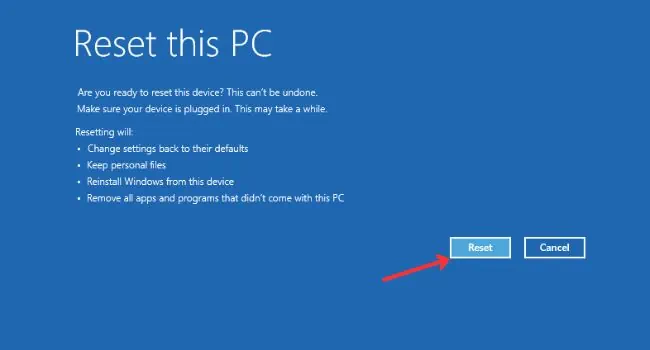
- In the Windows Recovery screen, pick Troubleshoot > Reset this PC.

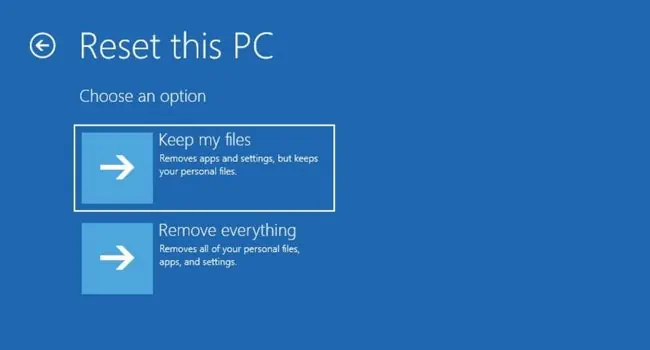
- Next, select Keep my files. If you’re fine with removing everything, you may opt for the second option too.

- Then, select your account and input the correct credentials.

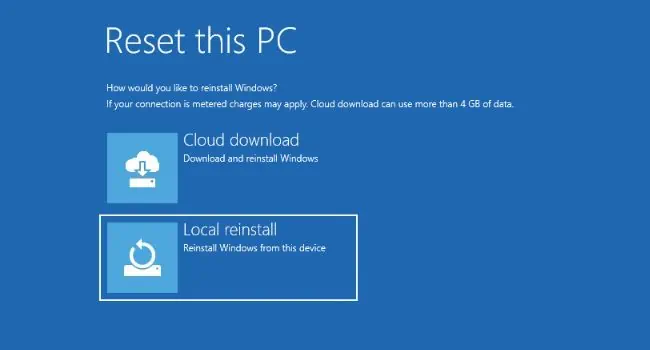
- Now, choose Local Reinstall.

- Press the Reset button and wait for your computer to get to its factory settings.

- Finally, wait for the Windows installation to complete. This may take several minutes.
- Once everything is complete, you should be booted into Windows without the BSOD error.
Additional Tip: If resetting the PC didn’t help as well, you need to perform a clean installation. However, if you’re getting the error after upgrading to a new Windows version (for example, Windows 10 to Windows 11), make sure you upgrade first and then perform the clean install.
Check Hardware Faults
If you were unable to solve your problem despite following every mentioned tip in this article, it’s probably a hardware failure. This may include faulty motherboard header, RAM, power supply, etc.
I highly recommend taking your PC or laptop to the authorized service center for inspection. If the warranty isn’t void, your manufacturer might replace the faulty component.
In case your hardware is also fine, I might be missing out on something. I’d love to hear your detailed problem in the comment section below to help you troubleshoot further.

