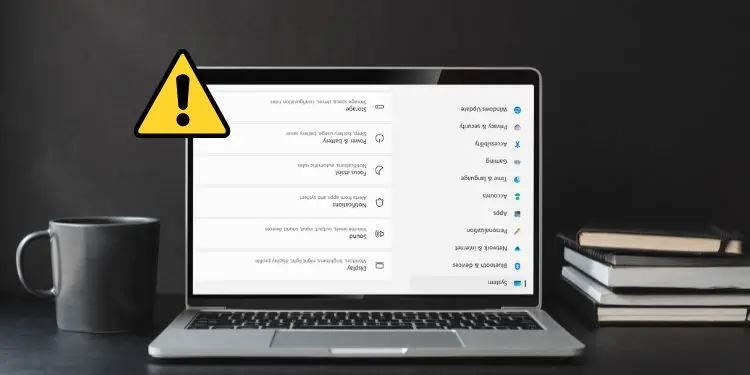
Most PCs these days support multiple display orientations. So, knowingly or unknowingly, you might have tweaked this setting that’s causing your laptop screen to go upside down.
Indeed, turning your screen to the other side is useful in laptops that support 360-degree rotation. However, this feature can be annoying if you can’t revert to its original orientation. Although this problem mainly happens due to manual faults, there can be times when corrupted monitor drivers could be the culprit.
Well, fixing this shouldn’t be a tedious task. So, in this article, we will guide you on how to fix the laptop screen upside-down issue using simple and effective ways.
Why is My Laptop Screen Upside Down?
Whether your laptop screen is upside down or has gone sideways, the major problem lies within the display settings. Also, if you do not remember changing your display orientation, your friend could be playing a prank on you.
- Tweaked display orientation in Windows Settings
- Accidental press of the hotkeys for changing orientation
- Monitor and sensor drivers aren’t working properly
- Outdated operating system
How to Fix Laptop Screen Upside Down
Before moving ahead, let’s learn about the four display orientations in Windows:
- Landscape: This is the normal orientation where your laptop screen sits upright. With this mode enabled, you can use your laptop horizontally without needing to tilt your head or change your sitting position.
- Portrait: In this display mode, your laptop screen adopts a vertical position, starting from the left to the right. This is exactly the orientation used in smartphones and is useful in laptops supporting tablet mode.
- Landscape (flipped): This is just the inverted version of the landscape display mode. Once it’s enabled, your laptop screen turns upside down.
- Portrait (flipped): This is also an inverted mode where your laptop screen goes sideways but just opposite to the portrait orientation. While the portrait mode displays content from left to right, the flipped version displays the same content from right to left.
Basically, your laptop screen has turned upside down as it is probably adopting the Landscape (flipped) orientation. So, to fix this, all you need to do is set your PC to Landscape mode. Also, if you plan to use your laptop vertically, you can configure this accordingly using the portrait and portrait (flipped) modes.
Now, without further delay, let’s jump right into the possible fixes for your laptop screen that has gone upside down.
From Windows Settings
Tweaking the display orientation is easily possible from Windows Settings. Given below are the required steps you need to follow to set your screen to Landscape mode:
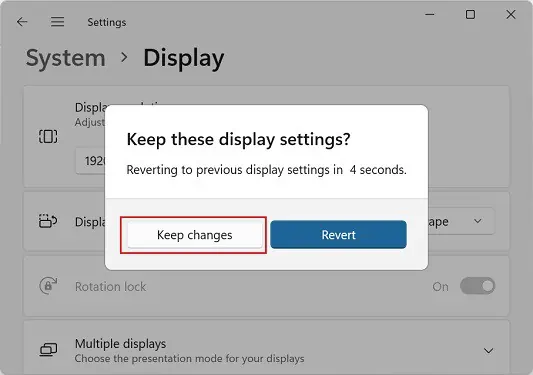
- On your desktop screen, right-click and choose Display settings. This opens the Settings window with several display configurations.
- Under the Scale & layout section, find Display Orientation.
- Then, expand the drop-down menu and choose Landscape.

- Now, the system asks you to keep or revert the changes. So, choose Keep changes, and your screen should return to normal.

From GPU Control Panel
Well, you can configure the screen orientation from your integrated or dedicated GPU software too. In this section, we have included the necessary steps for INTEL, NVIDIA, and AMD graphics cards.
On Intel Graphics Command Center
Most laptop users have Intel graphics cards, and it’s definitely possible to change the display orientation using its software. Well, you may not find this setting on INTEL UHD Graphics Control. Nonetheless, there’s an alternative option using INTEL Graphics Command Center:
- First of all, make sure you have downloaded the application from Microsoft Store.
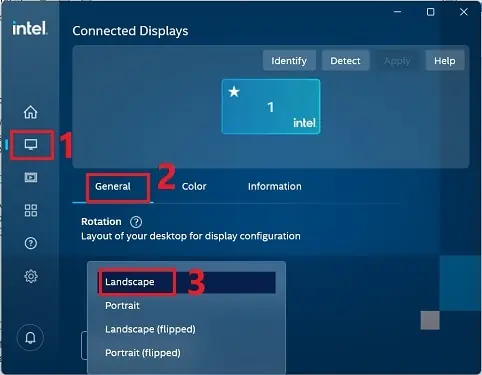
- Launch the utility and navigate to the Display tab.
- Under General, find the Rotation option and expand the drop-down.
- Now, select Landscape and press the Keep button.

On AMD Catalyst Control Center
If you have an AMD graphics card, you’ll likely get its control panel pre-installed on your laptop. Follow the below guide to learn how to do just that:
- From the Start Menu, search and open AMD Catalyst Control Center.
- Now, expand the Common Display Tasks from the left side of the window.
- Then, go to the Rotate Desktop option.
- Switch to the right panel and choose Landscape under Select the rotation that you want.
- Finally, press the Apply button, which should make your laptop upright.

On NVIDIA Control Panel
Like Intel and AMD, you can also use NVIDIA’s control panel to fix the laptop screen that has gone upside down. Here’s how you can use this application to fix the upside-down issue:
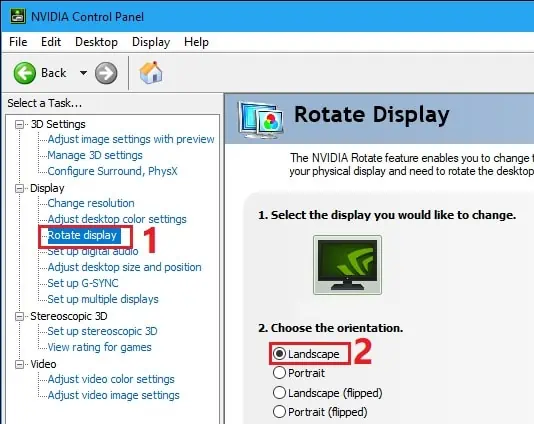
- Right-click on your desktop screen and choose the NVIDIA control panel option.
- From the left side of the window, go to the Display section and select Rotate display.
- Now, move to the center panel, and under Choose the orientation section, pick Landscape.

- Once the Apply Changes dialogue box pops up, hit the Yes button.
Using Hotkeys [For INTEL GPU Users]
Interestingly, if you are an INTEL GPU user, special hotkeys allow you to flip your screen anytime you want. Thus, if you have mistakenly pressed them, your laptop screen orientation changes in no time. However, this is only applicable to INTEL GPU users.
- Ctrl + Alt + Up Arrow: Landscape
- Ctrl + Alt + Down Arrow: Landscape (flipped)
- Ctrl + Alt + Left Arrow: Portrait
- Ctrl + Alt + Right Arrow: Portrait (flipped)
So, it’s pretty clear that if you find your laptop screen upside down, it’s because you pressed the Ctrl + Alt + Down Arrow hotkey. To bring back the original orientation, you need to use the Ctrl + Alt + Up Arrow hotkey.
However, not all Windows devices have this feature enabled by default. Hence, you need to configure a few settings if you want to use these hotkeys most of the time.
Unfortunately, enabling hotkeys isn’t possible from Windows settings. So, you need to do this from your dedicated software. Here’s how you can do it on Intel Graphics Command Center:
- Once you launch the utility, navigate to the System tab.
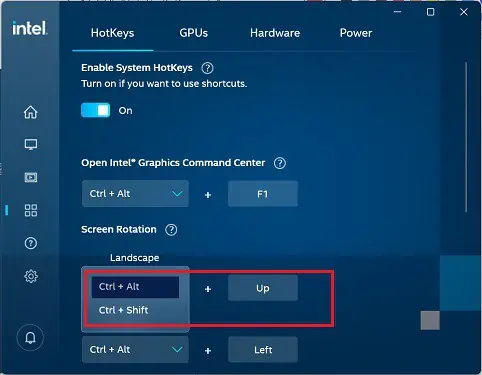
- Under Hotkeys, toggle on the Enable System Hotkeys. Now, you can start using it to flip your display.

- Here, you can even change the hotkeys. To do so, get to the Screen rotation section and expand the drop-down for the desired hotkey.
- Now, you can select either Ctrl + A or Ctrl + Shift to rotate your display. Moreover, you can also use some other keys instead of the arrows.

Note: If your PC doesn’t support the hotkeys, you will not find the Screen rotation section after enabling System Hotkeys in the Intel Graphics Command Center.
Configure Autorotation in Registry Editor
If your laptop screen keeps turning upside down, there’s probably an issue with the autorotation feature. Moreover, there can also be sensor-related issues. So, here’s how you can make changes to these settings to see if this fixes your laptop screen that’s turned upside down:
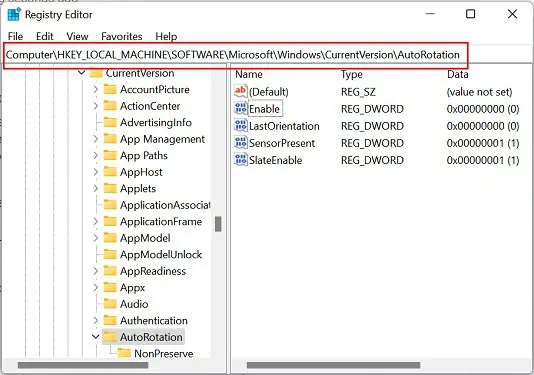
- Press the Windows key to search and open Registry Editor.
- In the address bar, copy and paste the following path:
Computer\HKEY_LOCAL_MACHINE\SOFTWARE\Microsoft\Windows\CurrentVersion\AutoRotation
- Here, double-click the Enable DWORD and enter the value 1 if it’s set to 0. This turns on autorotation.

- Now, you can restart your computer and see if your screen is upright again.
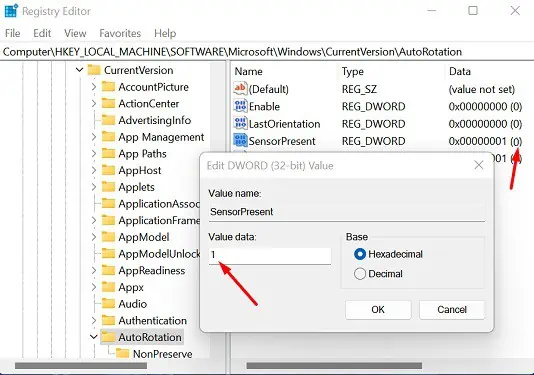
- If this doesn’t solve the issue, navigate back to the above path in Registry Editor and double-click the SensorPresent DWORD.
- In the dialogue box, change the value from 0 to 1 to enable the sensor that controls the autorotation.

- Restart your PC and check if this has resolved your problem.
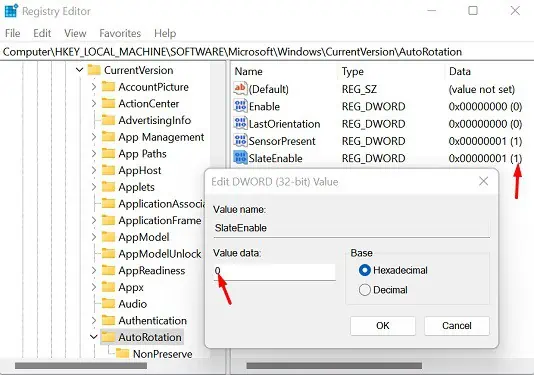
- If neither of the two work, go back to Registry Editor. This time, tweak the value of StateEnable, restart your computer, and check if this has turned your laptop screen upright.

Update Monitor and Sensor Drivers
Sometimes, outdated monitor and sensor drivers might be causing issues with the rotation feature. So, we recommend updating them to see if this helps:
- Use Windows + X keys and choose Device Manager.
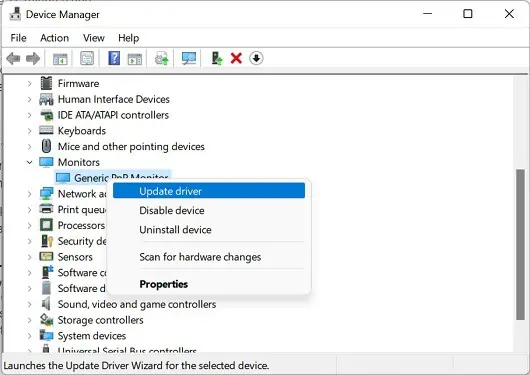
- Once the utility launches, double-click on Monitor and right-click on the monitor driver.
- Here, choose the Update driver option.

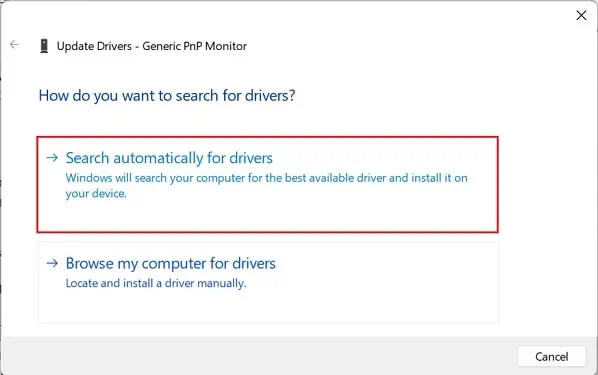
- In the ‘How do you want to search for drivers?’ dialogue box, select Search automatically for drivers.

- Wait until the necessary driver is installed on your device.
- Now, try changing the screen orientation to Landscape.
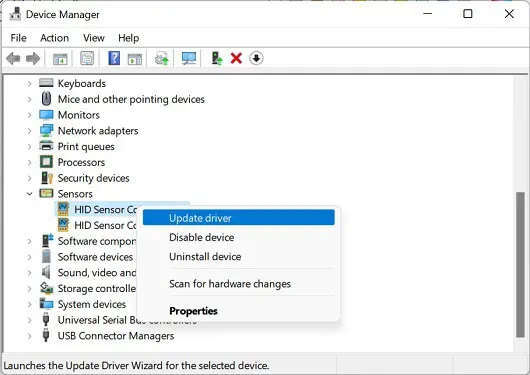
- If it doesn’t help, navigate to Device Manager again and this time, expand the Sensors option.
- Right-click on your sensor driver and choose Update driver.

- Follow the on-screen procedure and wait for the necessary drivers to be updated.
- Again, change the display orientation to Landscape and check if this solves the upside-down issue.
Also, you can try updating your GPU drivers. Here’s a detailed guide on updating AMD, Intel, and NVIDIA drivers.
Update Windows
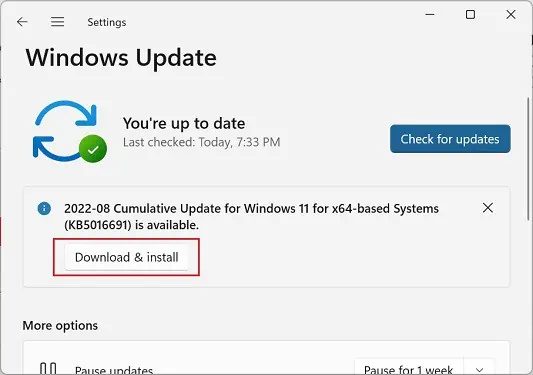
If updating drivers didn’t work, your operating system might have some underlying issue that needs to be fixed. So, updating Windows can solve such bugs and vulnerabilities that are creating problems with the screen rotation feature:
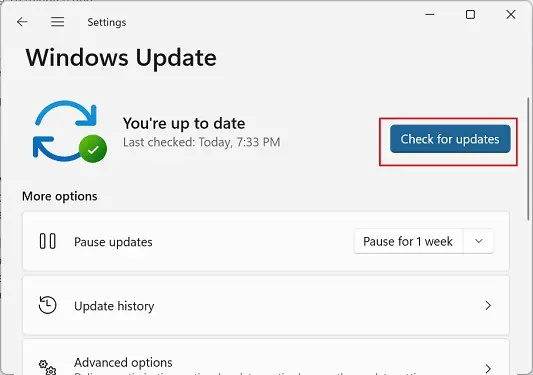
- Press Windows + I keys to launch the Settings application.
- Next, select Windows Update and press the Check for updates button.

- If there’s any available update, click on Download & install option.

- Now, you can restart your computer and change the display orientation to Landscape.

