If you are experiencing audio issues when trying to play something on your Lenovo laptop, it is mainly due to improper audio adjustments. Lenovo recommends its users employ their own audio drivers for the best experience. But, it can be problematic if you install the drivers incorrectly or install them from other manufacturers.
In addition to these, there are also other potential causes, like a crashed audio service responsible for the error. This article will guide you through different steps you can use to get your Lenovo laptop’s audio working back again.
How to Fix Lenovo Laptop Audio Not Working
Before You Begin
When your Lenovo laptop’s audio is not working, there are a few things you need to take care of before moving to other fixes. First, make sure the speaker is not muted, and the volume levels are set to audible range. You can simply change the volume levels from the audio icon on the taskbar.
If you own laptops from the Lenovo ThinkPad series, they have a separate volume control button on the top or left edges. Please try increasing the volume levels using those buttons too.
Secondly, if you are facing problems with external speakers, make sure the cable connections are proper. For a Bluetooth speaker, you should know how to pair a Bluetooth device on Windows properly. Here, we have compiled a list of 8 fixes to help you eliminate the audio problems on Lenovo laptops.
Reinstall Lenovo Audio Driver
Since the problem primarily arises due to audio driver issues, you should ensure you have installed the Lenovo drivers beforehand. You can uninstall all the previously installed audio drivers and fresh install the Lenovo audio drivers.
- Open Device Manager. You can open it by right-clicking over the Start button and choosing Device Manager from the list of options.
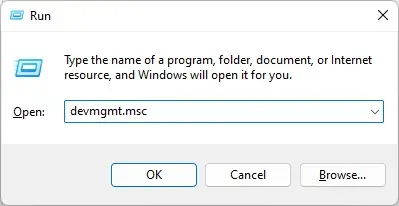
- You can also launch it from Run. Simply type
devmgmt.mscin the Run text field and hit Enter to open it.
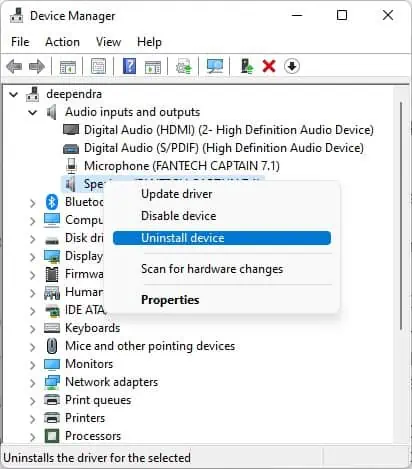
- Expand Audio inputs and outputs menu.
- Right-click the speaker and select Uninstall device.

- Confirm Uninstall in the popup.
- Do this for every listed speaker.
- Now expand the Sound, video and game controllers menu.
- Uninstall all the speakers under this section too.

- Restart your computer after uninstalling all the speaker profiles. Restarting your computer will fresh install all the audio drivers, and it should start working now.
However, it might not always work, which is when you need to install the driver package from the official website of Lenovo.
- Go to the official driver site of Lenovo.
- Hover your mouse pointer over the PC section and click Detect Product.

- Follow the on-screen instructions thereafter. Lenovo will install the required drivers for the audio to function correctly.

You should no longer face a problem after installing the audio drivers from the official site Lenovo if incompatible drivers were causing the issue. However, you need to make a few adjustments if that does not work too.
Troubleshoot Audio Issues
Windows integrates a built-in audio troubleshooter that helps diagnose any audio problems and suggests fixes accordingly. Simply execute the steps recommended by the troubleshooter once it finishes diagnosing the problem. You should no longer face a problem thereafter.
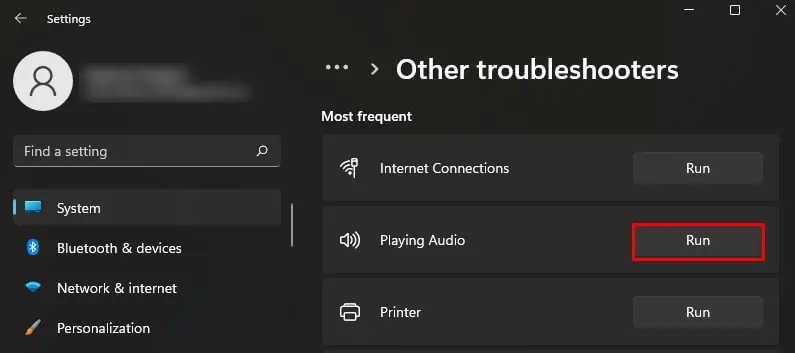
- Hit Windows + I keys on the keyboard.
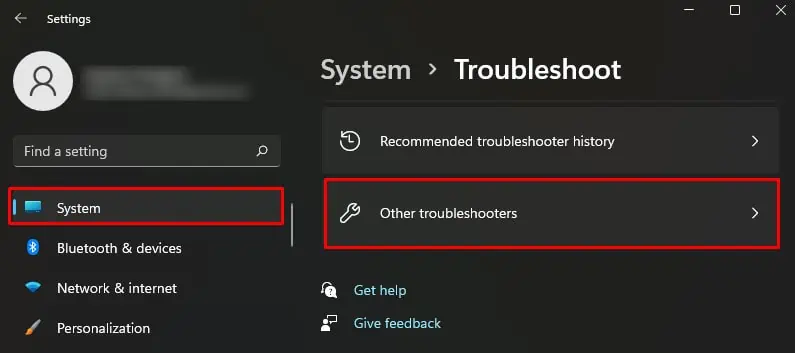
- Choose the System menu from the left pane.
- Then choose Troubleshoot on the right.
- Click Other troubleshooters.

- Find Playing Audio in the list of troubleshooters and click Run.

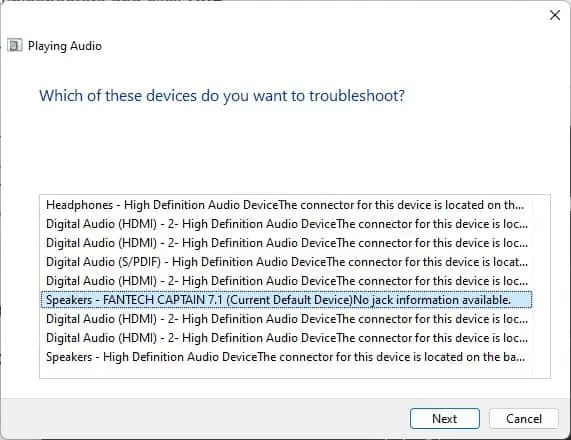
- Choose the device that you want to troubleshoot and click Next.

- Perform necessary actions according to the diagnostic results.
Test and Enable the Speakers
You can test the speakers to see if they are working correctly before concluding they have gone bad. During the test session, a melody is played if the speakers are in working condition and configured correctly. Else you won’t hear a sound that might indicate a speaker failure. You should also check if the speakers are enabled in the sound settings and enable them if not.
- Hit Windows + R.
- Type in
controlin the text field. - Then press Enter key to launch Control Panel.
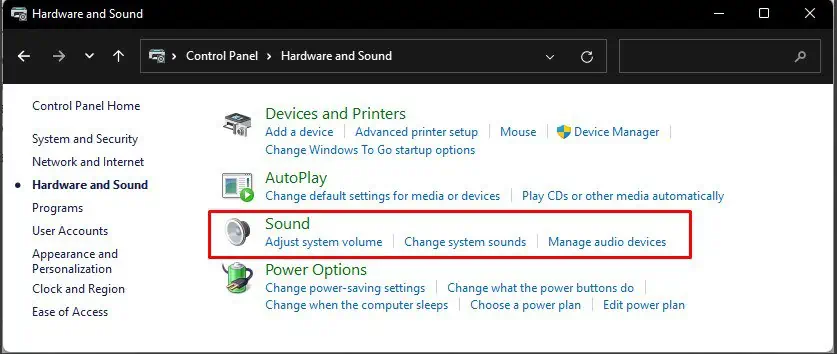
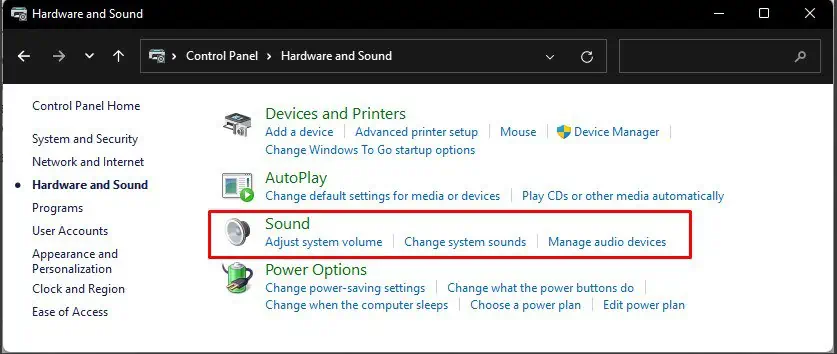
- Navigate to Hardware and Sound > Sound.

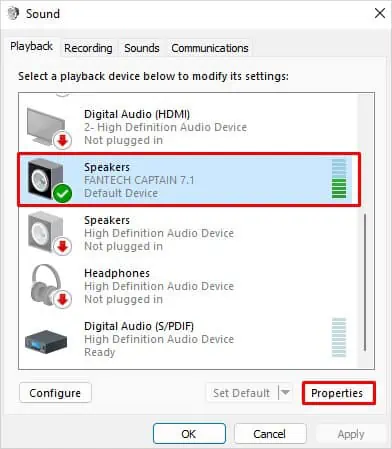
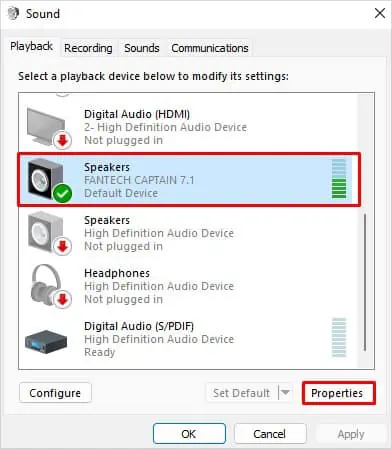
- Choose the speaker under Playback tab.
- Click Properties.

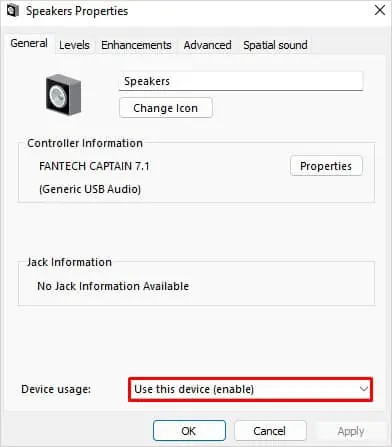
- Choose Use this device (enable) in Device usage drop-down and click OK.

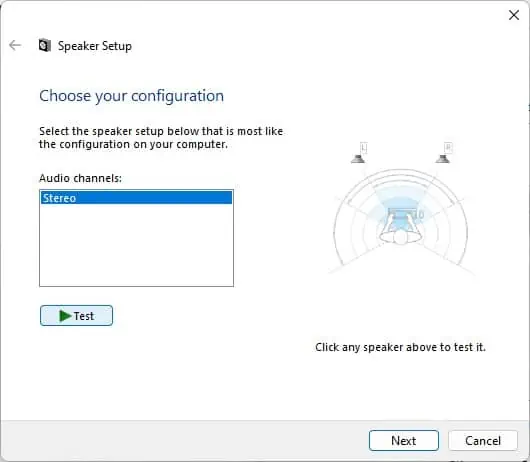
- Now click Configure button and tap the Test button. You should hear a melody if the speakers are working correctly. If not, please proceed with other fixes discussed below in the article.

Set the Proper Audio Output Device
You should make sure the proper device is set as an audio output device. This problem mainly arises if you have more than one speaker connected to the computer. Most probably, a built-in speaker on your laptop and the external speakers.
If you are using external speakers, ensure it is getting a proper power supply, whether from a USB port or wall outlet. Then set the audio output device correctly.
- Hit Windows + I keys. It will open Settings.
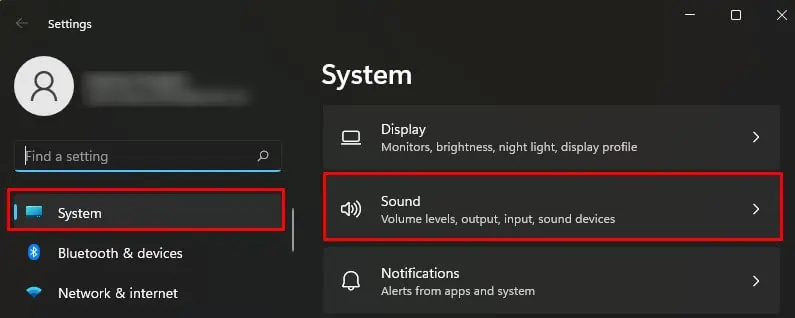
- Choose System > Sound.

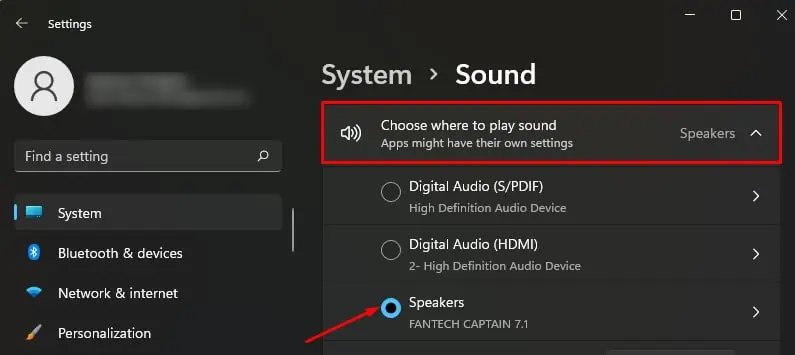
- Under Choose where to play sound section, select the speaker profile appropriately.

Adjust Volume Levels in Mixer
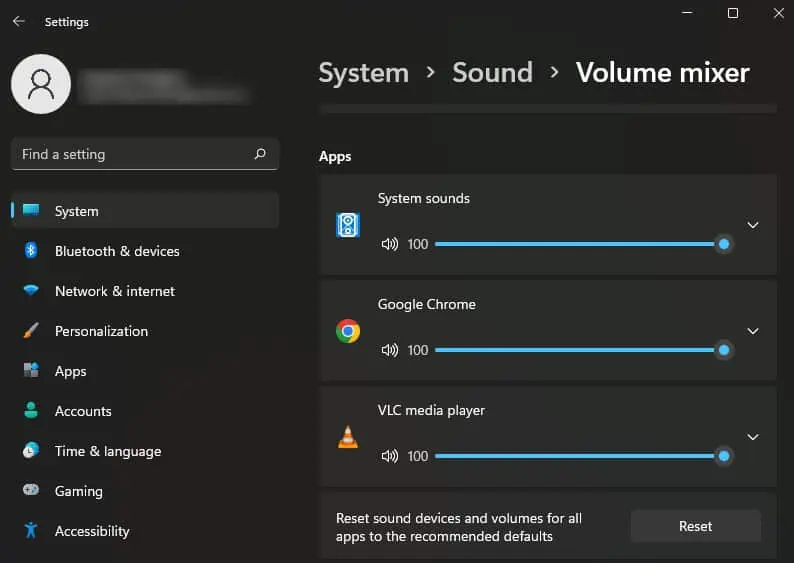
There might be cases where the sound is not working only on specific apps. If the same thing is happening on your device, you can adjust the volume levels from the Volume Mixer in Windows and resolve the issue.
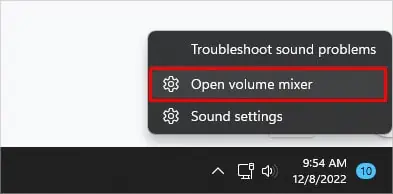
- Go to the lower right corner of the taskbar and right-click the sound icon.
- Choose Open volume mixer from the popup.

- Under the Apps section, select the proper volume level for apps where you are facing audio problems.

Allow Microphone Access
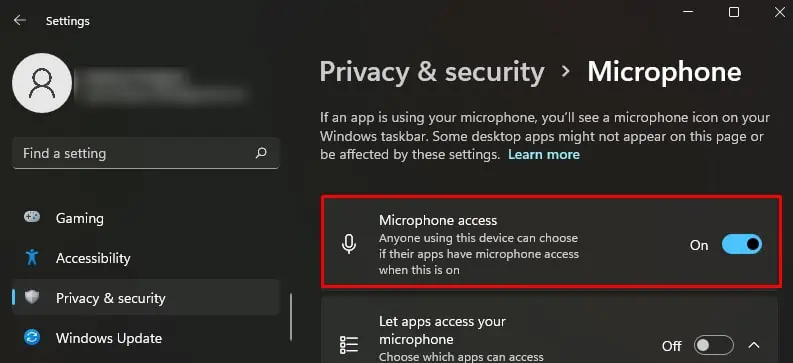
If you are having a problem using microphones with your PC, chances are there that the microphone access has been disabled. You need to enable microphone access for apps on your computer to use it without any issues.
- Hit Windows + I keys on keyboard.
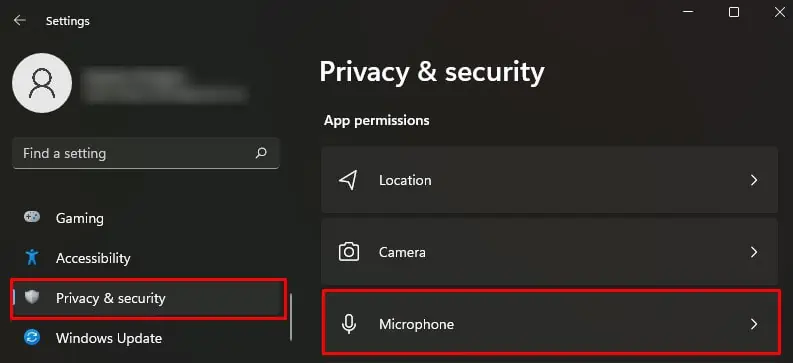
- Choose Privacy & security from left pane.
- Then click Microphone under App permissions section.

- Toggle on Microphone access.

- Toggle on access for applications as well.
Disable Sound Enhancements
Windows provides different audio enhancement profiles like Loudness equalization and Room correction to intensify and amplify the sound as per the user’s needs. However, incorrectly configuring these features can conflict with the audio codecs of sound and create issues.
Therefore, disabling those enhancements can be a good idea to solve the audio not working problem on your Lenovo devices.
- Launch Control Panel. Hit Windows + R, type
control, and hit Enter to open it. - Click Hardware and Sound.
- Next, click Sound.

- Choose the speaker profile under Playback tab and click Properties.

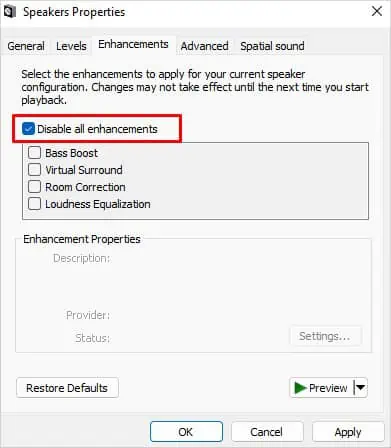
- Jump to Enhancements.
- Check the box next to Disable all enhancements.

- Click Apply > OK and see if the issue persists.
Restart Windows Audio Services
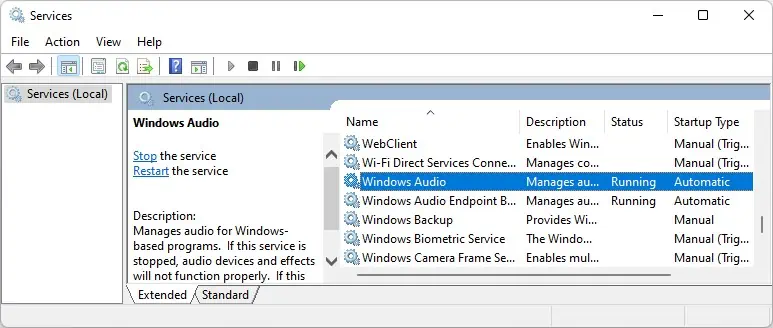
Windows Audio service handles all the audio-related processing on your computer. But when this service stops working, most probably due to a crash, the audio service on your Lenovo laptop stops working. Therefore, restarting the service can sort out the issue.
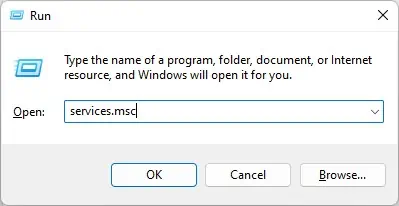
- Open Run. You can do this by pressing the Windows and R keys simultaneously.
- Type
services.msc. Then press Enter key.
- Scroll down to find Windows Audio service and double-click over it.

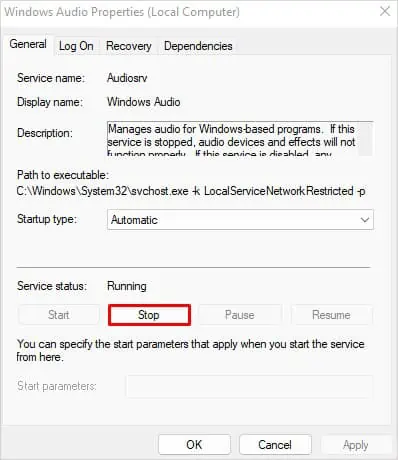
- Click Stop first. Then click Start after it stops.

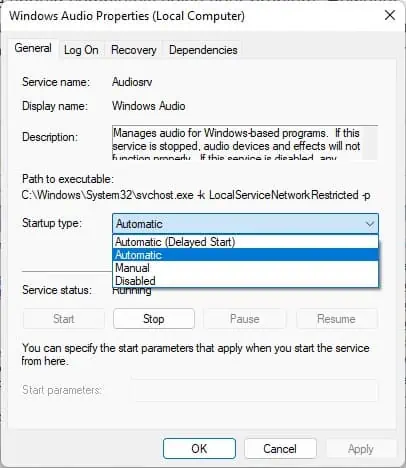
- Choose Automatic in Startup type drop-down.

- Click Apply > OK to save changes.
The fixes discussed in the article should completely solve your problem. However, there may be cases when the speakers on your Lenovo devices are faulty or there is a sound card failure and need a replacement. Please take your device to the authorized Lenovo repair center and get it repaired.

