Whether you have a Thinkpad, Yoga, Legion, Ideapad, or any other Lenovo model, getting a black screen is quite common. Your laptop could suddenly stop displaying anything due to a corrupted system update, overheating issue, outdated driver, or some other reason.
While the exact cause of the problem is difficult to determine, you can adopt simple yet effective techniques to solve it. It’s a good idea to start by hearing the POST beep or examining the LEDs to find out whether you’re experiencing a No Power, No POST, No Boot, or No Video issue.
Once you do that, it becomes easy to troubleshoot. Without further delay, let’s get straight into the possible solutions for every scenario to get rid of the black screen issue on any Lenovo laptop.
Before You Begin
Before anything else, you need to understand what No Power, No Boot, No POST, and No Video mean. Either of them can lead to a black screen, and once you identify what you’re actually experiencing, you’ll know what to do.
You might have noticed that the LEDs light up whenever you start your Lenovo laptop. These could be the status indicators or the keyboard backlit.
If you do not see any light or it dies within seconds after you start your notebook computer, know that you’re experiencing No Power. This happens mainly due to insufficient charge or battery-related issues.
On the other hand, in the No POST problem, the Lenovo laptop starts, and the respective LEDs also light up. But your system can’t get past the Lenovo screen and won’t boot up.
Usually, this happens due to corrupted BIOS updates or incompatible/damaged hardware components. You can check the LEDs or hear POST beeps and apply the recommended remedy, which I shall discuss further.
While the No Boot issue is also similar but here, your Lenovo laptop can POST, and fans spin, but the operating system won’t start. Usually, this is caused by corrupted system files or a problematic Windows update.
Lastly, a No Video issue is where your laptop completes the POST and can boot into the OS but yet there won’t be any video. As you might have guessed, this is an indication of a damaged screen or backlight.
Try General Fixes First
- Start by turning on your laptop and examining the LED. If you do not see the light, connect its charger and verify again. In case there’s still no sign of light, your device is out of power.
- Even if the charger is plugged in but not charging, I advise trying another compatible charger. Let it be charged for a certain time, and then start your device once it has enough power. Even if this doesn’t help, you probably require replacing the battery.
- Also, I recommend pressing the CAPS LOCK or any other key that emits light to see if the POST is completed. Since POST involves verifying hardware integrity, your keyboard won’t take input if the operation fails. If that happens, you have some hardware-related problems, and it would be best to take it to the nearest service center.
- If your laptop was running fine and suddenly went black, it could be due to sleep timers. Simply pressing the power button can wake the system up. If you do not want to experience the problem again, I advise turning off this feature.
- In certain cases, the display gets frozen due to heavy load with the graphics drivers. A quick workaround to this problem is to restart it using the Ctrl + Shift + Windows + B hotkey.
- Sometimes, even a simple restart can fix the problem. This is especially useful when you’re getting a black screen after experiencing an issue with a certain application.
- Try disconnecting the external peripherals (it could be your keyboard and mouse). The related drivers can conflict with the display drivers triggering the issue. If you were able to solve your problem, make sure you update/reinstall them.
- A common mistake is that you might have turned off the LCD screen backlight. You may press F9 to turn it back on. But do note that the dedicated key might vary on different Lenovo models.
- In case your screen is broken or your laptop has bumped into something, its backlight could be damaged. To verify this, take a white light near the screen and examine whether the graphics are illuminating.
Restart Windows Explorer Process
Did you get a black screen (with the mouse pointer available) as soon as you logged into Windows? This can happen when the Windows Explorer process couldn’t start properly.
Since Windows Explorer is responsible to load all the graphical user interface components, it needs to run all the time. By restarting the process, you can allow it to start again from a clean state, thus, solving the black screen issue:
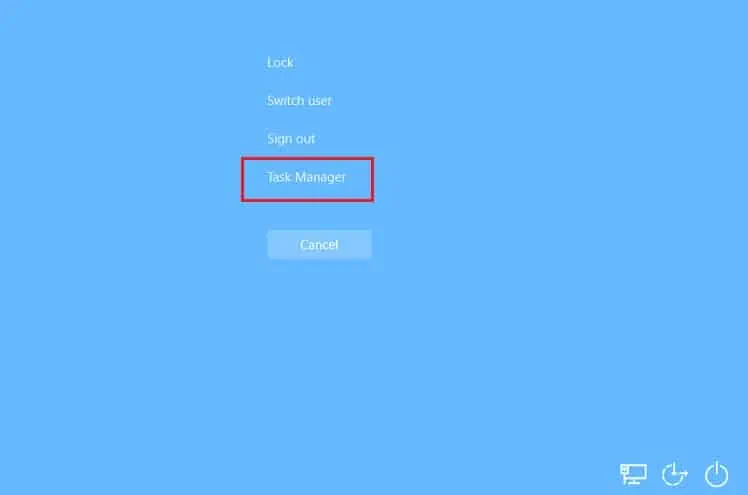
- Use Ctrl + Alt + Del key to open up the Task Manager screen.
- Click on Task Manager.

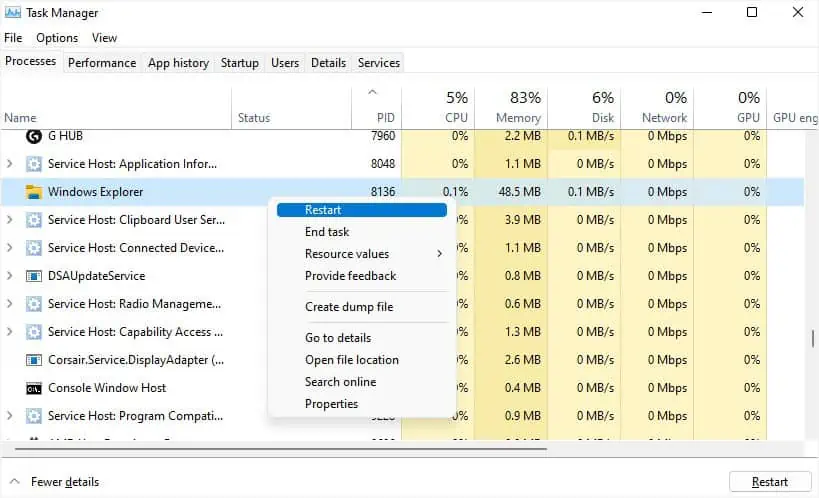
- From the Processes tab, find Windows Explorer and right-click on it.
- Tap the Restart button, and you’ll notice that the screen flickers and you get back your Windows screen.

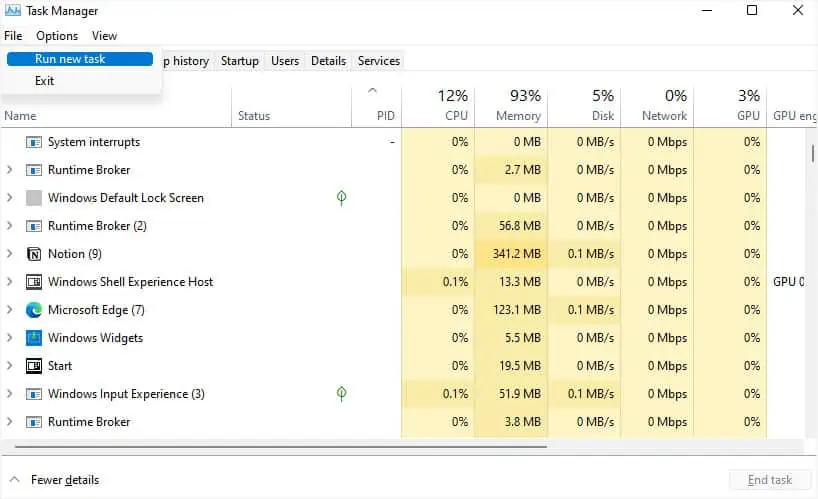
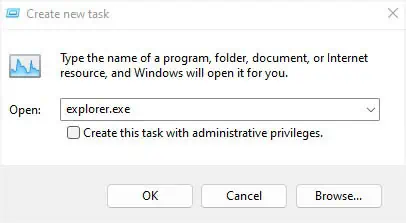
In some cases, the Windows Explorer process might not appear in the Task Manager window. Fortunately, you can create a new explorer.exe task, and this should potentially solve your problem:
- In the Task Manager window, navigate to File > Run new task.

- Once the Create new task dialogue box pops up, enter
explorer.exein the Open field.
- Hit Enter and you should get back your Windows screen.
For some users, even changes in the registry can trigger this problem. In that case, restarting or creating a new Windows Explorer process can’t fix it. Follow the below instructions to make changes to your current registry:
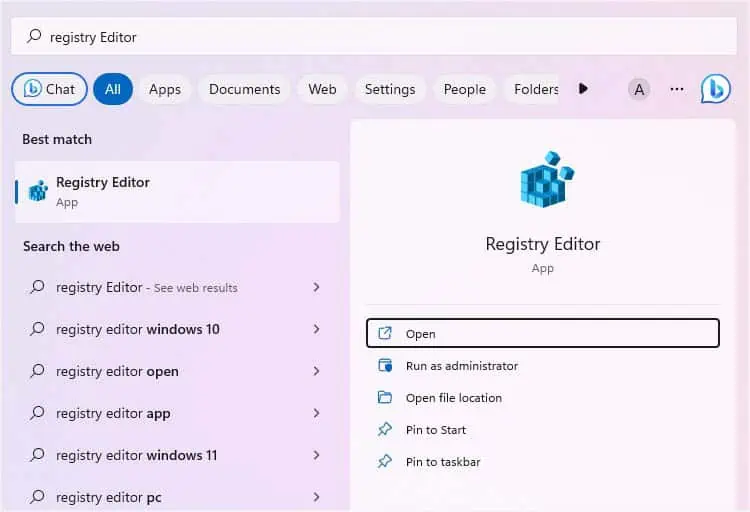
- Once you’re able to use Windows, open up Registry Editor from the Start Menu.

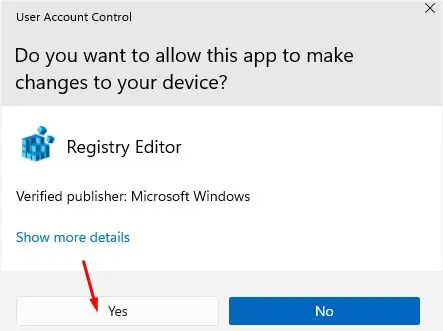
- Hit Yes to provide elevated privilege.

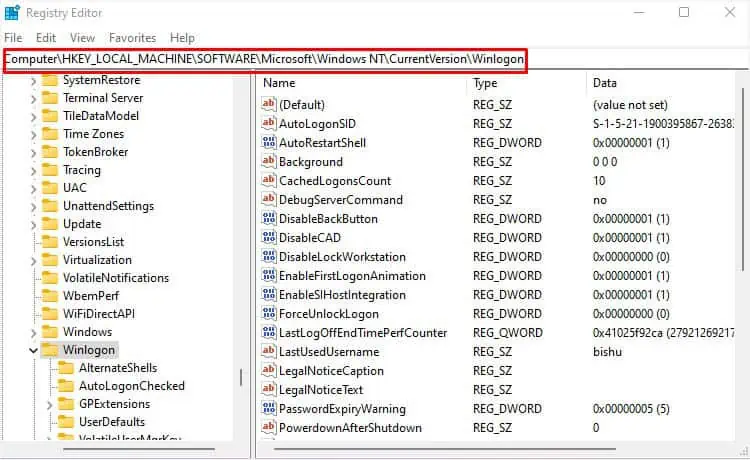
- Copy and paste the following path into its address bar:
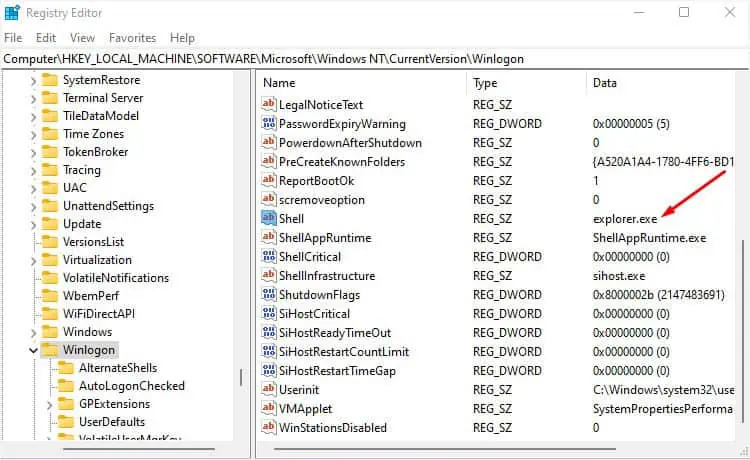
Computer\HKEY_LOCAL_MACHINE\Software\Microsoft\Windows NT\CurrentVersion\Winlogon
- Hit Enter, move to the right pane, and find Shell.
- Check the Data column. If it’s not set, double-click this DWORD value.

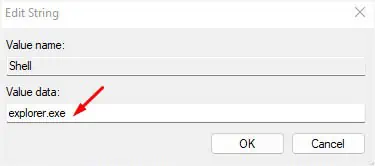
- In the Edit String prompt, input the value as
explorer.exeand press Ok.
- Restart your PC and you should no longer get the black screen on your Lenovo laptop.
Perform Static Discharge
Whether you’re facing a No Power or No POST problem, a hard reset can sometimes be the best solution. This involves clearing any residual electrical charges that may be causing the problem and resetting all your hardware components. This way, you can resolve possible power-related problems.
- Turn off your Lenovo laptop and ensure you have removed all the connected peripherals (including the charger).

- Also, slide out the external battery (if your Lenovo laptop has one).
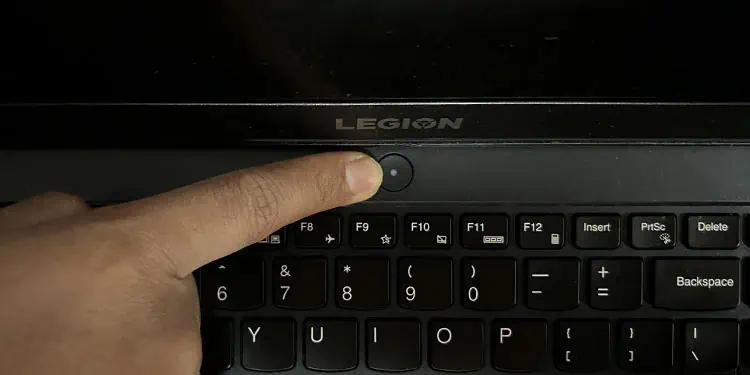
- Now, press and hold the power button for about 60 seconds to completely discharge the remaining power.

- Then, reinsert the external battery.
- Plug the power adapter back and start your laptop. Check if the operating system boots normally.
Note: If white light is blinking in your Lenovo laptop, charge your laptop for about an hour and perform the static discharge again.
Identify Beep Codes
If the Lenovo laptop can’t pass the POST stage, it should beep in a certain pattern. This is a special feature within most laptops to help identify hardware-related issues.
In the below table, I have listed some beep codes along with the affected component and possible solution. These are just the common ones that you can encounter on most Lenovo models. You can navigate to your own user manual to see if there are some more codes that you can find.
| Beep Code | Affected Component | Possible Solution |
| 3 short beeps and 1 long beep | RAM | Reseat the memory modules |
| 2 long beeps and 3 short beeps | GPU | Ensure the on-board graphics are enabled. If it’s an add-on graphic, reseat the component. |
| 4 long beeps (sometimes with 8998/8999 error) | PCIe/PCI MMIO | Try changing from Legacy BIOS to UEFI |
Run Lenovo Diagnostics
Once you’ve identified the possible cause and solution through the beep code, you can run the built-in hardware diagnostics. This helps you identify your Lenovo laptop’s health through the final test results—Passed, Failed, Warning, Canceled, or Not Applicable, or sometimes accompanied by an error code.
You can run this utility in the startup by pressing a dedicated key (distinct in most models). However, do note that not all Lenovo laptops support this feature.
- Force shut down your Lenovo laptop and start it again.
- Once you see the Lenovo logo on your screen, hit the F10 key repeatedly.
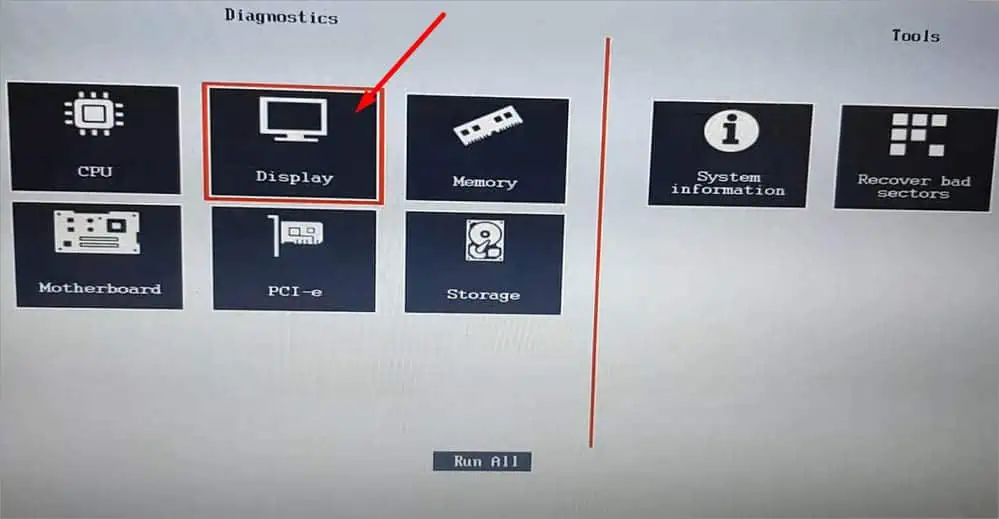
- You should hear a beep sound and then enter the Lenovo Diagnostics interface.

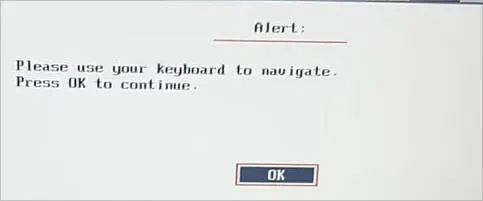
- In the Alert dialogue box, hit Ok.

- Pick Display from the listed items. In other models, you might find the LCD test option.

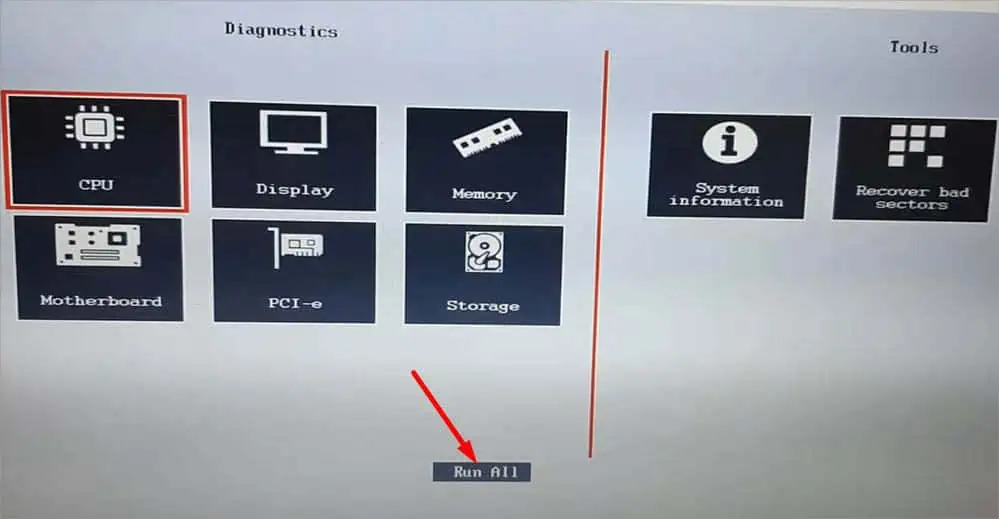
- In case running the Display diagnostics didn’t help, reenter the Lenovo Diagnostics window. This time, click on the Run All option. This will search and fix errors related to all the hardware that could be causing the display-related issues.

- Once the diagnosis is complete, exit the application and your laptop should boot normally.
Check for Display Problems in an External Display
For some Lenovo users, the display works perfectly fine when connecting to an external monitor. Clearly, this indicates issues with your laptop’s LCD screen.
You can even try it on your own. If you do not have an external monitor, connecting to a TV should also help you know the actual cause. If there’s still no display, know that you have a corrupted operating system or there’s a major hardware problem!
Try Booting Your Laptop in Safe Mode
Windows Safe Mode lets you enter a diagnostic interface with limited sets of drivers and settings. If the black screen is not due to system-related components, you can finally assume that a hardware component could be faulty or causing the issue.
In this section, I’ll guide you on how to boot into the Windows Recovery Environment. If you’re unable to start your Windows here, you can’t get to the Safe Mode.
- Force restart your Lenovo laptop two to three times to start Automatic Repair.
- Once you’re in the “Automatic repair couldn’t repair your PC” screen, hit the Advanced options button.

- Wait until you’re navigated to the Windows Recovery Environment.
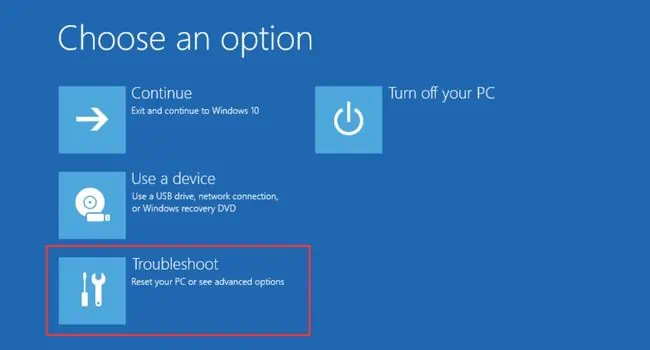
- Once you’re in the Choose an option window, select Troubleshoot.

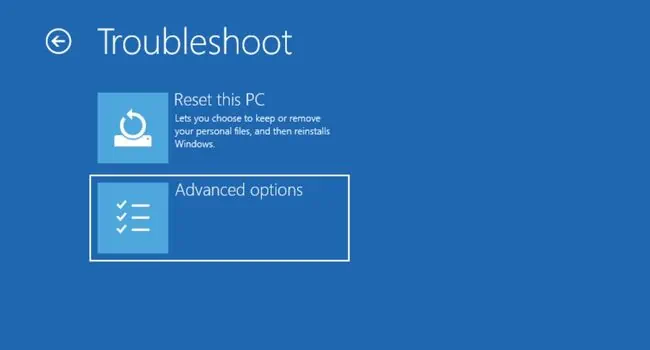
- Now, navigate to the Advanced options screen.

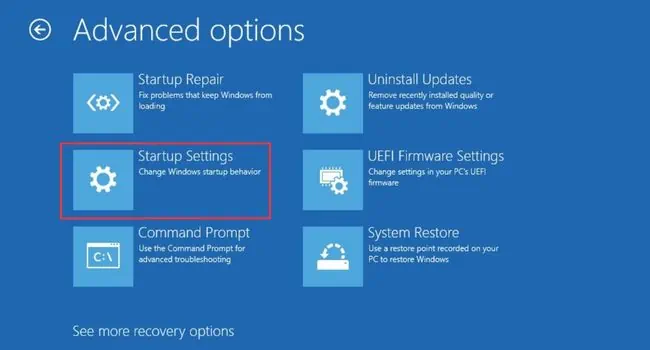
- You should see a number of options for troubleshooting. Here, you need to choose Startup Settings.

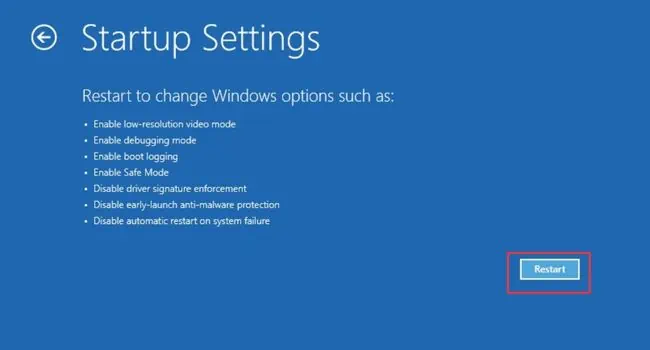
- Next, press the Restart button and wait for the Startup Settings screen to open up.

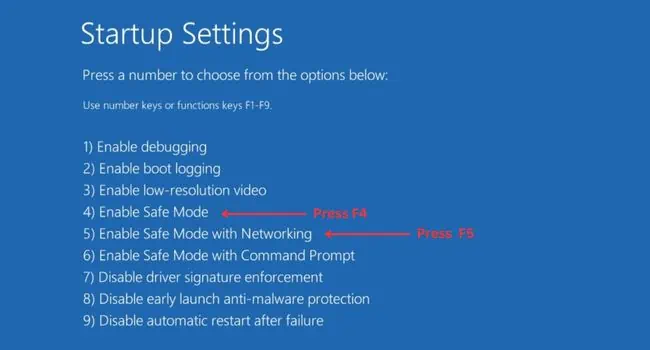
- Use F4 to start Safe Mode or F5 to enable it with networking.

- Wait and see if the Lenovo laptop starts up in Safe Mode.
Update or Rollback Faulty Drivers
A common cause of a black screen in a Lenovo laptop is outdated or corrupted display/graphics drivers. For that reason, I always recommend keeping them updated. But if you’re experiencing the issue after an update, you may choose to roll it back.
Note: Before anything else, boot your Lenovo Laptop in Safe mode or follow the below steps on an external monitor/TV.
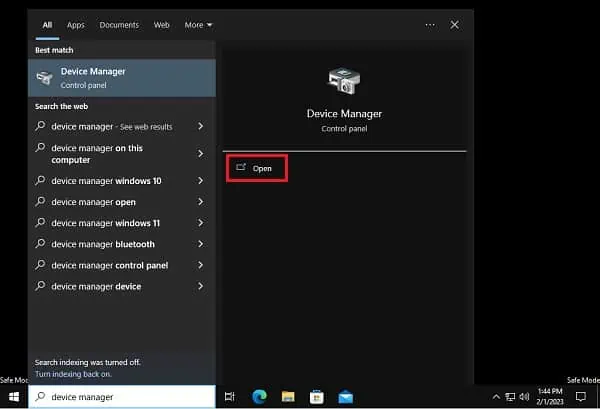
- Hit the Windows key to open Start Menu, search for Device Manager, and launch it.

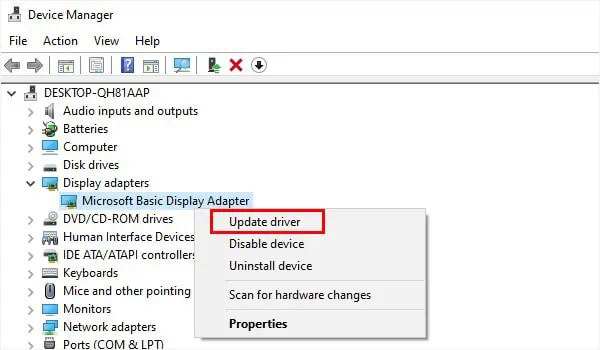
- Expand Display adapters and right-click on your graphics driver.
- Choose the first option–Update driver.

- After the Update Drivers dialogue box opens up, follow the on-screen instructions to search for the latest drivers automatically.
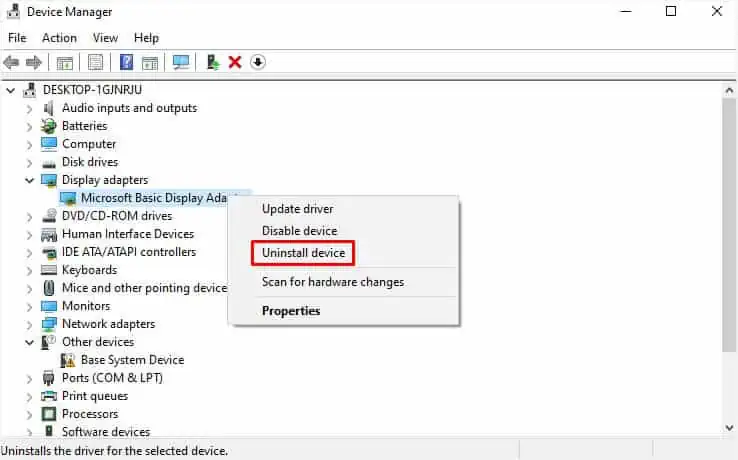
- If this didn’t help, right-click on the driver again and pick Uninstall device.

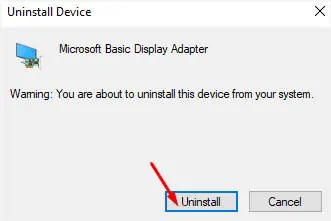
- In the confirmation dialogue box, click on the Uninstall button to confirm the deletion of the corrupted graphics driver.

- Now, restart your computer and the required driver should get installed.
- If you are still unable to fix the black screen on your Lenovo Laptop, open the Device Manager from Safe Mode or the external monitor again. This time, try updating or reinstalling the display drivers.
Here are the basic instructions to roll back the corrupted driver update:
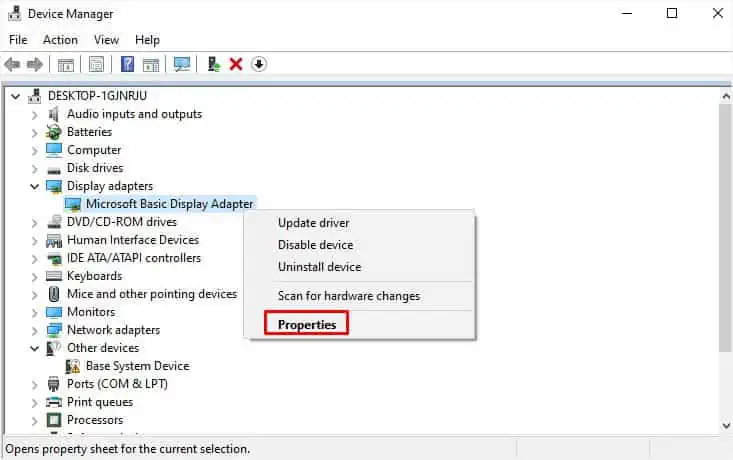
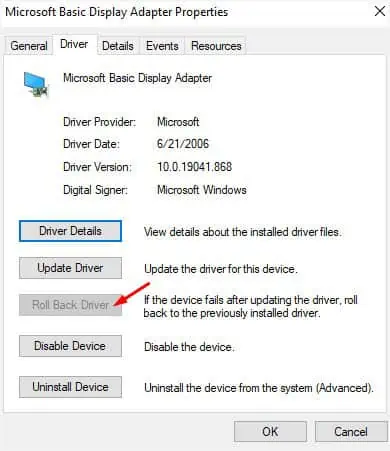
- In the Device Manager utility, right-click on the problematic graphics/display driver.
- Pick the last option–Properties.

- Navigate to the Driver tab and press the Roll Back Driver button.

- Now, in the Driver Package Rollback dialogue box pops, select the reason you’re trying to roll back your drivers.
- Press the Yes button and reboot your PC in normal mode.
Try Startup Repair
If you’re frequently getting a black screen during the Windows startup, a simple solution would be performing a startup repair. This will fix any related problem with your system files that could be causing the No Boot problem:
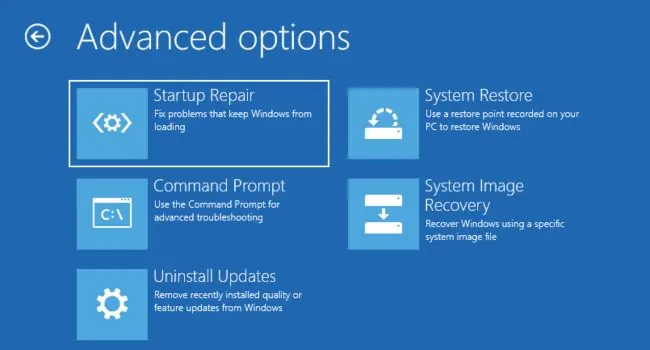
- Get to the Windows Recovery Environment as discussed earlier.
- Navigate to Troubleshoot > Advanced options.
- This time, choose Startup Repair.

- Wait for the utility to fix the startup-related issues. Once this is done, your Lenovo laptop should start normally. But if you get the “Startup repair couldn’t repair your PC” error, know that there might be other underlying issues.
Reinstall the Troublesome App
Some Lenovo users are getting the black screen only after opening a certain third-party application or when playing games. While the graphics driver remains the primary suspect, you can never rule out any possible problems with the troublesome application.
For that reason, try reinstalling the program. Also, I recommend running it on another working device to see if the same issue occurs. In case the problem persists everywhere, it would be wise to remove it from the device until the developer fixes the related bug.
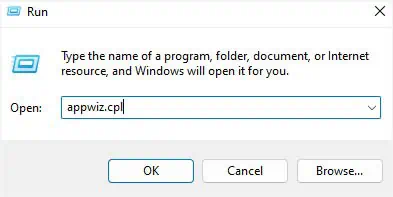
- In the Run window, execute the
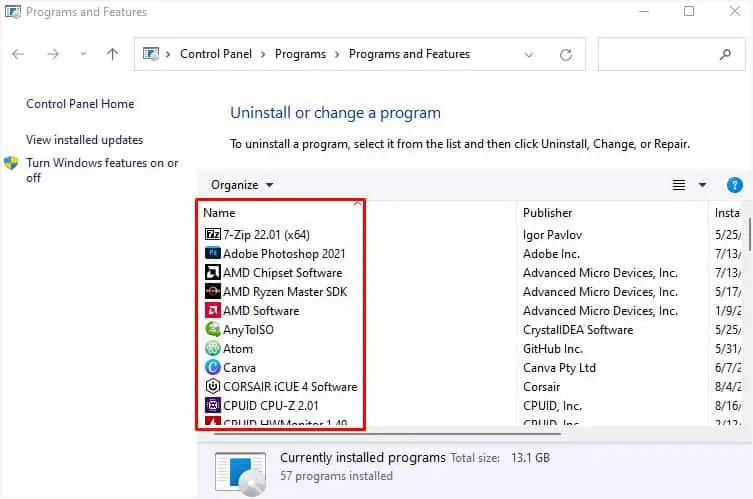
appwiz.cplcommand. This should take you to Programs and Features in Control Panel.
- From the listed apps, double-click on the one causing the display-related problems.

- Once the dedicated uninstallation dialogue box pops up, follow the on-screen instructions to remove it completely.
- Now, restart your laptop in normal mode and check if the black screen problem is now resolved.
- Reinstall the app and check if the issue happens again. If it does, I recommend uninstalling it and reporting the problem to the publisher. The only option is to wait for them to fix the related bug that could be causing the problem.
Check Faults With Internal Display Cable and Header
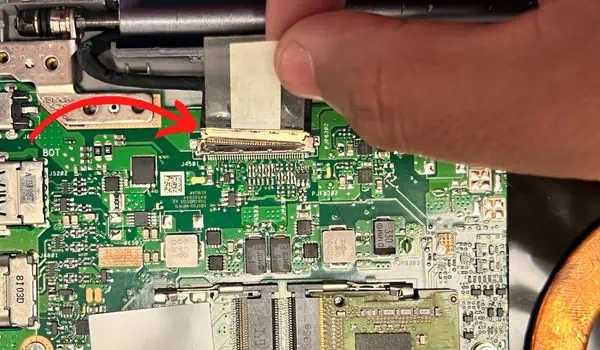
Every laptop has an internal display cable that’s connected to the dedicated motherboard header. If it gets unseated or damaged, the video signal might not reach the laptop screen leading to a black screen.
You can try reseating this cable to fix your possible black screen problem. But before operating with your laptop’s internal components, I highly recommend grounding the laptop or yourself. This prevents the sensitive parts to get damaged from static buildup on your body.
- Shut down your Lenovo laptop completely, and also make sure all the external peripherals are disconnected.
- If your model has an external battery, remove that as well.
- Perform a static discharge by pressing the power button for at least 10 to 15 seconds.
- Now, flip the laptop upside down and untighten each screw that holds the bottom cover in place.
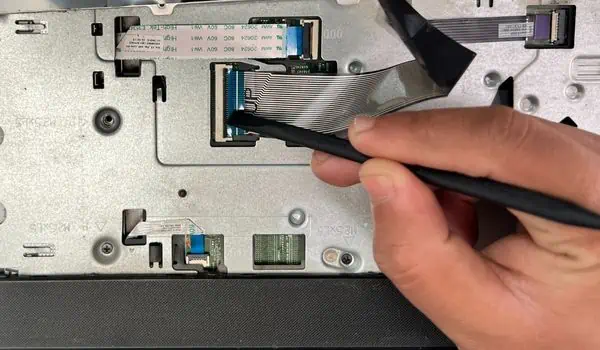
- Carefully pry out the bottom cover from its place. You may take the help of a plastic spudger.

In older Lenovo models, you may require removing the keyboard panel first.
- Now, locate the display connector. The exact location can vary depending on your laptop’s model. If you’re facing issues, you may refer to the laptop’s user manual available online. Usually, it’s a flat cable that goes around the fan and into the hinge.
- Slide any flat tool underneath the pin that holds the LCD cable in place.
- Then, carefully pull the connector out of the header.

- Next, I recommend cleaning accumulated dust near the pins using a Q-tip.
- Now, inspect the cable thoroughly (from the tip to the hinges). In case you find any damage, you may require replacing it with an authentic cable from an official Lenovo store or retailer.
- Whether it’s a new cable or the same old one, align the pins and slide down the connecter in the slot.
- Then, reconnect everything (including the internal/external battery) and start your Lenovo laptop.
Reseat Your Memory Modules
One of the prime reasons for a laptop screen to go black is RAM-related problems. The memory module on your notebook computer is responsible for holding the information that your processor requires during the startup.
Likewise, Video RAM (VRAM) is an essential part of the memory module that holds all the images and graphics-related information. Thus, it’s essential to check whether the RAM stick is properly seated.
- Start by turning off your laptop, removing any external devices, disconnecting the battery, and performing a static discharge.
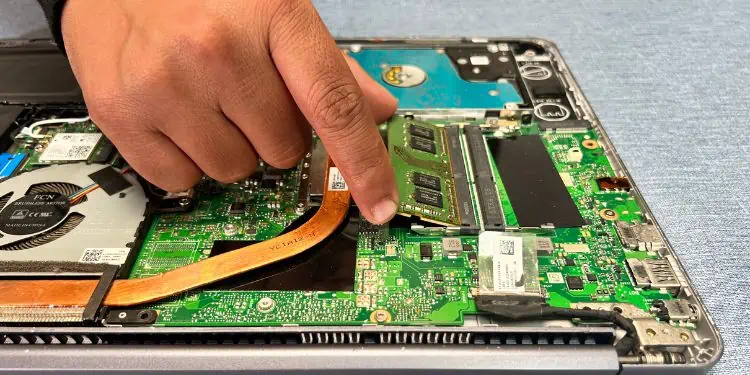
- Next, remove the bottom cover and navigate to the RAM section. This may vary based on different Lenovo models.
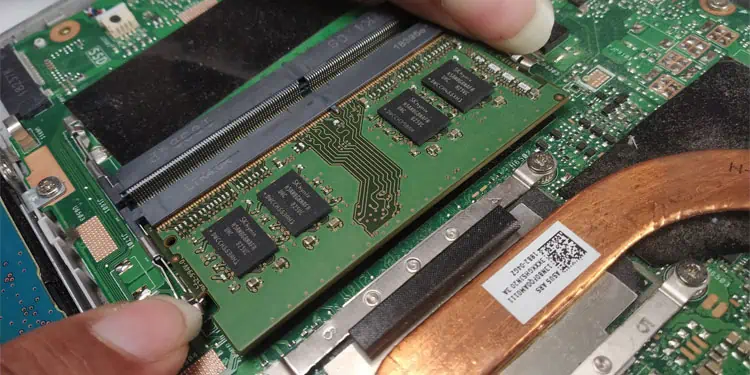
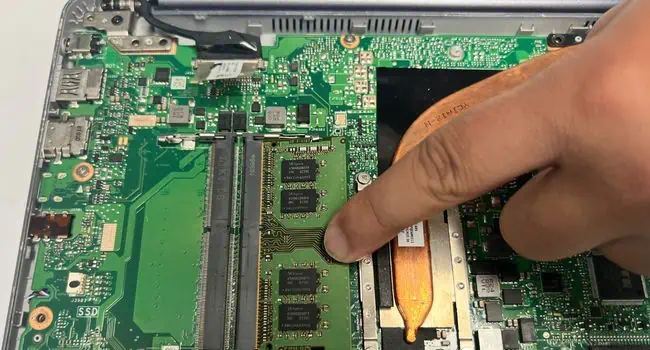
- Push the two levers outwards. Doing this should pop the module out.

- Pull it out of its slot. While you’re at it, I advise you not to touch the gold contact pins.

- Repeat the above steps if you have another module too.
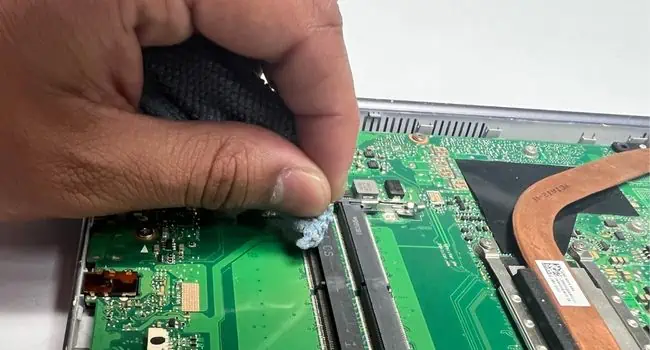
- Now, clean the slots and the RAM sticks using a microfiber cloth.

- Then, reseat the modules back to their slots ensuring proper alignment.
- Push the stick downwards until you hear a clicking sound.

- Finally, replug the internal battery cable, close the chassis, tighten back the screws, and start your Lenovo laptop. You should be able to boot up if the culprit was bad RAM.
Reset or Update BIOS
You’re more prone to seeing a black screen on your Lenovo laptop if you frequently play around with your BIOS settings. If you recently updated the BIOS or overclocked the CPU, I highly advise resetting them to factory defaults. This should resolve the configuration conflicts or incorrect settings that were applied earlier:
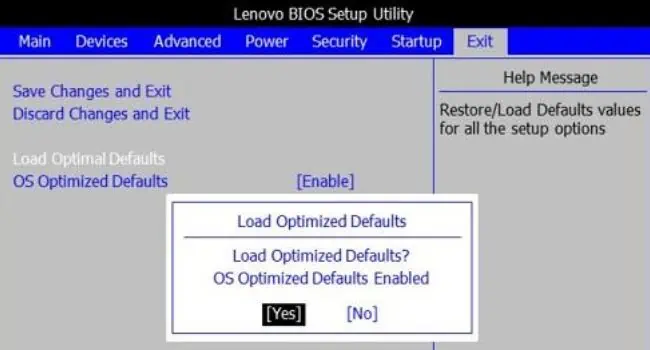
- Reboot your computer and press the BIOS key once you see the Lenovo logo. Pressing F2 or Fn+F2 should do the job. Since this varies on different models, I recommend checking it online.
- After you reach the Lenovo BIOS interface, find Defaults, Load Optimized Defaults, Reset BIOS, or similar options.

- Select the option and complete the on-screen instructions to complete the BIOS reset. Your Lenovo laptop should now restart and properly boot.
In case you were unable to access BIOS, it’s still possible to do it using the CMOS battery. All you have to do is open up the bottom casing, find the battery location, remove, and reseat it.
If resetting BIOS didn’t work out, your next choice is flashing/reflashing the working version. We have already covered a detailed guide on this subject. Check this article to learn how to update Lenovo BIOS using different ways.
Recover Your System
If none of the aforementioned steps helped, there’s a possibility that your system files could have gone corrupted and you’re unable to boot up. Fortunately, Lenovo Ideapad offers a One Key Recovery or Novo button that allows you to recover the previous system version in just two steps. Let’s jump into each one below:
- First, force shut down the notebook computer by pressing the power button for about 5 to 10 seconds.
- Locate the Novo button on your Lenovo Laptop after checking the user manual. The exact location varies on different models.

- Use a sharp tip object (a paper clip or SIM ejector will do) to press the Novo button.
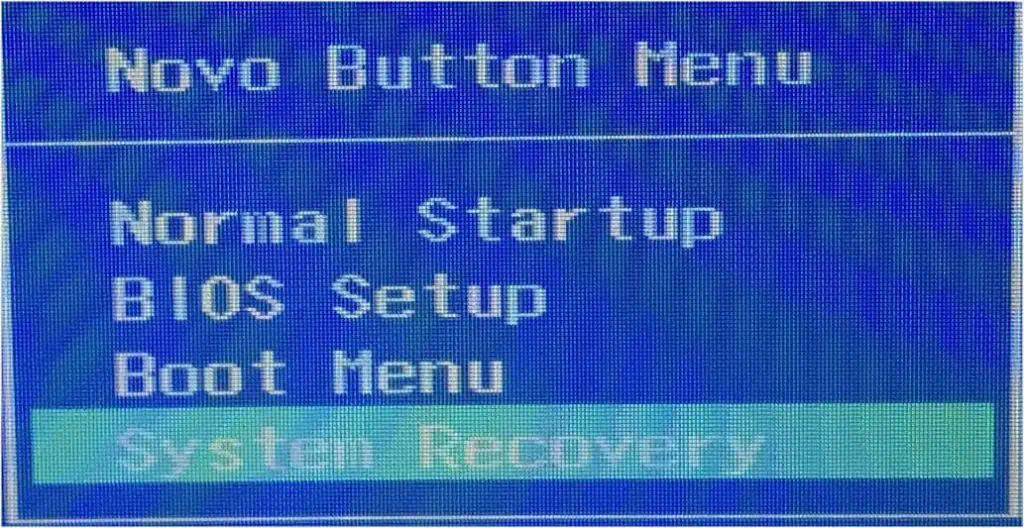
- Now, you’ll notice that your Lenovo laptop powers on and take you to the Novo Button Menu.
- Pick the System Recovery option.

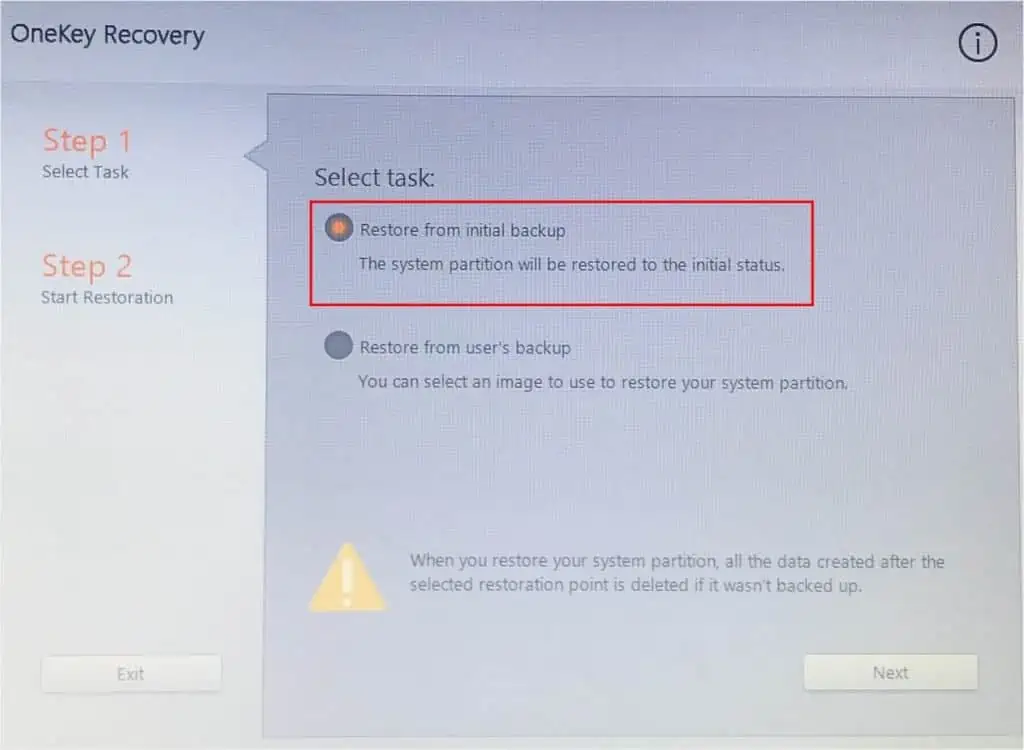
- Wait until you reach the OneKey Recovery window. In the first step, select any preferred task–Restore from initial backup or Restore from user’s backup. For demonstration, I’ve chosen the former option.

- Press the Next button.
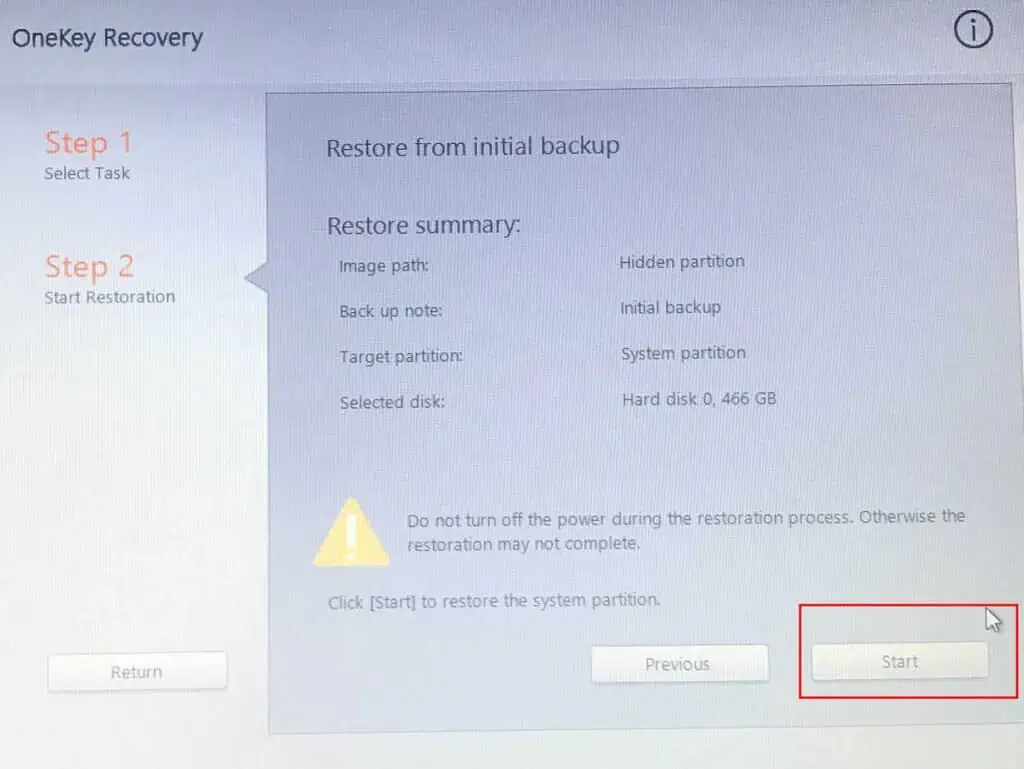
- In the second step, verify the Restore Summary before clicking the Start button.

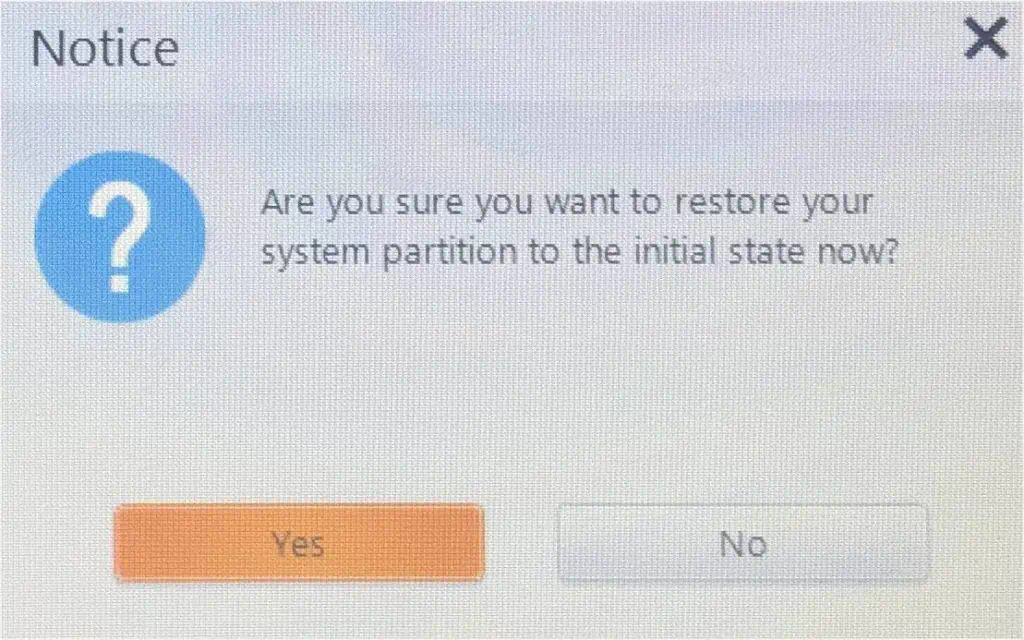
- Press Yes to confirm once the Notice dialogue box pops up.

- Finally, wait for the recovery to complete and you should be able to boot into your PC.
Additional Tip: Like the One Key Recovery feature, you may even use the built-in Windows System Restore feature from the Advanced Options screen in Windows RE. This can come in handy to those users who are using other models aside from Ideapad. Also, you may choose to uninstall the specific Windows version that could be causing the issue after a recent update.
Factory Reset or Clean Install OS
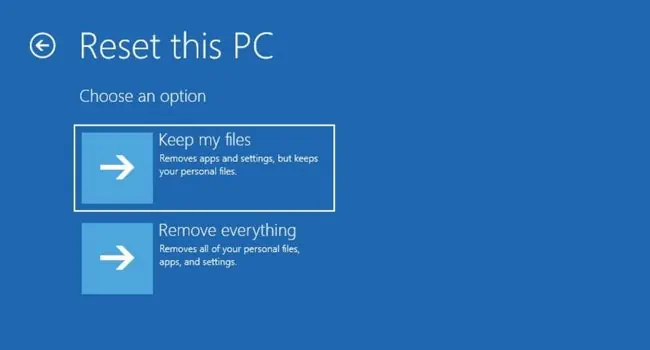
The final troubleshooting solution would be factory resetting Windows. This will remove most of the troublesome applications or anything else that could be causing the black screen issue on your Lenovo laptop. Let’s start with keeping your files intact and resetting the PC:
- Get to the Windows Recovery Environment.
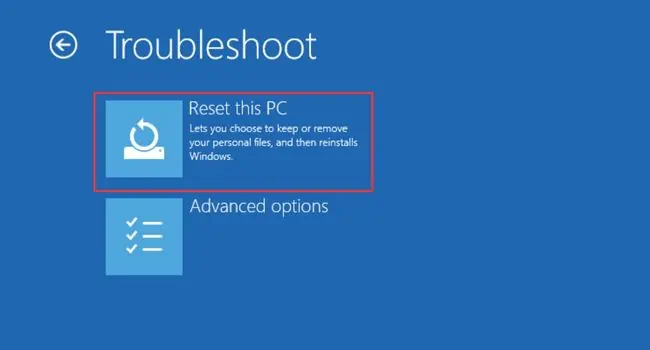
- Then, navigate to Troubleshoot > Reset This PC.

- In the next screen, choose Keep my files.

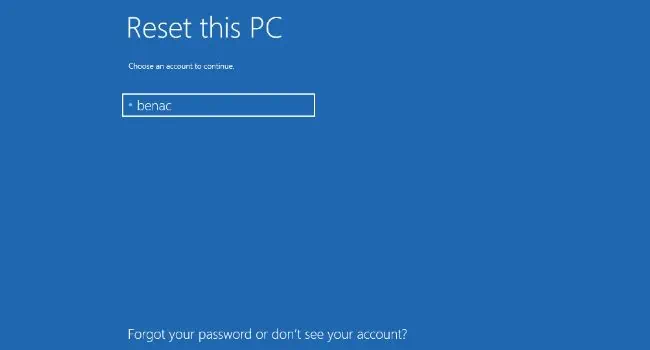
- Wait for the Reset This PC screen to start. Here, pick your account and enter the right password to continue.

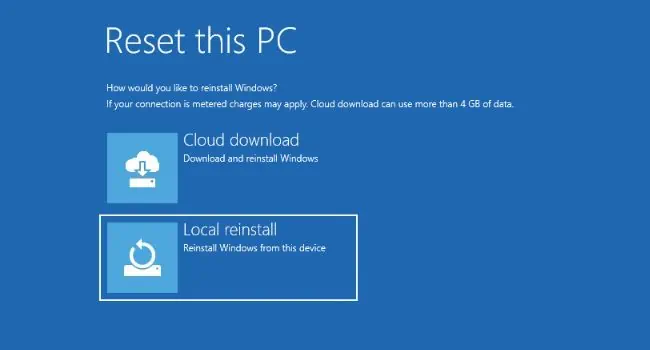
- Next, pick Local Reinstall.

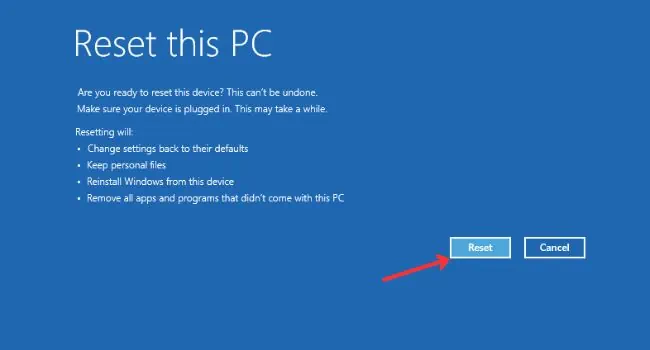
- Wait for things to get ready and once you’re on the dedicated screen, hit the Reset button.

- Now, wait for the process to complete. Do note that your laptop may restart several times.

If a normal reset doesn’t fix your problem, it’s time to reinstall the operating system. This involves creating an installation media and setting up Windows from scratch. Follow our other detailed guide that should help you do this with ease.
Fixes that Worked for Other Lenovo Users
While the above troubleshooting steps should be enough to solve the black screen problem, here are some additionals tips that worked out for a few Lenovo users. In case you were unable to fix your issue, one of the below could potentially help you out:
- Get to your Lenovo BIOS and switch the GPU mode from dGPU to Hybrid.
- Try disabling Fast Startup from Safe mode.
- A failing hard drive can also lead to a black screen with a blinking cursor. You can try reconnecting the drive or running SFC, DISM, and CHKDSK commands from the Windows RE.
- If you have an IdeaPad 3 14ADA5/IdeaPad 3 15ADA05/IdeaPad 3 17ADA05/V14-ADA/V15-ADA, here’s a forum that should help you fix the black screen after a BIOS update. However, you need to take extra care when performing these steps, and it is definitely not recommended for normal users. But if you’re someone who loves to tinker with PC/laptop components, this should be a guaranteed solution.
Take Your Lenovo Laptop for Servicing
I understand your frustration that even after following all the detailed steps, you weren’t able to solve your problem. Even though I have provided everything that could potentially fix the black screen issue, I might have missed out on certain details.
I’d appreciate it if you post your problem in the comment section below. Don’t forget to mention the Lenovo model you’re using and what, according to your knowledge, has triggered this problem.
As far as I’m concerned, you have an underlying hardware issue that requires professional assistance. These could involve a damaged LCD panel, RAM, display cable header, hard drive, CPU, hinge, or motherboard.
As most Lenovo community experts recommend, I also suggest reaching out to Lenovo’s nearest service center. Don’t forget to mention the troubleshooting tips you did earlier so that they can help you out with what has gone wrong.

