Using microphones with our computers has long been integrated with our daily lives, whether it be for video calls/conferences or recording and streaming purposes. So, if your microphone is too quiet or suddenly becomes so, you should troubleshoot it as soon as possible.
Many users have faced this issue after installing or upgrading to Windows 11. Usually, it happens because your system still uses the old drivers and causes conflicts with the new OS. However, it is also possible that you haven’t configured your microphone settings properly or that the device itself has some issues.
Regardless, you can try troubleshooting for any software causes or bypassing the issue altogether using a different audio channel. However, if your device is at fault, you may need a replacement.
Causes for Mic Too Quiet in Windows 11
Here are the potential causes for your mic being too quiet:
- Microphone volume too low.
- Microphone driver issues.
- The Enhance Audio option not compatible with the device or system.
- Problems with the physical microphone device.
How to Fix Mic Too Quiet in Windows 11?
First, make sure to check the connection of the microphone or headset with your computer if it’s an external one. You can also connect it to other devices and check the volume.
Also, a microphone has a sweet spot where the voice sounds best. Your voice may sound low if you are speaking to it further or closer.
Then, follow the possible solutions below to resolve your issue:
Check Microphone Volume Settings
It is possible to modify the volume for a microphone from your settings. You may have unknowingly decreased the volumes, leading to the above error. Or, the setting may have changed after installing an update or any apps that use the microphone.
So, before troubleshooting for other causes, make sure to check the volume and set it to the max. Here’s how you can do so:
- Open Run by pressing Win + R.
- Type
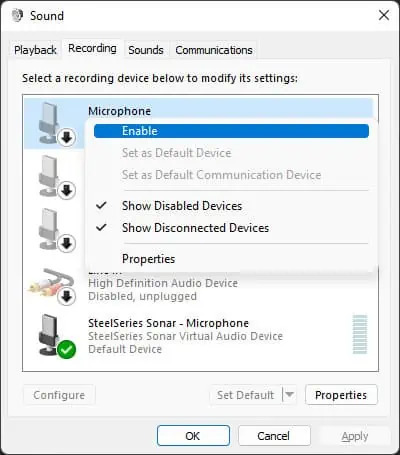
mmsys.cpland press Enter to open Sound Options. - Go to the Recording tab.
- Make sure your microphone is enabled (shows green tick sign). You can right-click on the microphone and select Enable if it isn’t.

- You can also Disable and then re-enable the microphone to refresh it.
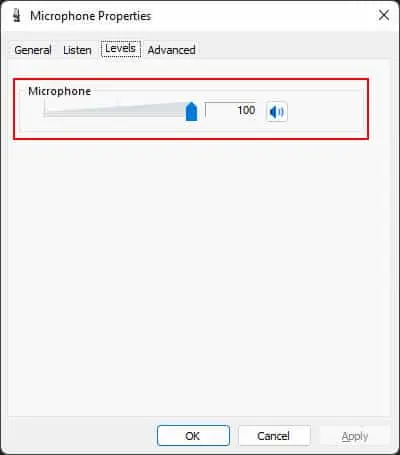
- Then, double-click on your microphone and go to the Levels tab.
- Make sure the volume is 100 and click OK.

- You can speak out and check the bar next to the microphone under Recording to test the volume.
- Then, keep clicking OK to apply the changes and close the Sound Options
You can also boost the Microphone volume by accessing its Properties, going to the Levels tab, and changing the Microphone Boost slider if the option is available.
Many apps also include their own volume settings that modify the microphone volume. So, you need to check such settings as well. The steps you need depend on the app itself, so we recommend referring to the official sources if you encounter any trouble.
Run Recording Audio Troubleshooter
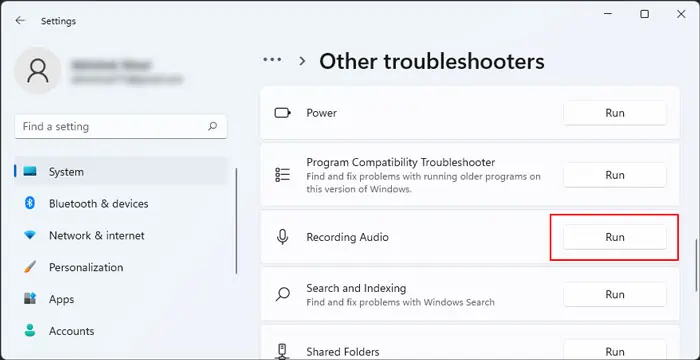
Windows includes dedicated troubleshooters to scan for and repair issues with your system components. You can try running the recording audio troubleshooter whenever you experience any problems with your audio inputs, including the mic being too quiet.
To run this troubleshooter,
- Open Run.
- Type
ms-settings:troubleshootand press Enter to open the Troubleshooting Settings. - Go to Other troubleshooters.
- Click on Run next to Recording Audio.

- Select your Microphone device and click Next.

- Follow the on-screen instructions.
Update Drivers
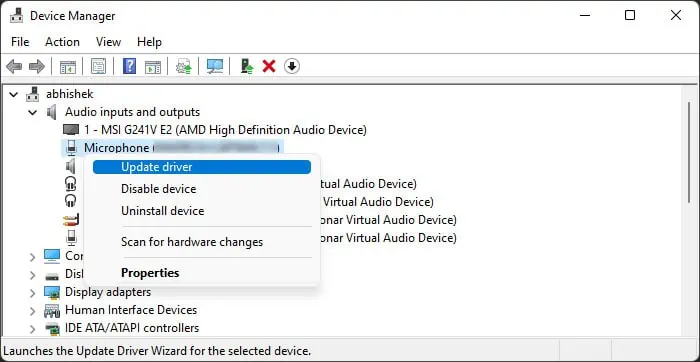
Bugs with the audio drivers may also cause your microphone to behave unexpectedly. It is best to keep your drivers fully updated to prevent such issues. Here’s what you need to do to update the microphone driver:
- Open Run.
- Type
devmgmt.mscand press Enter to open the Device Manager. - Expand Audio inputs and outputs.
- Right-click on your microphone and select Update driver.

- Select Search automatically for drivers and follow the on-screen instructions.
You should also update your chipset and motherboard drivers. You need these to properly use any peripheral devices, so issues with them can also lead to the above error.
Disable Enhance Audio Option
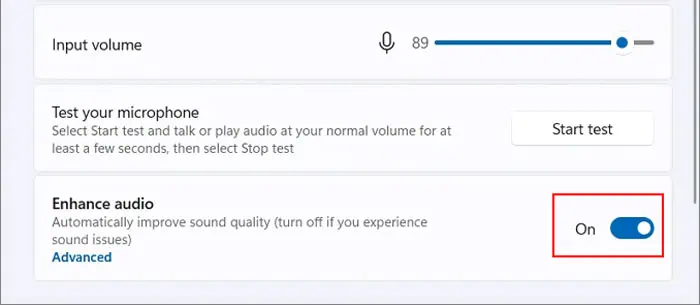
Some microphones include an option to enhance audio. While this option is there to provide a better recording experience, some devices do not work well with this setting. You can try disabling it and check if your mic records your voice normally after that. To disable the option,
- Open Run.
- Type
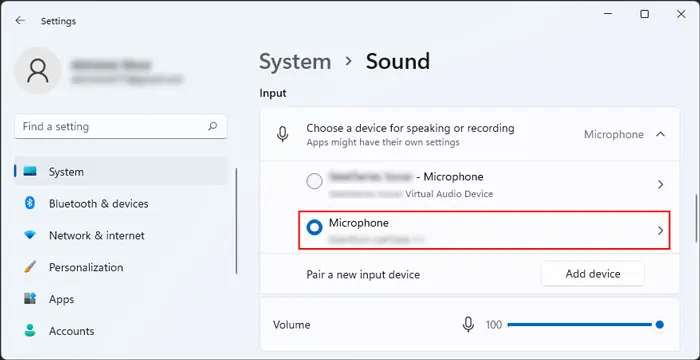
ms-settings:soundand press Enter to get to Sound Settings. - Under Input, expand Choose a device for speaking or recording and click on your microphone.

- Toggle Off Enhance audio if the option exists.

However, in some microphones, you may need to enable this option (if it was disabled earlier) to fix the issue.
Check Realtek Audio Console
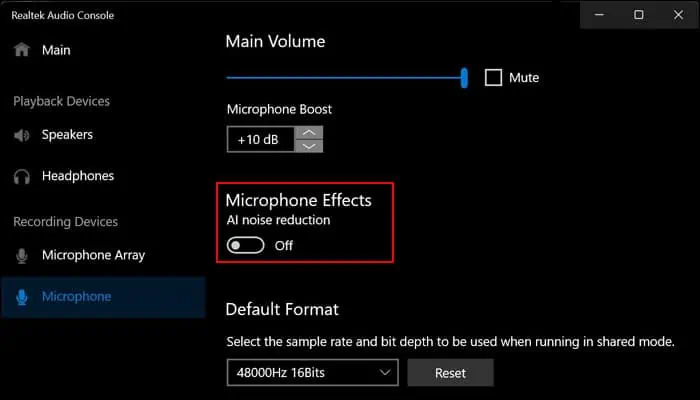
If you use Realtek audio devices, you can also open the Realtek Audio Console and look over the volume and noise reduction options
- Search for
Realtek Audio Consoleon the search bar (Win + S) and open it. - Under Recording Devices, select your microphone.
- Make sure the volume and boost levels are enough here as well.
- Then, enable/disable the noise suppression options under Microphone Effects (you may have one or more options) and inspect if any configuration fixes the issue.

Some apps may also include their own noise reduction options, so make sure to modify them and check as well.
Use Virtual Audio Device
Sometimes, Windows and the default drivers themselves may not be able to tap into the maximum volume for the microphone. In such cases, your microphone continues sounding quiet even when the volume and boost are at maximum.
You can bypass this issue by using a virtual audio device with its own driver. As such, the dedicated virtual driver can provide proper amplification to your microphone.
The exact steps you need to follow depend on the virtual device. However, here are the general instructions you need to apply to use such a device:
- Download and install a virtual audio device that comes with its own driver, such as VB-CABLE.
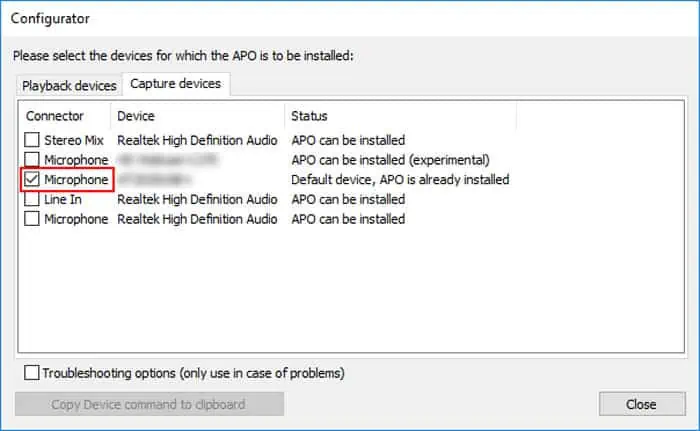
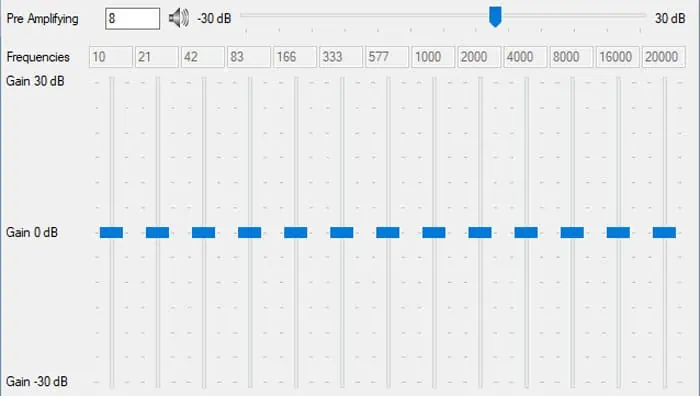
- Install an equalizer and capture the virtual audio input with the equalizer. (You may need to set the capture devices during the setup).

- Link your physical microphone to the virtual one using the steps below:
- Open Sound Options (
mmsys.cplon Run) and go to the Recording tab. - Double-click on your physical microphone and go to the Listen tab.
- Check Listen to this device.
- Set the drop-down box below to the virtual input and select Apply.

- Head over to the Levels tab.
- Set the volume to 100 and the boost to 0.0 dB. (You can change it later if you wish)
- Click OK.
- Then, change the volume and boost settings in the Realtek Audio Console if you have this app. Disable the noise suppression effects as well.
- Open Sound Options (
- Now, go back to the equalizer to increase the Pre-amplifying and Gain values of the microphone.

- If your microphone is still not loud enough after setting the maximum Pre-amplifying and Gain values, go back to Sound Options and increase the microphone’s boost value.
If you encounter any trouble following the process, we recommend you refer to the official instructions of the virtual audio device and the equalizer.
Clean or Repair Microphone
If you couldn’t resolve the issue using all these methods, there might be a problem with your hardware. We recommend taking it to a servicing center or a hardware expert to clean or repair it. You can do so regardless of whether the issue is with the internal or the external mic.
