The videos and pictures displayed on the monitor screen are not constant. The pixels in the images are redrawn continuously at milliseconds to make them smooth. So, technically, the monitor screen is flickering all the time. We are just not able to see it.
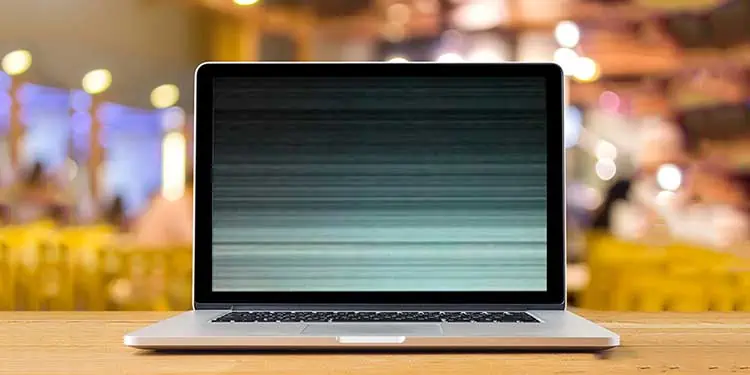
However, it is not common to find flickering lines on the screen. From bumping your monitor on something to having a faulty video driver, horizontal or vertical lines can appear for many reasons. The causes range from several hardware defects to software glitches.
It is normal to feel frustrated when you try to work and get constantly disturbed by some weird lines on the screen. But you do not have to throw away your monitor just because of this. The problem is fixable. You just have to pinpoint the causes behind it.
So, let’s not bore you with more details and get straight to its causes and their solution.
What Causes Monitor Flickering Lines?
As I mentioned, the reason can be anything from software error to serious physical damage.
For instance, most people habitually open their laptops by lifting the screen from one side. It causes the panel inside the screen to twist, which might cause disconnection in circuits. As a result, mostly vertical lines will appear on the screen.
Furthermore, the VGA cable or the cable connecting your monitor to your CPU might be loose. Most of the time, we just insert the cable and do not tighten the provided bolts. The loose connection might be causing the horizontal lines on your screen.
Also, the outdated VGA driver might malfunction and the screen may not have received full functionality.
Similarly, Did your monitor fall down? Or Did you WWEd it in response to your gaming result? Or Does your system heats up a lot? Let’s go through most of the causes behind the flickering lines on your monitor.
Now that you know about the possible causes for the lines to appear on your screen, let’s move towards fixing it.
How to Fix Monitor Flickering Lines?
If you have bumped your Monitor or dropped your Laptop, then it will most likely require repairing. Installing some program or shaking the monitor probably won’t fix it.
But if you do not remember such events happening, then do not rush to take your monitor repaired. Unless you have loads of cash lying around. Repairing a faulty monitor costs more than buying a new one. You can apply the fixes to rectify the issue.
Do not underestimate yourself. With a bit of our support, you can just do anything.
I am going to show you the best possible fixes for the flickering lines on your monitor screen.
Check the Monitor Cables
Monitors are connected to the CPU through VGA, DVI, or HDMI cables. If you are a Desktop user, you might have noticed a big cable coming from the monitor inserted into the back of the CPU. The connector has two inbuilt screws to prevent loose connections.
We generally ignore using those screws. Sometimes, the cable can detach slightly and the monitor might not show the visuals properly.
Here is the way you can test the cord.
- Disconnect the cable from the VGA port in the CPU.
- Clean it properly and reconnect it.
- Tighten both the screws ensuring it is not loose.
- Some cables have a VGA adapter at both ends.
- Disconnect, Clean, and Reconnect the cord towards the monitor end as well.
- Look at the monitor’s power cable and ensure it is not damaged.
If the line still persists, then it is time to check the integrity of those cables. Take those cables to another working computer and see if the cord is working fine.
If the lines appear on the computer, you can become sure that the cable is faulty. If it works fine, then go through another fix given below.
Check Your Monitor
The next thing to do is to check if your monitor is working properly. Sometimes the connections inside the monitor may be loose or the screen itself is damaged.
To test your desktop monitor, you can connect your monitor to another working computer. If the lines still flicker on the screen, you can be sure that your monitor has a problem.
Similarly, if you do not have another computer but can get another functional monitor, you can connect it to your system. If the flickering line appears even in the operational one, you can be hopeful that your monitor does not have any issue.
You can also try another way to test your screen by following the given instruction.
- Restart your computer.
- Right after the computer restarts, repeatedly press “F2” or “F10” to open BIOS.
- If the line appears on the BIOS page as well, then the issue is hardware-related.
In the case of a Laptop, you can tilt your screen to a different angle and see if the lines appear at every angle. You can also connect an extra monitor through the HDMI or VGA port on your laptop.
See if the problem is present in the other one as well.
Reset the Monitor Settings
Most of the monitors recalibrate their settings to fit our video settings fixed by the graphics driver. Some error might have occurred to the driver software or the monitor may not be compatible with the settings.
You can simply reset the monitor settings if it is a problem. Let’s go through the process of changing the settings to default.
- You will find a “Menu” button on your monitor. The button can be either on the side, front or lower end depending on the type.
- Press the button. Use the arrow buttons to move up and down.
- Find the “Reset” option and click on it using the respective button on the monitor.
Open the computer and see if the line appears from the start. If the line only appears after the Windows has been fully loaded, then you can look to fix the drivers or programs.
Check for Any Interference
You must remember the weird noise a speaker makes when your phone is going to ring. There can be similar interference from other electronics connections to the monitor. Magnets are a bigger threat to the health of a monitor.
The speakers or audio devices have magnets in them. If you have speakers placed near your monitor, it can show flickering lines on the screen. More importantly, it can damage the color coordination of your screen as well.
Remove all kinds of devices such as phone wires, internet routers, speakers, or any active electronics from your monitor’s vicinity.
Check if the line is still flickering on the screen.
Now that you have gone through the basic checking and ensured it’s all working fine, let’s move towards software fixes.
Update Video and Graphics Card Driver
In the earlier Windows version, the display used to be all large and unmanaged when we first installed the OS. It was because the video driver software was not installed automatically. However, nowadays the driver is directly installed.
But sometimes due to bugs in the software or some system glitches, the drivers might not work properly. Outdated drivers can also become incompatible to deliver quality visuals. Hence, you should routinely update the video and graphics card driver.
Follow the steps below to go through the procedure.
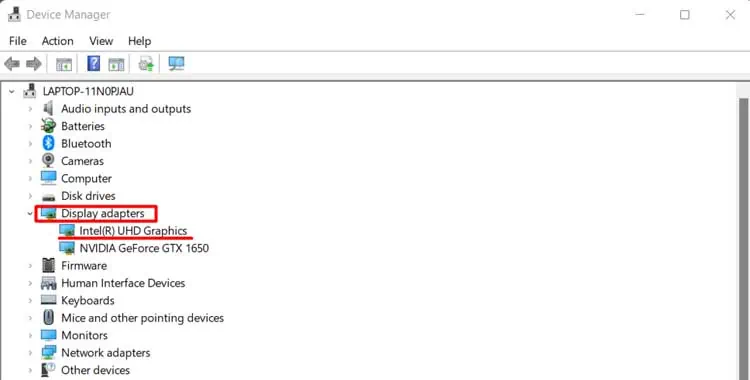
- Press “Windows + ‘X’ ” and select “Device Manager.”
- In the “Display adapters” option, Double-click on the graphics device shown.

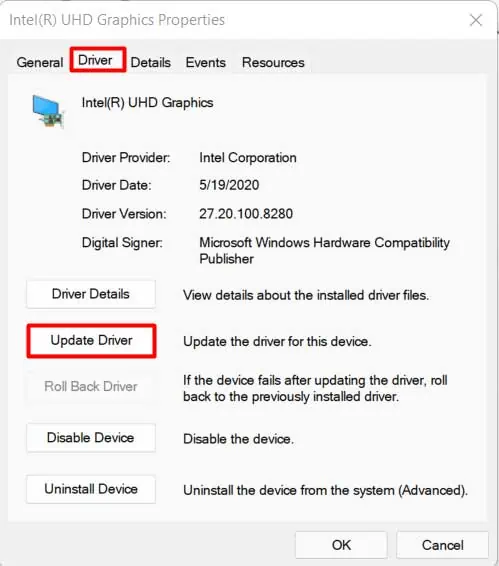
- Go to the “Driver” tab.
- Select “Update Driver.”

- Choose “Search Automatically for Drivers.”
- If you have both integrated and additional graphics, update both of them.
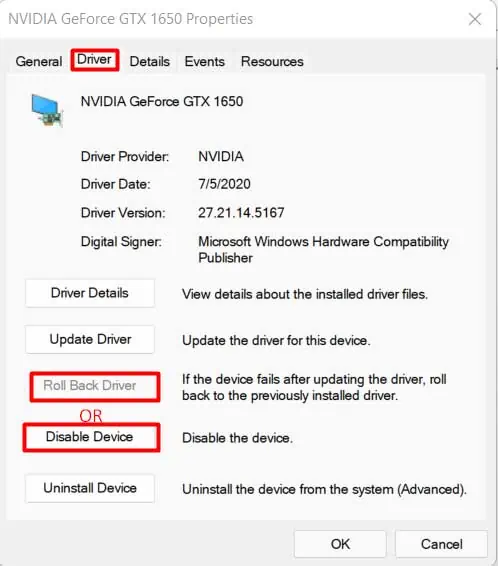
Sometimes, the update might have some errors. In such a case, you can roll back the installation.
- Follow up to “Step 3.”
- Click on “Roll Back Driver.”
- You also can click “Disable Driver”. Upon restart, your system will automatically install the driver.

Check if the problem still exists.
Change Display Resolution
Your screen has a specified resolution up to which it can support. If the display resolution is not within the recommended value, the flickering lines can appear as well.
You can change your monitor resolution to a lower or recommended value to solve the problem. Let’s look at the way to do it.
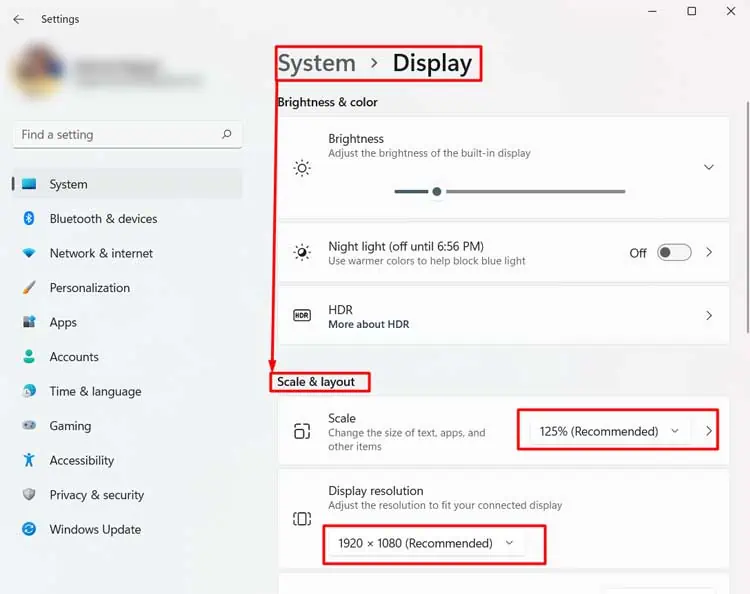
- Press “Windows + ‘X’ ” and select “Settings.”
- Click on “Display.”
- Under “Scale and Layout”, find “Scale” and “Display Resolution.”

- Select the one recommended for your PC in both sections.
See if your monitor still shows any flickering lines.
Adjust Refresh Rate
Your monitor creates an image on the screen repeatedly to make it much smoother. This function is controlled by the refresh rate of the screen.
You might have noticed some static lines on the screen when you take a photo of it with a camera. It is because the refresh rate of the two is not in sync. Similarly, if your monitor’s refresh rate is lower than recommended, it can cause flickering lines.
You should update the refresh rate of your PC to at least 60 Hz. Follow the procedure below to do that.
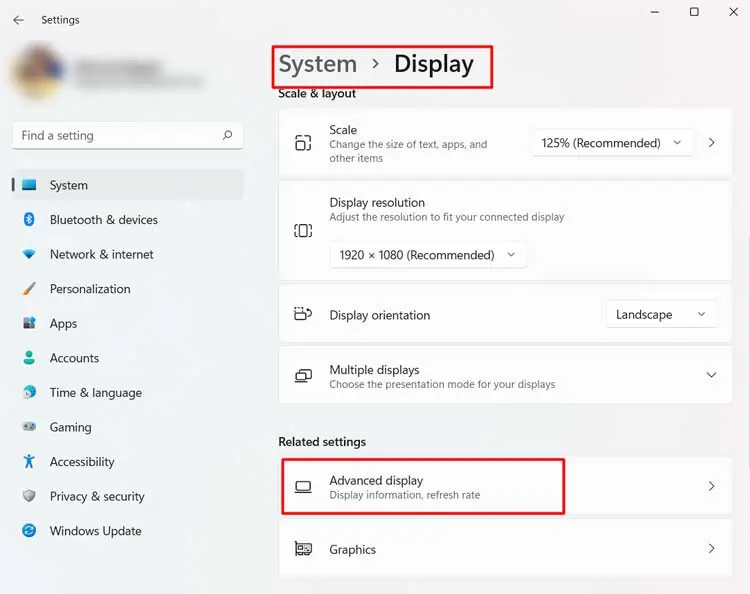
- Press “Windows + ‘X’ ” and open “Settings.”
- Select the “Display” option.
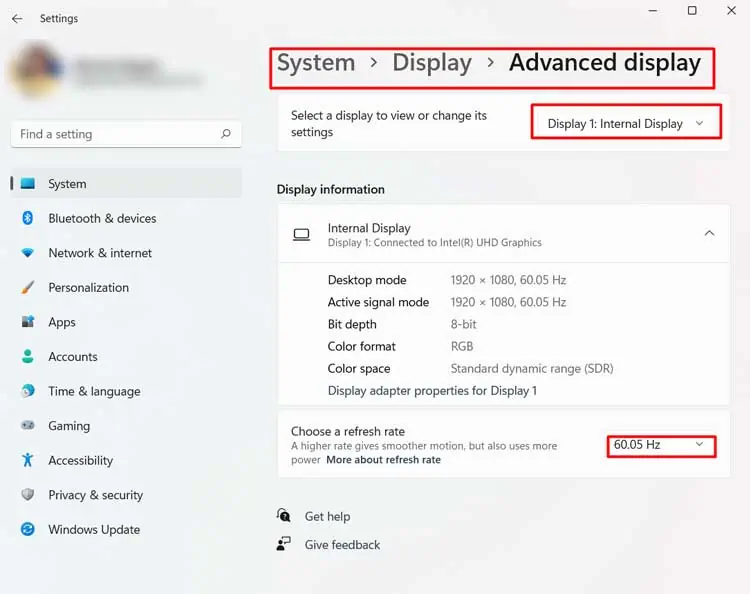
- Scroll down to “Advanced Display” and click on it.

- Select the Display whose settings you would like to change.
- Find “Choose a refresh rate” and select the one applicable for your PC.

- Your screen will refresh once.
If the lines are still flickering, move to the next step.
Boot into Safe Mode
Safe Mode opens the computer with only the necessary programs and driver. It will ignore all secondary software and hardware.
One way to check if the display has any errors is to open the computer in Safe Mode. In this mode, the computer boots up in 640 x 480 screen resolution. You can see if the problem occurs in safe mode or not.
Furthermore, Safe Mode can help you to know if any third-party programs are causing the lines. Let’s look at the way to boot your computer in safe mode.
- Press the “Windows” button.
- Click on the “Power” option.
- Press “Shift” and then click on “Restart” together.
- Recovery Mode will open in the next start.
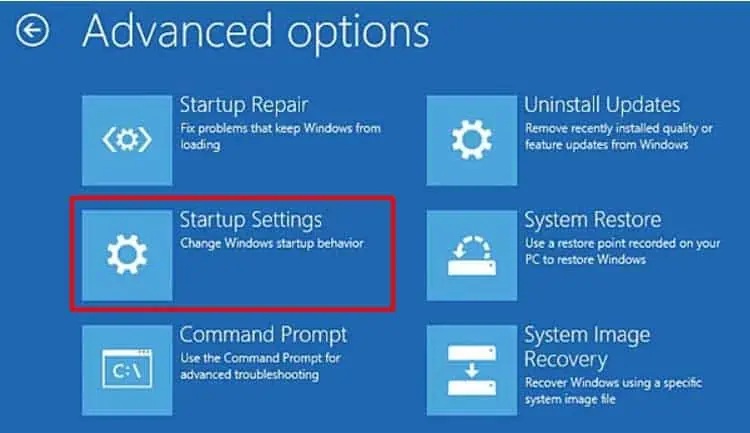
- Go to “Troubleshoot” and select “Advanced Options.”
- Find “Startup Settings” and click “Restart.”

- A window with several boot options will appear on the next start.
- Press the “4” or “F4” key on your keyboard to boot in Safe Mode.
If the line does not appear in safe mode, then you can follow the next step to identify the problem.
Clean Boot Your System
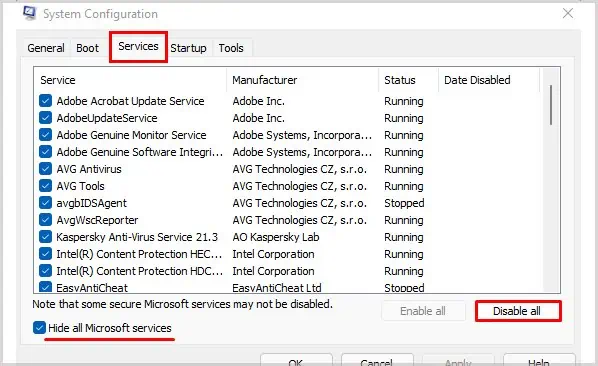
If the lines did not appear in Safe mode, then some other software might be causing the issue. Hence, you can clean boot your PC and disable all the programs. Then, enable each of them individually to see which one will start the flickering issue.
Let’s look at the process step-wise.
- Press “Windows + ‘R’” to open “Run.”
- Type
msconfigand click “Ok.” - In the “Services” tab, check “Hide all Microsoft services.”
- Click “Disable all” at the right of the dialog box and apply the settings.

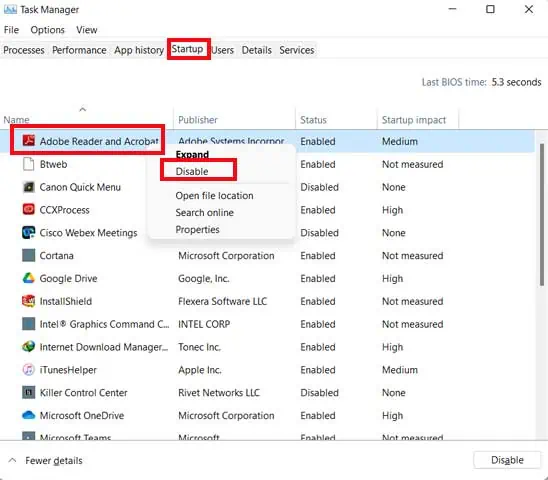
- Press “Ctrl + Shift + Esc” to open “Task Manager.”
- Go to the “Startup” tab and disable all the programs.

- Restart the computer.
See if the problem exists now. If you see no flickering lines, turn the programs on one by one and find the culprit.
Now, let’s look inside the system physically.
Clear all the Residual Power
Even when you turn your PC off, some power might be still remnant in your system. This residual power might cause heating of the internal component of your computer or monitor. It may even short-circuit the electronics.
So, you should clear your PC off all the residual energy. Let’s look at the steps to do that.
- Turn your PC off.
- Remove all connected devices. If you are on a desktop, remove all the connections.
- Press the “Power” button for 20-25 seconds to completely drain off extra power.
- Leave the system to cool for some time and power up later after a while.
Did you find the problem again? Don’t worry. You can still apply a few solutions.
Clean and Check Cables Inside
Accumulation of dust can slow down a computer, as well as cause hardware and software issues. If the dust prevents the fan from running properly, your processor can get seriously damaged. The dust inside the system can also clog the ports and might damage the jumpers as well.
You can refer to our comprehensive guide on cleaning dust from the computer.
You should see if the ribbon cables are properly connected to the motherboard. Also, you can check or reconnect all the wires inside if only you know how to do it.
Run your PC to see if the problem has gone away.
Check the Graphics Card and RAM
Even when the graphics driver is alright, the graphics card might have some fault or loosen physically. Moreover, the video card can get hot with continuous usage. This can also cause the flickering lines to dance on your screen.
Similarly, these lines can also appear if the RAM is not properly inserted into the motherboard. Sometimes, we just insert the RAM and forget to listen to the “Click” sound to warrant that our work is properly done.
Hence, if you have a removable graphics card, try reseating the card and RAM properly in the slot. Furthermore, you can let these parts cool down or manually cool them with a blower for a while. Excessive heat can be a crucial factor for your screen to get damaged.
Finally, if you are using a Laptop, then place it over hard objects or a cooler to let air flow smoothly. Using the Laptop on a hard surface might heat the system which could directly affect the screen.
Are the lines still present?
If nothing works out, there might be some bigger hardware faults in your system or in your monitor. Please visit the nearest service point to rectify the issue.

