Discord is a brilliant communication app for text and voice calls, but it is also infamous for running into errors. The “No route” error is one such error that will lock you out of a voice channel.
Although the exact causes for this error are fairly unclear, it commonly occurs when your Discord client cannot connect to the voice channel’s host server. Besides, server outage, misconfigured network, or VPN connection can also result in this error.
Restart the Router
Restarting your router is one of the simplest troubleshooting methods to fix internet-related issues. When you power cycle your router, it will perform a soft reset, which might fix general problems.

To power cycle your router, unplug it from the power source and wait 10- 15 seconds before plugging it back in.
Disable/Use VPN
A Virtual private network(VPN) makes your network connection private when browsing the internet by using a host server in a different location. Although it helps you keep your computer secure from the internet, it can sometimes cause connection issues while connecting to Discord servers.
If your VPN doesn’t work, you can disconnect your VPN and try connecting to the voice channel again.
But in some cases, your area network or IP addresses may not be able to access the servers. Using a VPN will allow you to bypass such blockage. But since Discord only supports UDP-enabled VPNs, make sure to use one accordingly.
Lower Firewall and Antivirus Restrictions
Sometimes, a firewall or antivirus software can also interfere with your connection. Few firewalls and antivirus programs have stricter security policies than others that may prevent your computer from connecting to voice channels. In this case, you can temporarily disable any third-party firewall on your PC to prevent such interference.
Similar to your PC’s firewall, your router also has a firewall. A strict firewall preference can block some specific data from passing through the firewall causing connectivity issues in Discord. You can lower this setting by going to your router settings.
Change DNS Servers
DNS servers store records of domains and their IP addresses. On that account, it also stores the IP addresses of Discord’s servers. If this record is corrupt or incorrect, the app will fail to connect to the servers leading to connection errors. To fix this issue, you can change your default DNS server to the one provided by Google.
- Press Win + I to open settings.
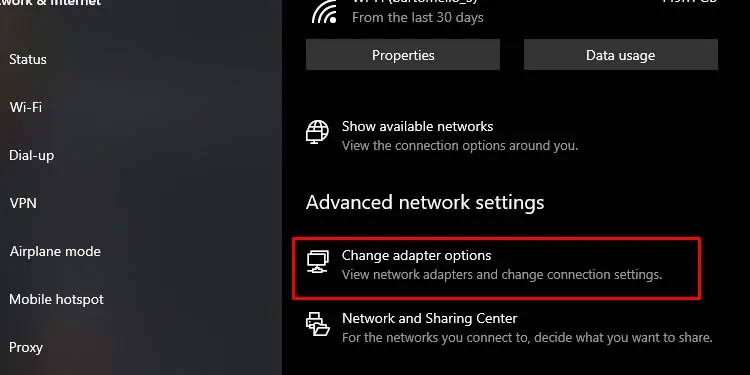
- Go to Network & Internet
- Select Status from the left panel.
- Click on Change adapter options.

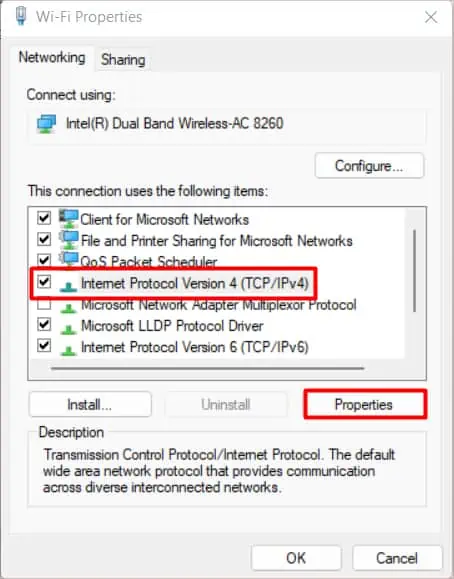
- Double-click on your current network connection and select Properties.
Press Yes to provide administrator privileges. - Select Internet Protocol Version 4(TCP/IPv4) and click on Properties.

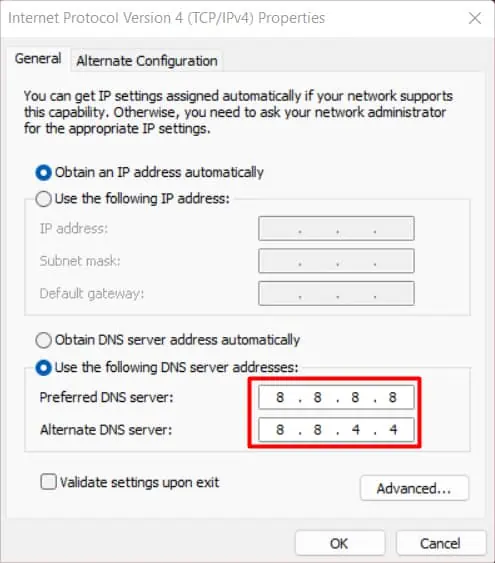
- Choose Use the following DNS server addresses.
- Input
8.8.8.8in the box next to the Preferred DNS server and8.8.4.4next to Alternate DNS server.
- Press OK to save the changes.
Change Voice Region
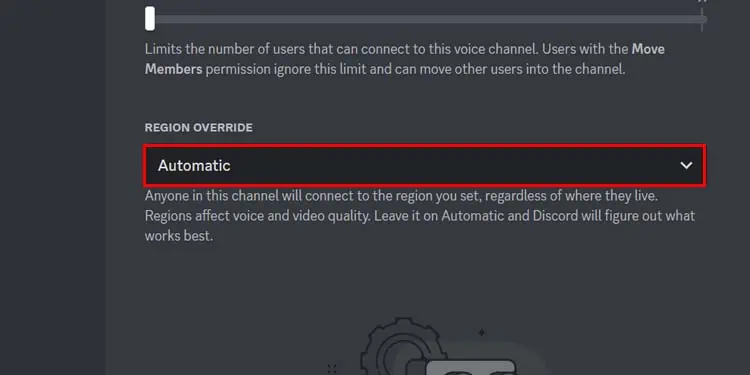
Discord has a voice region feature that determines the server location for that specific channel. This setting is set to select a region automatically by default. But you can change it to the region you prefer. In some cases, failing to connect to the selected voice region may also result in the “no route” error.
If you have server editing permissions, you can change the voice region from channel settings. However, if you don’t have permission to change it, you can ask someone with moderation privileges to do it for you.
- Open Discord.
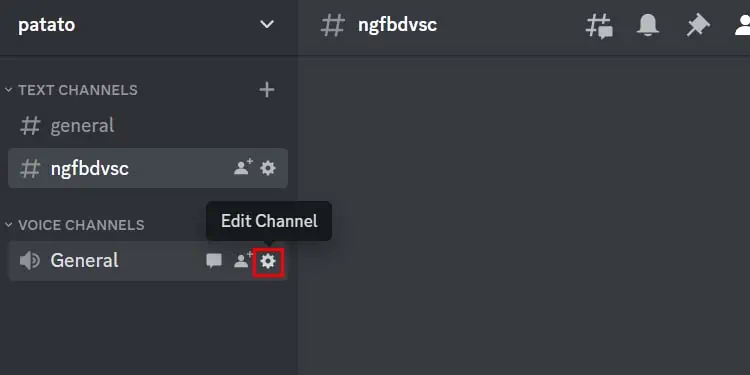
- Go to the Voice channel and select Edit Channel(Gear icon).

- Select Overview from the left panel.
- Click on the drop-down menu under REGION OVERRIDE and select the region closest to you or anyone you prefer.

Disable High Packet Priority Service
The High Packet priority is one of Discord’s Quality of Service features (Qos). This feature marks Discord’s data packets as a high priority, which improves your overall voice communication.
However, this feature depends on whether or not your router supports this feature. Some routers can cause more issues when this feature is enabled.
- Open the Discord app.
- Go to User Settings.

- Select Voice & Video from the left panel.
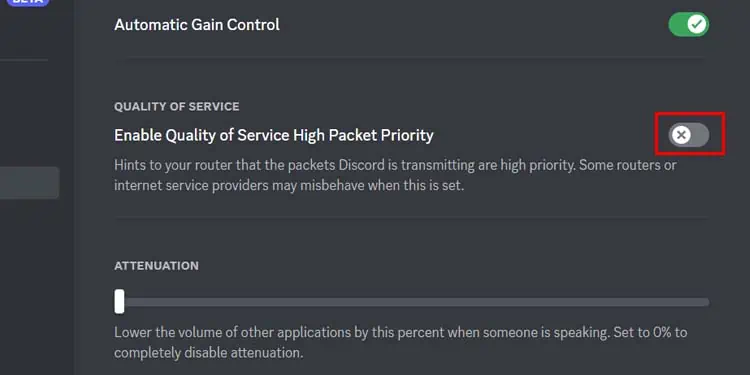
- Turn Off the Enable Quality of Service High Packet Priority slider under QUALITY OF SERVICE.


