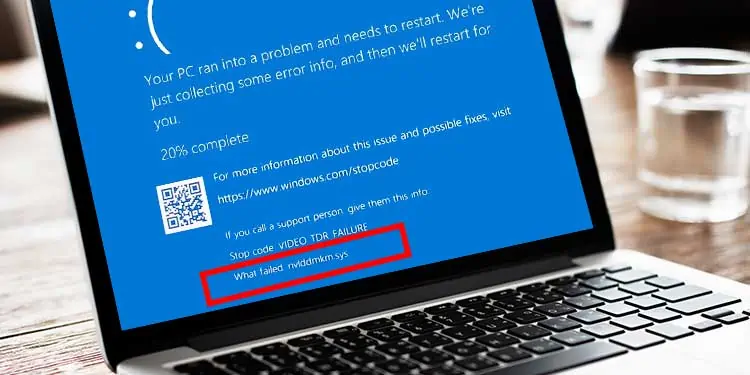
When gaming or performing any simple task, your computer might give you a black screen and revert to a normal screen. This either means that you have a loose power supply or your graphics driver is not responding correctly.
If it’s the latter, you may get a message on the error log that says, “Display driver nvlddmkm stopped responding and has successfully recovered.” Nvidia Windows Longhorn Display Driver Model Kernel Mode or the NVLDDMKM is a driver that helps with the communication between the OS and the Nvidia graphics driver.
So, if this driver fails, the computer will lose its display. If this error persists, you may also get a constant Blue Screen of Death, decreasing the health of your computer drastically.
What Causes NVLDDMKM Error?
The Nvlddmkm is a driver for the Nvidia graphics card. A corrupted driver can cause the Nvidia driver to malfunction. However, this is not always the case, as memory conflicts may also cause this error. Keeping this in mind, here are a few reasons the NVLDDMKM driver fails.
- Corrupted system files
- An issue with the graphic driver
- Overheated graphic card
- Conflicts with third-party application
- Faulty memory module
- Issue with Power Supply
How to Fix NVLDDMKM Error (Display Driver Stopped Responding)?
Now that we know what causes the display driver to stop responding, let us get to the solutions to fix the NVLDDMKM Driver error.
Run the SFC and DISM command
The SFC or the System File Checker command will check the system file for any corrupted file and attempt to fix these files. These system files are located inside C:\Windows|System32. As all driver files are installed inside System32, we can use this and the DISM command to scan and repair any corrupted driver files.
Please follow these steps to run the SFC command.
- Press the Windows key + R to open Run.
- Type “cmd” without the quotation mark and press Ctrl + Shift + Enter to run Command Prompt as administrator.
- Once the Command Prompt opens, type
Sfc /scannowwithout quotation and press Enter.
Once the SFC process is complete, we need to run the DISM command. The DISM or Deployment Image Servicing and Management command checks, scans, and repairs the local Windows Image.
Now, type these commands and press Enter after each command.
DISM /Online /Cleanup-Image /CheckHealth
DISM /Online /Cleanup-Image /ScanHealth
DISM /Online /Cleanup-Image /RestoreHealth
Once all processes are complete, you can restart your computer.
Change Link State Power Management settings
The Link State Power Management can sometimes cause the nvlddmkm error when turned on. Basically, the Link State Power Management is a part of the PCIe specification that manages the power supply to the PCIe port.
So, when this feature is turned on, the PCIe will get relatively lower power. This, in turn, causes the graphic card to malfunction sometimes. Therefore, we need to turn off this power-saving feature.
Follow these steps to disable Link State Power Management.
- Click on the Start menu and open Control Panel.
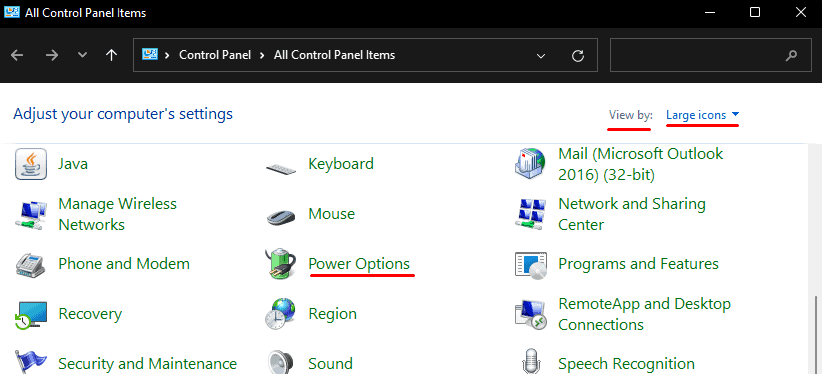
- Ensure that the View by option is set to Large icons, then click on Power Options.

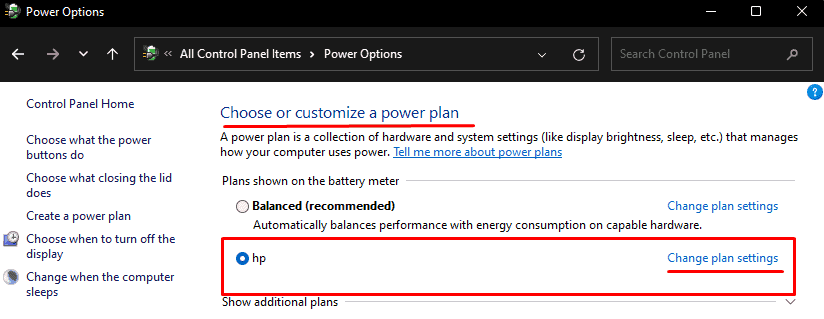
- Under Choose or customize a power plan, locate your power plan and click on Change plan settings.

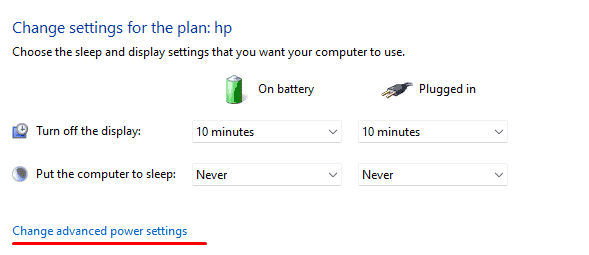
- Now, click on Change advanced power settings. Then, a Power Options dialog box will open.

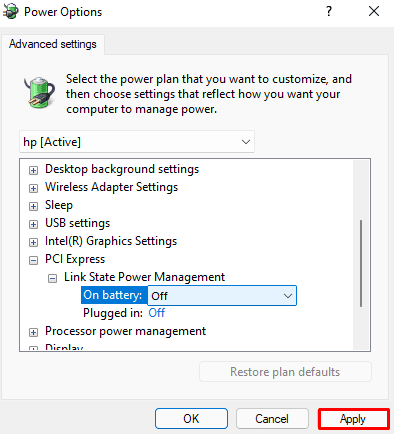
- Expand PCI Express by clicking the “+” sign on the left side.
- Now, expand Link State Power Management.

- Turn this option Off. If you are on a laptop, turn both On battery and Plugged in settings Off.
- Click on Apply, then OK.
Once you have completed this process, please restart your computer.
Disable High Precision Event Timer
The HPET driver, or High Precision Event Timer helps generate periodic interrupts that OS uses to synchronize multimedia streams, resulting in smooth gameplay. However, in some rare cases, this driver can also make the display driver irresponsive to OS requests.
To disable this driver, you can follow the steps mentioned below.
- Press the Windows + X key.
- Select Device Manager.
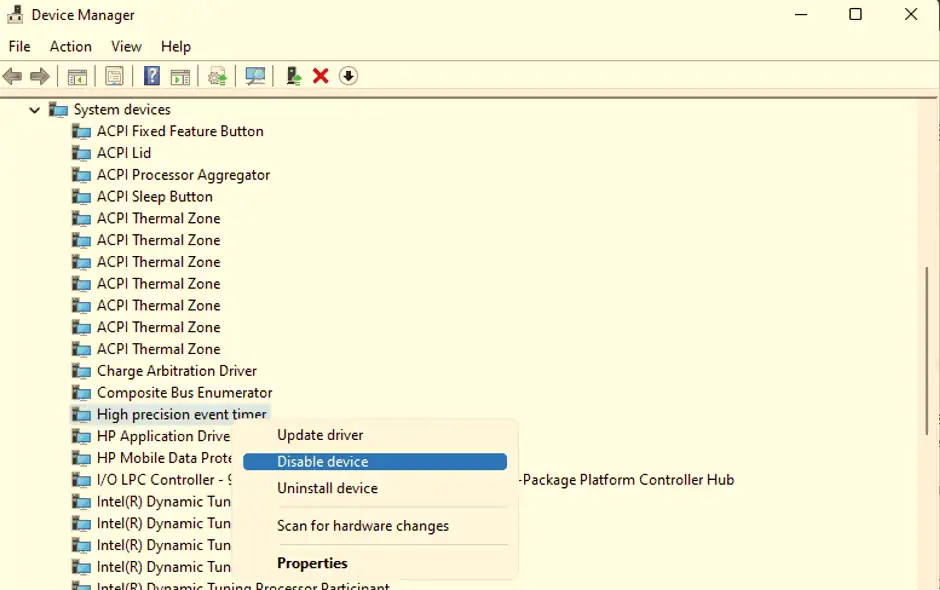
- Expand System devices and right-click on High precision event timer.
- Click on Disable device.

Change the Power Supply
If a computer’s power supply starts to fail, it will deliver low power to all connected components. This results in insufficient power for the GPU (Graphics Processing Unit) as well.
So, when we perform graphics-intensive tasks on these computers, the GPU may stop communicating with the processor, which simultaneously leads to a driver failure error or, in this case, NVLDDMKM error.
We can check if the power supply provides enough voltage from the BIOS (Basic Input and Output System). In the BIOS, we can check the PC’s health, and it will display how much voltage some component requires. If the voltage status is irregular, it is best to change the power supply.
Revert Fan Control Settings
Fan control software manages the temperature of your CPU and GPU. So, if settings inside these applications are improper, it may cause your graphics card to overheat. When a graphics card overheats, its performance will decrease. Try reverting these settings to default to see if it fixes the issue.
Change MSI Afterburner Settings
If you have a gaming PC, you are probably familiar with the MSI Afterburner. It is one of the best applications to monitor your hardware in real-time. However, the default setting lets Afterburner enable the GPU sensors to better hardware status. This may cause the Nvidia display driver (nvlddmkm) to crash.
Disable these two settings in MSI Afterburner to fix the Nvidia driver issue.
- Low-level IO drivers
- Low-level hardware access interface
Follow these steps to disable the settings that are mentioned above.
- Open MSI Afterburner and go to Settings.
- Under the General tab, uncheck Enable low-Level IO drivers and Enable low-level hardware access interface.
These settings are not only limited to MSI Afterburner, applications like GeForce Experience, Razer product application or Aura iQUE will also have these settings enabled. Therefore, it is ideal to disable these settings.
Change Graphic Card Slot
As we get the error NVLDDMKM from an unresponsive GPU, it is normal to assume that the PCIe port is faulty. The PCIe port connects your graphics card to your motherboard. A damaged PCIe port may be the reason behind your graphic drive not responding.
You can swap your graphic card to a different PCIe slot on your motherboard to see if it fixes the issue. However, we need to be careful while removing and inserting the graphic card onto the PCIe slot.
While changing the graphic card slot, we recommend cleaning the graphic card. Similarly, a graphic card can get overheated if the fans do not spin properly. This will result in a choppy GPU performance.
Underclock GPU
An overclocked GPU will boost your gaming performance but it also puts a lot of strain on your graphic card. These strains can cause your graphic card to give a choppy performance. So, try underclocking the GPU to see if it fixes the nvlddmkm error.
Here are a few ways we can underclock the GPU.
- Load default settings on BIOS
- Reset the BIOS
- Use MSI Afterburner
Change TdrDelay value
The TDR stands for Timeout Delay, and the Recovery tool detects any GPU failures and recovers them. The TdrDelay value determines the maximum time the GPU can stay unresponsive. If we increase this value, your OS will wait a specified period until your GPU responds.
Changing this value will not stop the driver error, but it can prevent your computer from entering Blue Screen of Death. Please follow these steps to change the TdrDelay value.
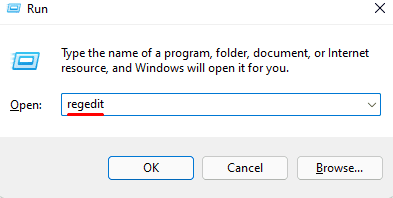
- Press the Windows + R key.
- Type “Regedit” without the quotation mark and press Enter.

- On the left side of the Registry Editor dialog box, navigate to:
HKEY_LOCAL_MACHINE>SYSTEM>CurrentControlSet>Control>GraphicDrivers - Double Click on GraphicsDrivers.
- On the right panel, double-click on TdrDelay.

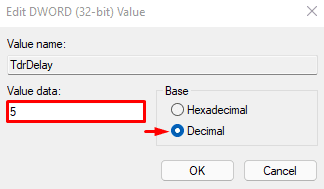
- Under Base, check Decimal.
- Change the Value data to 5 (this value is in seconds. Default value will be 2) and press OK.

- This value determines number of seconds the GPU can stay unresponsive.
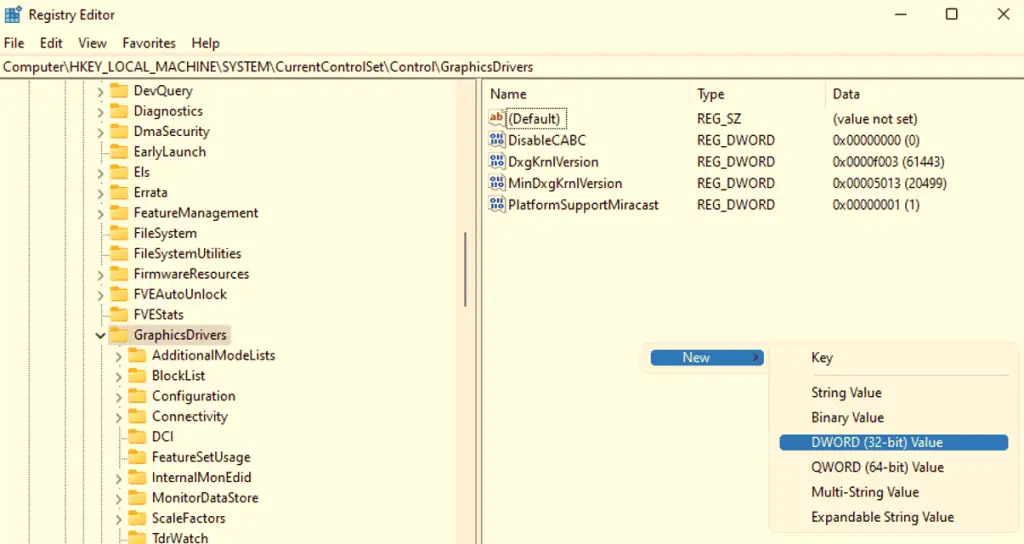
How to Add TdrDelay?
If you cannot find TdrDelay, follow these steps to add it in the Registry.
- Follow the above steps till step 4 and continue below.
- On the right panel, right-click on the empty space and click New.
- Click DWORD (32-bit) Value and name it TdrDelay.

Check Memory Module
As the GPU does require some physical memory to perform its tasks, faulty memory is also a reasonable cause for you getting the driver not responding error.
In order to check the health of your primary memory,
- Press Windows+R.
- Type MdSched.exe and press enter.
- A dialogue prompt will appear. Select ‘Restart now.’
- Let the test complete.
Once the test is completed, it will give you the status of your physical memory.
We can easily check if we have a faulty memory if our system runs on dual memory sticks. Remove any one of the RAM sticks and turn on your computer. If it turns on smoothly and you do not get the nvlddmkm error, we can conclude that the other stick was faulty.
If the computer still crashes, remove the other RAM stick and insert the previously removed one. Once you find the faulty RAM stick, replace it with a new one to fix the issue.
Unfortunately, if you run your system with a single memory module, you will need another RAM stick to test if the RAM you are using is performing correctly.
Update/Roll Back Nvidia Graphics Driver
An outdated driver may cause issues while sending or receiving data with the OS. Therefore, updating the driver to the latest version is always helpful to avoid errors like NVLDDMKM errors.
Follow these steps to update your graphics driver.
Press the Windows + X key and select Device Manager. Here, expand Display Adapters, right-click on Nvidia driver, and click Update driver. Restart your computer once the update is complete.
If you are using a Nvidia graphics card, we can use GeForce Experience to update all our drivers including the Nvidia Graphics Driver.
If the NVLDDMKM error starts after a display driver update, we can roll back to the previous version to check if it fixes this issue. To roll back a driver update, double-click on the Nvidia display driver, here you can see an option to Rollback driver. On choosing this option, the driver will revert to a stable version.
Reinstall Nvidia Graphics Driver
If the Nvidia graphic driver gets corrupted and updating and rolling back the driver to the previous version does not fix the issue, we can try reinstalling this driver. Firstly, we need to uninstall the earlier version of the Nvidia driver. The following steps will help you uninstall a driver.
Go to Device Manager and expand the Display adapter, then right-click on your Nvidia driver and select Uninstall.
We need to download the latest driver from the official Nvidia website. Once you open the website, select your OS and graphic card’s type, series, and product. Click on search and then download the driver.
After the download is complete, run the file and follow the Nvidia Driver’s installation process.
Update Windows
The Windows Update feature will update all our drivers and the OS simultaneously. Updating Windows to the latest version will also solve any compatibility issues. You can follow these steps to update Windows to the latest version.
Click on Start menu and go to Settings > Windows Update (Security & update > Windows Update for Windows 10). Here, you can download the update by clicking on Check for updates. Once the download is complete, restart your computer to install the update.
What Causes nvlddmkm.sys Blue Screen of Death
When a display driver stops responding, the OS will wait a certain amount of time for the driver to respond. During this period your computer will have a black screen. If the driver responds back, the error log may display the error message “Display driver nvlddmkm stopped responding and has successfully recovered.”
However, if the OS does not get any response from the driver, it again waits for a certain amount of time to restart. If this driver does not respond, we get a Blue Screen of Death.
Here is a list of reasons a GPU can stop responding.
- Overheated GPU
- Outdated driver
- Faulty RAM or GPU
- Low power supply

