Printers use CMYK (Cyan, Magenta, Yellow, and Black) color models to reproduce the colors accurately. If the printer runs low on any of these inks, you may encounter problems getting precise colors on the printout.
When your printer is printing pink, the most likely scenario is that the printer has depleted Cyan or Yellow ink, and the Magenta (pinkish-purplish-red color) is dominating the printer. As such, you should check the ink level and refill the ink to resolve the issue.
However, if the printer continues to print pink despite having enough ink, other causes like a faulty cartridge, jammed printhead, or a misconfigured color setting may be responsible.
Use Compatible Papers
Not all the papers found in the market are compatible with your printer. If you are using an incorrect paper type with the printer, the paper might fail to absorb the inks correctly.
So, always make sure you use printer-compatible papers for printing. After that, change the paper type in the printing preferences.
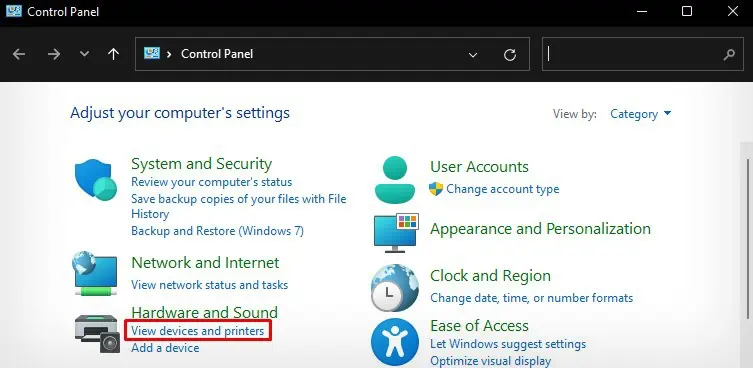
- Open Control Panel and click the highlighted option.

- Right-click the printer > Printing preferences.

- Choose the paper type inserted in the printer from the Media Type or Paper Type drop-down.

- Click OK.
Change the Color Settings
Printer users often overlook the color settings of their printer, but most of the time, it is what causes the printer to print pink. You could be dealing with the problem if the color settings are set to print more of a pink color than other colors.
You can reset the color settings to default values and check if it solves the problem. Here, I will be demonstrating steps for Canon printers. You can follow similar steps for other printers too.
- Open your printer’s Printing preferences.

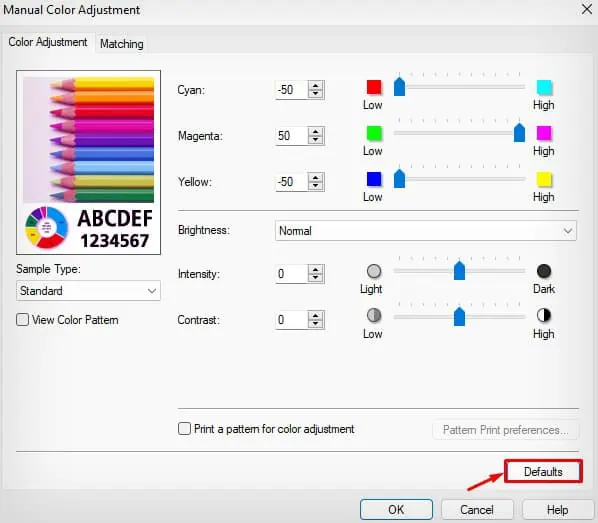
- Go to Main > Color/Intensity > Set.

- In my case, the Cyan and Yellow intensity were set too low but Magenta levels were too high. It was causing my printer to print pink.
- To solve this, click Defaults > OK.

Isolate the Color Cartridges
You can also temporarily disable the color cartridges on your printer and print without any issues. This way, you won’t have a problem if you are into printing B&W documents only.
Let me demonstrate how to do it on Canon printers.
- Launch Printing preferences.

- Go to Maintenance > Ink Cartridge Settings.

- Click the drop-down and select Black Only.

- Tap OK.
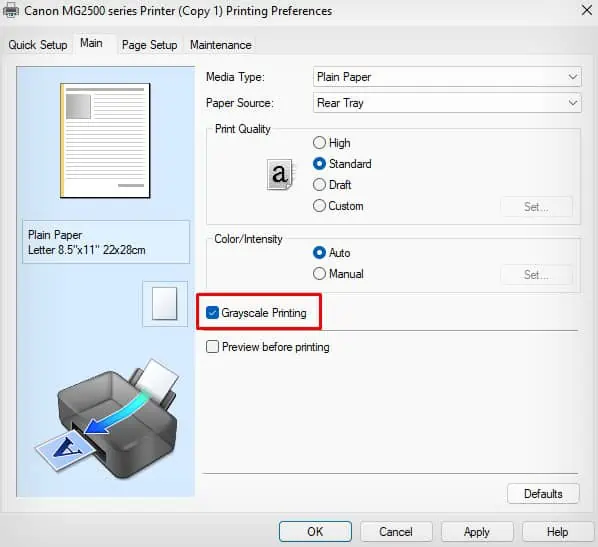
Since this feature is not available on all printer models, you can rather choose grayscale printing mode and print your documents.
- Launch Printing preferences.

- Find the color settings panel and choose Grayscale from there.

However, if you need to print color documents, proceed to the other fixes discussed below.
Check Ink Levels
You should always make sure the printer has sufficient inks to generate the colors correctly. Because running low on any one of the inks among Cyan, Magenta, Yellow, or Black can interrupt the color conversion process and cause the issue.
For instance, if you are getting pink on the printout instead of red, your printer might be out of yellow color.
You may refer to the image below to learn the color combination. You will then have an idea of which ink needs to be refilled or which cartridge needs to be changed.
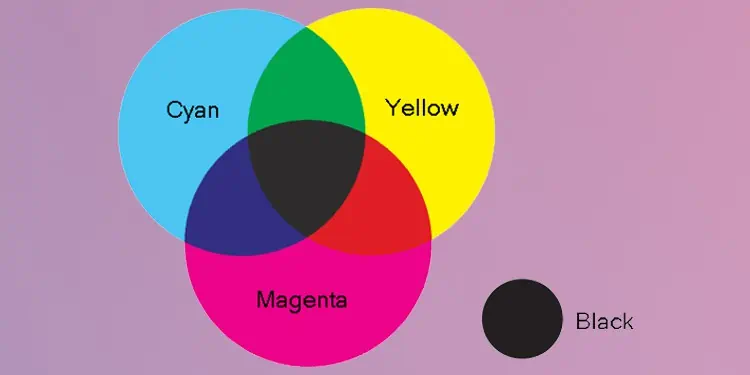
Similarly, you can check the ink levels on your printer using the printer assistant tool. Check the levels and fill the depleted ink accordingly.
Let me show you how to check ink levels in a Canon printer.
- Open your Canon printer’s Printing preferences.

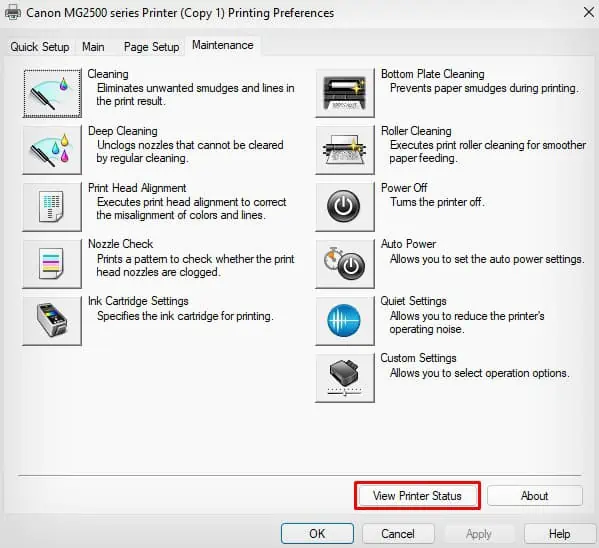
- Click Maintenance > View Printer Status.

- See the ink levels.

You can further consult this comprehensive guide to know how to check the ink levels in all printers.
Check the Nozzles and Clean the Printhead
Printheads contain tiny nozzles to spray the ink onto the papers. However, when they get clogged, the colors can not get into the papers correctly. In our case, the printer is printing pink. It means the nozzles responsible for spraying inks other than magenta might have been clogged.
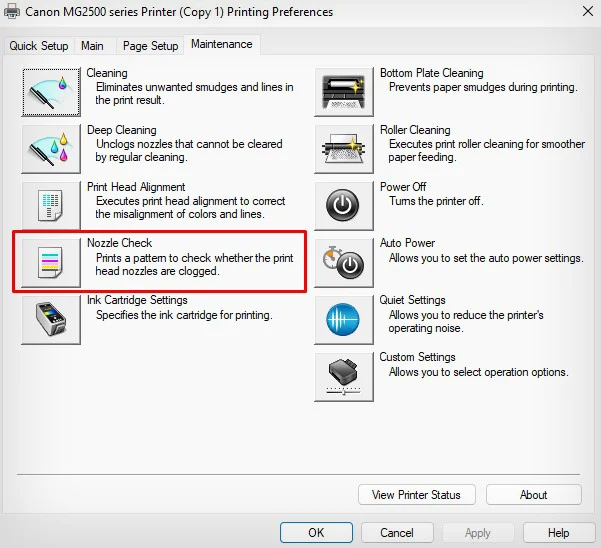
You can first print a nozzle check pattern to know which nozzle is clogged. Then take action accordingly.
- Open Printing preferences.

- Click Maintenance > Nozzle Check.

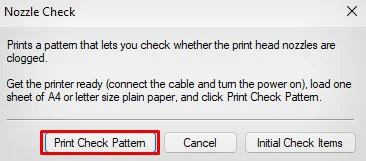
- Click this button.

- Click OK.

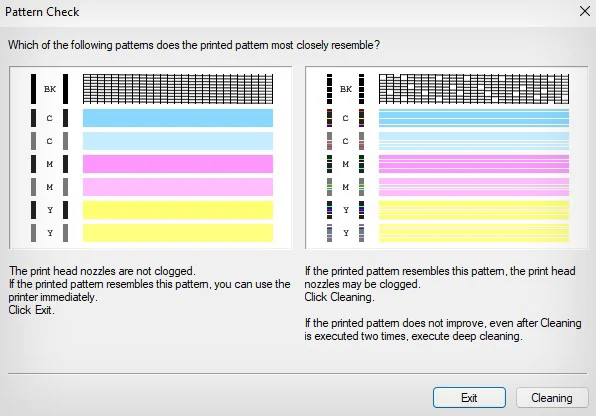
- The printout should look like this. If any color is missing or faded, you can confirm that the corresponding nozzle is clogged.

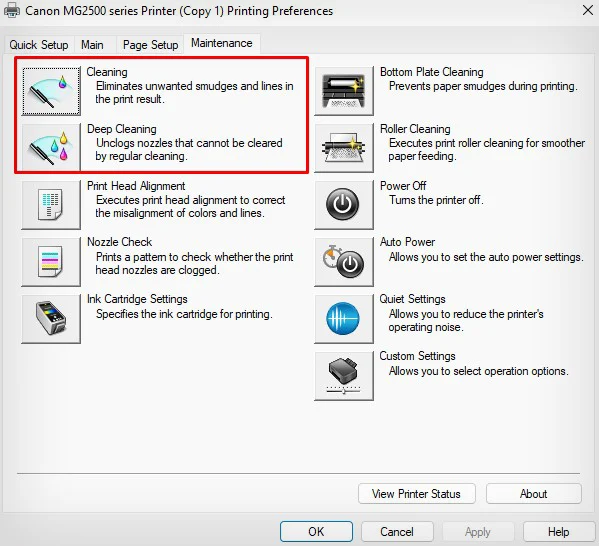
- You need to clean the printhead to sort out this. Go back to the Maintenance tab and run these two cycles.

If it does not work, I recommend cleaning the printheads manually. Remove the printhead from the printer and use a lint-free cloth dipped in distilled water to clean it. Once cleaned, insert it back into the printer and see if the issue persists.
You may further refer to this guide to learn more about how to clean printheads manually.
Service the Printer
Your printer might need a service if you are still unable to print normally. There are chances that the printhead is damaged.
A damaged printhead can not spray the correct amount of ink onto the paper, causing issues. You might need to get a replacement printhead and install it on your printer.
Similarly, the magenta cartridge might malfunction and leaking the ink unnecessarily. You can remove the cartridge and check if that’s the case. Consider getting a new set of cartridges and see if installing the new cartridges fixes the problem.
If nothing works, take your printer to an authorized service center for repair.


