The startup time on a computer involves the boot time and the welcome screen time. So, you need to account for both situations if your computer starts up very slowly.
A number of factors, including the presence of unnecessary startup processes, improper startup or BIOS settings and policies, as well as issues like malware infection or outdated systems can cause this problem.
Besides, you can also experience such issues due to old and slow hardware components.
Use Solid-State Drives
The main reason why your computer starts slow might be that your device components themselves are slow. During startup, your computer loads the necessary system files from the storage device to the RAM. So, if you use an HDD, this process will take up a lot of time.
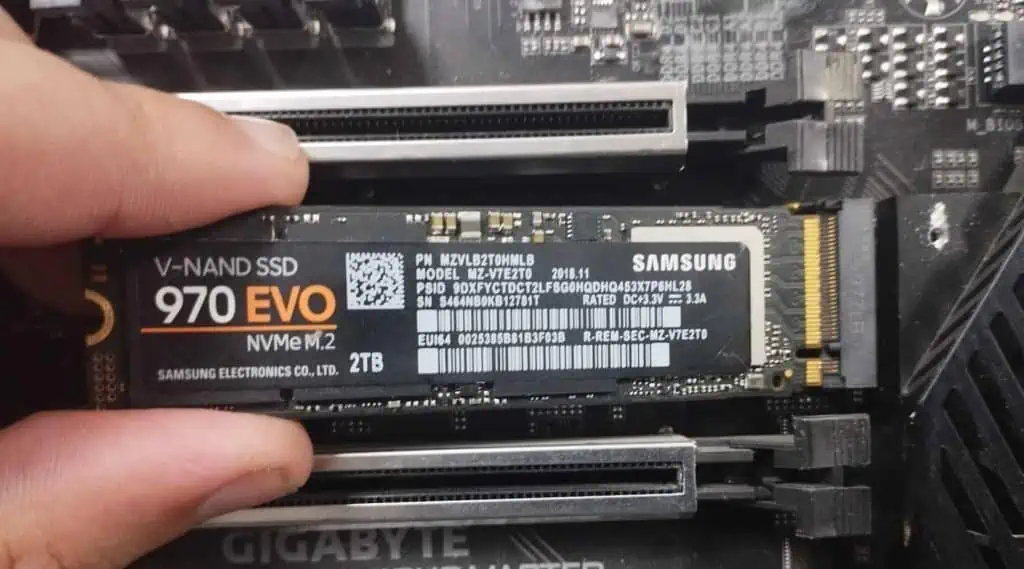
An SSD (Solid-state Drive) is much faster than a hard drive, so it’s always recommended to use this device as the primary disk (with the OS) on your computer for faster performance.
Disable Startup Apps and Service
One of the most common reasons for a long startup time involves the presence of many apps and services that run at startup. Your computer does not properly finish the startup process or allow you to log in unless it finishes loading all such processes, which is the reason for the slow startup.
This issue is especially likely if you have installed a lot of applications into your system. These apps may also install additional bloatware into your system that runs at startup.
You need to look for and disable all the unnecessary processes to boost startup performance.
First, check the startup apps.
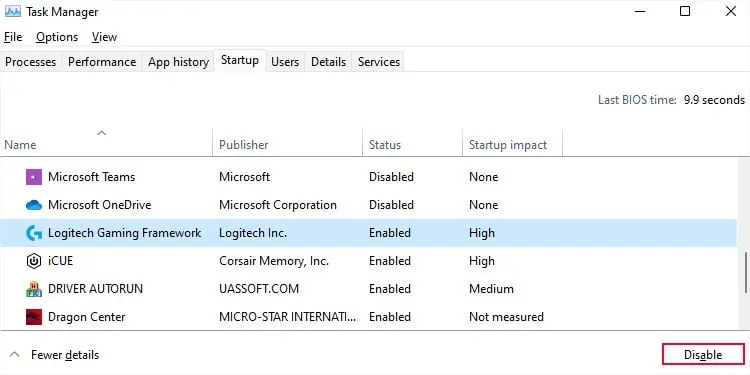
- Press Ctrl + Shift + Esc to open the Task Manager.
- Go to the Startup tab.
- Look for all applications that you don’t want the system to load at startup, especially those whose Startup impact says High.
- Select them and click Disable.

- But, if there’s a security application that you use, it’s better not to disable it regardless of the Startup impact.
Then, you need to go through third-party services.
- Open Run by pressing Windows key + R.
- Type
msconfigand press Enter to open System Configuration. - Go to the Services tab and check Hide all Microsoft services.

- Uncheck all the services that you don’t need. If you don’t know about the service, search on the internet for more information.
- As with the above scenario, I don’t recommend disabling security services.
You can also check which services or apps impact the startup time most by individually disabling them or doing so in bunches and restarting your computer.
Defragment Hard Disk Drives
Hard disks contain magnetic platters that store data inside numerous sectors. A read/write head on the disk accesses these sectors while the platters are rotating at high speed for read and write operations.
If the hard drive is fragmented, i.e., closely associated data is not stored in close sectors, it takes more time for the head to reach the relevant sectors in succession.
This process not only slows down the usual processing of the operating system but also its startup time if you have the OS on an HDD. So, you need to defragment the hard drives regularly.
SSDs work on a different mechanism and attempting to defragment them only decreases the lifespan of these drives instead of providing any performance benefits. So, only defragment your HDDs.
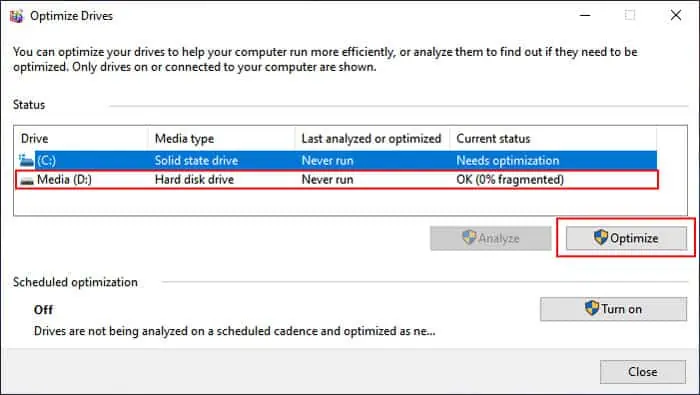
- Open Run.
- Type
dfrguiand press Enter to open Disk Defragmenter. - Select the Hard drives and click Optimize.

Disable Ultra Low Power Sleep
AMD’s graphical processors that are in a multi-GPU crossfire configuration have a feature called Ultra Low Power Sleep (ULPS). It basically disables the second GPU when the system is only using the first one. While it is a power-saving feature, some computers, especially overclocked computers can freeze or crash if it is on.
Additionally, it can also increase the startup time by a minute or more. So, try disabling it and see if it impacts this time. If not, you can enable it per your wish.
- Open Run.
- Type
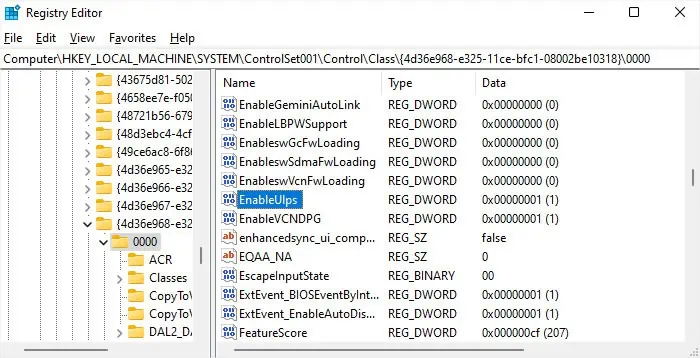
regeditand press Enter to open the Registry Editor. - Navigate to
Computer\HKEY_LOCAL_MACHINE\SYSTEM\ControlSet001\Control\Class\{4d36e968-e325-11ce-bfc1-08002be10318}\0000 - Look for and double-click on EnableUlps.

- Set the Value data to
0and click OK. - Restart your computer.
Change Startup Settings of Services
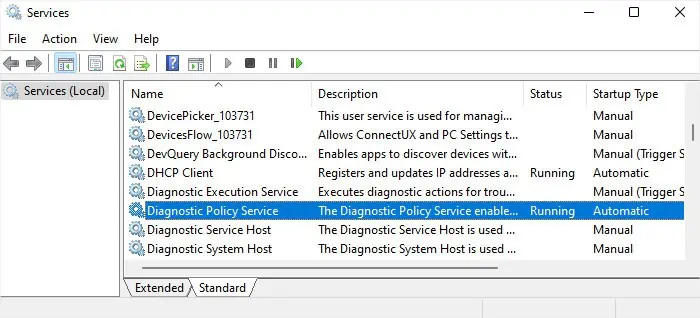
Apart from disabling third-party services, you can also try another tweak to lower the startup interval. Your services can have different startup types,
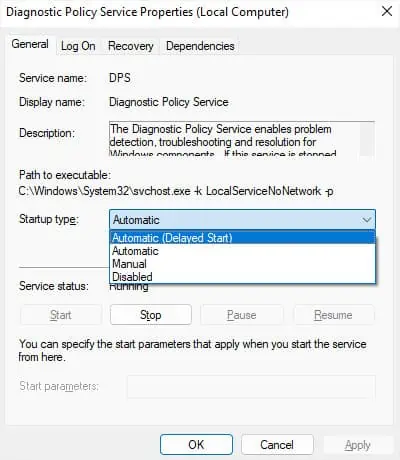
You don’t actually need all the services on your computer, and changing the startup type of a few services does not adversely affect your system. Here, you can browse through the services and change the startup type of some from Automatic to Automatic (Delayed Start) so that they don’t load at startup.
- Open Run.
- Type
services.mscand press Enter to open Windows Services. - Double-click on each service whose Startup Type is Automatic (not Delayed Start).

- Check the description to find out more about the service. It’s also better to seek help from the internet to get more information.
- If you think the service is not so important that it needs to load at startup, set the Startup type to Automatic (Delayed Start) and click Apply > OK.

- If you can’t change it, leave the service as it is.
Depending on your usage, you may also be able to disable some services or set them to Manual without any issues. However, make sure to check on the internet, forums, or support websites beforehand.
Some examples of services that are automatic by default but you can likely disable are:
Scan for Malware
Some malware scripts are designed to load at startup. In such cases, your system may unintentionally load them at startup and increase the boot time. These scripts will also be causing more harm to your system, so you should perform a full or offline scan to root out these threats.
- Open Run.
- Type
ms-settings:windowsdefenderand press Enter to open Windows Security. - Go to Virus & threat protection.

- Click on Scan options.
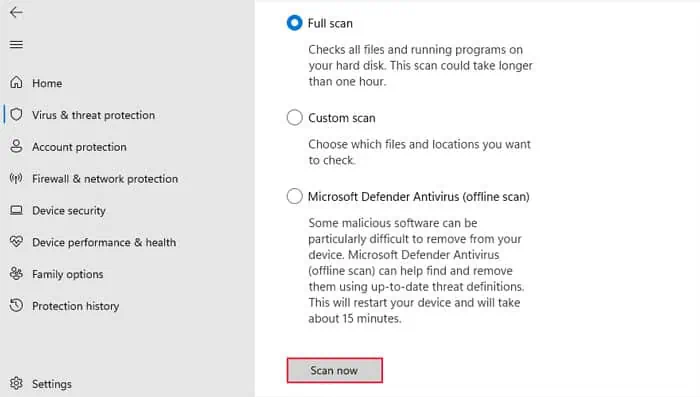
- Tick Full scan and then click Scan now.

You can also perform the Microsoft Defender Offline Scan to scan for and remove more persistent threats that Full scan can’t delete.
Check Task Scheduler
Windows allows the creation of automatic tasks that run according to various types of triggers. As such, it is possible to schedule a task to run at startup. These tasks will take additional time to run, thereby increasing the startup time. You can look for and change or delete such processes through the Task Scheduler.
- Open Run.
- Type
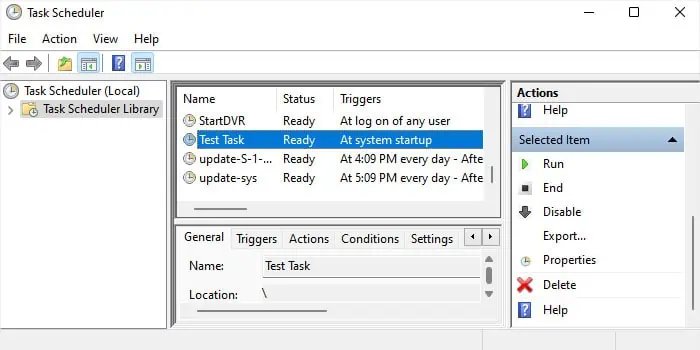
taskschd.mscand press Enter to open the Task Scheduler. - Go to Task Scheduler Library.
- Look for any tasks where the Trigger is At system startup.

- Also, double-click on tasks with Multiple triggers defined, go to the Triggers tab, and check if any trigger says At Startup.
- Check the details of such tasks.
- If they are unnecessary, delete the At Startup trigger or the task itself.
Enable/Disable Fast Startup
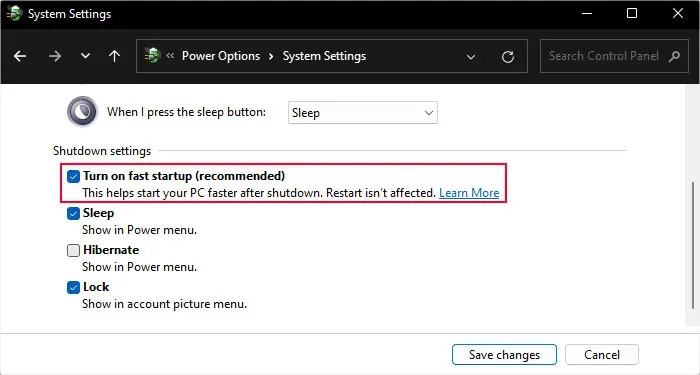
Fast Startup saves some active system files to an allocated space so that your system can quickly load them on the next boot. As the name suggests, it can reduce startup time.
But it comes at a cost. Your computer does not completely shut down, so you will need to restart your PC (not shut down) to refresh the kernel, complete the updates, and so on. It does not show a significant improvement if your OS is installed in an SSD, so it’s best to keep it disabled in such cases.
Additionally, a bug in a previous Windows version caused fast startup to increase startup time instead. So, you may also need to disable this feature if you still have such a version. If not, and if you use an HDD, it’s best to enable the fast startup.
- Open Run.
- Type
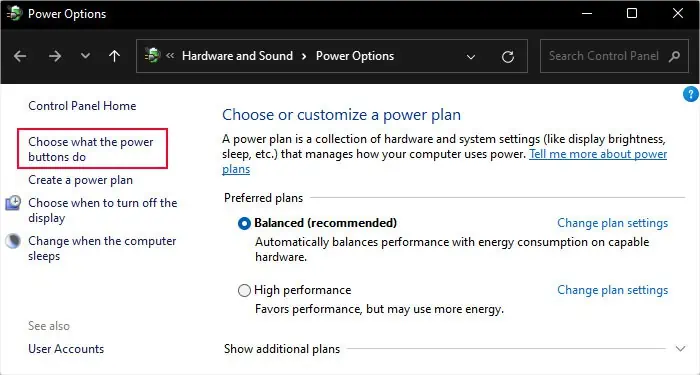
powercfg.cpland press Enter to open Power Options. - Select Choose what the power buttons do.

- Click on Change settings that are currently unavailable and check Turn on fast startup.
- Hit Save changes.

- If you can’t see the Turn on fast startup option, you need to enable Hibernation first.
- Open Run.
- Type
cmdand press Ctrl + Shift + Enter to open the Elevated Command Prompt. - Type the command
powercfg /h onand press Enter.
- Then, enable fast startup.
You can similarly disable Fast startup using the same steps if enabling it is causing the startup to slow down.
Update Windows
Similar to the fast startup, some Windows versions had specific issues related to the system performance. Also, Microsoft has also introduced particular performance improvements in some updates.
So, it’s always better to keep your system fully updated to get the essential features as well as prevent system issues, including those regarding startup time.
- Open Run.
- Type
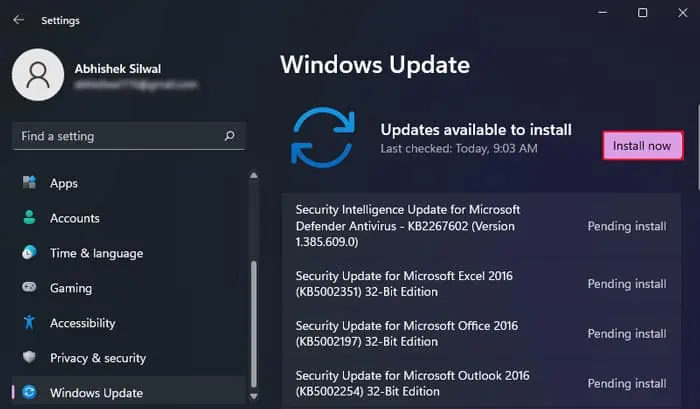
ms-settings:windowsupdateand press Enter to open Update Settings. - Click on Install now if updates are available. If not, click Check for updates.

- After installing updates, go to the Update Settings again.
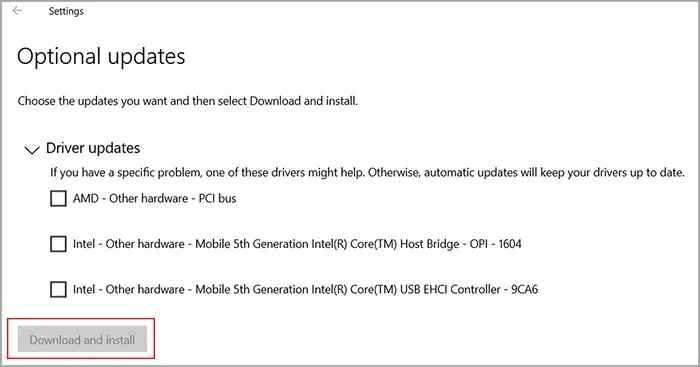
- Select Advanced options > Optional updates.
- Check all options after expanding the categories. Then, choose Download and install.

Disable Windows Subsystem for Linux
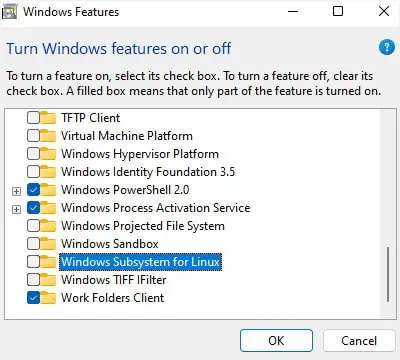
The Windows Subsystem for Linux (WSL) feature on Windows also considerably slows down the computer startup time.
If you or the previous owner of your computer was a Windows Subsystem for Linux user and you don’t use this feature now, you should disable it.
- Open Run.
- Type
optionalfeaturesand press Enter to open Optional Windows Features. - Uncheck Windows Subsystem for Linux.

- Click OK.
Change Boot Priority Setting
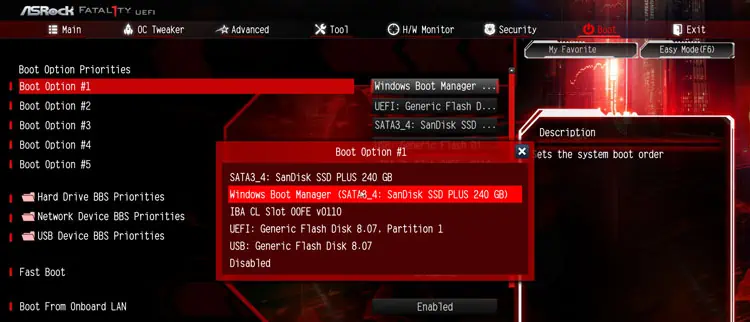
If your boot device configuration specifies looking for other boot devices, such as USB drives, CD/DVD, network drives, etc., before the OS storage drive, it will take some time while trying to detect the other devices.
And if you have connected these devices, even if they don’t contain the OS, your computer will use the additional time to look for the OS software. So, it’s best to set the OS drive at the top of the list to get the fastest boot time, especially on an MBR disk.
- Restart your PC and press the BIOS key as soon as you see the manufacturer’s logo to boot into BIOS. I recommend pressing the key repeatedly right after the computer reboots to get the timing right. If you don’t know your BIOS key, seek help from official sources.
- Then, navigate to the boot order or priority setting.
- Make sure your OS storage device is at the top of the list.

- Save the changes and exit the BIOS.
Enable No GUI Boot
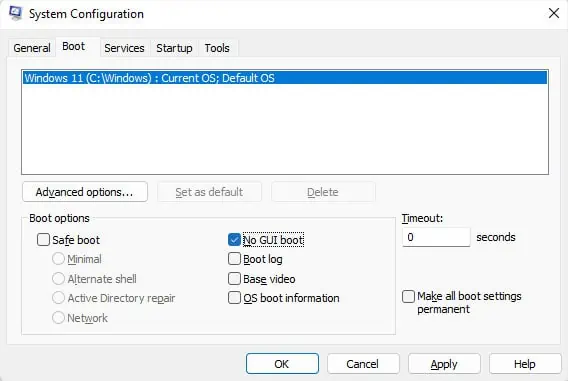
It is possible to disable the Windows icon or Welcome screen display during startup on windows. Doing so will speed up the startup by one to a few seconds, so you can try it if you want the fastest boot time possible.
However, keep in mind that if you have a very low-spec system, this feature can cause crashes. So, first, I recommend creating a restore point that you can revert to if you encounter any issues. And only then try out this method.
- Open System Configuration (
msconfigon Run). - Go to the Boot tab and check No GUI boot.

- Click Apply and OK.
- Restart your computer to check for any issues. If you encounter any, revert the change after logging in to your account or restore your system using the restore point you created earlier.
Check Startup Group Policies
It is mainly a possible solution for a domain computer, especially if the computer needs to load some startup scripts. But you can tweak a few group policies in such cases to reduce the startup time.
- Open Run.
- Type
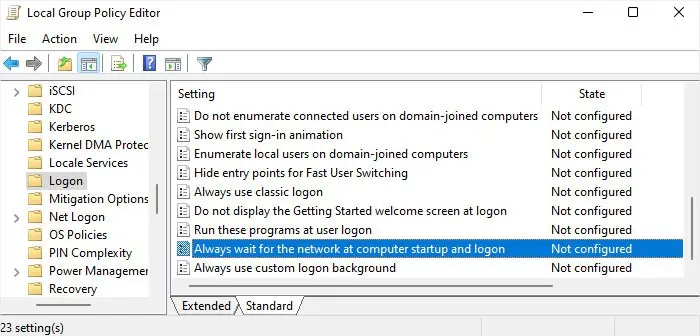
gpedit.mscand click OK to open the Local Group Policy Editor. - Navigate to Computer Configuration > Administrative Templates > System > Logon.
- Make sure Always wait for the network at computer startup and logon is set to Not configured. You can double-click on it, check Not configured and click OK to change the policy.

- Go to Scripts inside System.
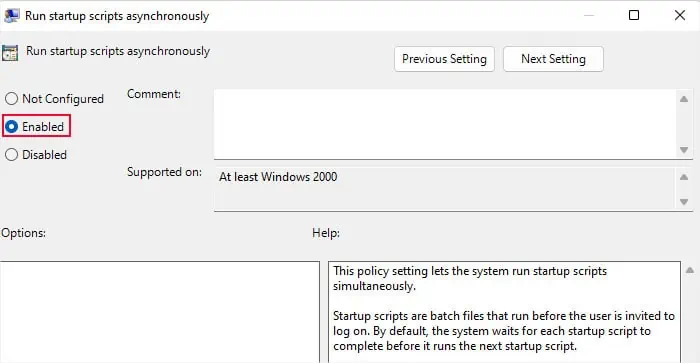
- Double-click on Run startup scripts asynchronously.
- Check Enabled and hit OK.

- Restart your PC or enter the command
gpupdate /forceon Command Prompt to apply the changes.
Upgrade Other Hardware Components
Sometimes, even if you use an SSD as a boot drive, RAM or CPU may still bottleneck the PC performance. So, if you are still running an older system, you may need to upgrade such components as well if you want a faster boot or startup time.
Also, if the power supply barely meets the needs of your devices, they may not perform at their full potential, so I also recommend checking the PSU and upgrading it if necessary.
You can use a multimeter to check the voltage on the PSU connectors and compare it with the PSU specifications and requirements of the hardware devices.
