Windows 11 has come a long way from its buggy inception phase and has been continuously optimized since. However, there are still some issues in Windows 11 that can cause your system to lag and eventually freeze.
Your Windows 11 may keep freezing due to reasons like malfunctioning storage devices, insufficient RAM, corrupted system files, or incorrect screen resolution aspect ratio.
However, as long as your computer hardware meets the minimum system requirements to run Windows 11, you should be able to troubleshoot and fix these issues yourself.
Before You Begin
There are a few things you need to keep in mind to be able to properly run Windows 11 on your computer.
First, make sure to check your PC specs to see if it meets the minimum system requirements for installing Windows 11.
Also, make sure to keep some space available in your OS drive. If your OS drive is full or nearly filling up, you can try deleting temporary and unnecessary files.
For the sake of this article, we will be addressing freezing issues on live Windows, but if your Windows 11 computer freezes at startup without even booting up, you can refer to our other article.
Run a Malware Scan
If your Windows 11 keeps freezing, the first thing you should do is try to make sure your computer isn’t infected with any kind of malware. Malicious software makes your system more prone to crashing as it can even consume large amounts of your system resources causing performance drops and even periodic freezes.
So, you should try running a malware scan to ensure this isn’t the case.
- Right-click the start menu and select Settings.
- Navigate to Privacy & security > Windows Security.
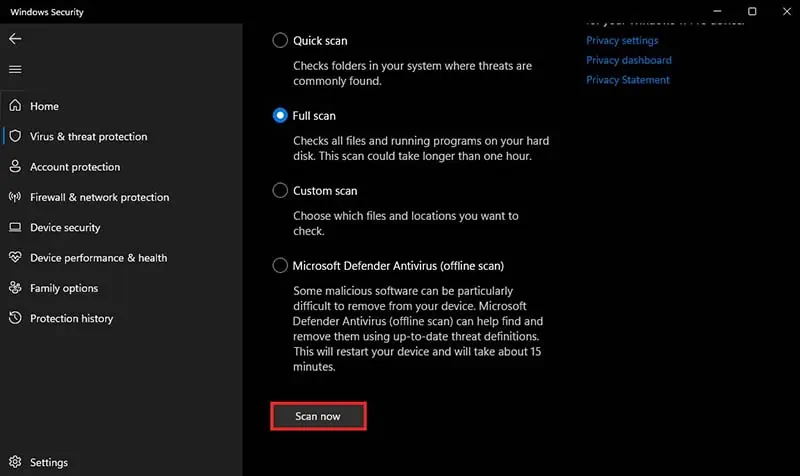
- Select Virus & threat protection under Protection areas.

- In the new window that pops up, click on Scan options.
- Select Full scan and click on Scan now.

If you have a different antivirus software active on your computer, you can also run a malware scan from that application instead of Windows Security.
Set an Appropriate Screen Resolution
You can also experience periodic system freezes if your graphics card can’t really handle the screen resolution set in your monitor. If you have a 4K monitor, and your resolution is set to 4K, but if your computer has a low-end GPU, it won’t be able to handle your display running at that resolution.
This is apparent when you’re running graphics-intensive tasks like gaming. So, you can try downgrading your screen resolution or setting an appropriate one supported by your GPU to fix this issue.
- Open Settings using Windows + I shortcut.
- Navigate to System > Display.
- Scroll down to Display resolution and set it as
1920 x 1080from the drop-down menu. (If your graphics card supports higher resolutions, you can set an appropriate resolution.)
- Select Keep changes.
If you have an ultrawide monitor setup, make sure you set the screen resolution with an aspect ratio of 16:9. The screen resolutions with 16:9 aspect ratio are 1024x576, 1152x648, 1280x720, 1366x768, 1600x900, 1920x1080, 2560x1440, and 3840x2160.
Reinstall GPU Drivers
The GPU drivers are used by your system to connect with your graphics card, which is essential for your computer display to function properly. However, if your graphics drivers are outdated or corrupted, it can also cause system lag and freezes.
To fix this kind of issue, you can try to reinstall your graphics driver from the official website.
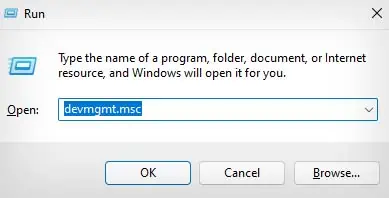
- Press Windows + R to open Run dialog box.
- Type
devmgmt.mscand press Enter to open Device Manager.
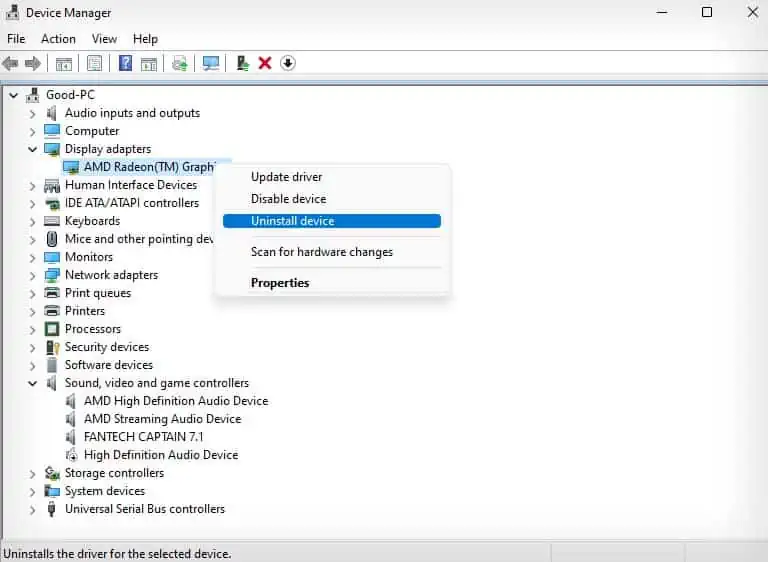
- Expand the Display adapters tab and right-click your graphics driver.

- Select Uninstall device and click on Uninstall again.
- Open a web browser, and go to the official website of your GPU manufacturer.
- Search for your GPU device and download its corresponding driver.

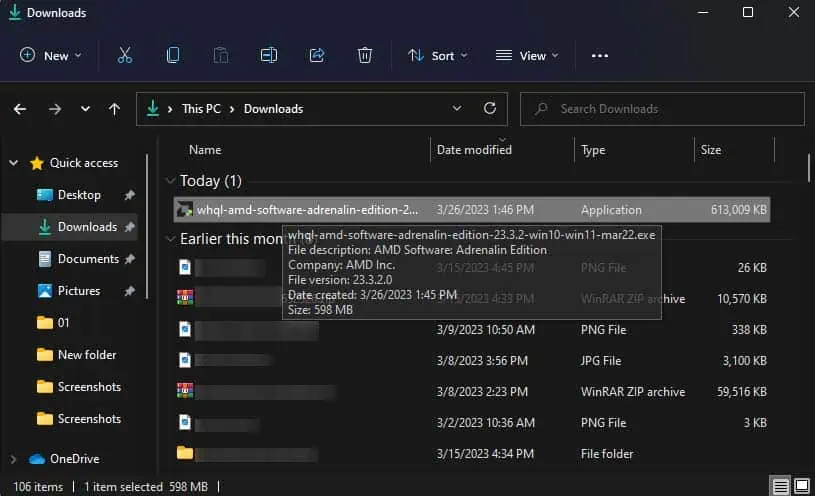
- After the download is complete, go to the Downloads folder in File Manager and run the set-up file.

- Follow the on-screen instructions to install the graphics driver.
- After the process is complete, restart your computer.
Alongside the GPU drivers, you might also want to reinstall your storage drivers, as they can also cause your system to freeze if corrupted. The storage drivers are located under Disk drivers in Device Manager, and you can use the same method as above to uninstall them.
After the uninstall is complete, you can restart your computer to automatically reinstall your storage drivers.
Windows Update
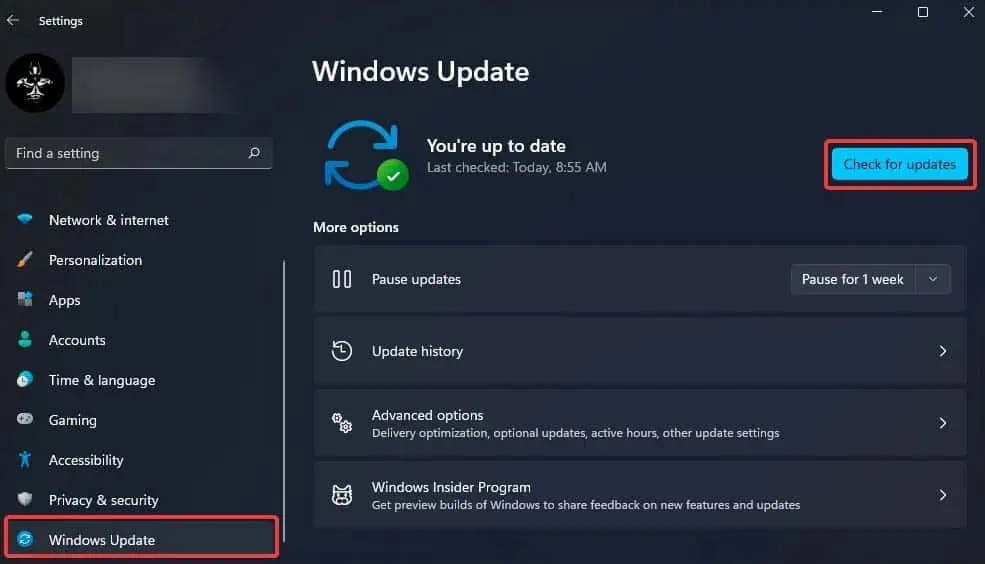
You can also try updating your Windows to see if it fixes the issue of your system periodically freezing. If this issue was caused by bugs in your version of Windows 11, a Windows update will likely fix the issue, as they carry bug fixes for known issues.
- Right-click the start menu and select Settings.
- Click on Windows Update from the left sidebar.
- Select Check for updates.

- If an update is available, Windows 11 will automatically start downloading it.
- Restart your computer to install the downloaded update.
Perform DISM, SFC, and CHKDSK scan
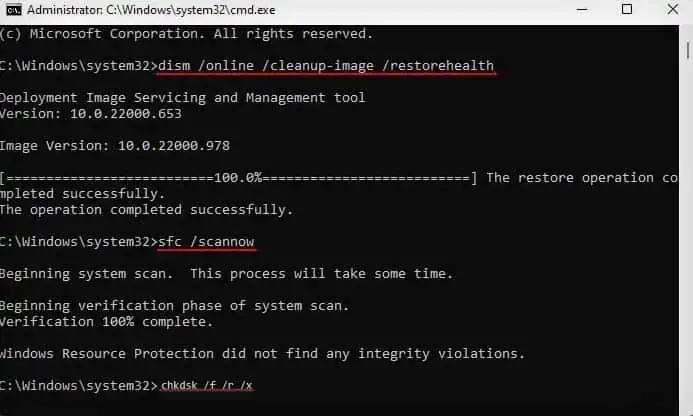
Your computer can also periodically freeze if some important system files are missing or corrupted. To check for and fix this kind of issue, you can try running a DISM and SFC scan. The DISM command will repair and make sure your Windows image is healthy, while the SFC scan will use the Windows image to fix any corrupted or missing system files.
Also, if your computer’s internal drive is corrupted or has bad disk sectors, your system can get stuck in the process of reading it. This can cause significant lag and system freeze. So, you can also try running a CHKDSK scan to check for and fix issues like these in your drive.
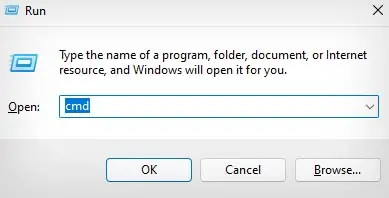
- Launch Run utility using Windows + R hotkey.
- Type
cmdand press Ctrl + Shift + Enter.
- In Command Prompt, type the following command and enter in order:
dism /online /cleanup-image /restorehealthsfc /Scannowchkdsk /f /r /x
- Exit Command Prompt. Restart your computer.
If you have more than one drive on your computer, you can also try to run the CHKDSK scan on those drives. To do so, you will simply need to specify the drive letter of the drive you want to scan in the CHKDSK command.
For instance, chkdsk D: /f /r /x
Set Virtual Memory
Another reason why your computer may periodically freeze is if you have insufficient RAM for the task you’re performing. By default, Windows 11 needs a minimum of 4 GB RAM to function properly. If you’re running heavy programs on your computer, even 6 or 8 GB RAM might be insufficient
So, to fix this kind of issue, you can try expanding your virtual memory. This lets you use a part of your drive to act as a virtual RAM that will help increase your system performance.
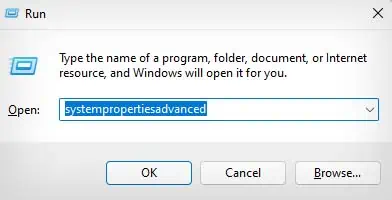
- Open Run.
- Type
systempropertiesadvancedand press Ok.
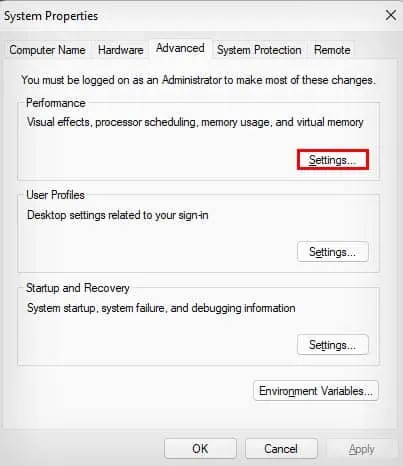
- Under Performance, click on Settings.

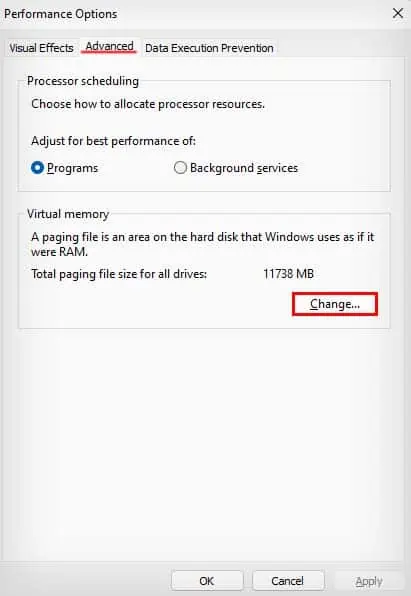
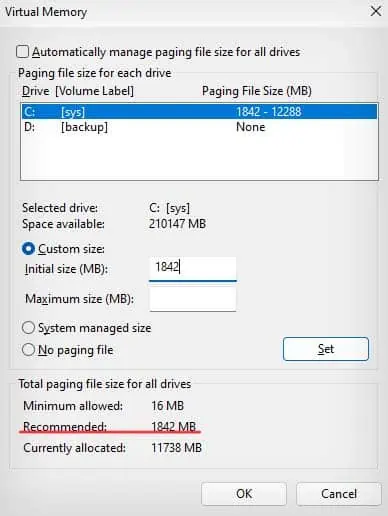
- Under the Advanced tab click on the Change option.

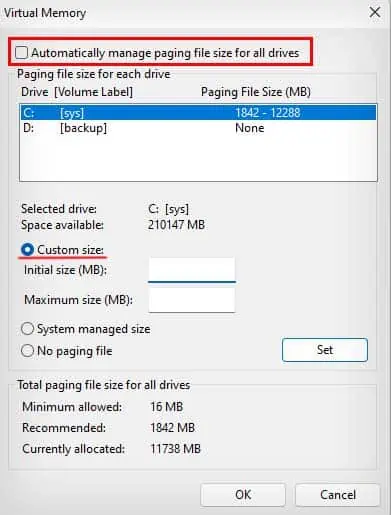
- Make sure the Automatically manage paging files size for all drives option is disabled.
- Select your OS drive and click on Custom size.

- Set the Initial size (MB) as the Recommended amount under Total paging file size for all drives.

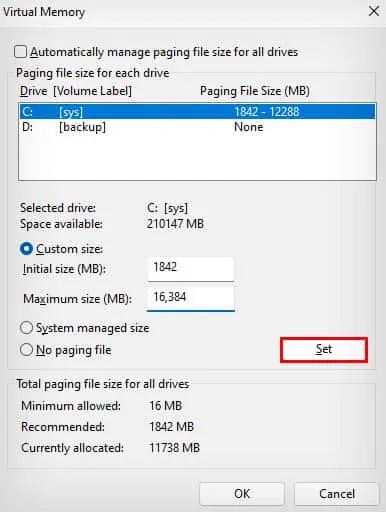
- Set the Maximum size (MB) as either 1.5 times, 2 times, or 4 times the amount of your RAM. (1GB = 1024 MB)
- Make sure to balance the maximum virtual RAM size according to your physical RAM and drive space. For instance, if you have 8 GB of RAM, setting the max Virtual RAM size as 4 times will take up 32 Gb of space in your drive.

- Click on Set and OK.
- Close all the dialog boxes and restart your computer.
Check Your RAM
You might also want to check your RAM to make sure it isn’t the one causing the issue. A faulty RAM can also cause your system to freeze or even crash unexpectedly. To check the state of your RAM, you can try doing so with the Windows Memory Diagnostic tool.
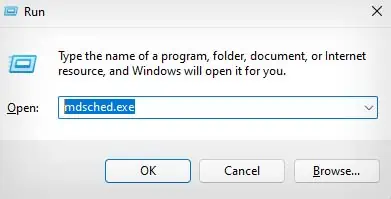
- Launch Run.
- Type
mdsched.exeand press Enter.
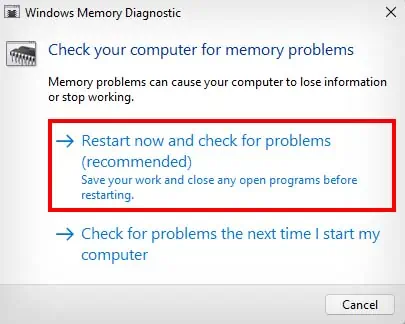
- Select Restart now and check for problems in the new window.

- Follow the on-screen instructions and restart your computer.
- After the restart, Windows Memory Diagnostic will start checking your RAM. After it is done, it will restart again and display the results.
If Windows Memory Diagnostic does display some issues with your RAM, you might want to reseat your RAM. If you have multiple RAM sticks, you can also try alternately reseating them to check if only one of them is faulty. If none of these works, you can try replacing your RAM.
Disable Hardware-accelerated GPU Scheduling
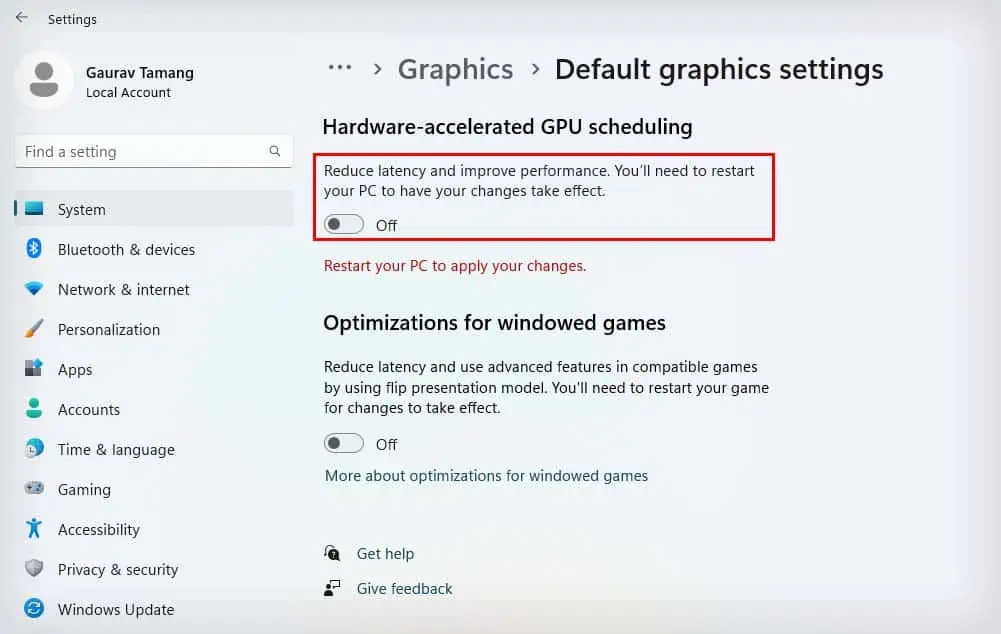
Enabling GPU acceleration lets your computer programs offload certain tasks to your GPU rather than always running on the general-purpose CPU. This can greatly improve performance and reduce latency.
However, GPU acceleration can also cause your system to periodically freeze if the GPU drivers are incompatible with this function. So, you can try disabling GPU acceleration to see if it fixes the issue.
- Press Windows + I to open Settings.
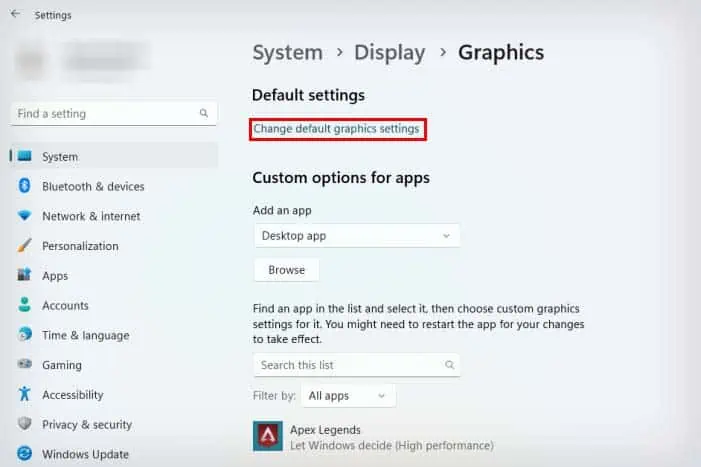
- Navigate to System > Display > Graphics.
- Click on Change default graphics settings.

- Toggle off the Hardware-accelerated GPU scheduling option.

- Exit Settings and restart your computer.
- If disabling this setting doesn’t fix the issue, you can enable it again.
Disable Overclocking
Unstable Overclocking can also cause your system to periodically freeze, and it can even result in crashes. If you are running an Overclocked system, you should disable the overclocking. If you overclocked your system from third-party software, you can disable it from the same software.
If you have also changed your BIOS settings for overclocking, you should also reset your BIOS to default settings.
You can also try updating your BIOS, as it also restores your BIOS settings to the default configuration. Furthermore, it makes sure your BIOS isn’t outdated.
Reset Windows 11
Lastly, if all the above methods still do not fix your issue, you can try resetting your Windows 11. A system reset will reinstall Windows 11 for you, and it will also delete all your data from the system drive. So, make sure to back up your system drive first before resetting your computer.
- Launch Settings using the Windows + I hotkey.
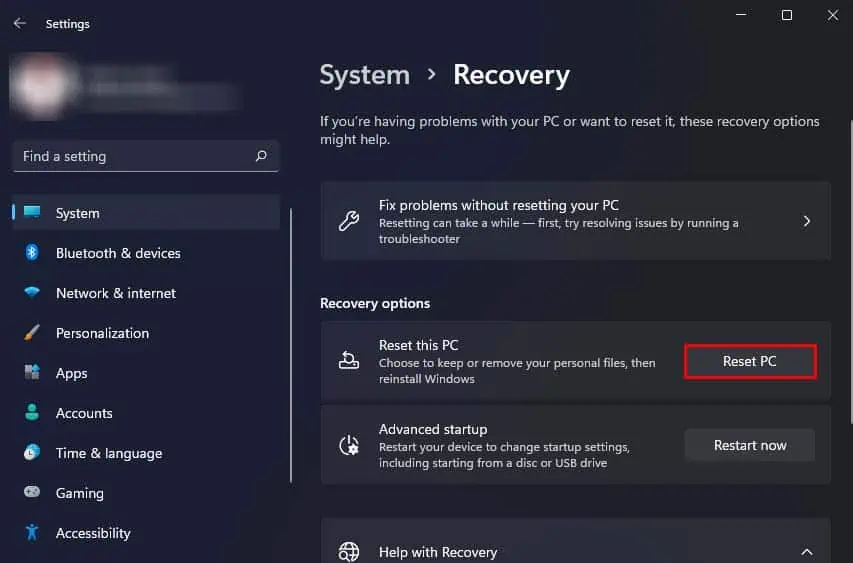
- Navigate to System > Recovery, and click on Reset PC.

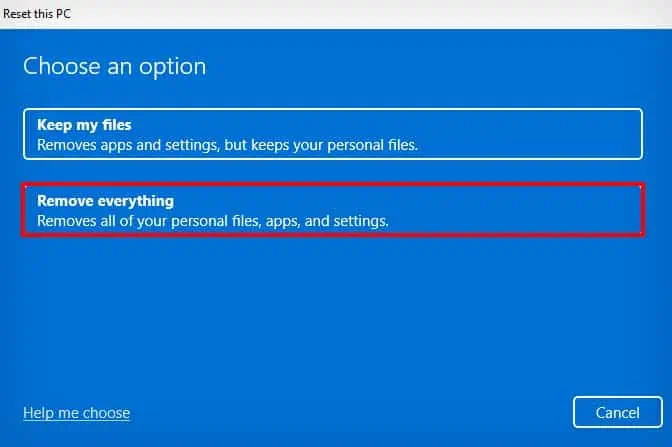
- Click on Remove everything. (Selecting Keep my files will only save the data present in your User accounts folder.)

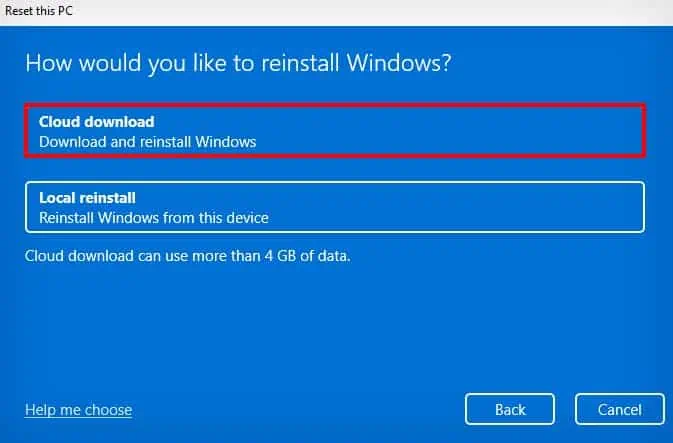
- If you have a stable internet connection, choose Cloud download. If you don’t have a network connection, this option won’t appear.

- Select Next and follow the on-screen instructions.
- After the process completes, set up your Windows 11.
Hardware Troubleshooting
If you still experience system freezes even after resetting your Windows 11 computer, then it is likely caused by hardware issues. A Windows reset will root out most of the software problems, leaving only hardware issues that could be the cause.
This issue can also be caused by problems in your other hardware like storage device, GPU, CPU, or Motherboard. If you are experienced in hardware troubleshooting and repair, you can try repairing or replacing the hardware yourself.
However, if you have no experience in hardware troubleshooting, it is best to visit a computer repair shop to get it fixed. Also, if your device is under warranty, you can contact the appropriate party to have it repaired for free.

