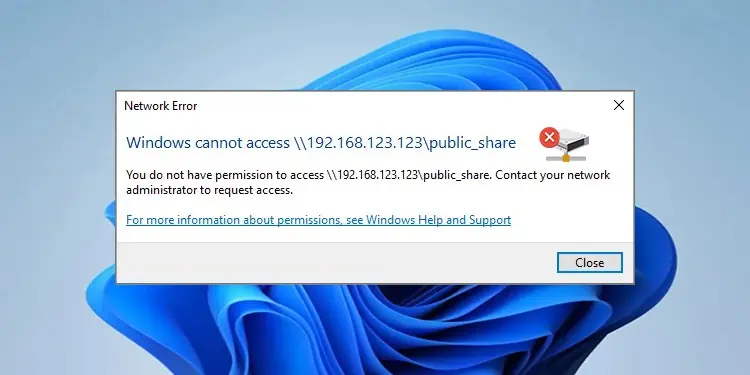
The error message “Windows Cannot Access Network Drive” is primarily a problem generated by improper network sharing configurations. The problem is often seen when users do not have sufficient permissions to access the shared drive or file. In rare cases, issues with the local network sharing protocols such as SMB can affect accessing the drive.
Sometimes, the network drive access is restricted with an error message “Your organization’s security policies block unauthenticated guest access.” Other times, the network drive access error occurs with the code 0x80004005. There are several reasons for this error to occur and there are no straightforward ways of resolving it.
We have compiled some probable fixes which might certainly help you access the shared network drive.
Enable File/Printer Sharing and Network discovery
The first thing you have to check is if the resource-sharing features such as File/ Printer Sharing and Network discovery are turned on.
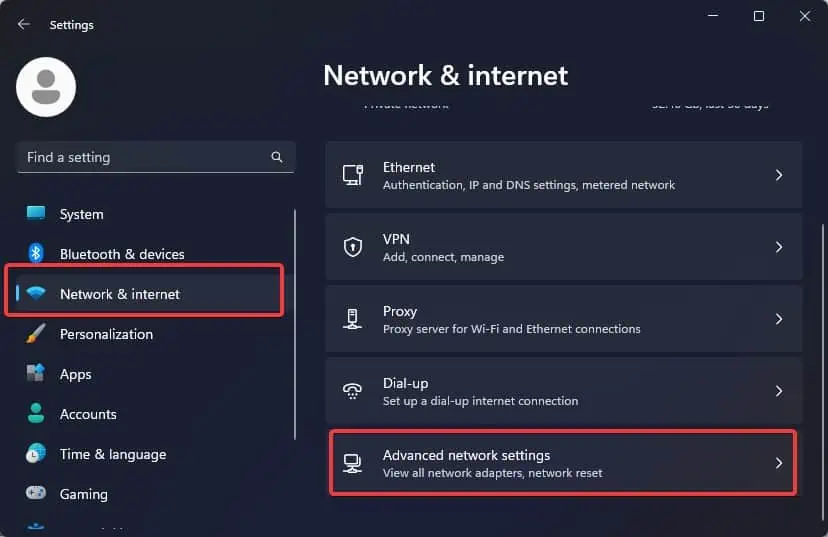
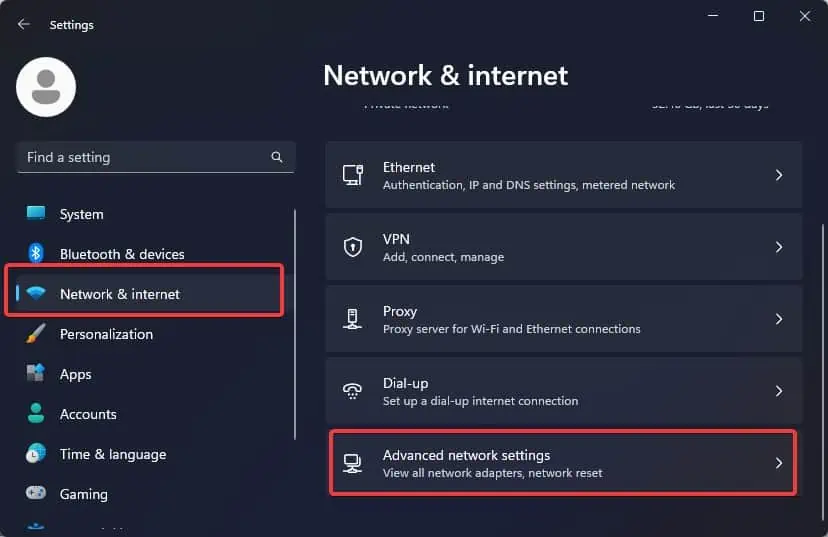
- Press Windows Key + I to open Settings.
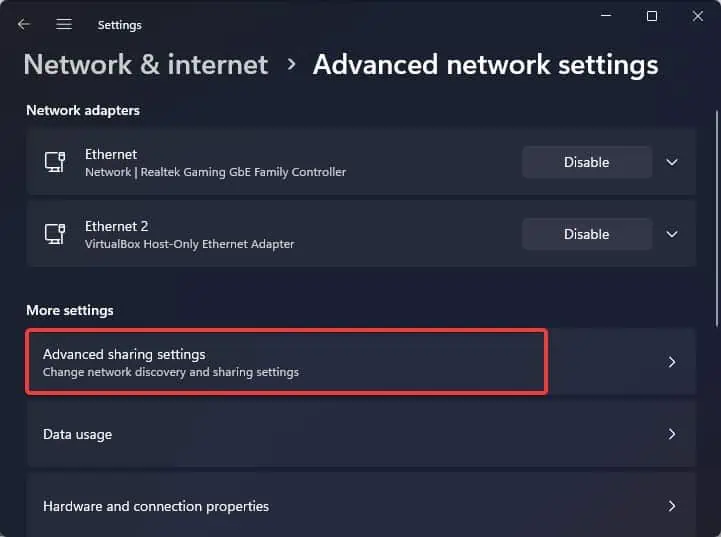
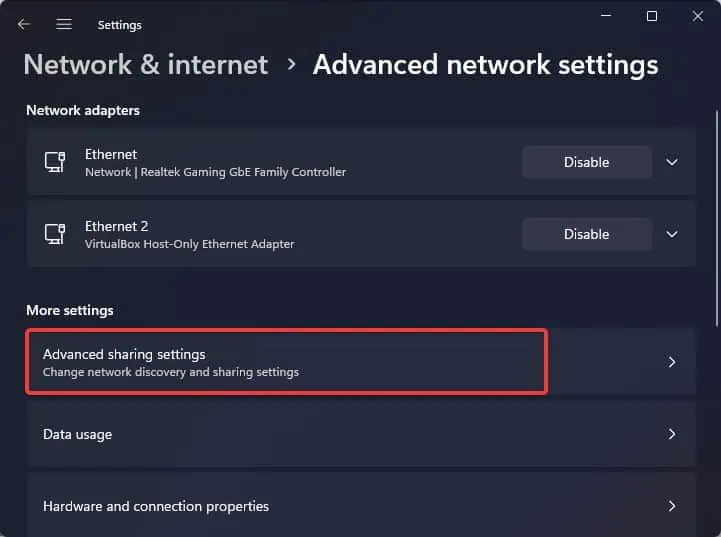
- Go to Network & Internet > Advanced network settings.

- Then, go to Advanced network settings.

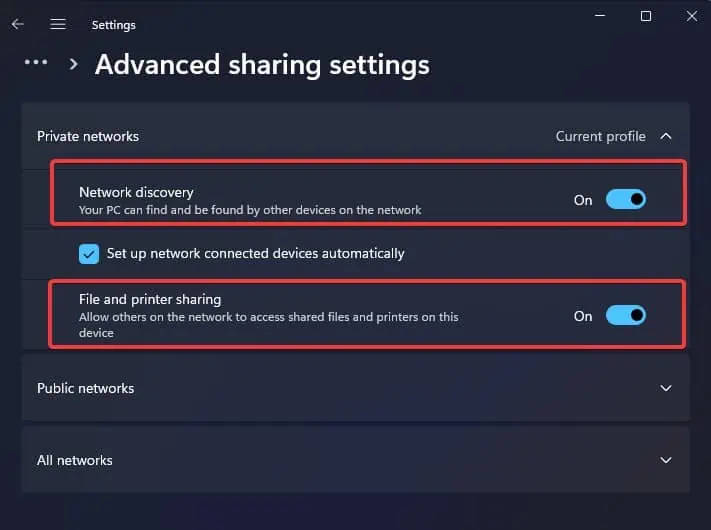
- Click on the Network discovery and File and printer sharing sliders to turn the features on.

Grant Network Sharing Permissions
Once the basic network sharing configuration is set, you must check that you have permission for the user to access the network drive. To access anything over a shared network you must have permission from the network administrator.
Note: This process is meant just for home users with full control over the network. For work or enterprise-level network sharing you must consult with the network administrator.
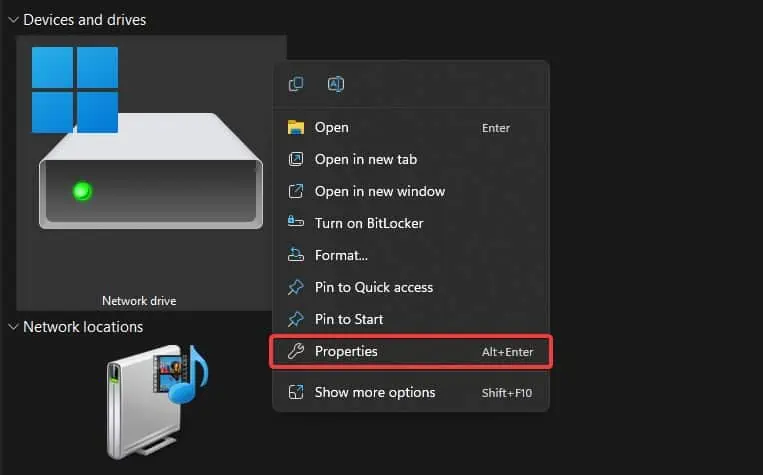
- Right-click on the drive you wish to share over the network.
- Select Properties.

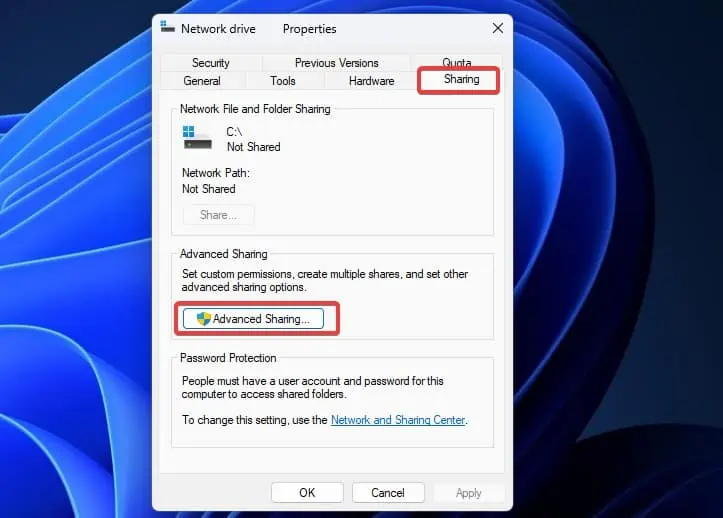
- Go to the Sharing tab.

- Click on the Advanced Sharing button.
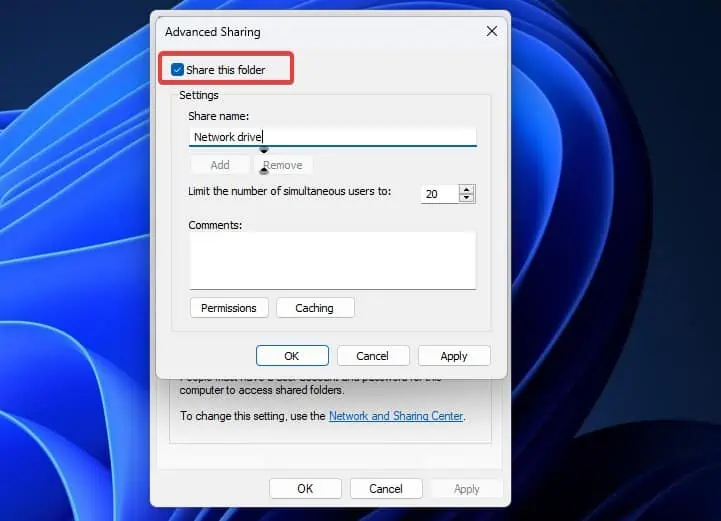
- Check the Share this folder option.

- Finally, click on Ok to save the changes and check from the other device if you are able to access the shared drive.
Grant Security Permission
Once you assign the network sharing permissions, you must add the user to the security list as well. Through this, you can control to what extent the user can have control over the shared network drive. For now, we will show you how you can assign full permissions to the user named “Everyone”.
- Right-click on the drive you want to share on the network and select Properties.
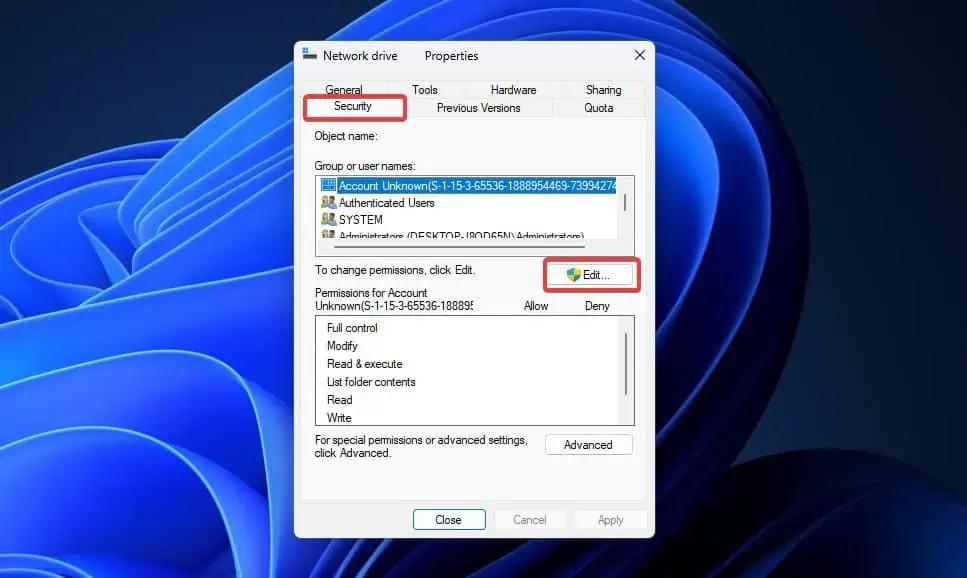
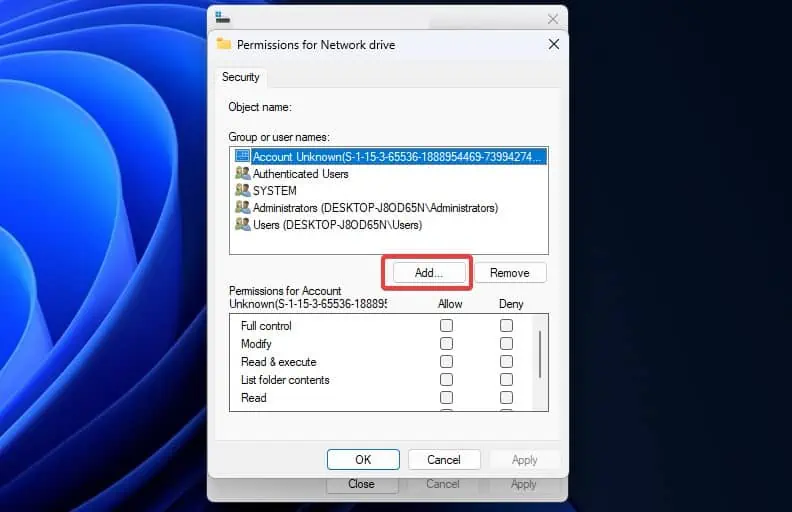
- Go to the Security tab and click on the Edit button.

- Click on Add.

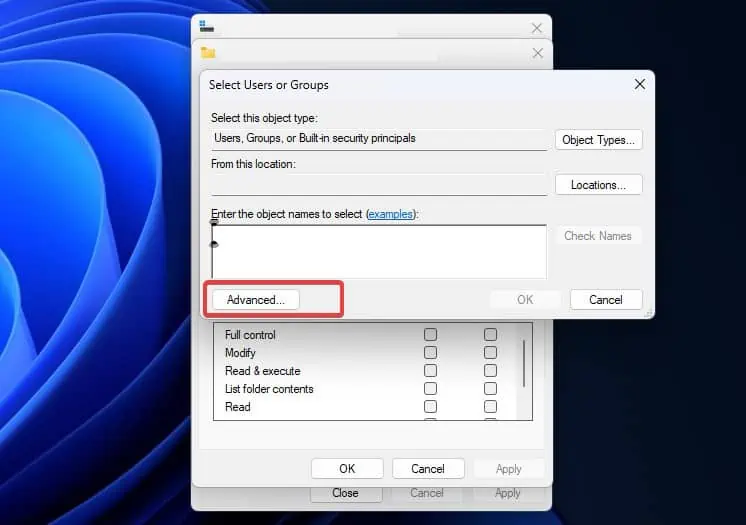
- Then in the Select Users or Groups Window, click on Advanced.

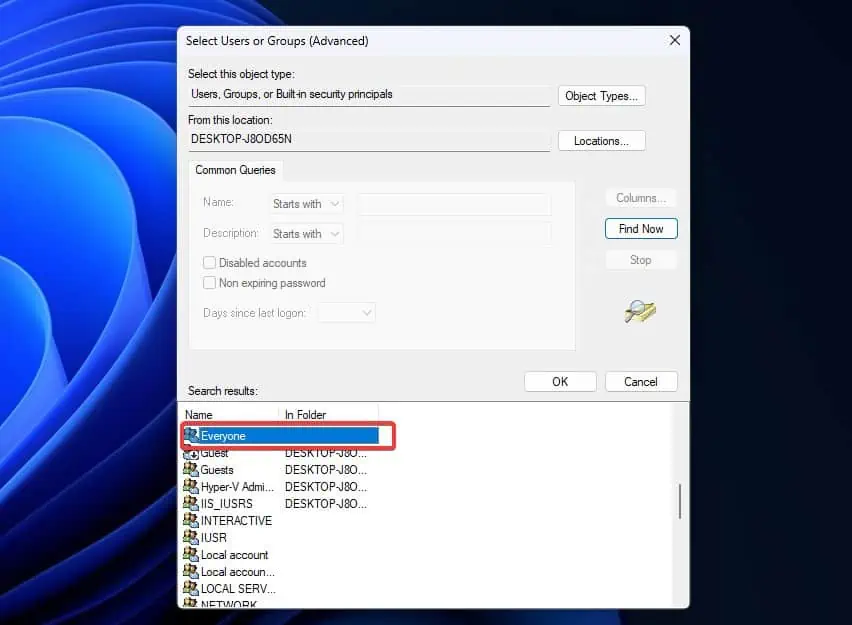
- Now, click on Find Now and select Everyone from the search list. Click on OK.

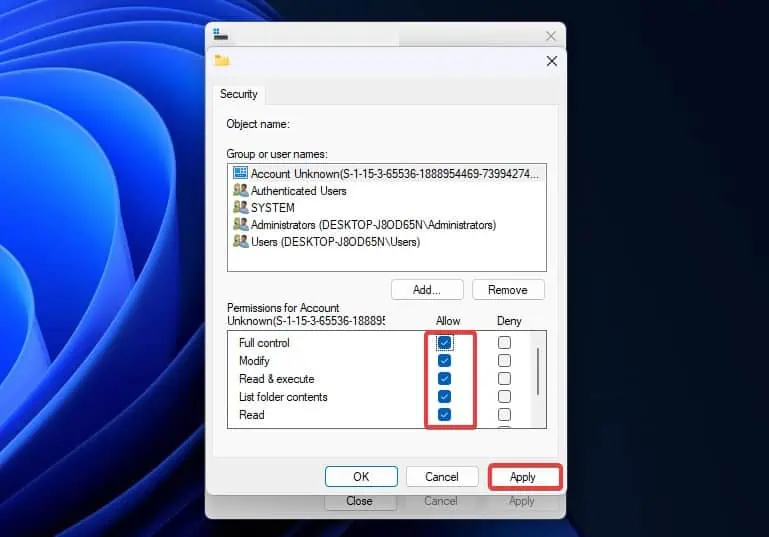
- From the Permissions for Everyone Section, assign Full control and click on Apply.

- Finally, try accessing the drive from your computer.
Enable SMB Protocol
Windows uses the SMB protocol for network sharing with non-Windows devices. There are chances that this client-server communication protocol is disabled on your system. The system might also only support SMBv2 or higher for network sharing. Here’s a quick workaround for enabling SMB 2.0 with some command lines.
- Open PowerShell with administrative privileges.
- Enter these commands to check the status of the SMB protocol.
Get-SmbServerConfiguration | Select EnableSMB2Protocol
- If you find SMB protocol status is labeled False, you will need to enable it using this command line.
Set-SmbServerConfiguration -EnableSMB2Protocol $true
- When asked Type Y and hit enter for final confirmation.
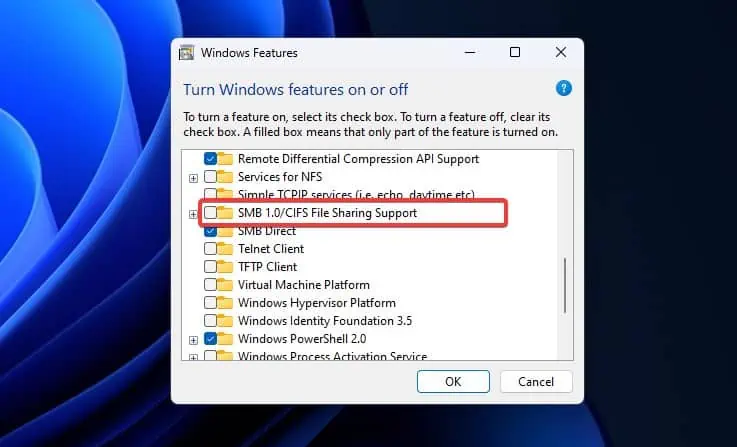
For older devices, you may have to enable SMB 1.0 file-sharing support as well. Although this protocol is already deprecated and not safe to use, some users are able to regain access to the network drive by enabling SMB 1.0 file-sharing protocol on Windows. You can enable this feature temporarily and see if this makes the network sharing work.
- Press Windows key + R, type
optionalfeatures, and hit Enter. - Find SMB 1.0/CIFS File Sharing Support and check the feature.

- Click on OK to save the changes.
- Finally, check if you are able to access the shared drive.
Enable NetBIOS over TCP/IP
NetBIOS is a protocol that facilitates resource sharing among the computers connected to a local network. If NetBIOS is disabled any service requiring it might fail to function properly which can make the shared network drive inaccessible.
To solve the problem ensure that every computer on the network has NetBIOS over TCP/IP enabled.
- Press Windows Key + R, type
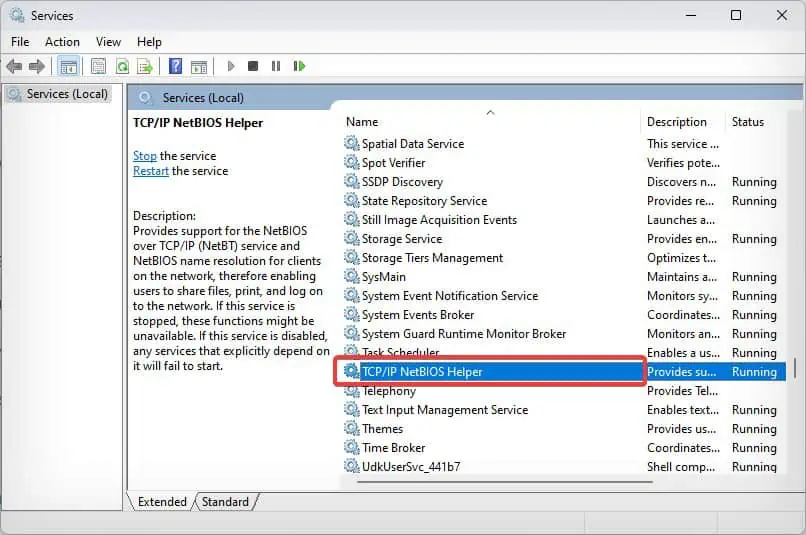
services.mscand press enter. - Search for TCP/IP NetBIOS Helper and double-click to open it.

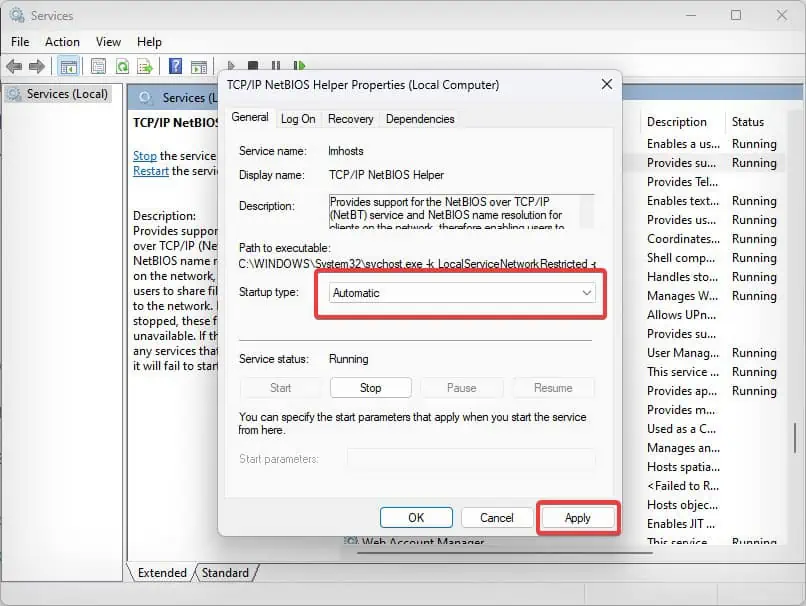
- Set the Startup type to Automatic.

- Click on Apply to save the changes.
Once you have reconfigured the startup settings for the NetBIOS, you will have to enable it over the network adapter as well.
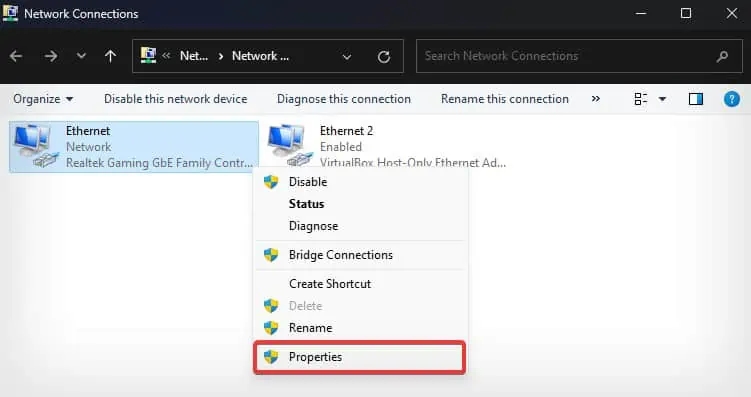
- Again Open Run, type
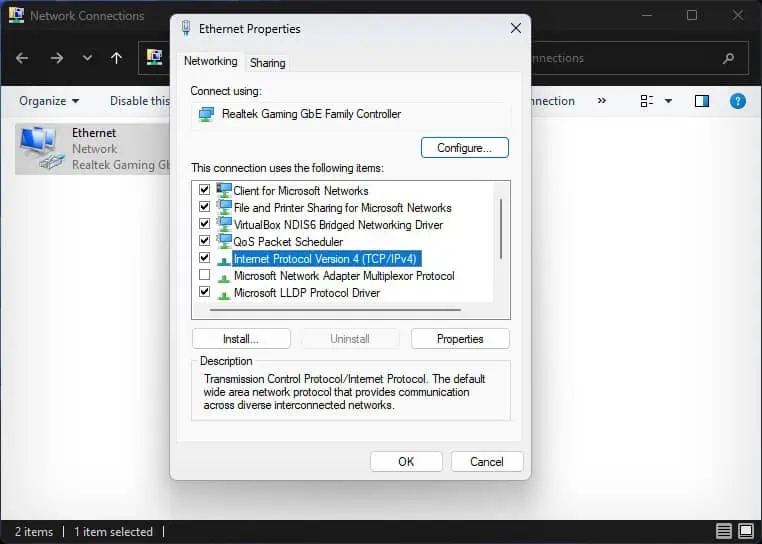
ncpa.cpland hit enter. - Right-click on the network adapter and select Properties.

- Search for Internet Protocol Version 4 (TCP/IPv4) and click on it.

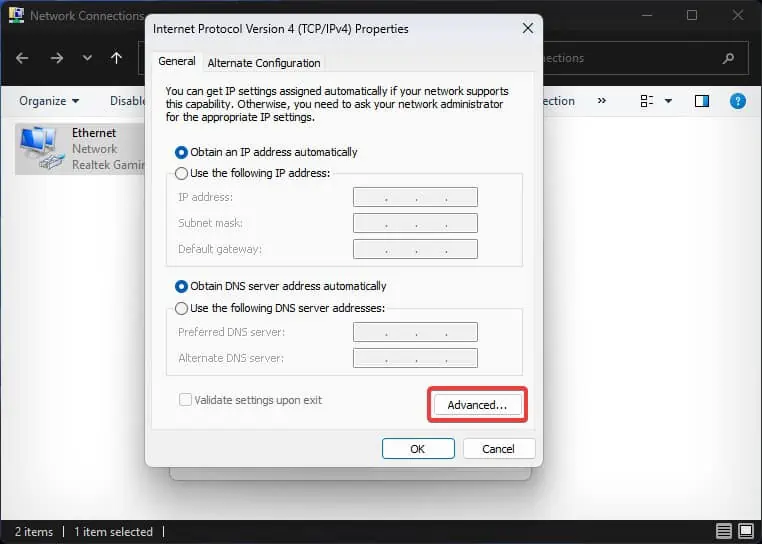
- Click on the Properties button.
- Click on the Advanced button.

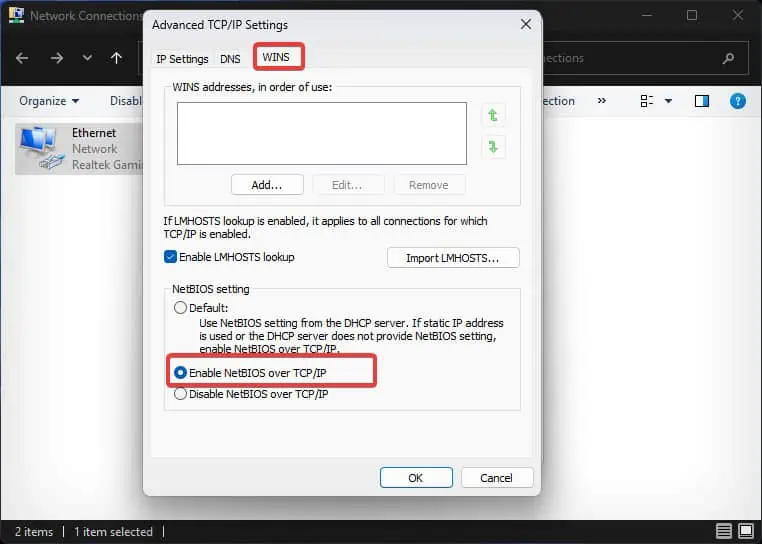
- Go to the WINS tab and click on Enable NetBIOS over TCP/IP option. Click on OK to save the changes.

Turn off Password-protected Sharing
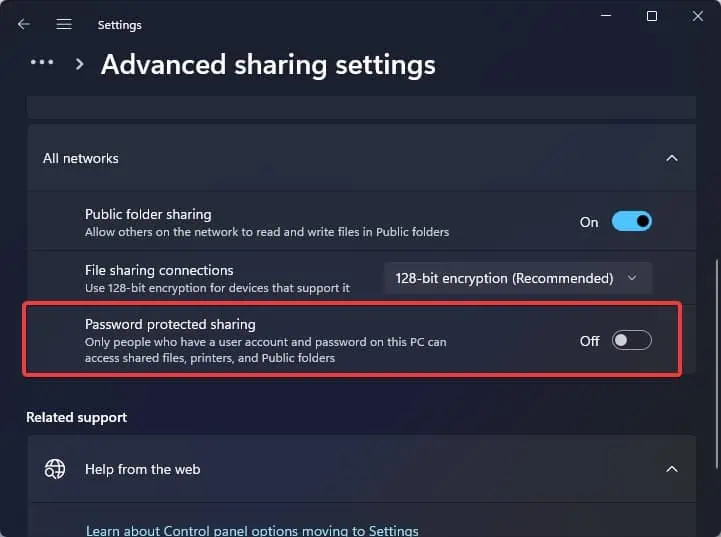
This method is only suggested for the home network. If you have turned on password-protected sharing, try disabling the feature. This will allow you to access the network drive without entering any login credentials.
- Press Windows Key + I to open up Settings.

- Go to Network & Internet > Advanced network settings > Advanced Sharing Settings.

- Click on All networks and then click on the Password protected sharing slider to turn the feature off.

Restart the Services
Some users experiencing the same issue have reported that many important network-sharing-related services were not running on connected computers. They seem to have resolved the issue after restarting such services.
- Press Windows key + R, type
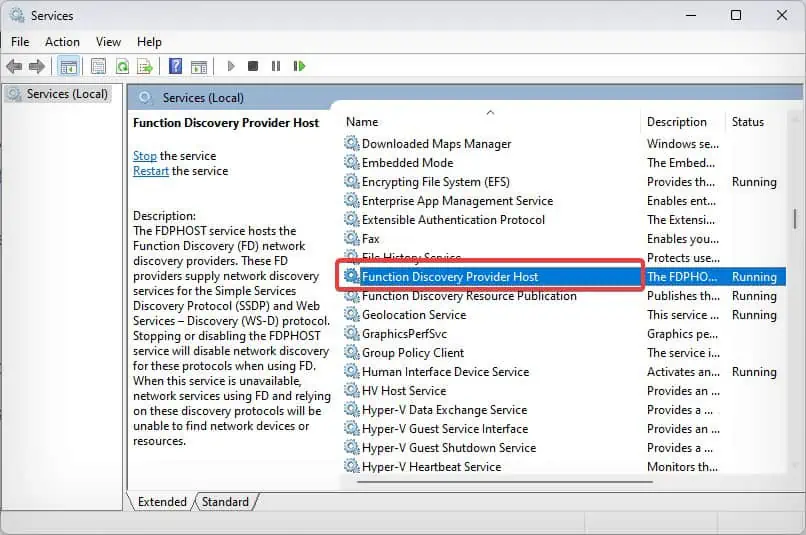
services.msc, and hit enter. - Search for Function Discovery Provider Host in the services list and double-click to open it.

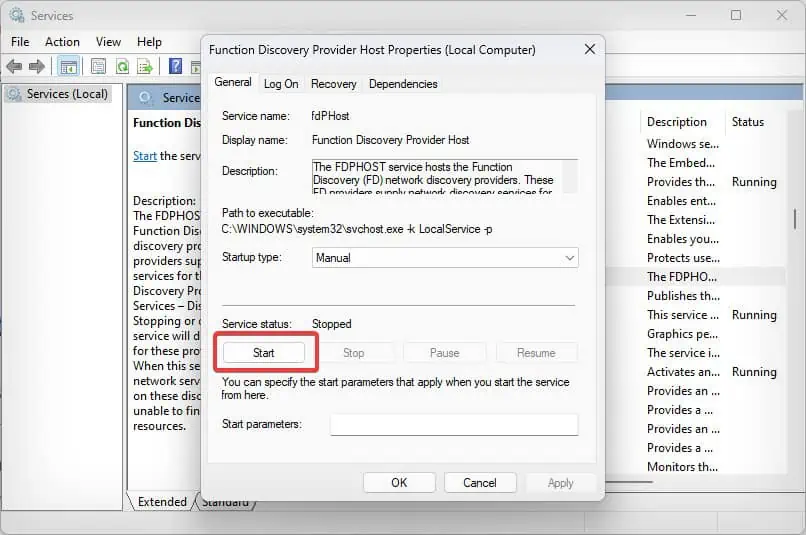
- If the service has been stopped click on the start button to start the service.

- Similarly, search these services and check if they are running properly. If not, start the services accordingly.
- Function Discovery Resource Publication
- Function Discovery Provider Host
- UPnP Device Host
- SSDP Discovery
- DCP Client
- DHCP Client
Enable Lanman Workstation
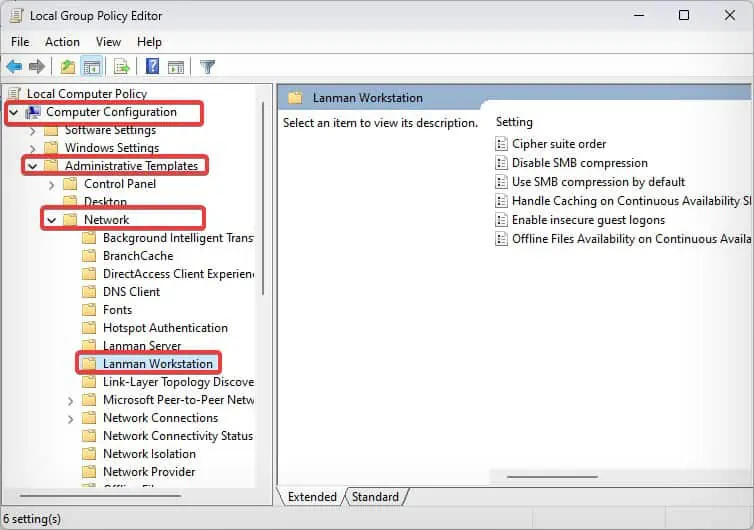
Sometimes Windows is not able to access the shared drive or folder with an error message saying that “Organization’s security policy blocks the unauthenticated block guest access.” In such a situation, enabling the Lanman Workstation policy setting in the file server will solve the problem.
Note: Important SMB features get disabled after you enable this setting. This can lead to security vulnerabilities in the server. It is not recommended to use this feature in an enterprise network.
- Press Windows key + R, type
gpedit.mscand hit Enter. - Go to Computer Configuration > Administrative Templates > Network > Lanman Workstation

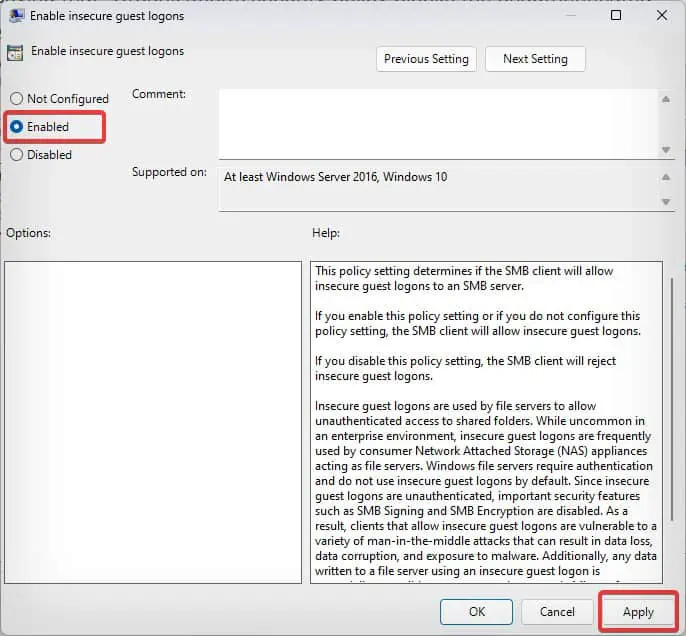
- Double click on Enable insecure guest logons.
- Click on Enable and then OK.


