Computers consist of a Network card that helps you get connected to the internet through the means of Ethernet or Wi-Fi. If this piece of hardware is damaged or not detected by the system, then you cannot connect to the network.
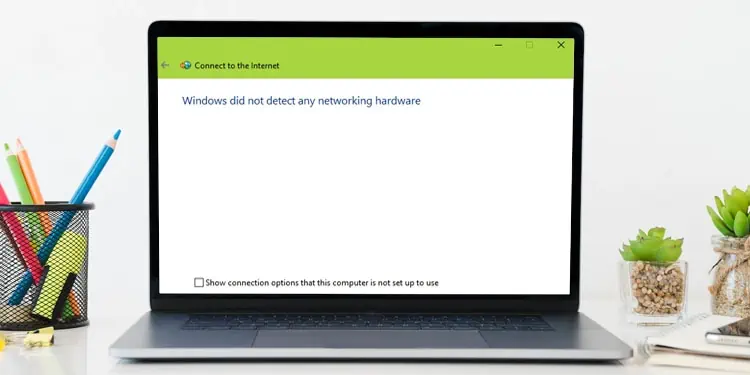
However, sometimes, you may experience the error message “Windows Did Not Detect Any Networking Hardware”, even when the network adapter is working fine. Some of us may see this error when new updates are installed on the system. To add to this, there are also a few cases where the culprit is VPN software.
Causes For the Windows to Not Detect Any Networking Hardware
Most of the time, Windows shows the Networking hardware not detected error because of the following issues:
- Outdated or Corrupted network drivers
- Faulty Windows Update
- VPN installed in the PC
- Inappropriate power management settings for the network card
- Hardware issues
Fixes to Solve the Error
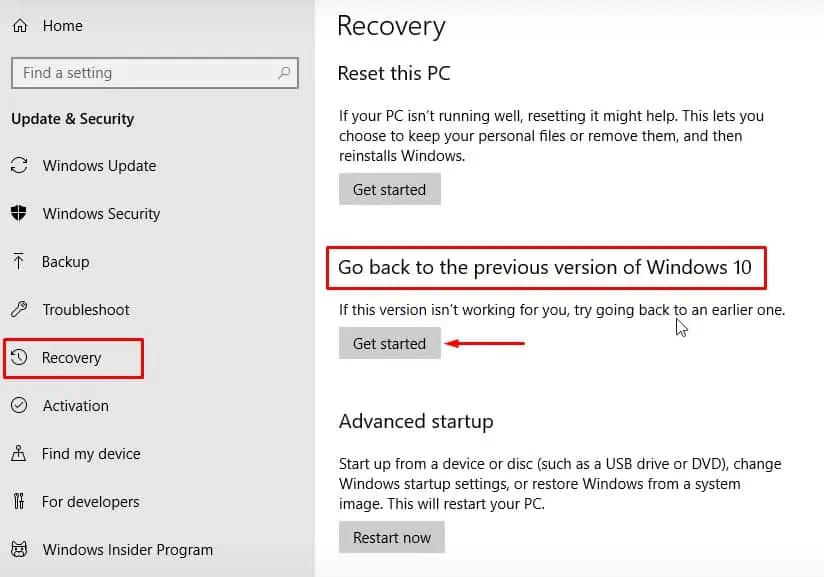
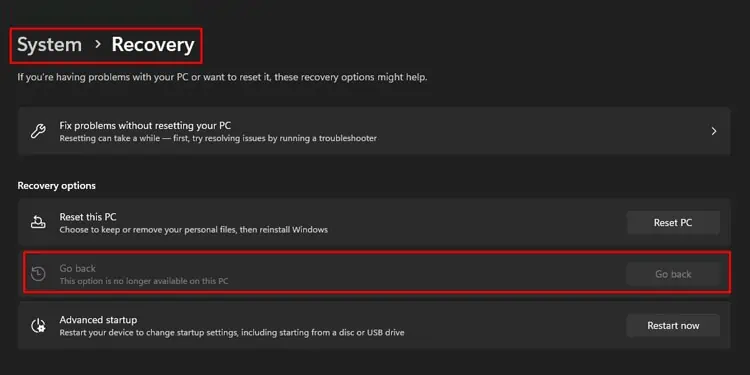
If you have just upgraded your PC to Windows 10 or 11, and the error appears right after the upgrade, then you can roll back the installation. There are cases where this has fixed the issue.
- Press Windows + ‘I’ to open Settings.
- Go to the Recovery option.
- Find Go back or Roll back Windows and click on it.

But if the option to roll back has been greyed out and not available to you, or the issue still persists, let’s get on to the fixes right away.
Run Windows Troubleshooter
Windows Troubleshooter can fix some minor issues on your network device. If any other programs are interfering with the device or its driver, then the Windows troubleshooter will identify the issue and try to solve it.
- Press Windows + ‘I’ to open Settings.
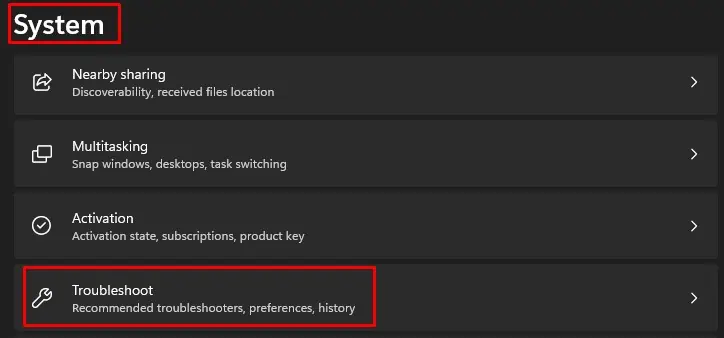
- Go to Troubleshoot in the System menu.

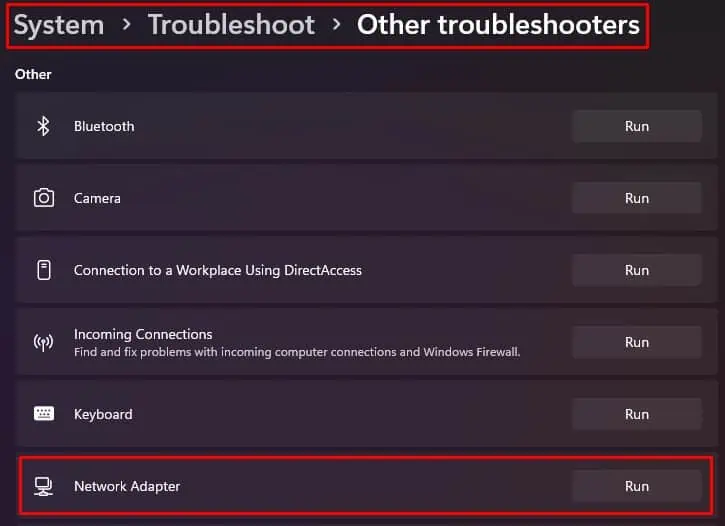
- Find Other troubleshooters.
- Look for Network Adapter and click Run to start the troubleshooting process.

It will identify the issues and fix them automatically. See if the error appears again.
Troubleshoot Network Drivers
Usually, the problem arises when the network driver is outdated or corrupted. So, you will have to troubleshoot any issues with the drivers first.
Update or Roll Back Drivers
It is highly probable that the new driver update is incompatible with your PC. So, you should roll back the drivers to their earlier version.
- Press Windows + ‘R’ and type
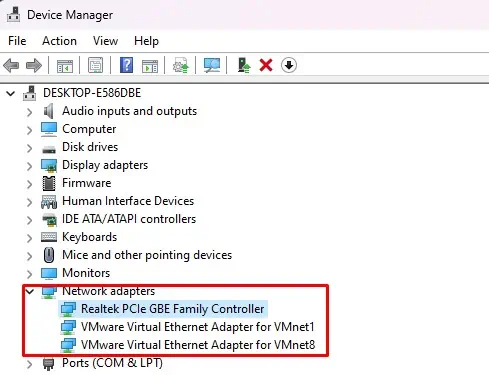
devmgmt.mscto open Device Manager. - Find Network Adapters and expand them.
- Look for the ethernet or wireless adapter that the system is unable to detect.

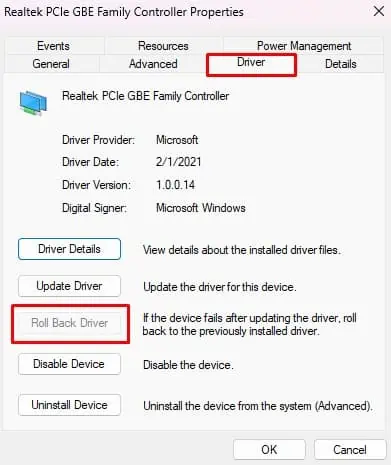
- Double-click on it and go to the Drivers tab.
- Click on Roll Back Driver.

But, if the drivers have not been updated, then you should update them instead of rolling them back.
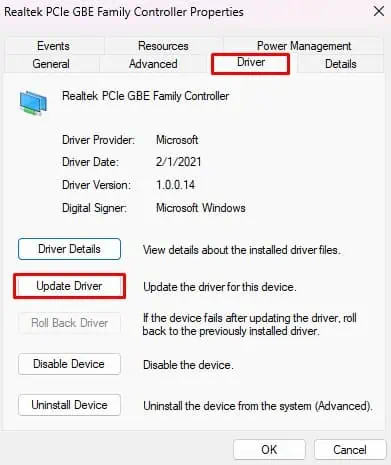
- Go to the Drivers tab of the device.
- Click on Update Driver and choose Search automatically for drivers.

Check if the issue is solved now.
Install the Drivers Manually
If updating the drivers through Device Manager does not work, then you should update the drivers manually. To do that, you will have to download the drivers first.
The ethernet network drivers are usually found along with the motherboard drivers on the manufacturer’s website. But wireless adapters may have a different vendor, and you may find their driver software on their own page.
Uninstall the Network Device
Finally, if updating or rolling back the drivers does not do the job, you can uninstall the device and let the system install the compatible one on its own.
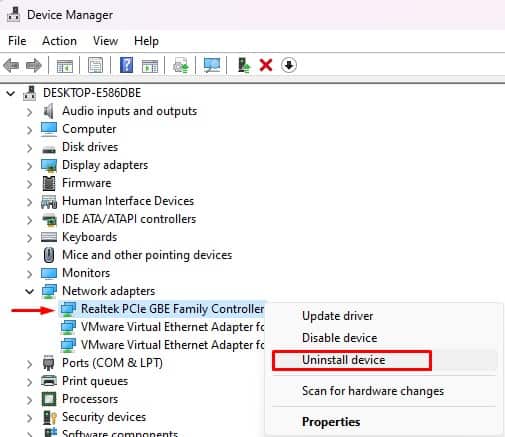
- Find the troubling device name inside the Network Adapters in Device Manager.
- Right-click on it and select Uninstall device.

Upon restart, the drivers will be installed automatically, and the problem should be solved now.
Uninstall Recent Updates
When the computer receives some major updates, then the existing drivers may become incompatible with the new updates. Usually, such problems should get solved after updating the drivers. But, sometimes, there may be faults with the recent Windows update itself.
Thus, you will have to uninstall the very update to solve the problem.
- Press Windows + ‘I’ to open Settings.
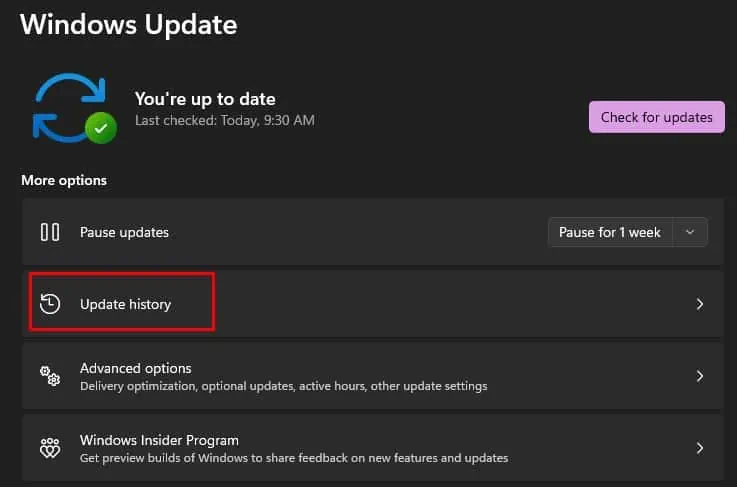
- Go to Windows Update and click on Update History.

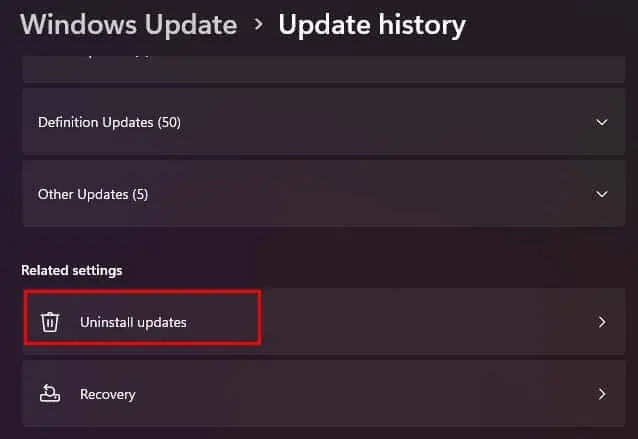
- Find Uninstall updates.

- Select the recent update after which the problem started and click Uninstall.
See if the error is resolved. If you do not want to uninstall the Windows update, you can look for any new pending updates. Most of the time, Windows tends to provide a fix for any faulty updates.
So, it can also solve the issue of the PC not detecting networking hardware.
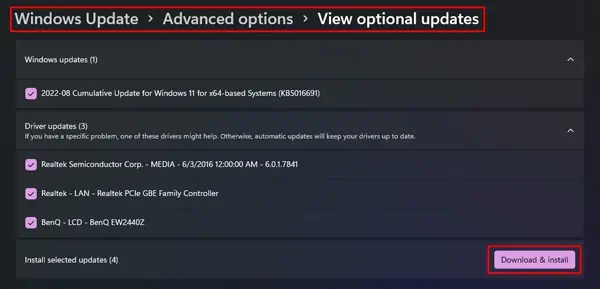
- Go to Windows Update and click Install all to complete all the pending updates.

- Again, go to Advanced Options.
- Click on Optional updates.
- If there are any updates there, install them all.

Observe if the problem has been solved now.
Remove Registry Entry of VPN
If you have installed a Virtual Private Network (VPN) in your system, then it may be the culprit. The VPN connection instance may have made use of the adapter, causing the system to not detect it.
It usually happens if you use any unsupported VPN on your PC. Thus, the problem should get solved when you uninstall the third-party VPN program. However, it may not always work. The VPN may have installed DNI_DNE on your computer, which may be causing the interference.
So, you will have to remove it. But first, you need to check if the DNI_DNE is installed on your PC.
- Open the Run dialog box using Windows + ‘R’.
- Enter cmd and press Ctrl + Shift + Enter to load Elevated Command Prompt.
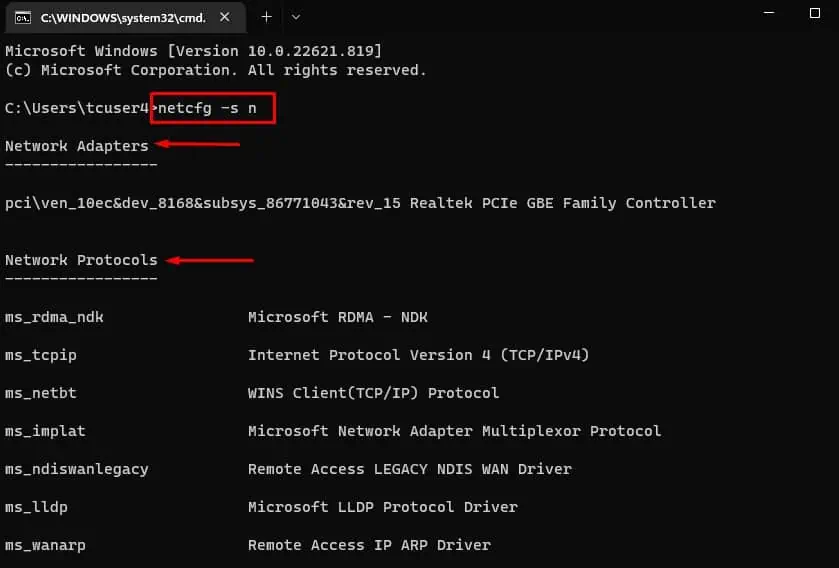
- Type
netcfg -s nand hit Enter. It will list all the network protocols and services installed.
If there is no DNI_DNE in the list, then you can move on to the next fix. However, If you find it there, let’s move on to remove it.
- Type the following commands one by one in the Command Prompt.
reg delete HKCR\CLSID\{988248f3-a1ad-49bf-9170-676cbbc36ba3} /va /fnetcfg -v -u dni_dne
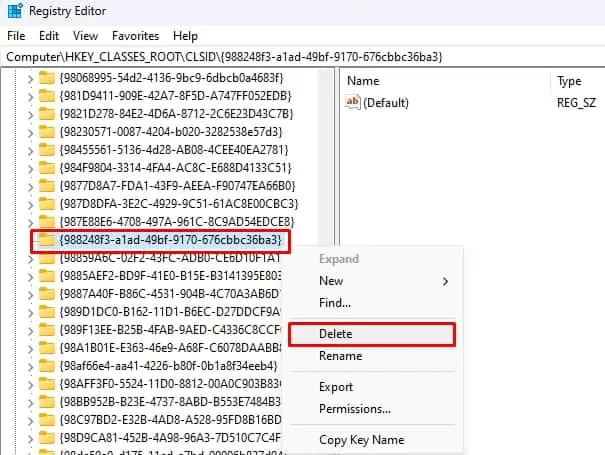
If you are not able to delete the registry from the above command, you will have to do it manually from Registry Editor.
- Press Windows + ‘R’ and type
regeditto open Registry Editor. - Navigate to
Computer\HKEY_CLASSES_ROOT\CLSID. - Find the key
{988248f3-a1ad-49bf-9170-676cbbc36ba3}. - Right-click on it and select Delete.

Restart your PC and see if the problem is solved now.
Set Power State for Network Adapters to Maximum
Windows have the feature to turn off the hardware device or run them in low-power mode when not in use. If this feature is on, then the system may not be able to detect the network hardware.
Thus, you should set the device to operate in a high-power state.
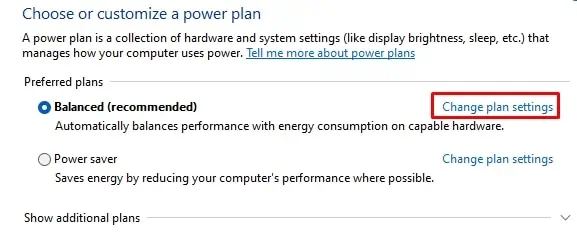
- Press Windows + ‘R’ and type
powercfg.cplto open Power Options. - Click on Change plan settings at the side of the current power plan of your PC.

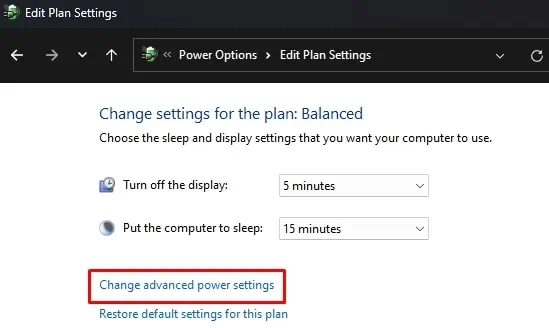
- Go to Change advanced power settings.

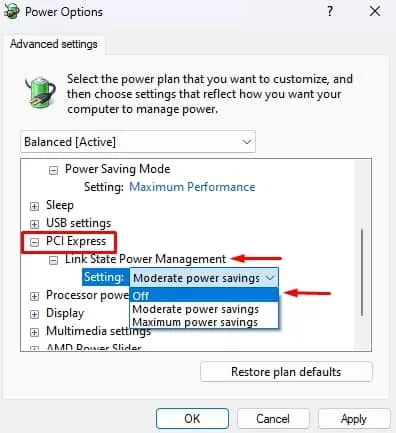
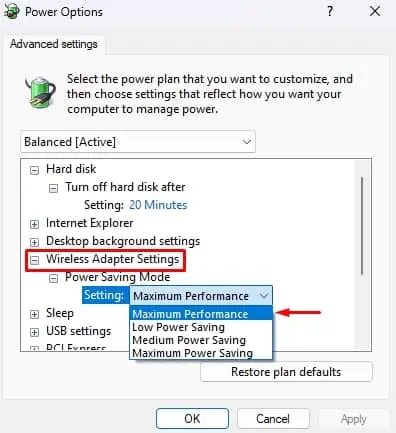
- Find PCI Express and go to Link State Power Management.
- Change the Settings to Off or Moderate Power Savings.

- If the problem is associated with the Wireless network adapter, find Wireless Adapter Settings.
- Set the Power Saving Mode to Maximum Performance.

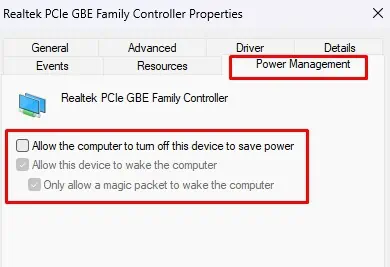
Similarly, you can also disable the ability of the system to turn off the network adapter.
- Press Windows + ‘R’ and type
devmgmt.mscto open Device Manager. - Expand Network Adapters and double-click on the troubling device.
- Go to the Power Management tab and uncheck Allow the computer to turn off this device to save power.

Observe if the error still persists.
Use External Network Card
If nothing works out, then there are probably some hardware issues with your network device. So, you can obtain an external network card or dongle that can be used to do the same job as the internal one.
You should be able to connect to the network through the new card now.

