When your Chrome is crashing often, observe its behavior first. For instance, if it only opens for a certain period and crashes or doesn’t open at all, could determine the severity of the problem. If Chrome is only crashing while downloading something, it could mean that the download file is faulty or not compatible.
Luckily, this error is due to common reasons and you can try some simple fixes for it. So, let’s move on to learn more about why your Google Chrome is crashing and how to fix it.
Why is My Google Chrome Crashing?
If the case isn’t severe, simple causes might just be high resource usage. But if it’s severe, there could be malware in your browser. Nevertheless, Chrome can crash for a variety of unknown reasons as well. The following potential causes might be behind Chrome crashing.
- Potential malware
- Outdated version
- Corrupted cache files
- Too many tabs are open
- Many apps are running in the background.
- Low RAM on your PC
How to Fix Google Chrome Crashing?
Prior to applying the solutions below, let’s try some basic tricks to get Chrome working again. Try restarting the browser and your PC as well. Press the keyboard shortcut Alt + F4 keys to exit Chrome. Now, restart Chrome. If you’re on a Mac, you can press the Command key + Q.
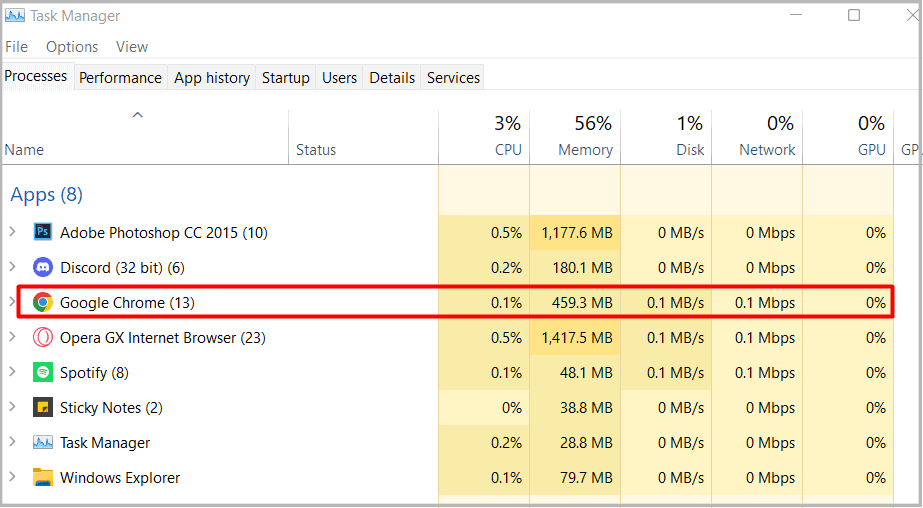
You can also try force-ending Chrome from the task manager. Press the keyboard shortcut Ctrl + Shift + Esc to open Task Manager. From the list of apps, select Google Chrome and right-click on it. Click on End task.
If the above basic fixes are still not helping, we can move ahead to further solutions.
Close all Tabs, Background Processes, and Startup Apps
If you have a lot of tabs open in your browser and a lot of programs running in the background, this can cause Chrome to crash. If you visit your Task Manager, you can notice that Chrome usually has a very high resource usage.
It also depends on your processor and the size of your RAM. If your PC has low RAM like 2 to 4 GB and you have multiple heavy programs running, your computer will cause even Chrome to fail to load. This is because your computer’s capacity is unable to process all apps and programs at once.
So, to fix this problem, you can start by closing all unwanted tabs from your Chrome. Then, end all background processes from the Task Manager and also disable programs at Startup. Here’s how you can do it:
For Background Processes
- Open Task Manager by pressing the keyboard shortcuts Ctrl + Shift + Esc.
- Below the Processes section, you can view all the background processes.

- You can select the apps that are consuming a lot of power. Right-click on it and click on End Task.
For Startup programs
This is where you can view which programs automatically run when you start your PC. If there are a lot of programs enabled in Startup, this can also contribute to the high resource usage, causing Chrome to crash. So, you can disable some programs you don’t need in the Startup process.
- Go to the Startup tab in the same Task Manager window.
- Simply right-click on any program and click on Disable.

Delete Chrome App Data
This is another solution that’s similar to resetting Chrome. You can delete all the Chrome app data from the local C drive. This will make Chrome restart as brand new. Although you’ll lose some temporary data, your passwords will remain saved. So, here’s how you can do it:
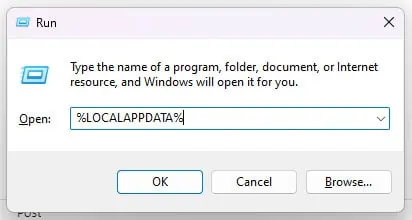
- Press Win + R keys to launch the Run dialog box.
- Enter “%localappdata%” to open the AppData folder.

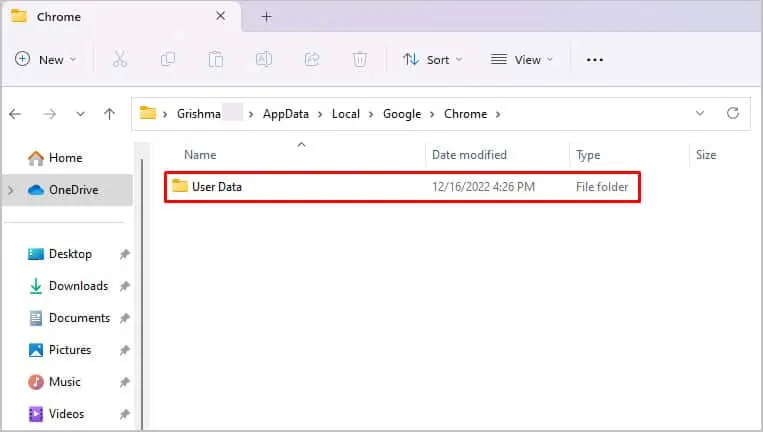
- Double-click on Google.
- Then, go to the Chrome folder.
- You’ll notice a folder named User Data. Open the folder and delete all files.

Now, when you restart Chrome, it’ll start creating new data.
Uninstall Chrome Extensions
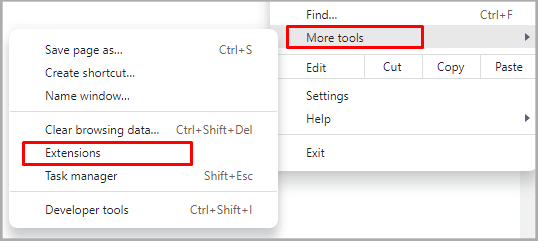
Extensions are fun to use but not all of them are safe for your browser. Some suspicious extensions can have bugs, corrupted files, or even viruses. So, we recommend uninstalling such extensions from Chrome. Here’s how you can do it:
- Click on the three dots in the top-right corner to open the menu.
- Select More Tools.
- Then, click on Extensions.

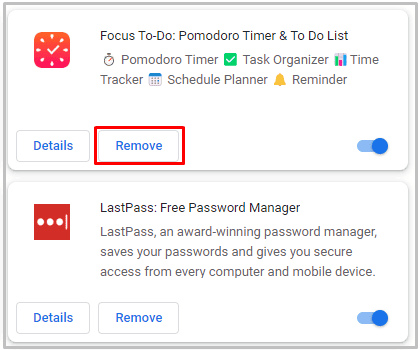
- Select an extension and click on Remove.

If you’re having a hard time figuring out which extension to remove, try checking the info on the Chrome Web Store. Look for the extensions in your list and check the reviews. You can also check the ratings and the number of users. Finally, click on the owner as well in the Offered by section. This way, you can get more information on whether the developer is reliable.
Delete Cache Files
Cache files are the recorded documents of your browsing data that help to load websites quickly. However, it’s important to clear them regularly. This is because such piled-up data can get corrupted after a long time and affect the performance of your Chrome browser. So, here’s how you can clear cache files on Chrome:
- Open Settings by clicking on the three dots in the top-right corner.
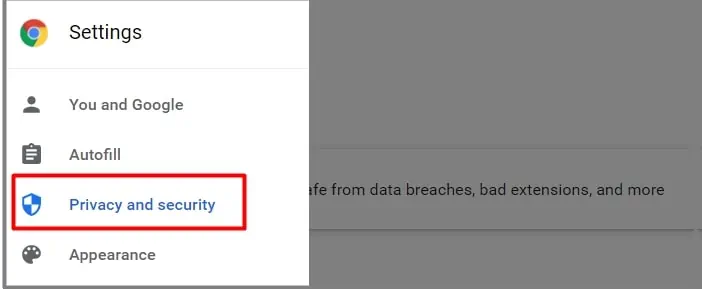
- From the left side, select Privacy and Security.

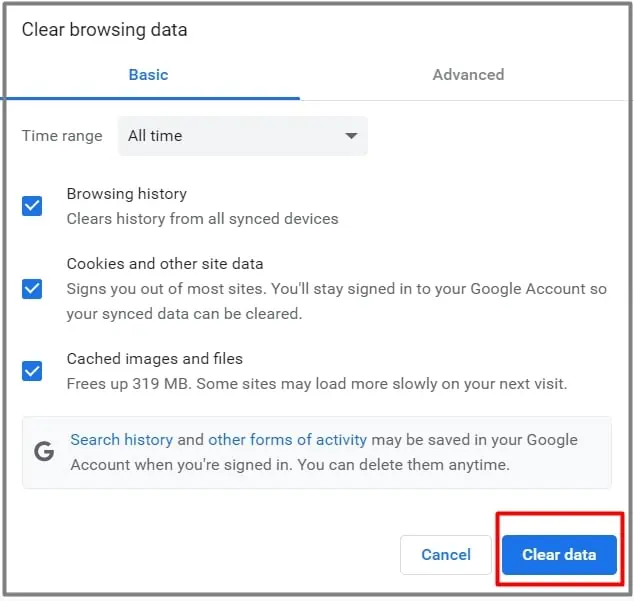
- Select the Clear browsing data option.
- Select Browsing history, cookies, other site data, and Cached images and files. You can also select the time range of these data.

- Now, click on Clear Data.
If you’re using Chrome on Mac, you can follow these steps to clear Cache data.
- Launch Safari and go to History.
- Click on Clear History and open the menu.
- Click on Delete Data from your desired timeline.
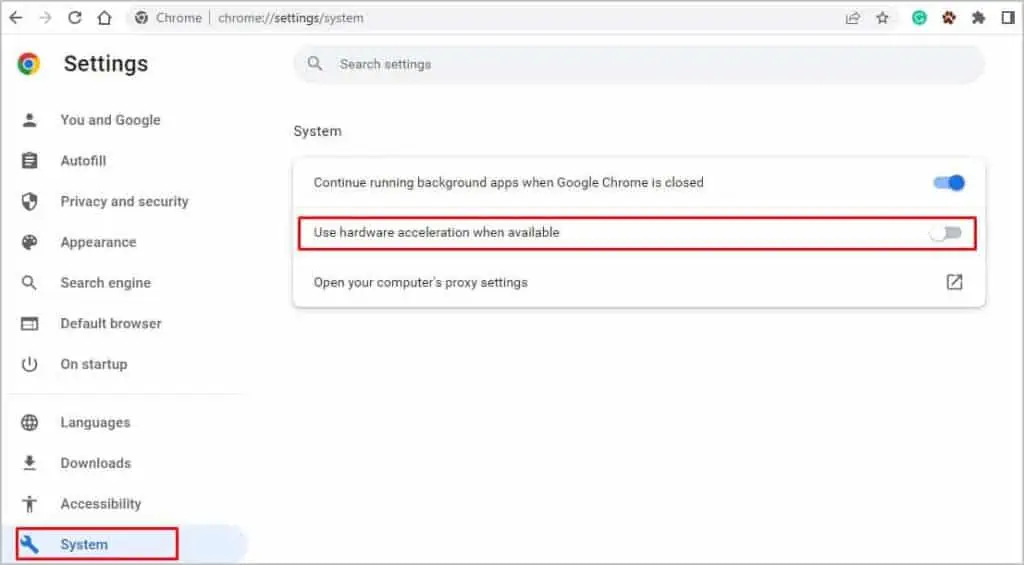
Disable Hardware Acceleration on Chrome
Hardware Acceleration is when your computer software gives out tasks to the hardware components to improve your PC’s performance. This option is always on by default. But, there can be issues like the Chrome browser crashing when the settings send tasks to the GPU instead of the CPU.
In such cases, you can turn off the Hardware Acceleration. Here’s what you’ll need to do:
- Go to the Settings.
- Click on System.
- On this page, you’ll see the option that says Use Hardware Acceleration When Available. Simply turn the option off.

- Now, you can restart Chrome.
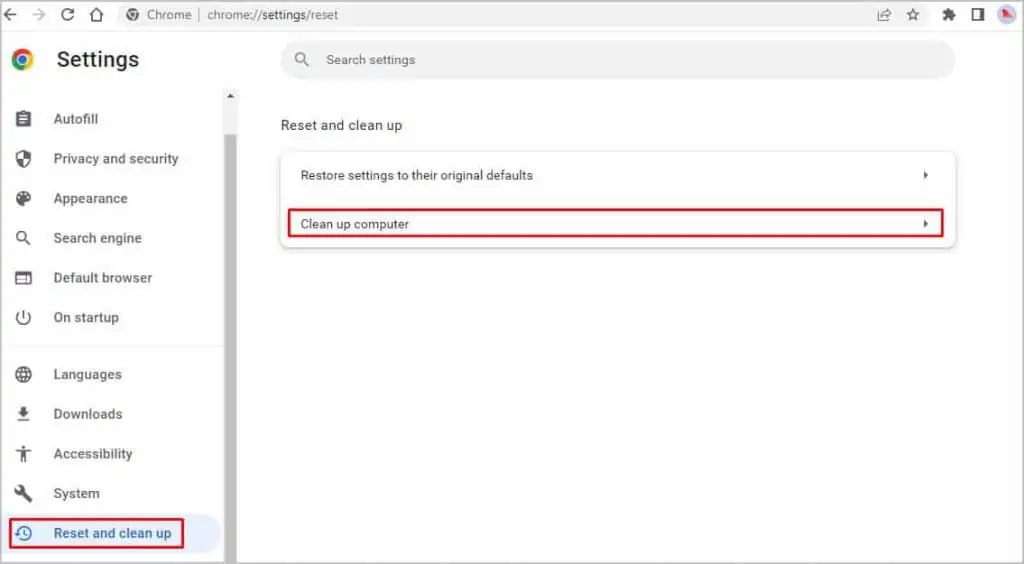
Search and Remove Harmful Software Using Chrome
Some harmful software can also be the reason behind Chrome crashing. So, you can search for them and remove them using Chrome. Here’s how you can do it:
- Go to Settings and click on Reset and Clean up.
- Click on Clean Up Computer.

- Next to Find harmful software, click on Find.

Use Antivirus Software
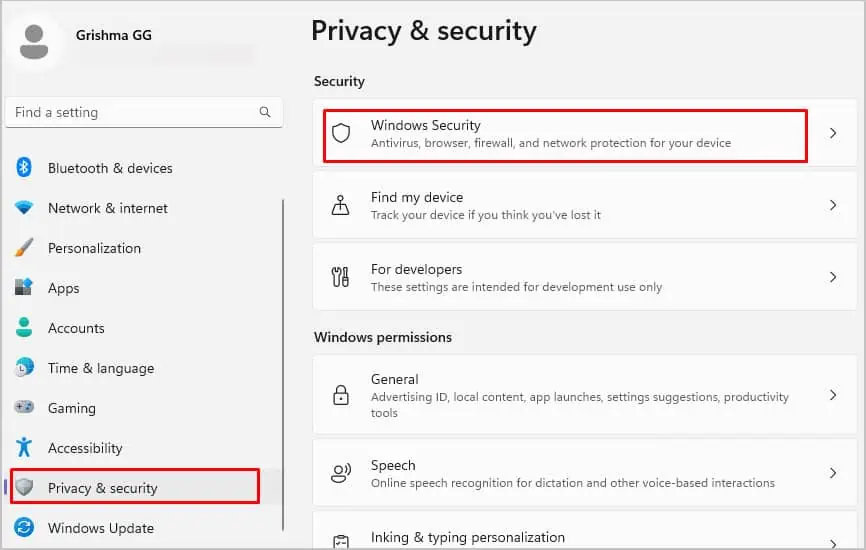
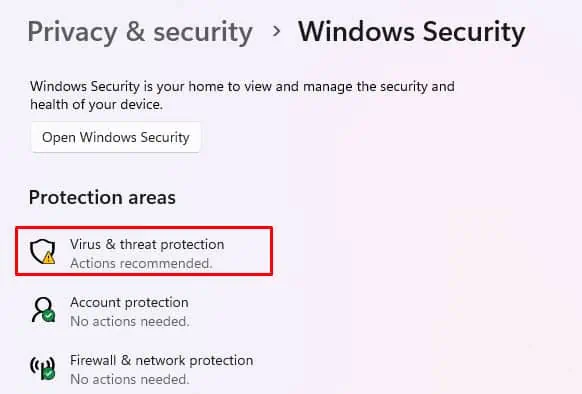
One of the final solutions is scanning for viruses. Such unusual glitches in Chrome can also occur due to viruses. So, if you’re on Windows, you can use the following methods to scan for viruses.
- Go to Settings and click on Privacy & Security.
- Click on Windows Security.

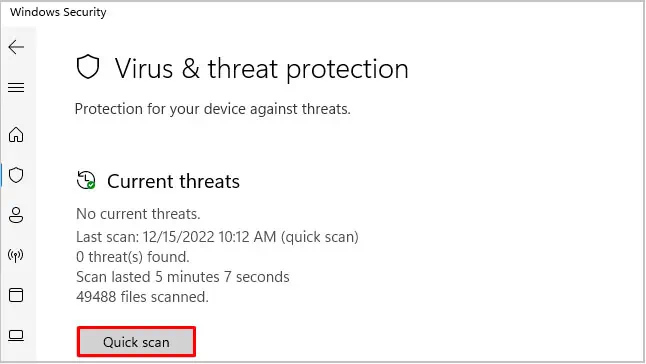
- Select Virus and Threat Protection.

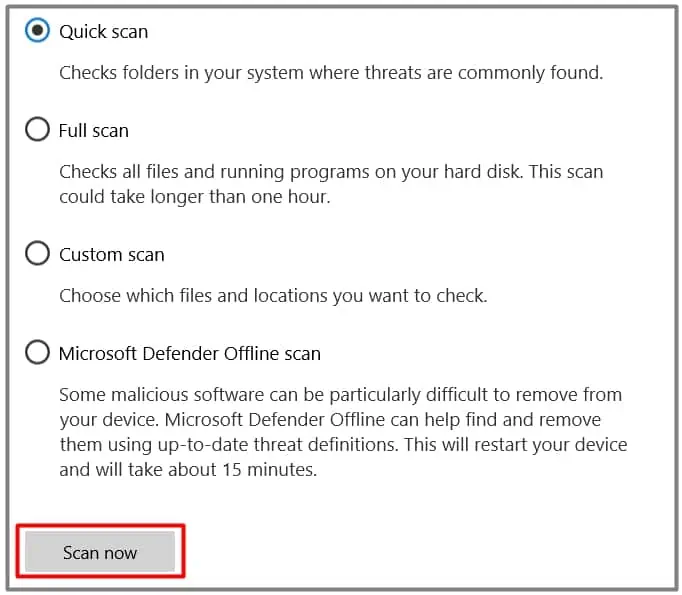
- Click on Quick Scan. If you want more options, click on Scan options.

- Then, choose either a Full scan, Custom Scan, or Offline scan, and then click on Scan now.

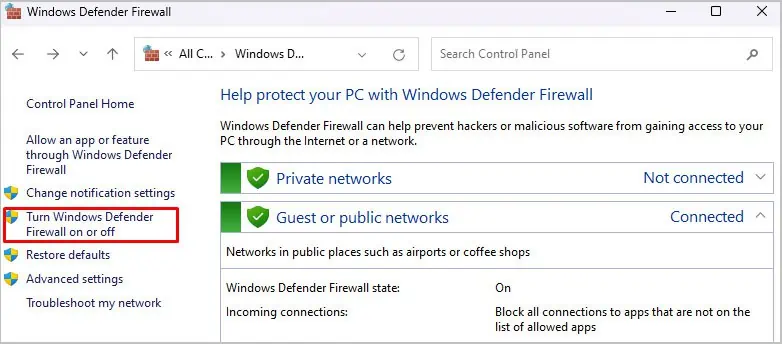
If you want to protect your browser from future threats, you can turn on Windows Defender Firewall.
- Open the Control Panel.
- Click on Windows Defender Firewall.
- From the left panel, click on Turn Windows Firewall on or off.

- For both Private and Public network settings, click on Turn on Windows Defender Firewall.
- Click on OK.
You may also use any premium software if you prefer.
Update Chrome
Lastly, you can also try updating Chrome. Since outdated versions can be more prone to minor glitches and crashes, updating Chrome can help fix such issues. Usually, Chrome updates itself automatically. However, you can also manually check and install any available updates. Simply go to Settings > Help > About Chrome.
Uninstall and Reinstall Chrome
If no solutions are working for you, you can try uninstalling and reinstalling Chrome. Doing so will help clear up any minor bugs. Here’s what you’ll need to do:
- Open Control Panel.
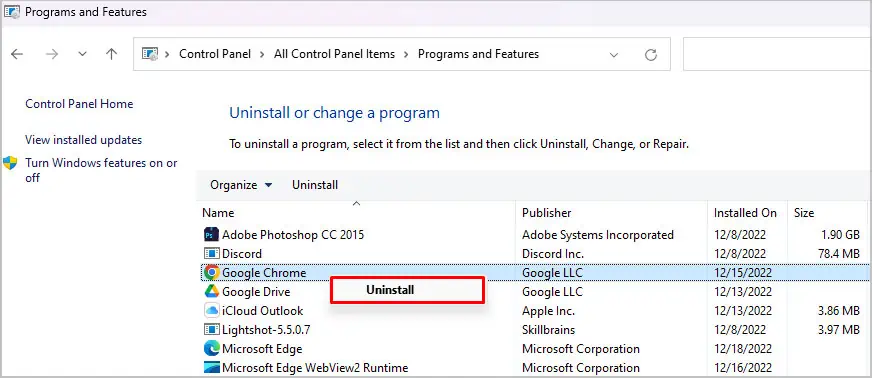
- Go to Programs and Features.
- Now, you can view the whole list of programs on your PC.
- Right-click on Google Chrome and click on Uninstall.

- To reinstall Chrome, download this installation file.
- Once the setup file is downloaded, click on Install Anyway.

