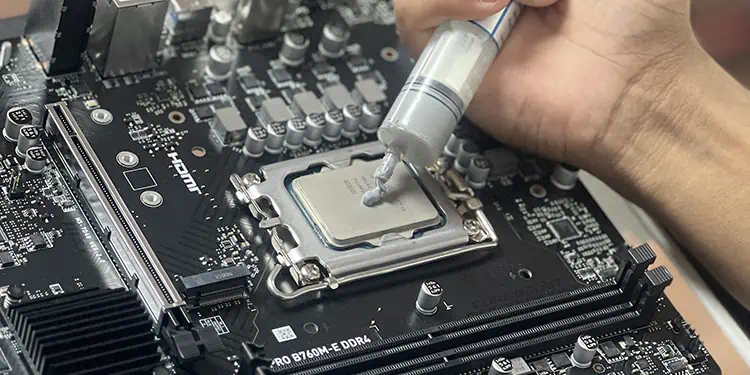
Applying different amounts of thermal paste onto the CPU will give slightly different results. So, it is important to use a suitable amount to get the lowest CPU temperature possible.
The ideal amount of thermal paste on a CPU is sufficient to spread over evenly, forming a very thin layer that covers the surface without spilling over to the sides. This amount can vary depending on the type of thermal paste and the size of the CPU’s Integrated Heat Spreader (IHS).
In this article, I’ll go through all the considerations that go into determining the best thermal paste amount. Then, I will show you a few tests I did to help you get a better idea before giving any conclusion.
General Considerations for Thermal Paste Amount
To decide on the most suitable thermal paste amount for your CPU, first, you need to understand how the amount matters and what other factors affect it.
The amount directly impacts the heat dissipation or thermal conductivity of the interface. Both the quality of the paste and the size of your CPU IHS/die affect how much paste you’ll need. Let’s discuss all of these in detail.
Thermal Conductivity
If the CPU IHS surface perfectly matched with the heatsink, there would be no need for the thermal paste. However, even for new devices, their surface is not even at a microscopic level.
So, if you place a heatsink onto a CPU without any thermal interface material, many pockets of air will remain between them. The air increases the overall thermal resistivity of the cooling system, and your CPU will start overheating, thereby affecting its lifespan and performance.
The thermal paste is supposed to fill all these gaps and provide the much-needed thermal conduction between the CPU and the heatsink. So, the amount of the paste needs to be enough to completely cover the surface of the CPU to maintain proper heat dissipation.
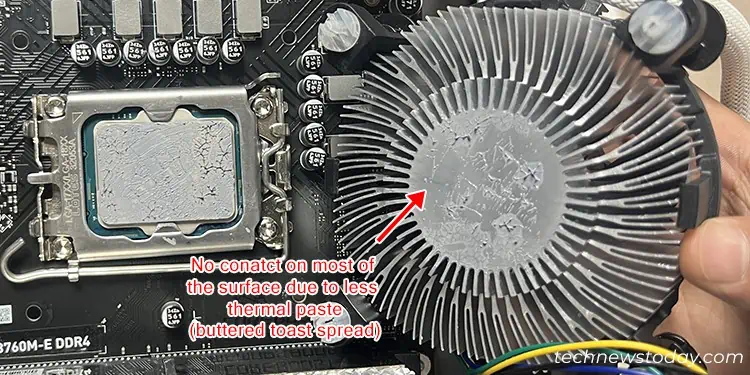
On the other hand, the thermal paste itself is nowhere near as thermally conductive as the metal in the IHS and the heatsink. It is just better than air in this regard.
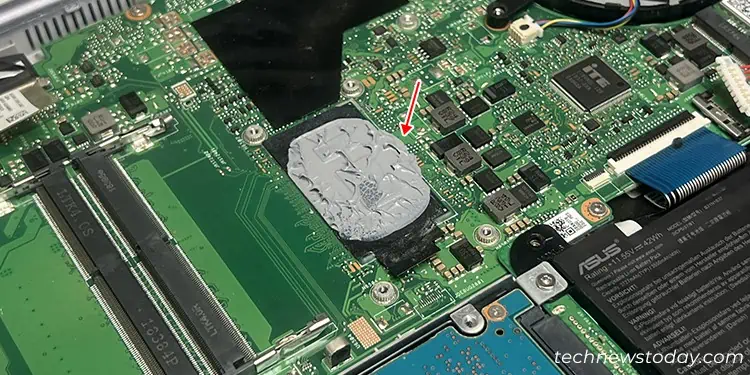
So, too much thermal paste is also not an ideal option as it will just deteriorate the cooling process. A thick layer may also introduce some air bubbles because of more surface irregularities in the paste.
What’s more, if you apply an excess amount of paste, it will squeeze out to the motherboard or CPU socket due to pressure from the CPU cooler. If you use any electrically conductive pastes like metal or liquid metal-based ones, they can cause short circuits and fry your motherboard.
Type and Quality of Paste
Different types of thermal pastes have different ranges of thermal conductivity. Metal-based ones provide higher thermal conduction but come with the drawback of being electrically conductive.
Ceramic, Silicon, or Carbon-based pastes don’t have such drawbacks, but they offer much lower thermal conduction. So, having a thicker layer or metal-based thermal paste is not as bad as having a similar layer of other such pastes.
For these conventional thermal pastes, a layer of 0.5mm is a good amount. For higher-quality ones, you can go up to 1 mm without losing much performance.
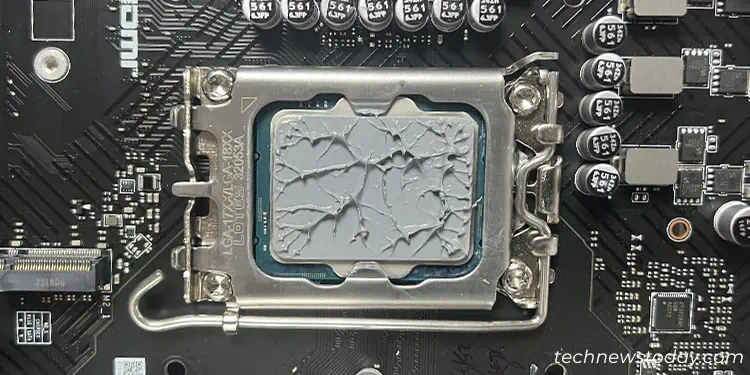
The viscosity of the paste also matters as it determines how much the paste can spread due to pressure from the heat sink.
A more viscous paste does not have much risk of spilling to the motherboard, but it accumulates in a smaller area and increases the thickness of the paste layer. So it actually introduces more thermal resistivity.
Presence and Size of IHS
The Integrated Heat Spreader (IHS) of the CPU has a larger area compared to the CPU die to increase the overall surface of heat dissipation. Consequently, it requires a correspondingly larger amount of paste to cover all the area.
If you have delidded the CPU (or for the laptops), a smaller amount of the paste is enough to cover all the surface of the CPU die.
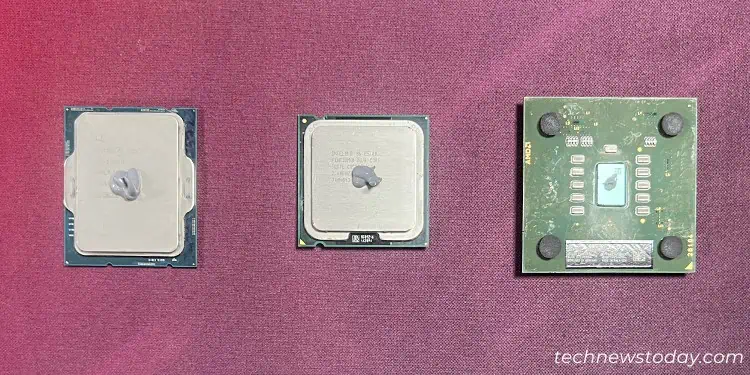
Also, the size of IHS will vary depending on the CPU’s socket size. CPUs with larger sockets have correspondingly larger IHS, so they require more thermal paste.
Testing Out Different Amounts
I’ve covered everything you need to know to determine the right amount of paste for your situation. Now, I’ll be showing you a practical test I conducted to explore those points even further.
In this test, I used different amounts and patterns of thermal paste on my CPU under the same ambient temperature and other environmental conditions.
The test was to monitor the CPU temperature when the computer is only running background processes and during a CPU stress test. I used an open-air computer test bench as I needed to replace the thermal paste many times.
While it doesn’t provide a proper representation of what would happen inside a CPU case, I still think it is enough to show how the different amounts would affect the CPU cooling process.
I used the following components for this test:
- CPU: Intel i3-12100 (LG1700) (non-overclock)
- Motherboard: MSI PRO B760M-E DDR4
- CPU Cooler: Intel Stock Air Cooler
- Thermal Interface Material: FidgetGear HC-151 Thermal Grease Paste
Note: These tests may not represent the hard and fast rule of applying the paste in all scenarios. It is simply what I experienced in my setup.
Also, I used my own labels to better explain the difference in amount and pattern. I have provided pictures of how the paste looked before and after the installation of the cooler as well. So please rely on those instead of the names.
Test 1: Small Dot
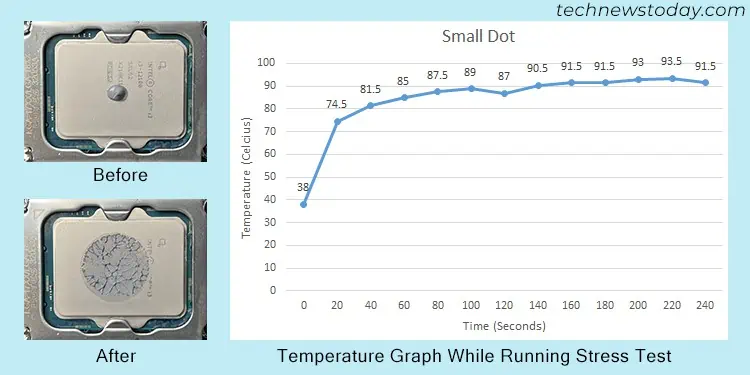
- Average Idle CPU temperature: 38°C
- Average CPU temperature on 100% Usage: 91.5°C
Test 2: Medium Dot
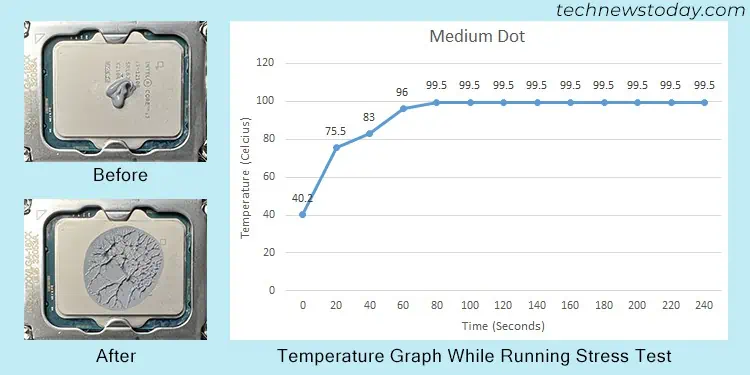
- Average Idle CPU temperature: 40°C
- Average CPU temperature on 100% Usage: 99.5°C
Test 3: Large Dot
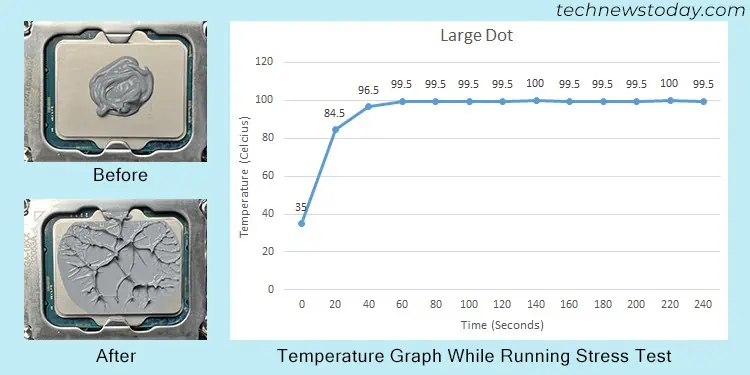
- Average Idle CPU temperature: 35°C
- Average CPU temperature on 100% Usage: 99.5°C
Test 4: Small Spread (Similar Amount as Small Dot)
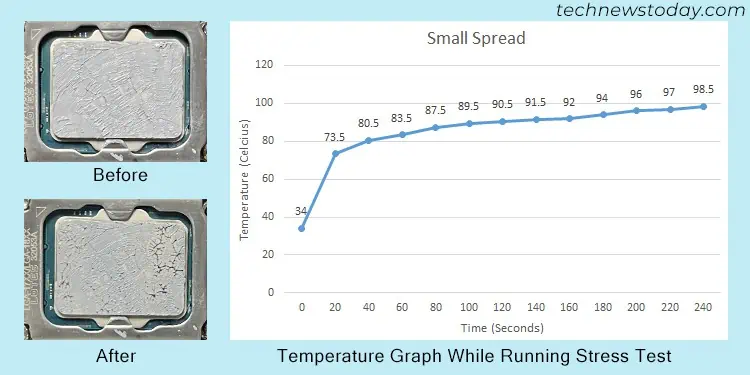
- Average Idle CPU temperature: 34°C
- Average CPU temperature on 100% Usage: 97°C
Test 5: Medium Spread (Similar Amount as Medium Dot)
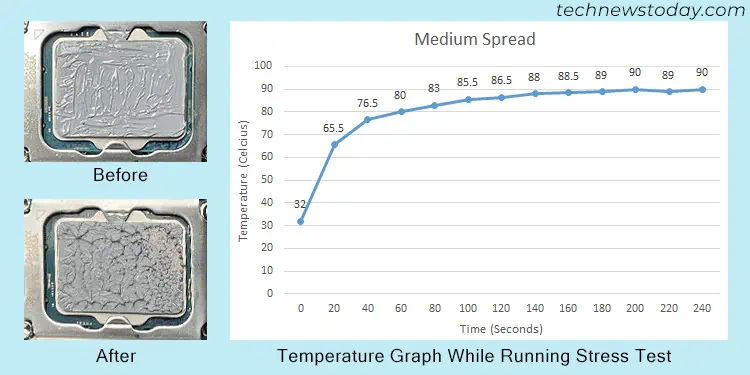
- Average Idle CPU temperature: 32°C
- Average CPU temperature on 100% Usage: 89°C
Test 6: Large Spread (Similar Amount as Large Dot)
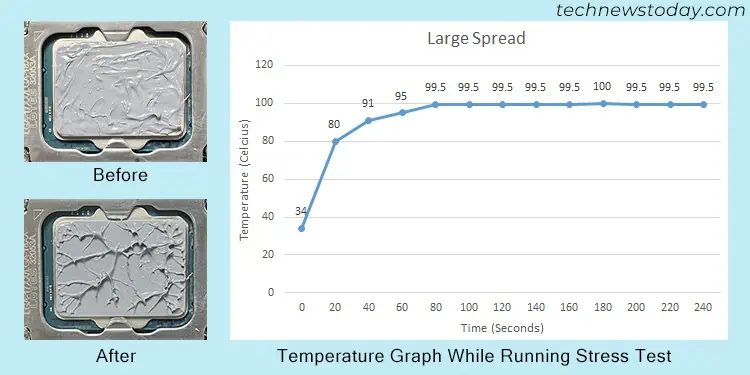
- Average Idle CPU temperature: 34°C
- Average CPU temperature on 100% Usage: 99.5°C
Test 7: Small Cross
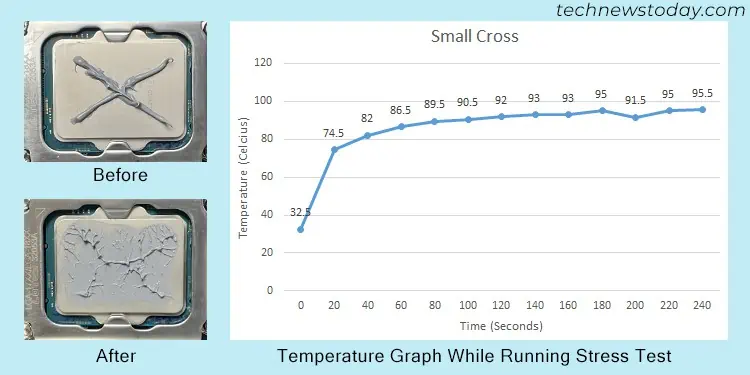
- Average Idle CPU temperature: 32.5°C
- Average CPU temperature on 100% Usage: 95°C
Test 8: Larger Cross
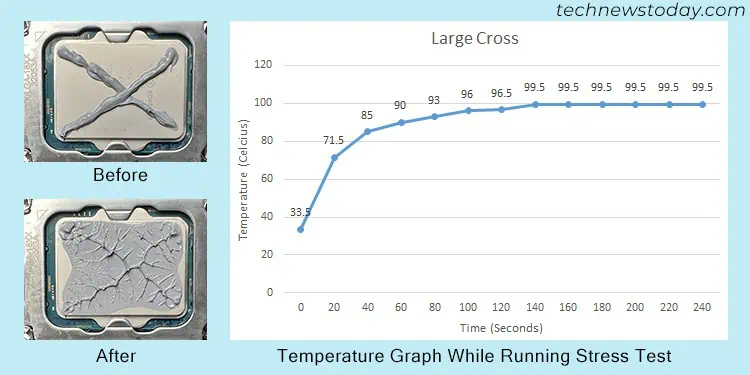
- Average Idle CPU temperature: 33.5°C
- Average CPU temperature on 100% Usage: 99.5°C
Conclusion
From these tests, we can conclude the following outcomes:
- If we just look at the dot patterns, the smallest one gave the best results compared to others even though it spread over a very less surface. It was likely because it didn’t introduce more thickness and, consequently, more thermal resistivity. The thermal paste I applied with an X or cross shape follows the same pattern.
- For the butter toast spreads, the spread with the least amount did not contact all the area of the cooler, and the larger spread was too thick. So, the spread with a medium amount of paste gave the best result.
- Even with a very similar amount of paste, the medium spread gave better performance than the corresponding dot pattern. It is because the paste maintained contact over all the surfaces of the CPU and the cooler without introducing as much thickness as the latter.
- But its performance was much closer to that of the small dot. We can assume that the amount of paste was still a little bit too much. Decreasing it but keeping it slightly above the small spread amount might have given a better performance.
- While there is a difference in performance between all tests, it is not that much. When only running background processes, the temperature remained between 32 and 35 for most tests. On the first two, it was slightly higher (38-40) since they had the worst paste spread area.
- Even under 100% CPU usage due to the stress test, different amounts only showed a temperature difference of less than 10°C.
How Much Thermal Paste Do You Need for a CPU?
After understanding the general considerations and going through my test results, you may have an idea of how much thermal paste you need.
To give a brief overview, the amount of the paste depends on the size of your CPU and the type of the paste. You simply need to get the thinnest possible layer while covering the complete surface of the IHS or CPU die after installing the cooler. So choose a proper pattern as well.
I recommend you try different amounts of pastes, install the cooler, and then remove it again. Then, you can judge how much you’ll need from its spread and thickness. After that, you can use your best amount and pattern whenever you reapply the same paste to the same CPU.
The temperature difference may not be that much, with a slight difference in amount. But it’s always better to get the most out of your CPU, especially if you are overclocking it.
