It’s always good to regularly backup your iPhone, especially if you fear losing your crucial data to system malfunction.
However, backups can take up large amounts of storage space. So, if you don’t have enough iCloud storage or don’t want to fill up your PC space, you have the option to back up your iPhone to an external hard drive.
So, without further ado, let’s dive right into learning how to transfer all your iPhone data to an external hard drive.
How to Backup iPhone to External Hard Drive?
Depending on your device, you can apply different methods to backup your iPhone to an external hard drive.
The older macOS system will require you to back up your iPhone with the iTunes application. But, with the latest macOS versions, you don’t need any assistance from iTunes because the backup feature is in-built into the operating software.
Backup through Finder
If you’re running on iOS 13 and macOS Catalina or the later versions, the backup process from transferring your iPhone data to your mac device is reasonably straightforward. Instead of relying on the iTunes application, you can now directly backup through your Finder application.
Here is how you can do it.
Step 1: Backup iPhone to Mac
- Connect your iPhone and external hard drive to your Mac.
- Locate Finder on the dock or use the shortcut Command + Spacebar to open Spotlight Search and type in Finder.
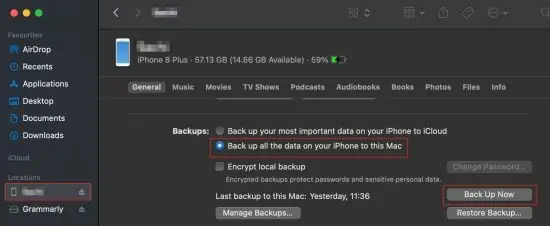
- From the left panel, head over to the Location section and select your iPhone.
- Under the General tab, check the option for Back up all the data on your iPhone to this Mac.

- Tap on the Trust Computer button on your iPhone, if necessary.
- Now, click on the Back Up Now button.
Step 2: Locate and Transfer iPhone Backup to Hard Drive
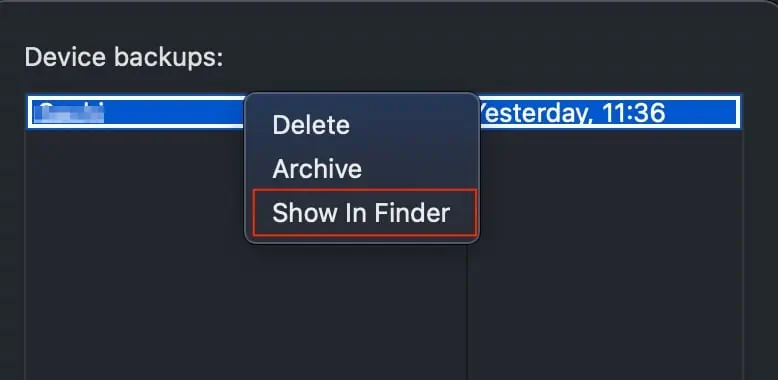
- After the process is complete, click on the Manage Backups button.
- Control-click on your backup and select the Show in Finder option.

- Control-click on your backup folder and select the Copy option.
- Locate your external drive from the left panel and hit Paste.
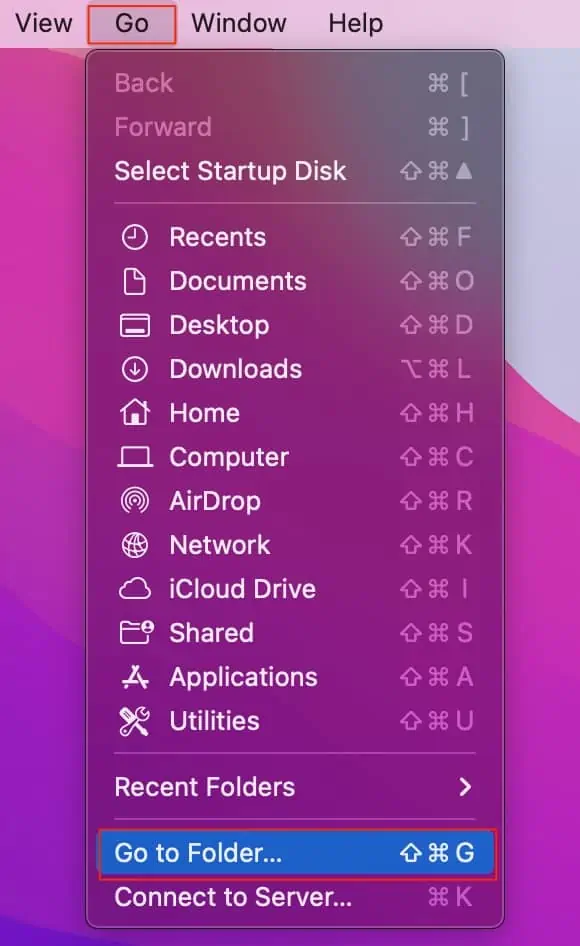
- Alternatively, you can also navigate to the Go menu and select the Go to Folder.

- Paste the following path:
~/Library/Application Support/MobileSync/Backup - Now, copy and paste the folder onto your external hard drive.
Backup with iTunes
With the older versions of the macOS and Windows PCs, you will have to download the iTunes application. This process is similar to that of backing up from the Finder application. Here is how you can do it.
Back Up iPhone to PC
- Open your iTunes app on your Windows or Mac.
- Now, connect your iPhone and external hard drive through a USB cable.
- Click on the Device icon on the top left corner.

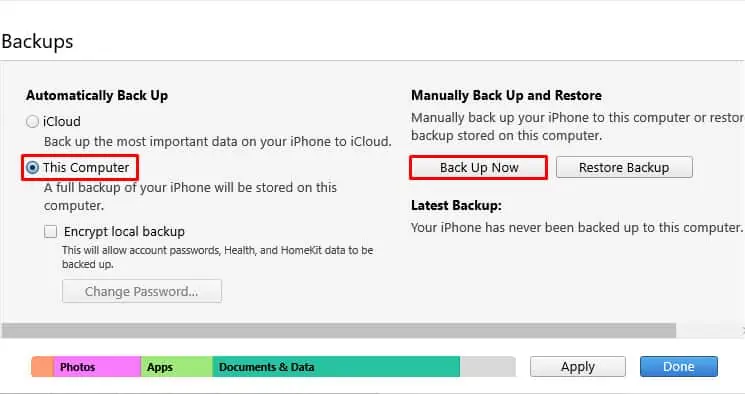
- Under the backup section, check the option for This computer.
- Next, click on the Back up Now button.

Locate and Transfer Backup to Hard Drive
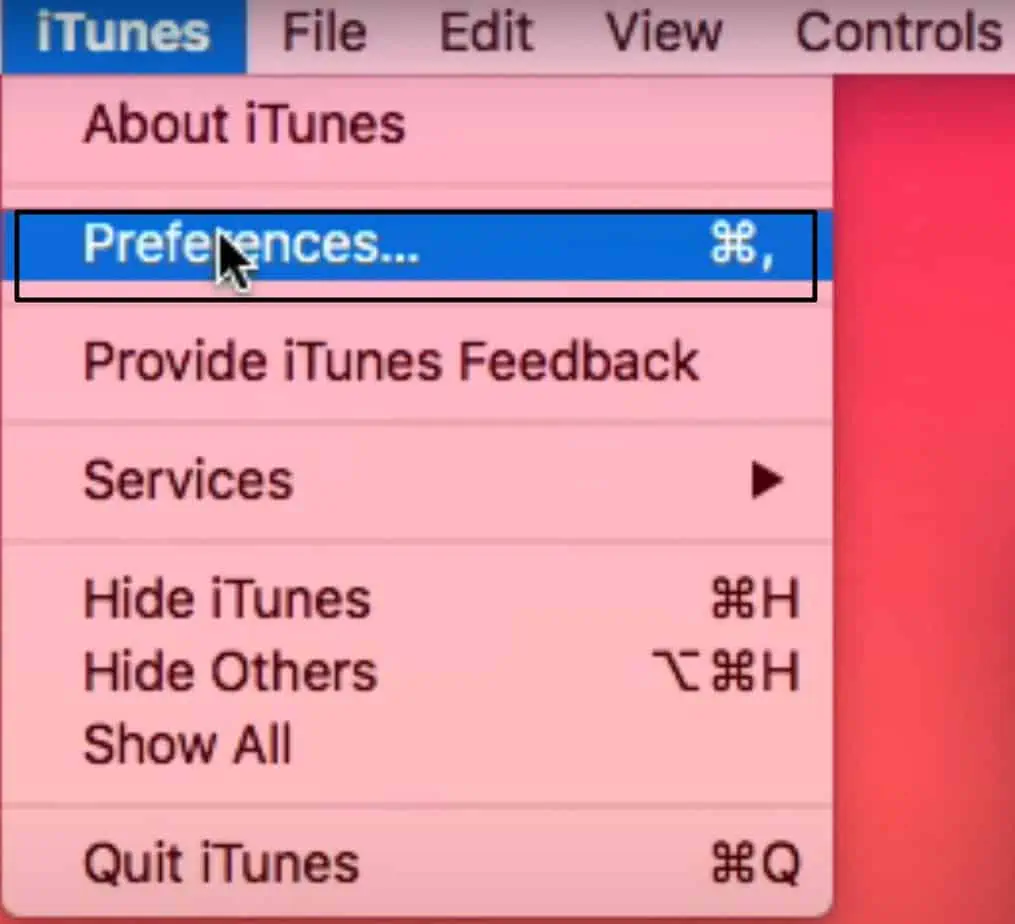
- After the backup process is complete, click on iTunes from the top menu bar.
- Select the Preferences option.

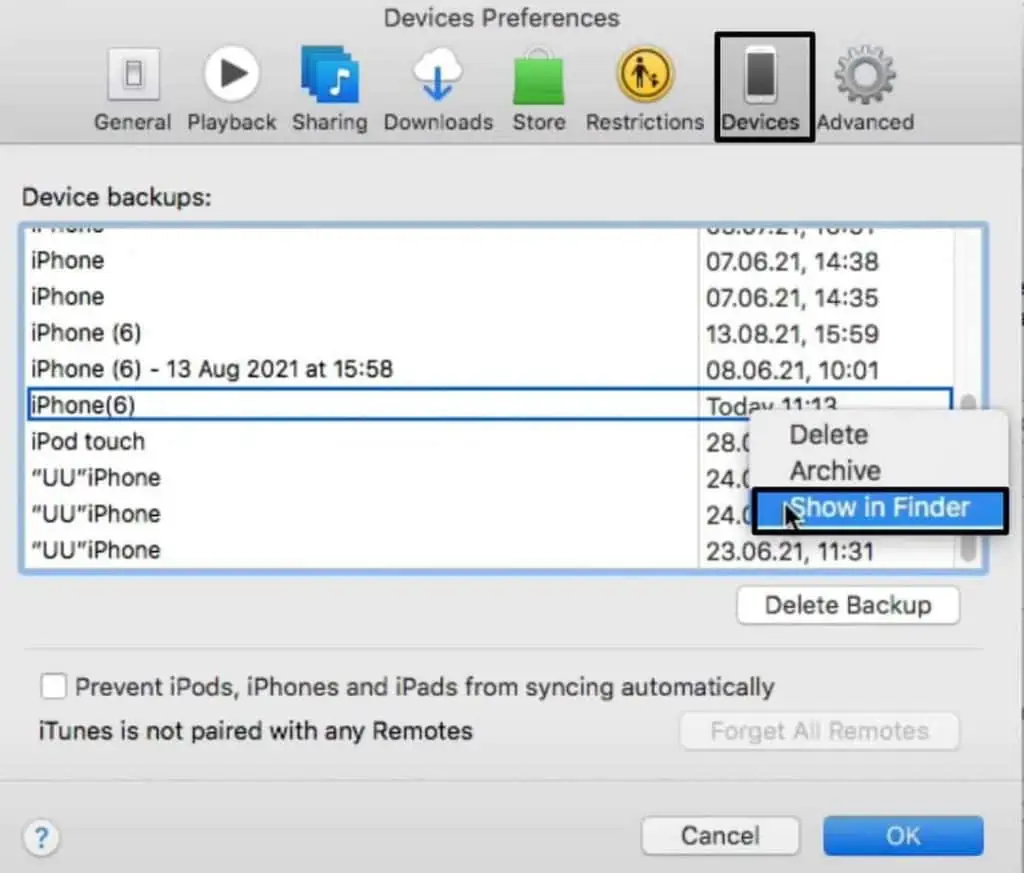
- Switch to the Devices tab and choose the backup you have made.
- Right-click on the backup and select the Show in Finder option.

- If you’re using iTunes on Windows, locate the backup through this path:
\User\(username)\AppData\Roaming\Apple Computer\MobileSync\Backup\ - Copy the backup folder.
- Click on your external hard drive.
- Choose or set up a new folder and paste the backup item on your external drive.
Use Third-Party Applications
If the above backup methods seem too tedious and long, you can opt to back up your iPhone through third-party applications. Many of these applications are free, but you will need to upgrade to the premium version to access the full functionality. Some of the more popular backup apps for iPhone include SyncBird Pro and Dr.Phone.
How to Backup iPhone Photos to an External Hard Drive Without a Computer?
If you want to backup your iPhone without a computer device, you can directly connect your iPhone to the external hard drive. But, you will require a USB-C connector or an adapter for this method.
If you have the connector, here are some steps you can follow.
- Connect your external drive to your iPhone.
- Now, head over to the Files app.
- Select the files or photos you would like to transfer.
- Now, save the photos to your external hard drive.
How To Change your Backup location?
By default, all your iPhone backups are stored in the same location. However, if you want to change your backup location, you will have to create a symbolic link.
Here is a step-by-step guide on how you can do it.
On Mac
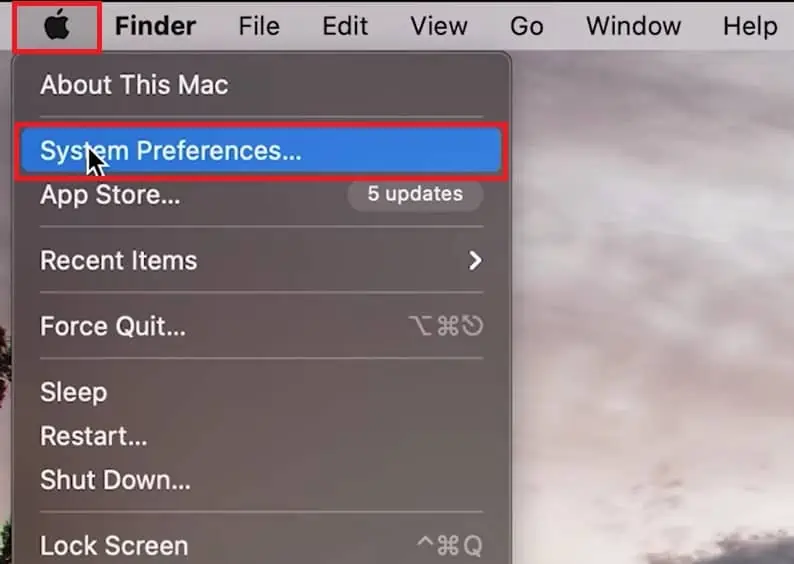
- Navigate to the menu bar and click on the Apple logo.
- Select the System Preferences option.

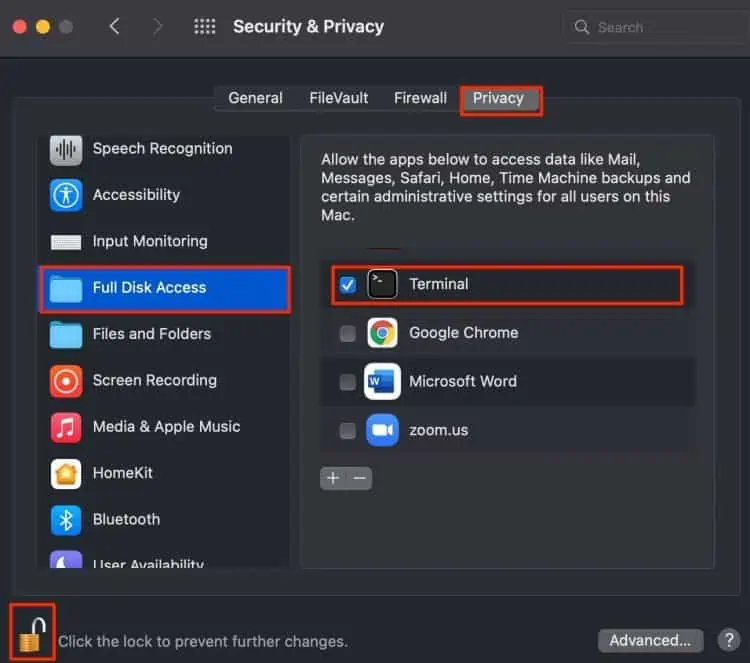
- Double-click on the Security and Privacy option.
- Switch to the Privacy tab and click on the Lock icon in the bottom corner.
- Enter your Mac’s password.
- From the left panel, select the Full Disk Access folder.
- Check the option for Terminal.

- If the Terminal Utility is not on the list, click on the + icon to add the Utility.
- Now, launch Terminal.
- Paste the following command on your window.
ln-s /Volumes/ExternalHarddiskName/ios_backup ~/Library/Application\ Support/MobileSync/Backup/
On Windows
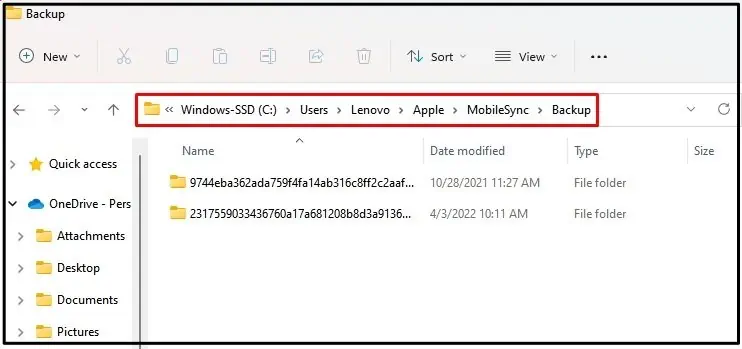
- Locate the backup location on your PC.
If you have downloaded iTunes from browser:C:\users\{USERNAME}\AppData\Roaming\AppleComputer\MobileSync\Backup
If downloaded from Microsoft store:C:\users\{USERNAME}\Apple\MobileSync\Backup
- Once you find your backup location, rename the folder.
- To transfer the file to a new location, open and create a new folder on the new drive location.
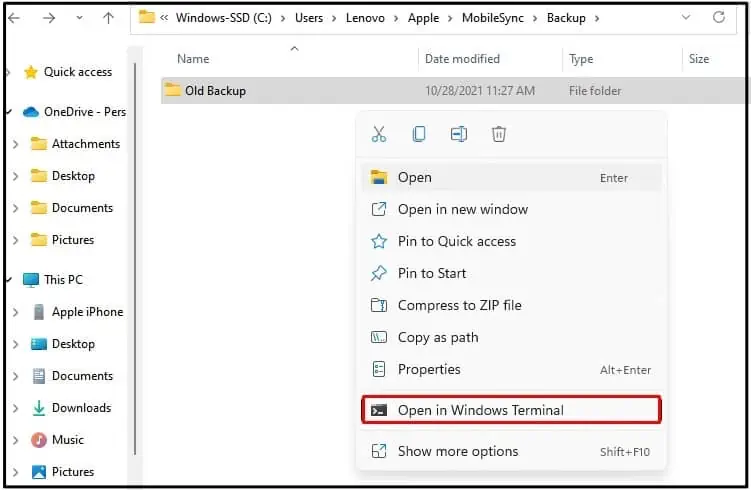
- Now, to divert the backup folder, hold down the shift key and right-click on the old backup location.
- Select the Open in PowerShell window here or Windows Terminal option.

- Now enter the following command on the window.
cmd /c mklink /J “Old Location path \Backup” “New Location Path.” - Once you type the command, press Enter.
- Finally, exit out of the PowerShell and you’re all set.
Related Questions
Why is my iTunes not recognizing my iPhone?
While connecting your iPhone to your PC, there are a few things to consider. Firstly, please make sure that your iPhone is unlocked. Additionally, make sure you tap on the Trust this computer from your iPhone to give full access to iTunes.
If the issue persists, here are some troubleshooting methods you can follow.
- Unplug your iPhone and reconnect to your PC again.
- Force Quit iTunes application and Restart.
- Update iTunes to the latest version.
- Update your iOS operating software.
How to Transfer Photos from iCloud to External Hard Drive?
If you are running out of your iCloud storage, you clear out the space by transferring the iCloud photos to your external drive.
Here is how you can do it.
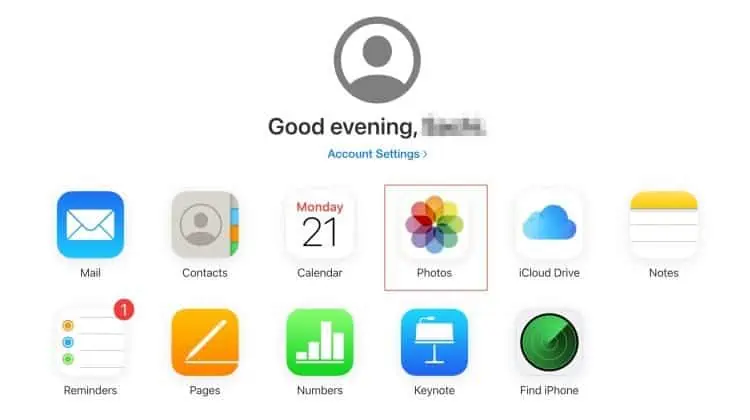
- Open up iCloud.com on your web browser.
- Enter in your log-in credentials and sign in to your iCloud account.
- Double-click on the Photos app.

- Select the photos and click on the Download option from the top right corner.

- If you have downloaded multiple images, it will convert into a zip file.
- Now, locate the downloaded zip folder and copy it.
- Finally, paste it into your external drive.

