Changing your mouse’s DPI is a bit more complicated than it first appears. While Windows offers basic mouse speed adjustments, anything that requires more refinement must include third-party software.
Understanding DPI and its effect on your mouse usage is a significant first step toward adequately utilizing the DPI settings on your mouse.
What Does DPI Mean on a Mouse?
The most basic way to explain DPI is that it’s a measure of how fast the cursor moves across your screen. If you increase the DPI, it moves more quickly. If you lower the DPI, it moves more slowly.
DPI stands for dots per inch.
How to Check Mouse DPI in Windows
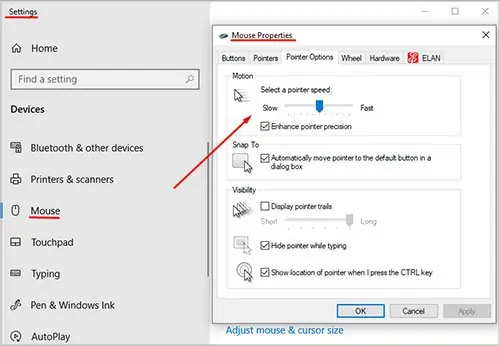
Check your mouse DPI at the speed you’re most comfortable with to get a baseline for which DPI feels right for you. Surprisingly, Windows doesn’t include an actual way to check DPI. You can check the pointer speed, though, which is the Windows version of a DPI adjustment. Another option is using a third-party website to see your current DPI.
Checking DPI in Windows
- Press the Windows key.
- Type Mouse Settings in the search bar.
- Click the corresponding app.
- Click the marker on the slider to see what number your cursor speed is set at.

Unfortunately, that is the only way to check your DPI without third-party software. It also doesn’t give you an accurate DPI measurement. It’s good to know how to do it, though, because it means that you can adjust your mouse sensitivity in Windows.
This is especially important for people using mice that don’t come with their adjustment software.
How to Change Mouse DPI in Windows
Everyone can change mouse DPI in Windows, though that isn’t always the best solution.
Changing DPI in Windows
- Press the Windows key.
- Type Mouse Settings in the search bar.
- Click the corresponding app.
- Drag the slider left to lower the DPI and right to increase the DPI.
You can also scroll down, click additional mouse options, look at the Pointer Options tab, and use that slider. It adjusts automatically when you change the DPI in Mouse Settings. The one in Mouse Settings adjusts automatically when you change the Pointer Options tab. The two are linked.
Since changing and checking the DPI in Windows isn’t very accurate, it’s better to do it in mouse management software if your mouse supports it.
Changing the DPI in Logitech G Hub
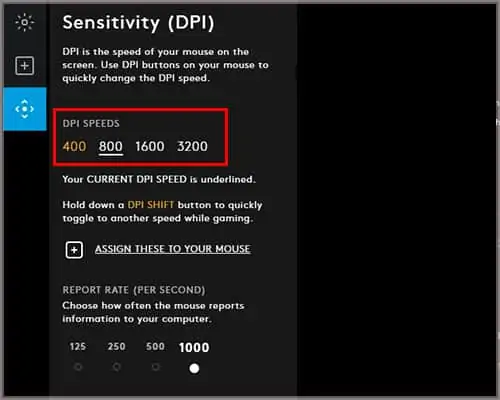
Logitech G Hub can manage multiple mice simultaneously, as well as other Logitech devices. Different DPI settings will be available, depending on the model of your mouse. However, adjusting it should work the same for most Logitech mice. You’ll be able to see any connected mouse as long as the program is working correctly.
- Open Logitech G Hub.
- Click on the mouse you want to manage.
- Click on the Sensitivity icon, which looks like a dot between four arrows.
- Click on a pre-determined DPI number to select it.

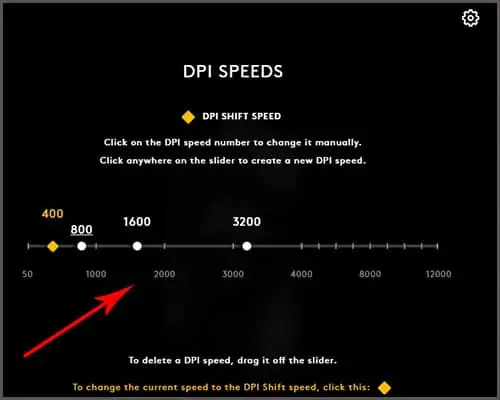
- Double-click a number on the DPI slider bar to set that as your current DPI.

The DPI slider on some mice can only handle a certain number of pre-determined DPI settings at once. You can click a number and drag it off the slider to create a new setting. Double-click on the bar where you want to add the new DPI once the old one is removed.
If you have a DPI Shift button, click a number on the bar and then click the DPI Shift Speed orange diamond to assign it as the DPI shift speed. The orange number if your DPI Shift number, and the underlined number is your current DPI.
How to Change DPI in Razer Synapse
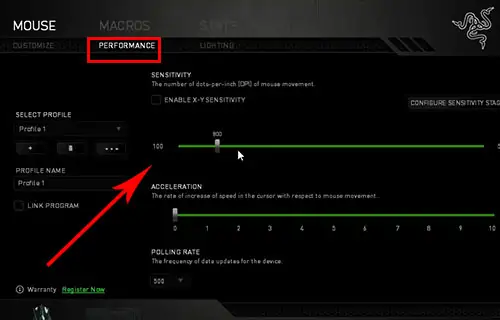
Razer Synapse is set up to manage any Razer devices connected to your computer. The devices it’s currently managing will appear on the screen with images of each one.
- Open Razer Synapse.
- Click on the mouse you want to manage.
- Click on the Performance tab.
- Drag the slider to change your DPI.

In Razer Synapse, you can also adjust the DPI for both vertical and horizontal movement if you choose. You have to click “Enable X-Y” at the bottom of the slider to get the option.
Razer also offers the choice to adjust the DPI in stages, as long as you toggle the option on. You can choose the number of stages and type your preferred DPI for each.
How to Adjust DPI in Corsair iCUE?
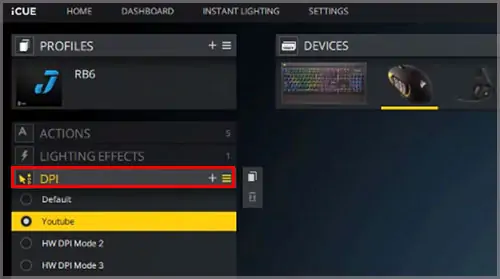
Corsair’s iCUE software lets you save different DPI profiles if you want to switch between programs. Each DPI stage has an X and Y setting, though the Y setting for vertical movement isn’t always enabled.
- Open iCUE.
- Click on your mouse.
- Choose DPI in the side menu.

- Click the plus sign under DPI Presets.
- Drag the slider to choose the DPI you want for a stage.

- Click the three-dot menu button.
- Choose Activate.
You can also assign indicator colors to indicate which DPI setting is active for mice that support the feature.
How to Adjust DPI on a Macbook?
Adjusting your DPI on a Macbook is a lot like adjusting it on Windows. You don’t set an actual DPI, but instead, change the cursor speed with a slider.
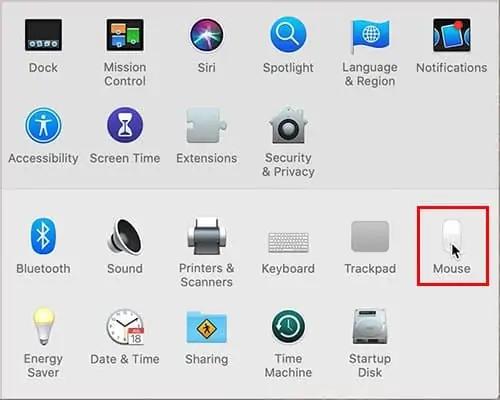
- Click Settings.
- Choose Mouse.

- Drag the tracking speed slider from slow to fast, depending on your preference.

If you want to adjust the actual DPI, you’ll have to do it in your mouse software.
How to Adjust DPI on a Chromebook?
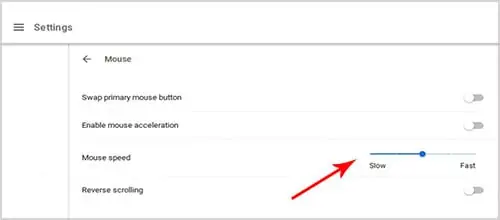
Like macOS and Windows, Chrome OS uses a slider to adjust pointer speed instead of a proper DPI measurement.
- Click the time to open the System menu.
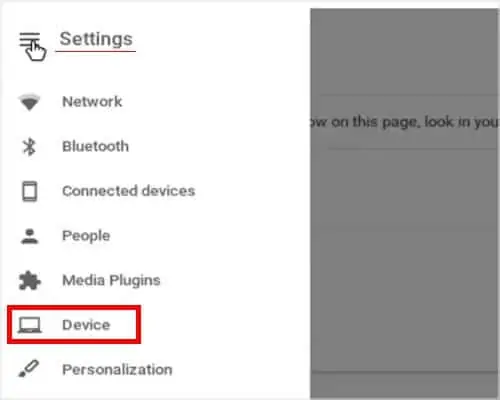
- Click the Setting icon.
- Choose Device.

- Click Mouse and touchpad.
- Drag the mouse speed slider from left to right to adjust its speed.

You can also enable or disable mouse acceleration – which is pointer precision – in this area by toggling it on or off.
Why is DPI Important?
DPI matters because the sensitivity of your mouse affects the performance in a lot of different applications. Raising or lowering your DPI can help improve certain functions that you perform with your mouse, especially in gaming and graphic design. It also feels better for certain people to use a lower or higher DPI for general computing.
Every time you move the mouse an inch, the cursor moves a corresponding amount. That amount is higher with a higher DPI and lower with a lower DPI.
Who Should Use a Higher DPI?
The larger your screen, the higher DPI you might need. Since the mouse will move more quickly across the screen, it helps you reach the point you want to click more rapidly.
People doing large-scale work in graphic design may want to increase their DPI. Those who use short-burst weapons in games might also benefit from a high DPI since they can move faster.
Who Should Use a Lower DPI?
A lower DPI is best for smaller screens because you won’t shoot past the point you want to land on.
It’s also suitable for precise mousework. For example, if you use a sniper in a game, you want to make sure you can make detailed moves in a small area to line up your target. If you’re doing detail work on graphic design, you might also prefer a lower DPI.
What is Adjustable DPI?
Adjustable DPI is precisely what it sounds like. It’s a mouse with DPI that you can adjust. However, it’s not quite that simple.
You can adjust the DPI of almost all mice on the computer. Windows has a setting that changes it.
Many mice also come with manufacturer software that includes a DPI adjustment. These are often more precise and have places to save your settings so you can go in later and quickly choose a previous DPI that you liked.
Some mice include a DPI switch on the mouse itself. These are often called DPI switching on-the-fly. You can press it quickly to change from one DPI preset to another. People who want multiple DPI settings in-game or who want the ability to adjust without going into software should choose these types of mice.
Is There an Ideal DPI?
Not really. The ideal DPI is the DPI that you prefer. It’s purely a matter of personal preference.
People who participate in tasks will always have an idea of what the correct DPI is. A great example of this is professional gamers. Many of the pros have a DPI that they use in their best games. That doesn’t mean it’s ideal, though. That’s evident because each pro has their preferred setting.
How Do I Know What DPI Is Right for Me?
Finding the proper DPI is a matter of trial and error. Even after years of working on the computer, doing photo editing, and gaming, I still adjust my DPI from time to time to see whether changing it up offers me some kind of benefit.
You should see whether it takes you longer than you want to reach a place on the screen or if you’re more likely to go past it. Notice whether that habit changes based on the task you’re undertaking too.
Try a DPI of around 500 to start, especially for precise work. Move up or down to see what works best.
Another thing to remember is that many games and programs have built-in DPI adjustment sliders in their settings too. So you are adjusting your speed at many different points and not just in one type of software.
What DPI Mouse Should I Choose?
That depends on your preferences. If you’re doing general computing, any mouse should work comfortably. However, if you intend to game or do design work, I recommend finding a mouse that offers at least 1600 DPI. That way, you have a lot of room to make adjustments for any situation.
Some mice come with extremely high DPI. If you purchase a 16000 DPI mouse, the chances are that you’re never going to use it at such a high setting. It will feel like it’s zooming across the screen with the slightest push. It should be fine as long as a mouse has the DPI you need. You can choose the one you want based on other settings.
Should I Adjust My DPI in Windows or Other Software?
I prefer to set my mouse at seven on Windows since it doesn’t adjust the DPI by the standard measurement. From there, I make more precise adjustments in Logitech G Hub. That way, I can change the DPI with the correct numbers, save my measurements, and have the proper DPI adjusted for my on-the-fly button.
What Is Pointer Precision?
Point precision is a form of automatic DPI adjustment. When you move your hand more quickly, Windows increases the DPI momentarily to help you move more rapidly across the screen. If you move more slowly, it reduces the DPI.
Should I Use Pointer Precision?
That depends on your setup. It might suit you if you’re doing general computing or things that don’t require precision. However, if you’re doing precise design work, I recommend turning it off. It’s better to have complete control of the adjustment yourself.
If you’re gaming, you should turn it off. It prevents you from landing on the point you’re aiming at, especially if you have to change your position quickly.
Frequently Asked Questions
Can I Change the DPI on a Razer Mouse Without Synapse?
There isn’t a straightforward way to change the DPI on a Razer mouse without Synapse. If you have onboard mouse profiles, you can delete Synapse and just use those after they’re set. However, you’ll have to use the cursor speed adjustment on your computer if you don’t want to use Synapse.
How Can I Change the DPI of My Mouse on Xbox?
You can drag the cursor in settings to increase and decrease your sensitivity. However, there is no direct DPI adjustment. If your mouse software supports it, you can set a DPI profile on your mouse and save it to the mouse before setting it up to use on the Xbox.
What Is the Highest DPI Mouse?
The Razer Basilisk Ultimate Gaming Mouse has a DPI of 20,000, which is higher than any other mouse you can find for sale.
How Does a Mouse Work for DPI?
Mice today aren’t like the mice of the past. Older mice have a little ball that rolls around in the center of the base. It makes contact with the surface, and the cursor on the screen mimics the movement of the mouse.
This movement could be hindered by many things, notably dust or dirt. As the trackball got less new and clean, its connection to the surface was less reliable. It would drag, act unpredictably, and offer a less-than-smooth mouse experience, no matter what kind of activity a user engaged in.
Modern mice use light instead of a rubber ball. There are two main kinds of mice to choose from: optical and laser mice. Each one shines a light on the surface. A camera picks up the movement of the light and reports the position to the computer. However, moving the mouse an inch on the pad doesn’t equal an inch on the screen. That’s where DPI comes in.

