If you recently added an RGB keyboard to your gaming setup, you’re probably keen on reconfiguring its colors and patterns.
Indeed, this is possible on most RGB mechanical or membrane keyboards using assigned keys. Nonetheless, downloading their dedicated software offers additional settings allowing you to explore several other color and pattern options.
In this article, you will explore how to change or reconfigure RGB on different keyboards. But before that, let’s first learn about the benefits of using RGB on a keyboard.
Benefits of RGB on Keyboard
Ever since RGB was introduced on keyboards, the lights have made it easier for us to determine whether our device is working or not. Also, it’s become easy for gamers to assign lights to keys they regularly use, like WASD for navigation. Apart from that, RGB is beneficial in various other situations like:
- Configuring colors to warn you when your system starts overheating
- Increasing RGB light brightness helps you type and play games in the dark
- Making your computer setup visually aesthetic
- Changing the colors of each key to maintain focus and provides a visual response
- Customizing colors that help to match your personality
How Can I Change or Reconfigure RGB on Keyboard?
Reconfiguring RGB depends on your keyboard model. For different manufacturers, there are different steps involved. So, without further ado, let’s see how to change them in general and specifically for some popular keyboards.
On General Keyboards
In most RGB keyboards, FN + C keys help you cycle through different colors. However, this may not apply to all the models. So, we recommend checking your keyboard’s user manual or the manufacturer’s official website.
Moreover, some keyboards have a dedicated scroll wheel that helps you try several backlight color options. If yours doesn’t have one, you can use a dedicated icon on the function keys. Generally, using FN + [F5 – F8] keys in most RGB keyboards can help you tweak the colors and patterns.
Now, let’s move on with the reconfiguration process on some of the most popular keyboards.
On Razer Keyboard
Razer provides an endless possibility of choosing RGB lighting that helps to customize your mechanical gaming keyboards. In this section, we will explore the three ways to reconfigure them on a Razer keyboard.
Using Keyboard Keys
Changing the lighting effects on a Razer keyboard is possible using dedicated hotkeys. However, each key varies depending on your model and our suggestion to check the user manual.
In the Razer Huntsman Mini keyboard, you can press the FN + Ctrl + [Numbers from 1 to 9] to change the Chroma effect. On the other hand, Razer BlackWidow V3 Mini HyperSpeed also allows additional options when you press the same hotkeys multiple times.
Well, other Razer models should also work somewhat similarly. Nonetheless, to learn what the pressed keys exactly do, you’ll need to search for your respective model on the internet.
From Keyboard Tab in Razer Synapse Software
Razer Synapse Software is a hardware configuration tool that assists you in customizing your Razer devices. Once you download this application, you can assign macros and even rebind your keyboard controls.
Basically, this software allows you to tweak brightness, on/off lighting, and explore quick effects. Here is the complete guide on how you can reconfigure them:
- Ensure you have downloaded the application first. Then, search and launch it from the Start Menu.
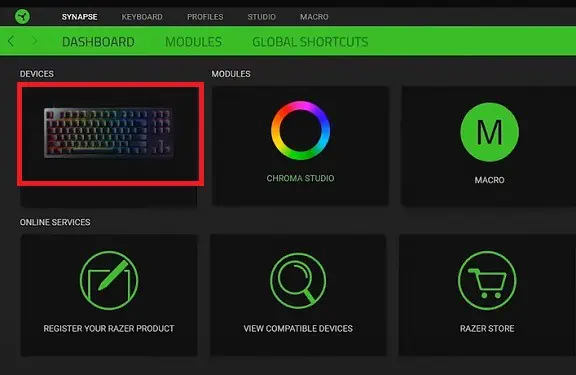
- Under Devices, find your keyboard and click on it.

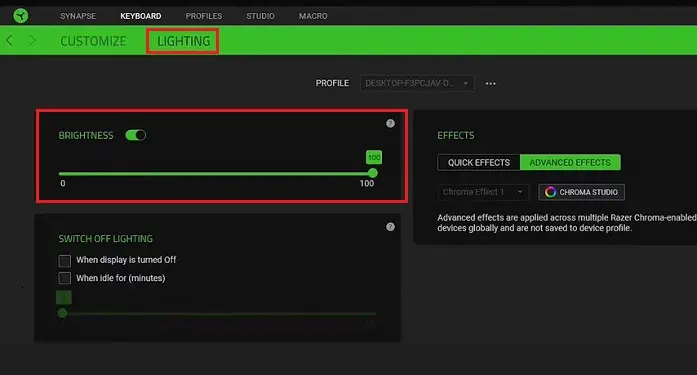
- Just below the Razer menubar, you’ll find two options – Customize and Lighting. Choose the latter one.
- Now, select your keyboard profile from the Profile drop-down. Ensure you have selected the right one, as the settings only apply to the particular profile.
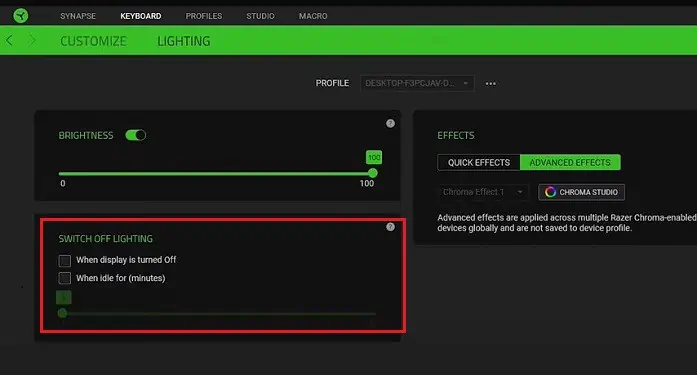
- If you’re planning to turn off the RGB on your keyboard, tick the When display is turned off or When idle for (minutes) option.

Selecting the former setting will turn off the lighting when your monitor goes off. On the other hand, the latter option asks you to choose a certain minute. Then, the RGB automatically turns off if the keyboard goes idle for that time. - Next, turn on the Brightness option to choose the opacity of the Razer keyboard. Using the slider, select your desired brightness.

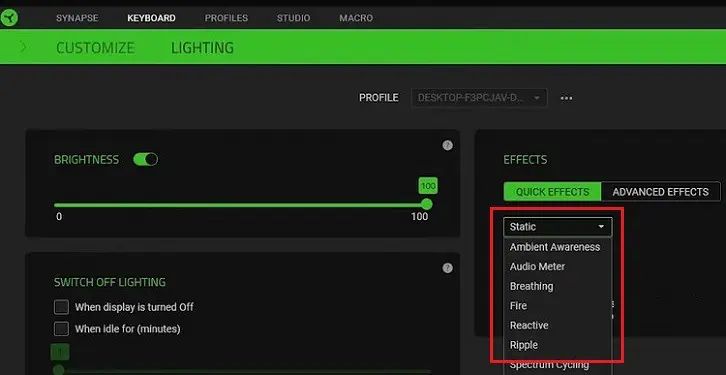
- Now, to reconfigure the RGB effect for your keyboard, select the Quick Effects tab. Then, choose anyone you prefer from the drop-down. Interestingly, some effects allow you to select a color, while some provide an option to change the direction.

From Chroma Studio in Razer Synapse
The above method from the keyboard tab only allowed you to change a few RGB settings. However, using Chrome Studio, you can customize your own colors and even choose plenty of new effects that aren’t in the Quick Effect tab. Follow the simple steps below to reconfigure RGB from the Chroma Studio:
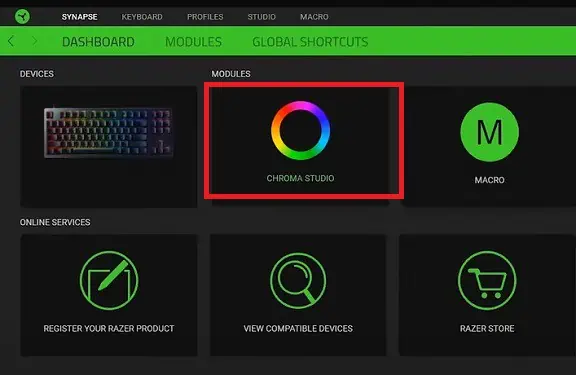
- Launch the Razer Synapse application and from Modules, choose Chroma Studio.

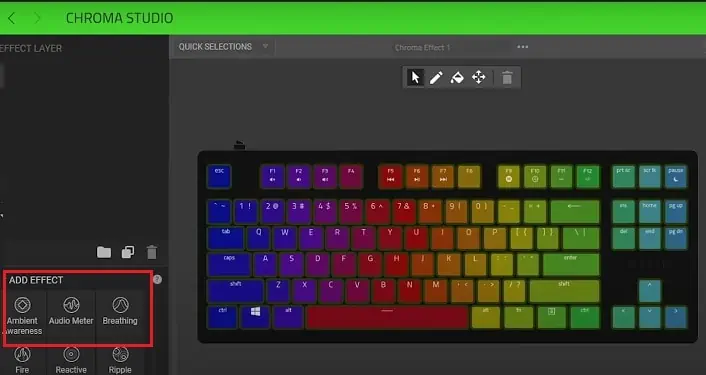
- From the bottom-left panel, choose any effect you wish. You can notice that a selected effect will be added as a layer in the Effect Layer. |

- Now, move to the center, where you can see a keyboard with several colors on each key. Choose those keys you want the colors to change. Alternatively, you can do this from the Quick Selections drop-down too.
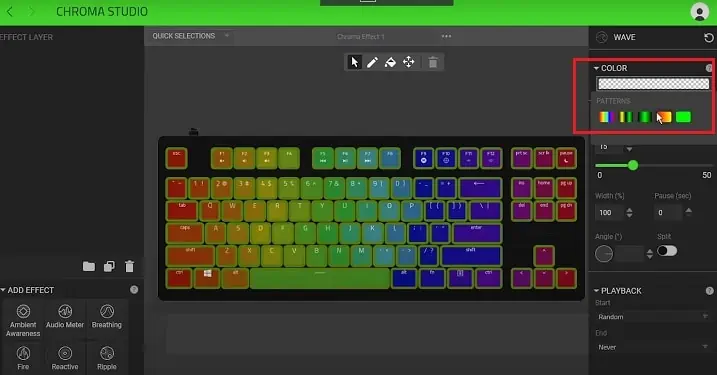
- Next, move to the right panel and select the rectangular box in the Color section.
- Choose your desired pattern and set its color. Now, tweak the width, speed, and angle from the Properties section.

- Then, pick a start and end point from the Playback section and click on Save Changes.
- Check the keyboard to see if your changes are applied successfully.
On Corsair Keyboard
As in a Razer keyboard, changing RGB on the Corsair keyboard is possible using keyboard keys and dedicated software. So, without further delay, let’s check both of these methods.
Using Keyboard Keys
Most Corsair keyboard models use the FN + Number keys for reconfiguring RGB. For example, pressing FN + [1 – 5] will individual lighting, and using the FN + [6 – 0] will change effects.
However, some Corsair keyboard, like the K63 Gaming Keyboard, doesn’t have an FN key. Thus, it’s not feasible to reconfigure RGB on such models, and you need dedicated software, which we will have explained below.
In Corsair iCUE Software
Like the Razer Synapse, iCUE is the application that helps you configure all the necessary settings of your Corsair peripherals. So, before moving ahead, we suggest you download the program first.
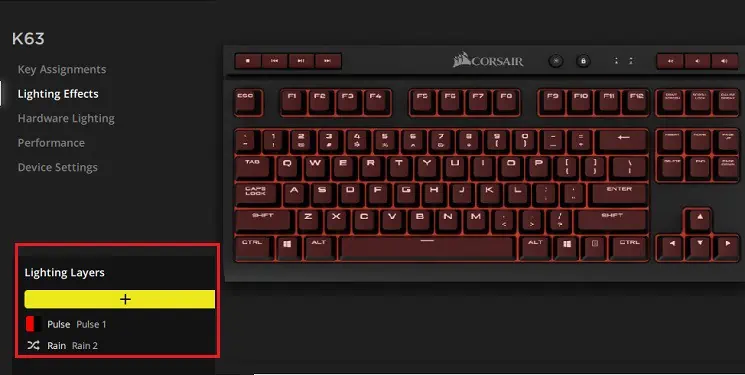
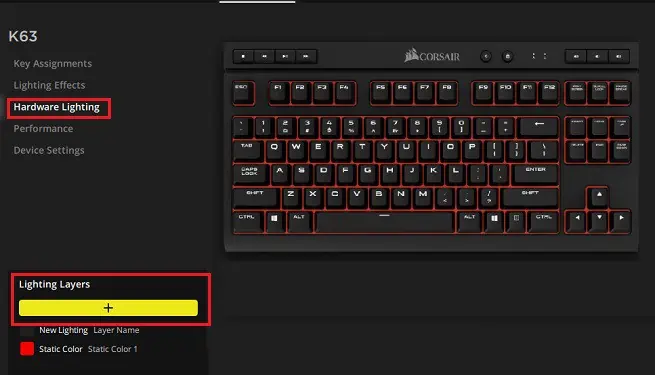
Interestingly, this program allows you to control both Lighting Effects and Hardware Lighting. For demonstration purposes, we’ve used the K63 Gaming Keyboard. Nonetheless, the steps will work for any other Corsair keyboard that supports the iCUE software:
- Launch the application and choose your profile.
- Then, choose your Keyboard and select the Lightning Effects under your model’s name.
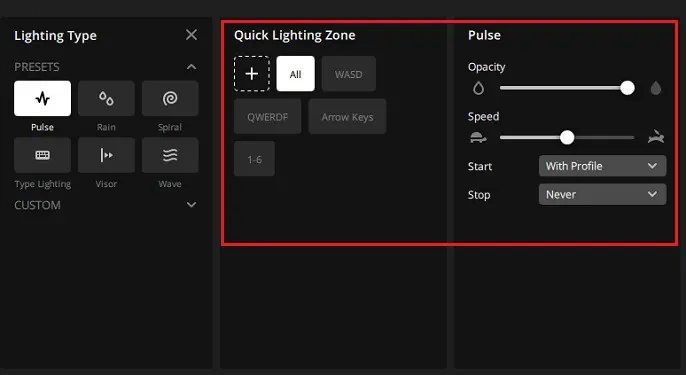
- Next, click the ‘+’ icon from the Assignments section, and choose a lighting type from the Presets. Else, you can create a custom one from the Custom drop-down.

- Also, choose a Quick Lighting Zone and finally manage color from the Watercolor section.

- Once you’ve set the Lighting Effects, choose the Hardware Lighting option from the left panel. Here, choose your desired colors and save the changes.

On Redragon Keyboard
Redragon is a low-budget quality keyboard adopting mechanical switches that gives you a pretty good typing and gaming experience. Like other gaming keyboards, most Redragon models have RGB lighting that can be changed using keyboard keys and dedicated software.
However, if you have a rainbow backlit keyboard, there’s no option for RGB reconfiguring. However, the methods below should work for those Redragon keyboards that support changing RGB.
Using Keyboard Keys
In most Redragon RGB keyboards, using FN + Arrow keys should help you tweak various colors and lighting effects. However, using keyboard keys depend on your model, and the hotkeys to reconfigure RGB can be found in the keyboard manual. Nonetheless, here are some of the keys that might work on most Redragon keyboards:
- Press FN + ~ twice and keep pressing FN + Right Arrow key to choose your desired backlight color. To save this setting, use FN + ~ again.
- Simply pressing FN + Right Arrow key will change RGB on the keyboard.
- Press FN + Down Arrow key to decrease brightness.
- Press FN + Caps Lock to turn off the lighting.
- Press FN + INS/HOME/PGUP/PGDN/END/DEL to tweak the lighting pattern.
Using Dedicated Software
Unlike Razer and Corsair keyboards, Redragon provides dedicated software for each model. This means the settings of one model can vary from another. So, you first need to check your model and download the installation file from the manufacturer’s official website.
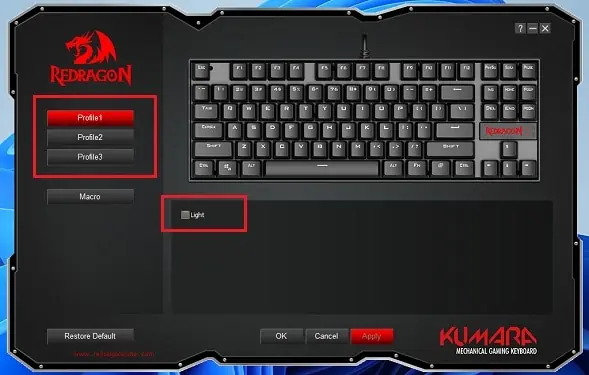
Once the installation is complete, you can proceed with the guide below. For demonstration purposes, we’ve used the K552-RGB Kumara Mechanical Gaming Keyboard:
- Launch the application and choose a profile.
- If you want to turn off the RGB, simply untick the Light option.

- Next, expand the drop-down beside Light and choose a lighting effect.
- Then, adjust the brightness. Drag the slider towards the right to increase and left to decrease.
- Also, you can change how fast the pattern works using the Speed slider.

- For some effects, you get to change the color while you can change the direction for others. Simply configure them as per your desire.
- Once you’ve made the changes, click on the Ok or Apply button to save the changes.
On Logitech Keyboard
Logitech is best known for its quality keyboard, mouse, and other peripherals. So, if you’ve paired a Logitech keyboard, you’re at the right place to learn how to reconfigure its RGB settings.
Using Keyboard Keys
Most Logitech RGB gaming keyboards, like the G513, have dedicated hotkeys to change the lighting effects and colors.
Generally, pressing the FN and the function keys from F8 to F8 should help you tweak the lighting activities. However, this totally depends on your model. So, we suggest looking up the keyboard manual to see the one that works for you.
In Logitech G Hub
The Logitech G Hub offers the Controls and Sync Lighting feature for your keyboard and other peripherals. Interestingly, you can animate up to 16.8 million colors.
Indeed, this is useful software for all Logitech users. Follow the below guide to learn how to change or reconfigure RGB on your keyboard using the app:
- Firstly, ensure you’ve downloaded the Logitech G Hub from the manufacturer’s website.
- Once installed, open the application and choose your keyboard.
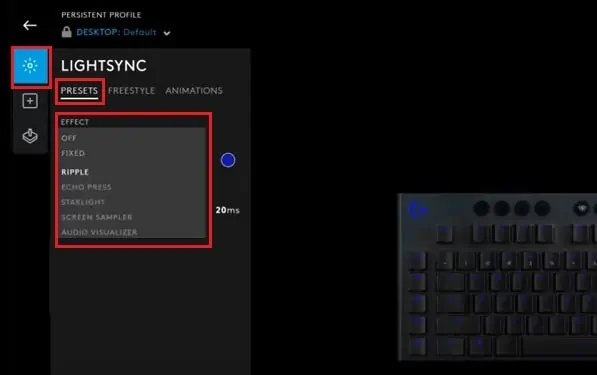
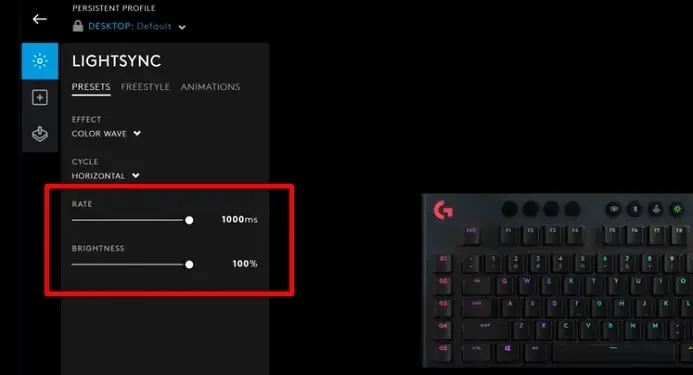
- Now, choose the Lightsync icon and then go to Presets.
- Then, expand the Effect dropdown and choose anyone you like. Also, select the Cycle to determine how your effect gets applied on your Logitech keyboard.

- Next, choose a rate that controls how fast the effect gets applied.
- Also, you can increase or decrease the brightness using the Brightness slider.

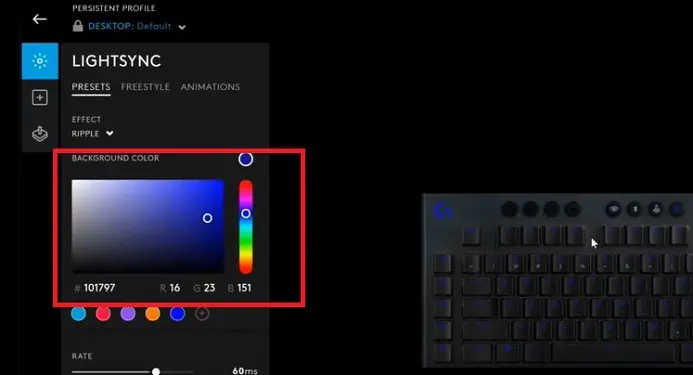
- Selecting some effects allows you to change the Background and Echo colors. So, we suggest trying out every option to satisfy your need.

In Logitech Gaming Software
Like the Logitech G Hub, the Logitech Gaming Software also helps to reconfigure or change RGB on your keyboard. So, if you have downloaded this application, here’s what you need to do next:
- Launch the program and choose your keyboard.
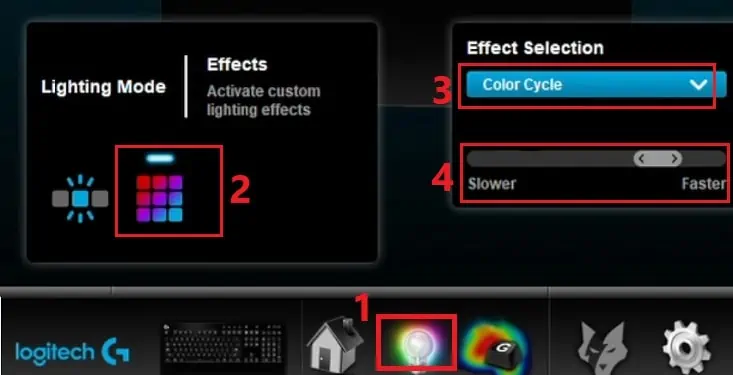
- From the bottom corner of the window, click on the light icon. This will open the lighting mode settings.
- In the Lighting Mode, choose the RGB icon that navigates you to the Effects settings.
- Under Effect Selection, expand the drop-down and choose any effect you like.
- Next, configure all the options you get for a certain effect. For example, choosing Color Cycle will allow you to make it slower or faster.

Can I Change RGB on Laptop Keyboard?
Changing the colors and patterns on an RGB laptop keyboard is possible. Like the dedicated software for external keyboards, some manufacturers provide an application to tweak the settings.
For example, HP Omen gaming PCs have OMEN Command Center to reconfigure RGB on your laptop keyboard. Moreover, Asus TUF provides the TUF Aura Core to tweak the color and pattern settings.


