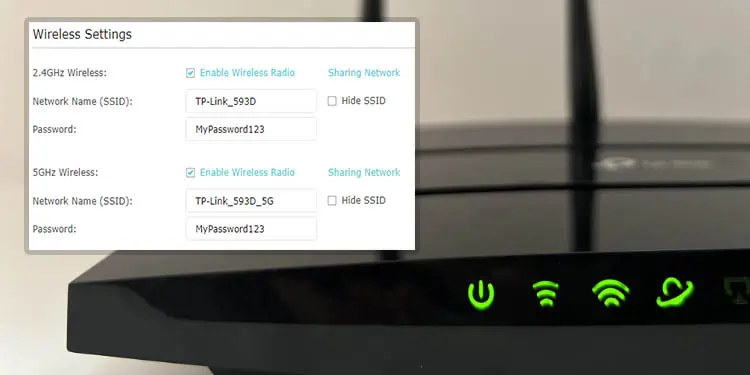
Experts recommend changing your Wi-Fi password every month or at least once in three months. There’s no hidden secret here—occasionally setting new passwords avoids the possibility of someone stealing it and hogging up your internet bandwidth.
Also, if you recently purchased a router or got it from the ISP, it’s either not secured or comes with a weak one. You might want to change this to a password having strong strength such that it’s effective against guessing and brute-force attacks.
Changing a Wi-Fi password is not at all tedious and will take no longer than two minutes. You can do this from a computer or your smartphone. However, if you’ve forgotten the passcode and are unable to connect to the network, you require a PC/laptop with a wired connection (use an ethernet cable).
Step 1: Find Router’s IP Address
To access your router’s configuration page, you need to know the Default Gateway first. Generally, you can find this on the back of your router.
But, if you lost the sticker or someone has changed the IP, I have provided step-by-step instructions for both PC and mobile users to get this information in no time.
On Windows
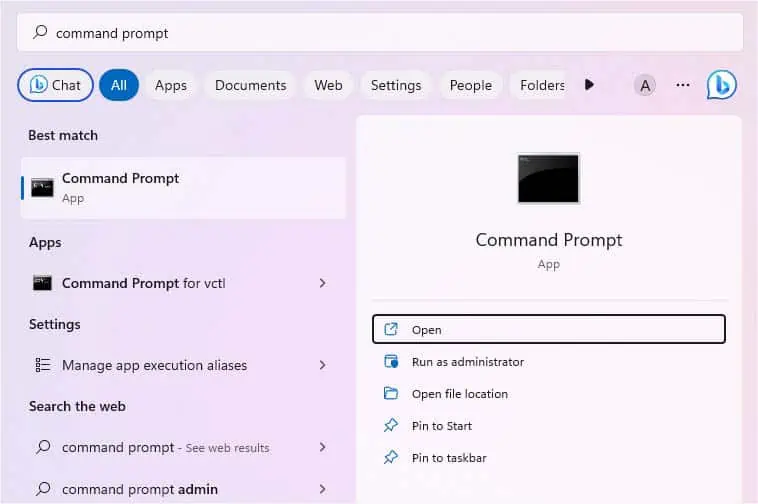
- First of all, launch Command Prompt from the Start Menu.

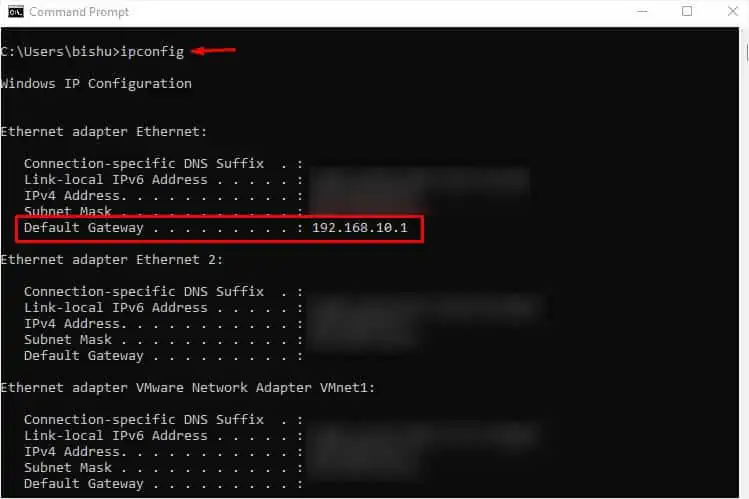
- Next, execute the
ipconfigcommand to list all the network configurations. - Navigate to your adapter and check the Default Gateway field. This is your router’s IP address.

- Copy it.
On macOS
- Press the Apple icon from the top-left corner of the screen.
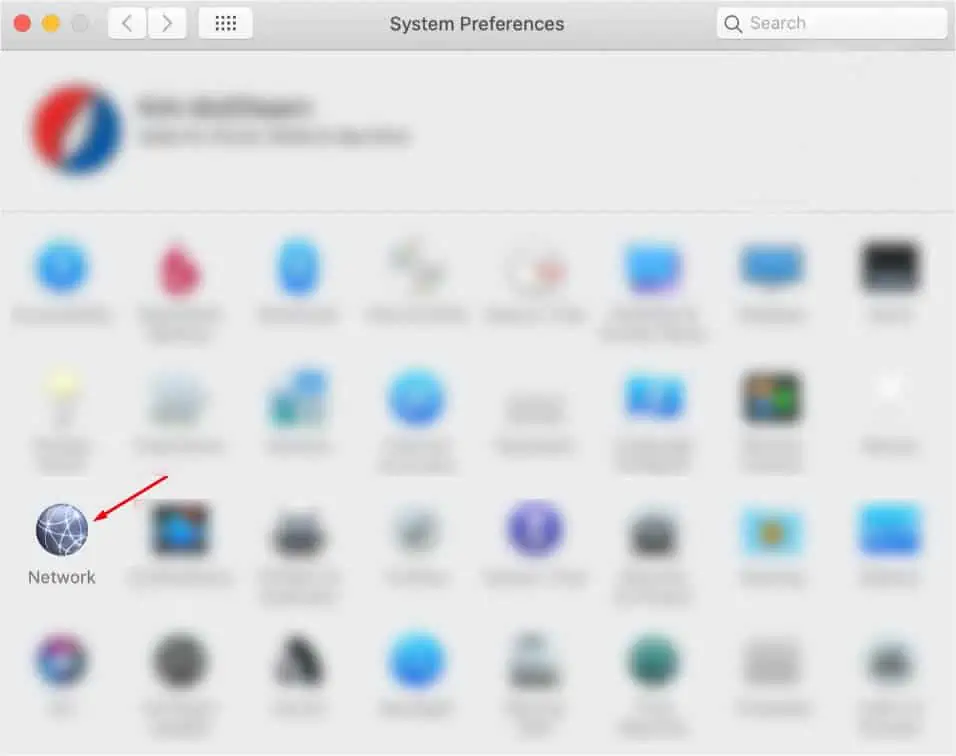
- From the drop-down list, pick System Preferences.

- Now, select Network.

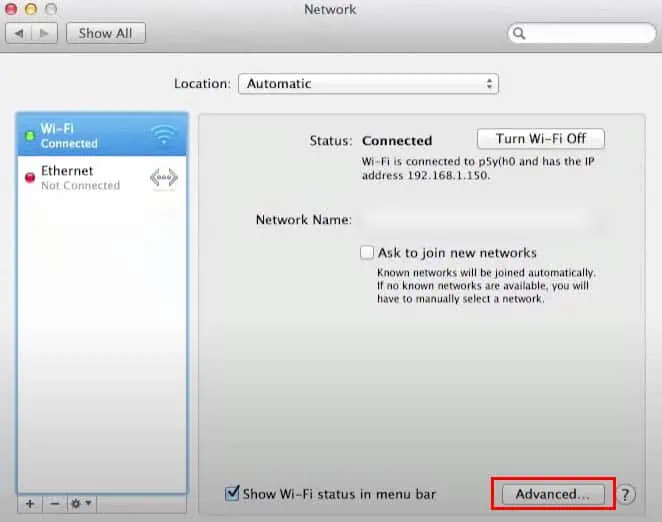
- Then, click on the Advanced button from the bottom-right corner of the window.

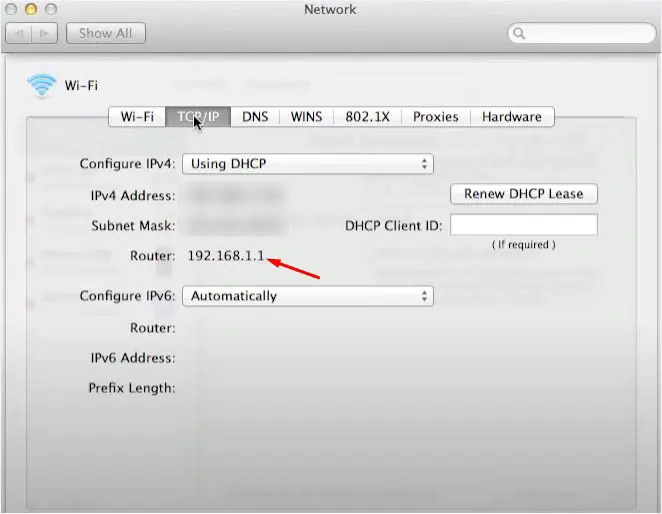
- Get to the TCP/IP tab and check the Router field to identify its IP address.

On Android
- First, pull down the Notification/Action bar to access the Quick Settings menu.
- Long tap on the Wi-Fi icon to open up its dedicated settings.
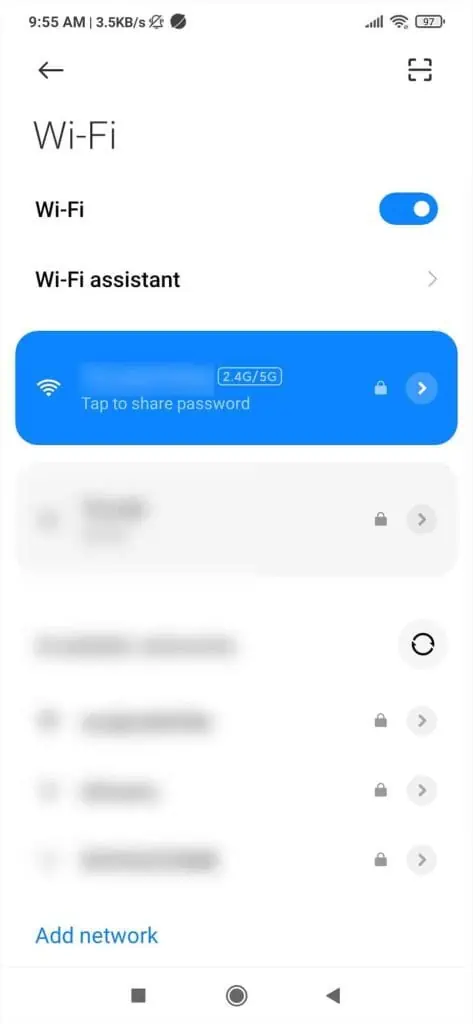
- Select your current Wi-Fi connection. In some models, you might see a settings icon next to it.

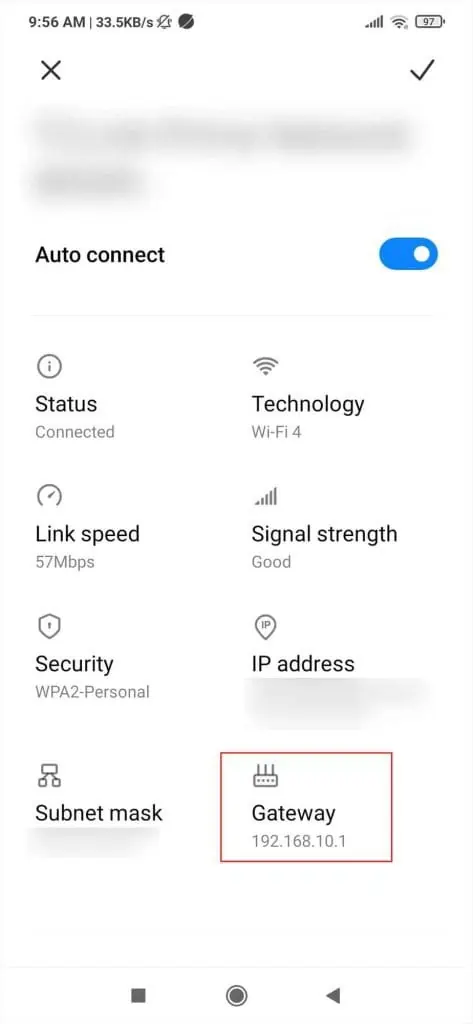
- Check the Gateway field to get your router’s IP and copy it.

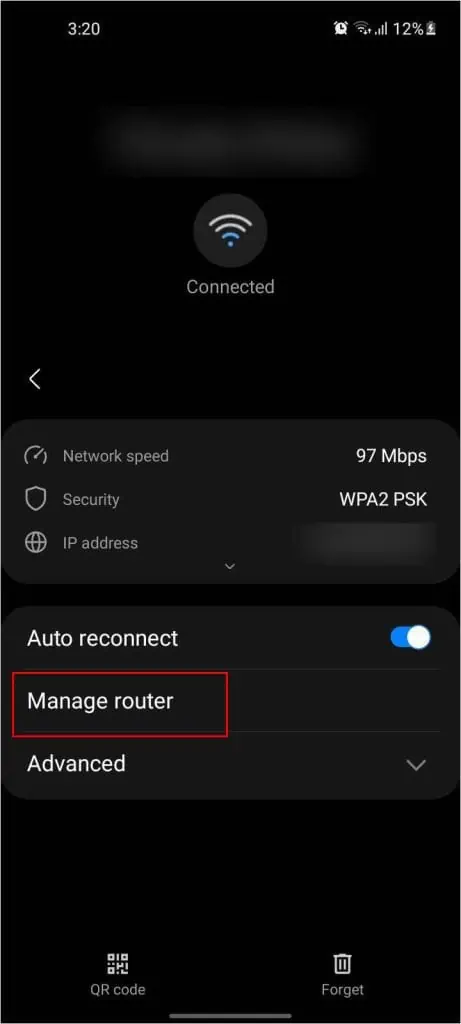
In some Android smartphones, you might not get this option. Instead, there’s a Manage Router option that instantly opens up the router page.
On iOS
- Open the Settings app from the home screen.
- Choose Wi-Fi.
- Press the information icon next to your currently connected network.

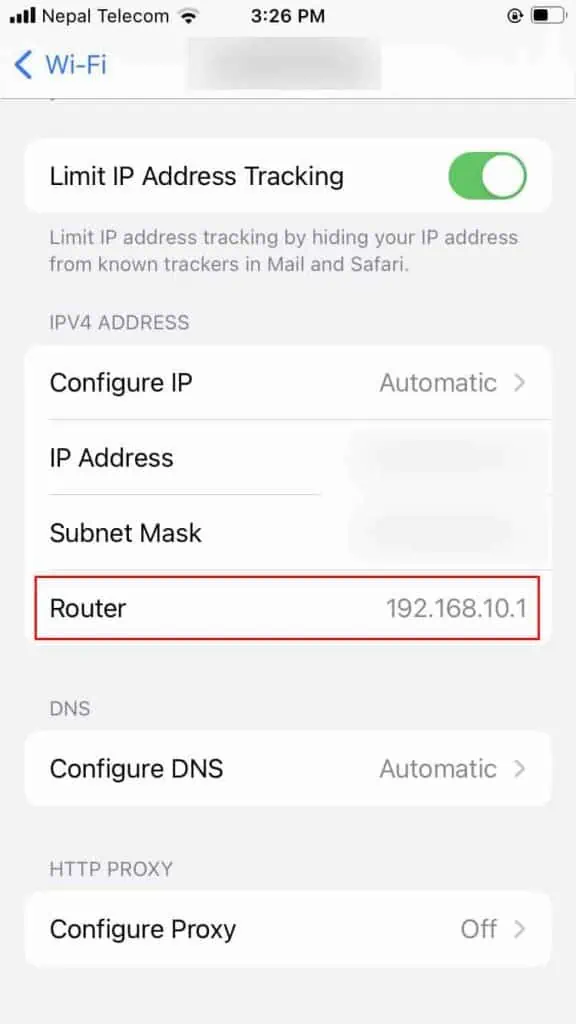
- Scroll down to get to the IPV4 ADDRESS section.
- You should see a Router field with an IP. Copy it.

Step 2: Find Router Login Credentials
Along with the router’s Default Gateway, you also require its login credentials in order to access the interface. The information is also included in the router’s sticker. If you or someone else hadn’t changed the credentials, check the back of your device and use it in Step 3.
In case you got the router from your ISP, they could have changed it. So, you can contact them to get the details. But if you or someone else had edited the credentials earlier and you don’t remember it, the only option is to reset your router and use the default values.
If you have lost the sticker and wish to know the default configuration, you can easily check for this online based on your router’s model. For your ease, I have listed the login credentials of some popular brands in the table below.
| Brand | Username | Password |
| TP-Link | admin | admin |
| Asus | admin | adminor password |
| Linksys | no username (blank) or admin | admin or public |
| Netgear | admin | password or 1234 or admin |
| Belkin | Admin or admin or no username (blank) | admin or password or no password (blank) |
| D-Link | Admin or admin or user | admin or user or password or no password (blank) |
| Motorola | no username (blank) or admin | Motorola or motorola or no password (blank) |
Step 3: Access Router Settings Page
Now that you’re aware of your default IP along with the login credentials, it’s time to open the router’s configuration page. Note that the entire interface for every brand and model is different.
However, if your ISP has blocked the router’s page access, you’ll likely meet with the “This site can’t be reached” with no option to bypass the screen. In such a scenario, there’s nothing much you can do than to contact your ISP.
While this is a rare case, most of us can get access to the interface as soon as we enter the correct IP. To clear out any confusion, here’s a simple demonstration of how to access an Asus router’s configuration page:
- Open up any web browser.
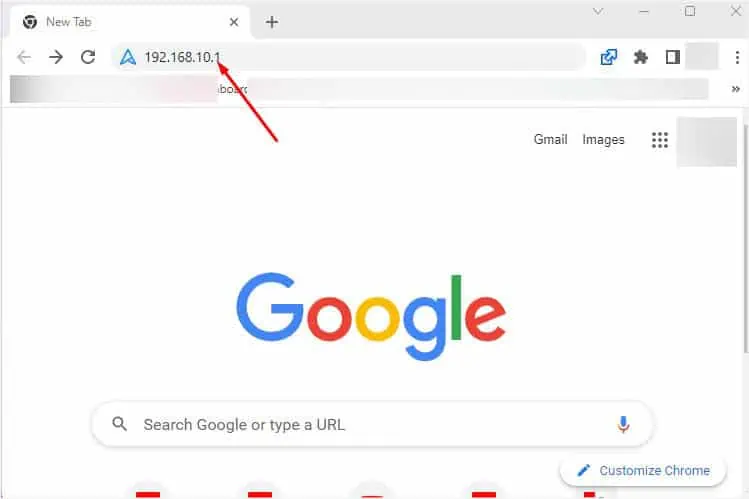
- Next, input the router’s IP and hit enter.

- The router’s login page should pop up. For security reasons, you might get the “The connection is not secured” error message. In such a scenario, you may click on Continue to site.
- Now with the username and password you found in Step 2, log in to get access to the Router’s interface.

Step 4: Change Wi-Fi Password
After gaining access to the router’s page, you can now navigate to the Wi-Fi or Wireless section to change the password. As mentioned earlier, the interface varies based on your manufacturer and model.
Nevertheless, I have gathered the necessary steps for the most popular brands in this section. Even if you do not find yours here, you may go through each of the steps to understand the terms as they are almost similar on most routers.
But before moving on, make sure you choose a strong password. You may even utilize a password analyzing tool to help identify whether the passcode is strong or weak.
Important: After changing the password, your device gets disconnected from the Wi-Fi. So, you need to forget the old password and reconnect using the new one.
On TP-Link
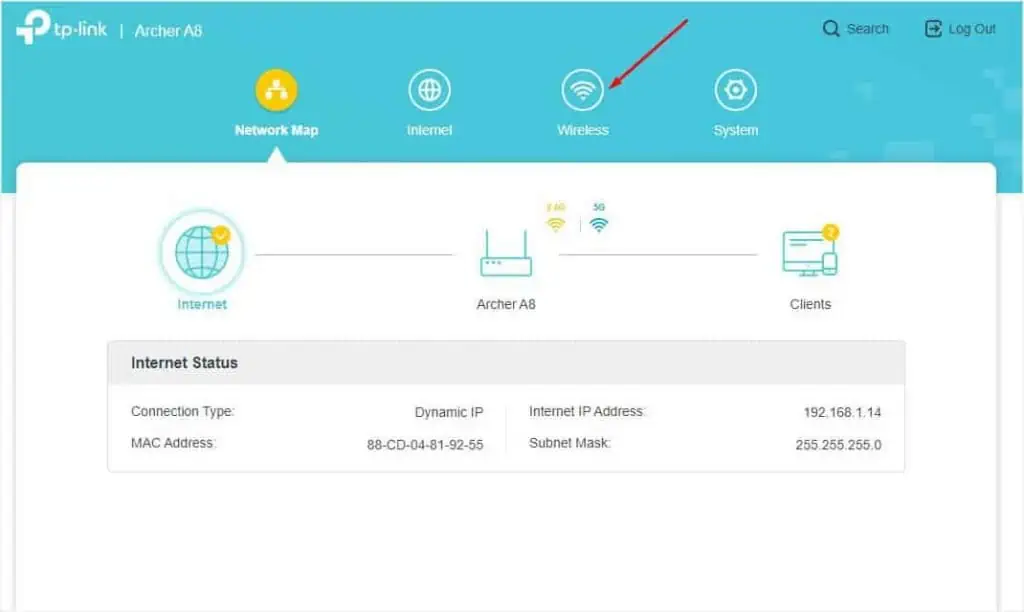
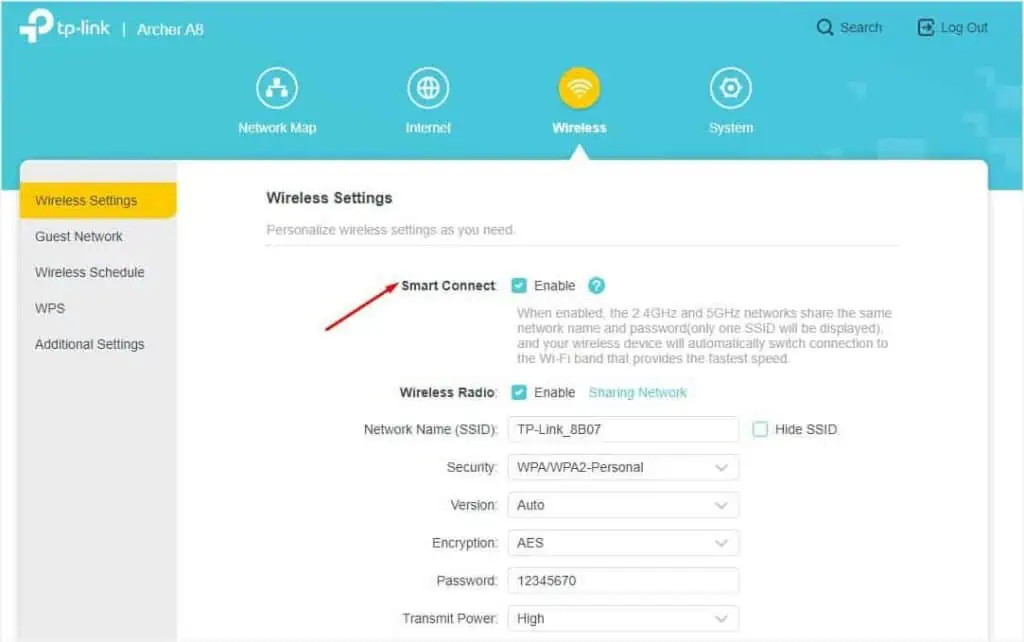
I’ve used the Archer A8 model to demonstrate how to change the Wi-Fi password. Since TP-Link has tons of other models, the steps might vary slightly.
- First, switch to the Wireless section.

- Start by confirming the band you’re going to use. Checkmark 2.4GHz or 5Ghz. Selecting both will show two SSID names.
In Archer A8, there’s an option called ‘Smart Connect’ that switches to the best band and only shows one shared SSID. For my ease, I’ll enable this feature.
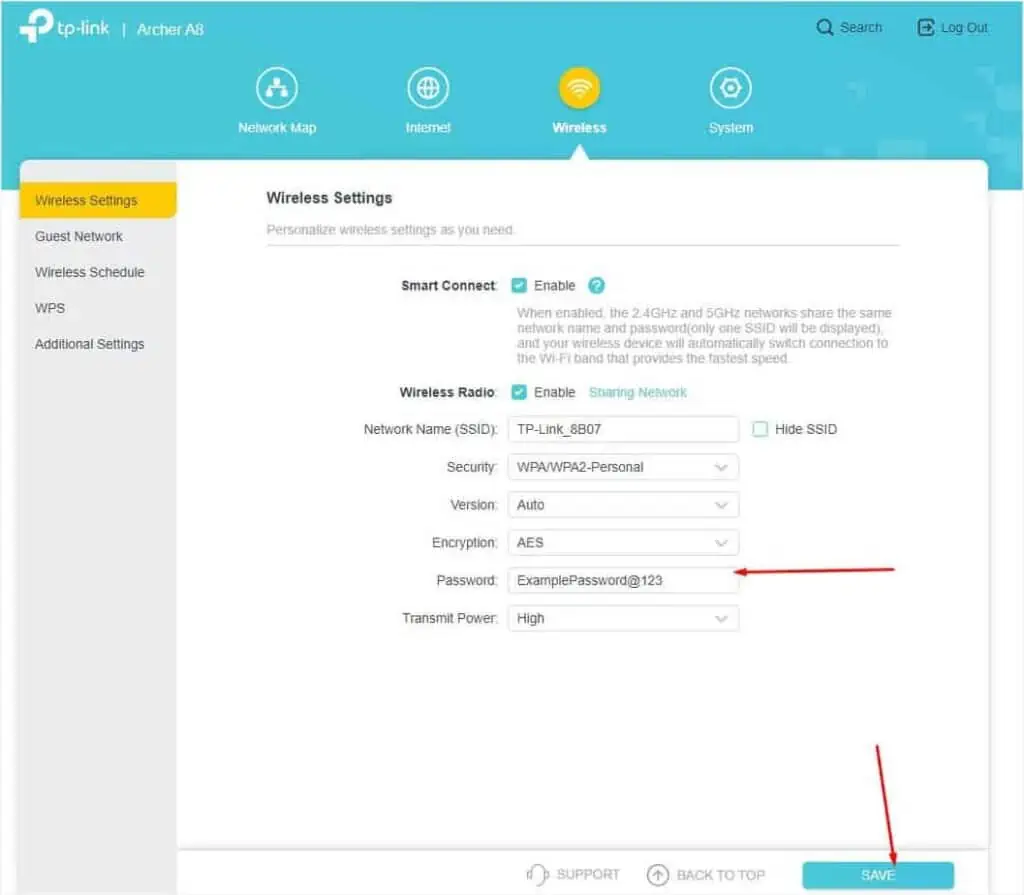
- Now, get to the Password field and change it as per your desire.
- You may also change the Network Name/SSID and set the security (along with version and encryption types). I would recommend opting for WPA2-PSK (AES).
- Finally, hit the Save button.

Note: If you do not have the Smart Connect option, you require setting new passwords separately on the two bands. In such cases, it’s a good idea to keep different SSIDs.
On Asus
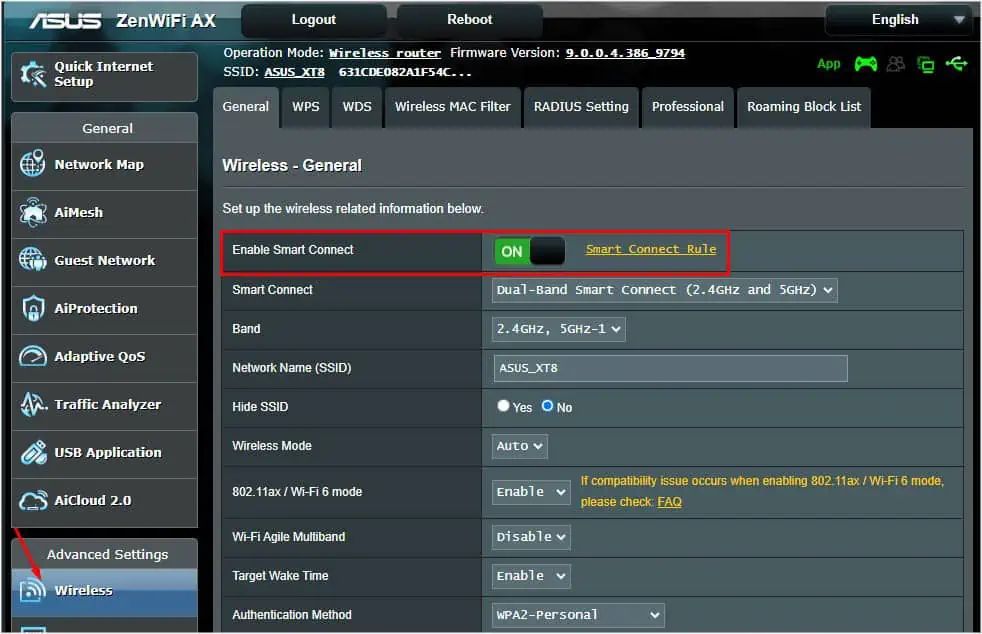
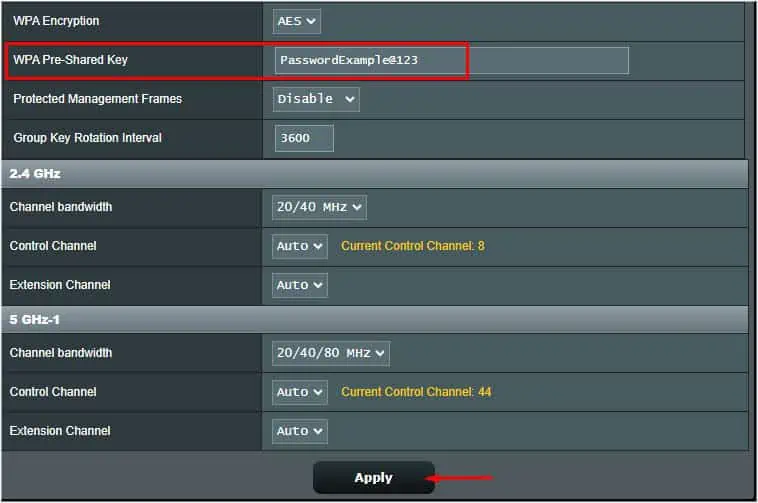
Here, I’ve demonstrated the steps for RT-AX95Q and this should be similar to all the newer ASUS models.
- Get to Advanced Settings and pick Wireless.
- Then, start by enabling Smart Connect. In case yours doesn’t have this feature, you’ll need to change the Wi-Fi password separately for both 2.4 and 5Ghz.

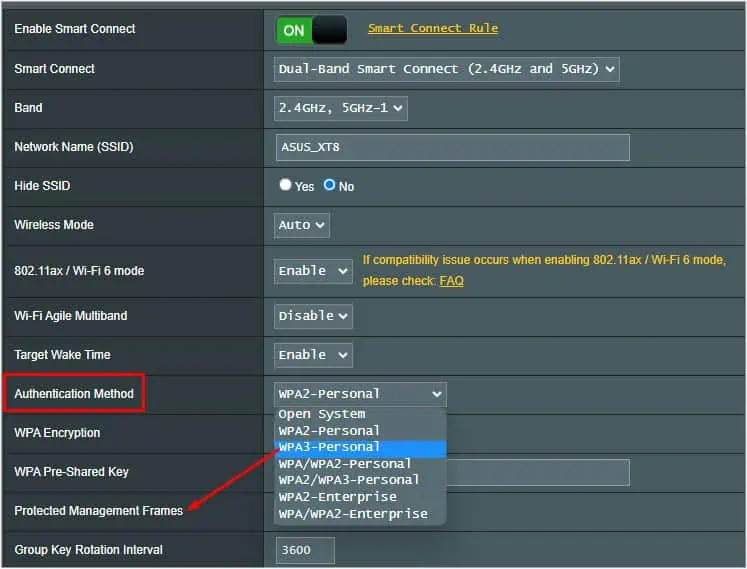
- Next, choose an Authentication Method. Avoid the Open System option as this will make your Wi-Fi public. Instead, opt for WPA2 or WPA3. For the latter, you’ll have to enable the Protected Management Frames.

- Look for the WPA Pre-Shared Key and set a new password here.
- You can also change the SSID and configure the channel settings separately for the two bands.
- Scroll down and press the Apply button.

On Linksys
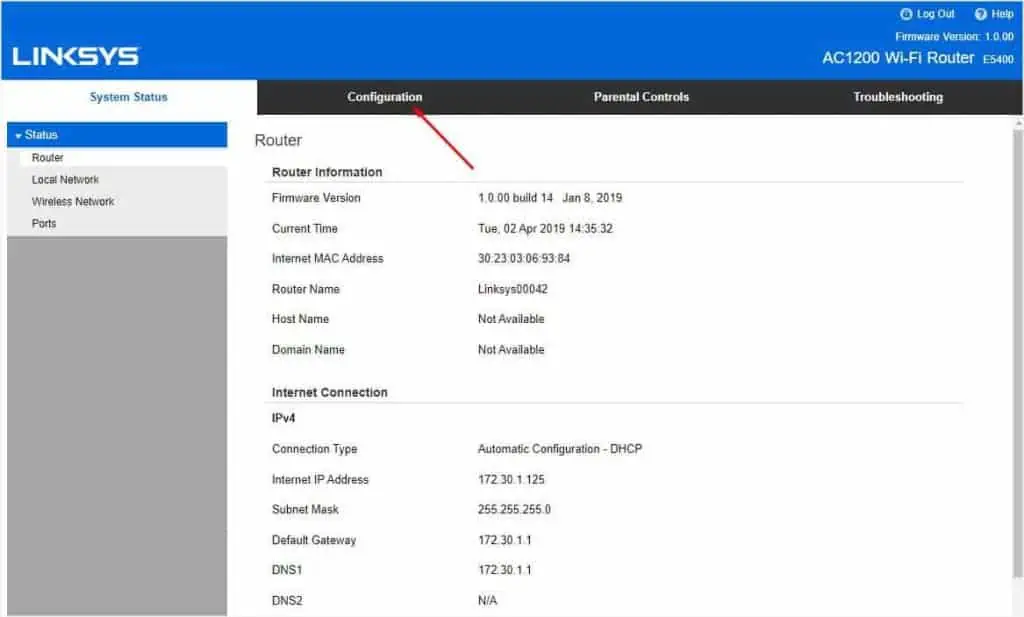
The involved steps are for the E5400 Wi-Fi Router. However, the steps may vary on other Linksys and Cisco models.
- Navigate to the Configuration tab.

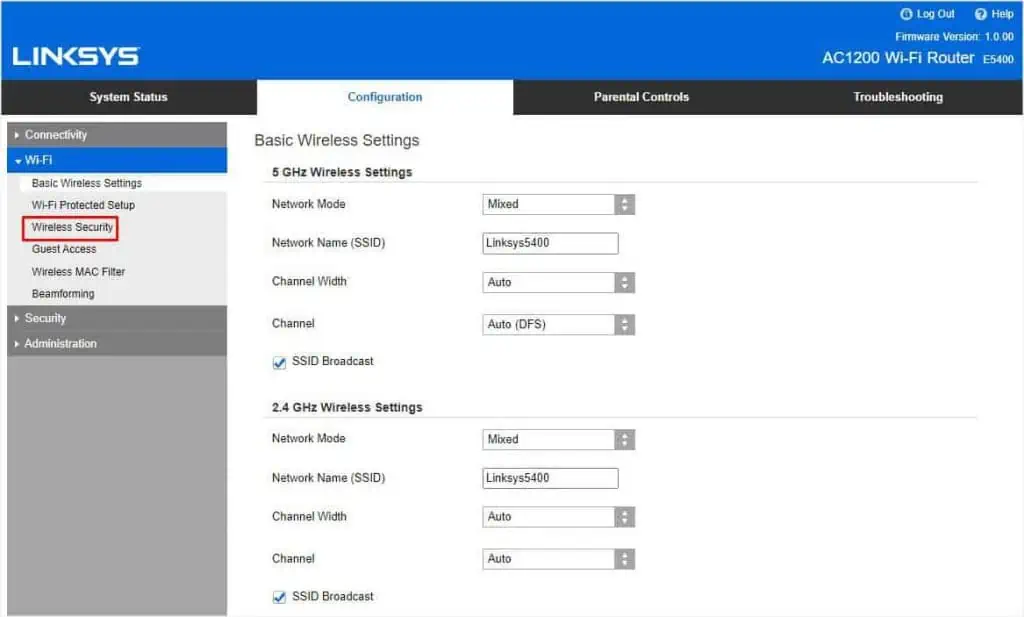
- Expand the Wi-Fi drop-down.
- Pick Wireless Security.

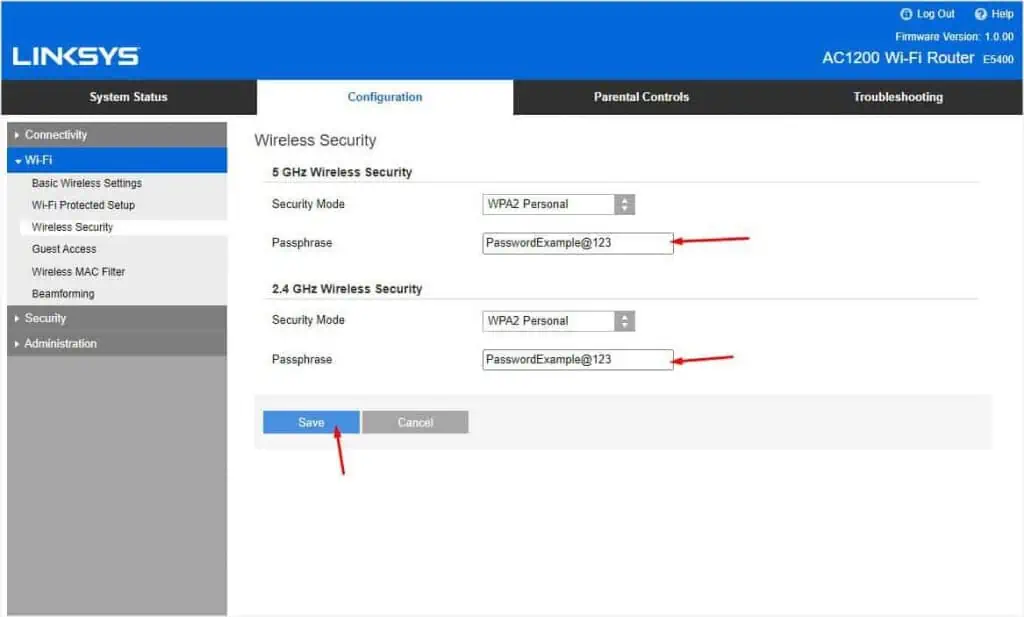
- Starting with 5 GHz Wireless Security, set the Security Mode. Do not keep it Disabled.
- Now, from the Passphrase field, change your Wi-Fi password.
- Repeat the same steps for 2.4 GHz Wireless Security.
- Finally, press the Save button.

On Netgear
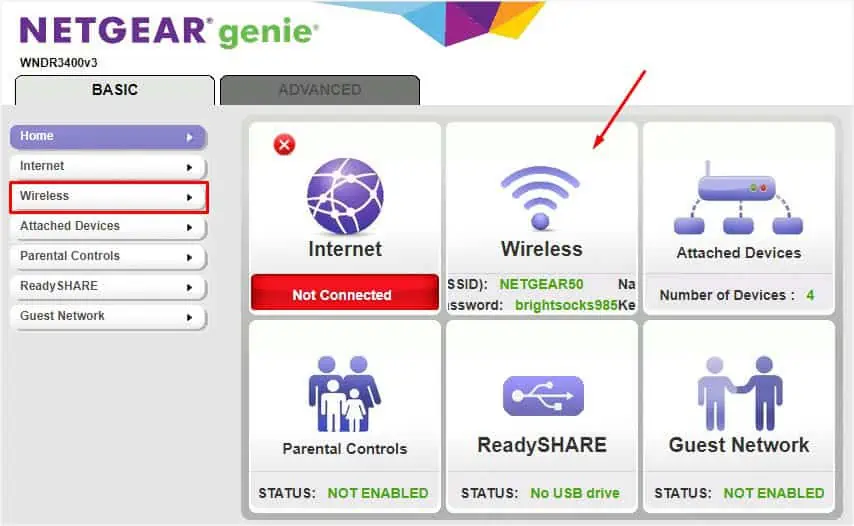
Here’s how to change the Wi-Fi password on the N600 Genie model. The demonstration may slightly vary on other Netgear routers.
- From the left pane, pick Wireless. You can navigate here from the right pane’s Wireless icon too.

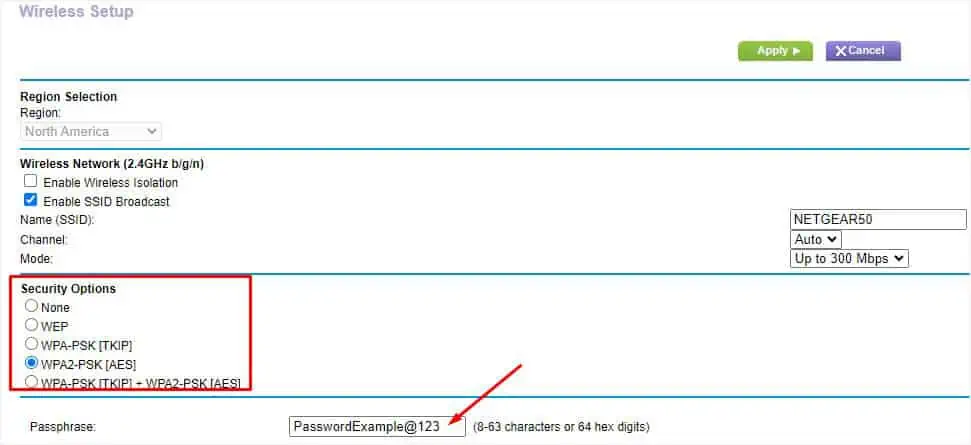
- Start by ensuring the SSID name, channel, and mode of 2.4GHz b/g/n are all correctly configured.
- Next, ensure you have set a security option.
- Get to the Passphrase section and change the Wi-Fi password. Note that it should be 8-63 characters or 64 hex digits.

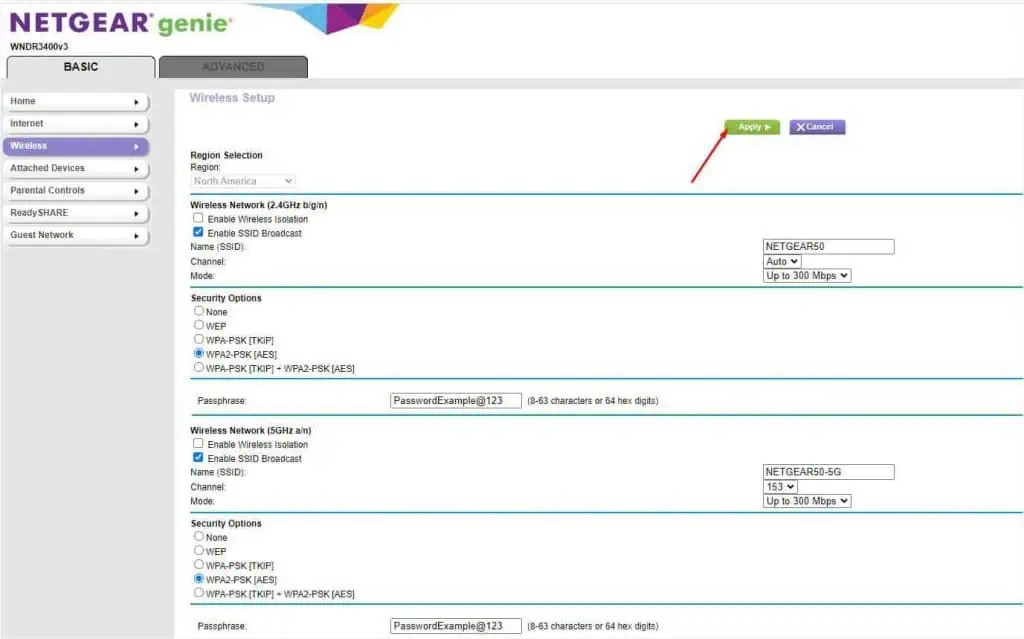
- Repeat the above steps for 5GHz a/n network settings.

- Finally, hit the Apply button from the top of the screen (under Wireless Setup).

On Belkin
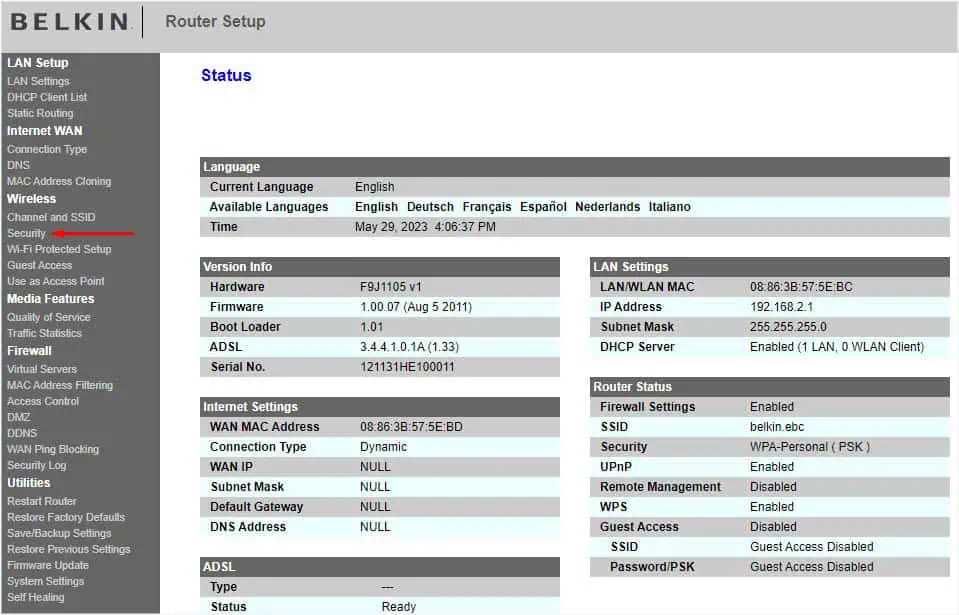
In the following steps, I’ve used the N450 model for a quick demonstration. The steps should be somewhat similar on every other Belkin router.
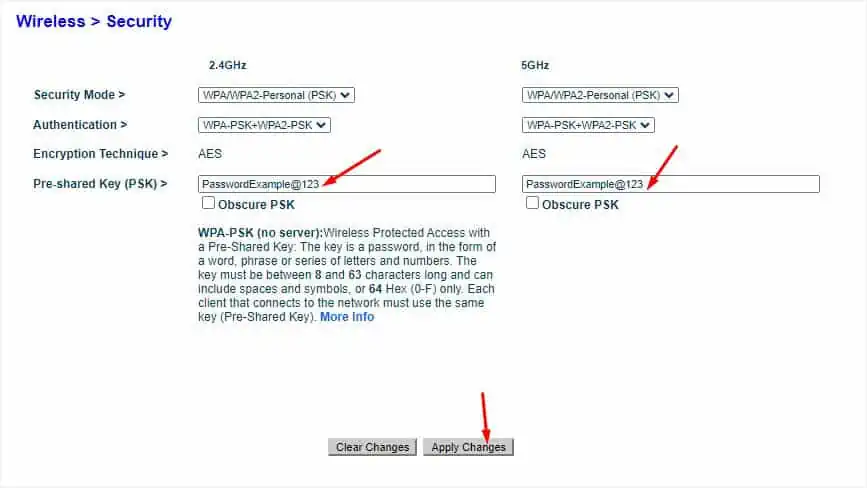
- In the left pane, look for the Wireless section. Select Security.

- Start by setting a security mode and authentication simultaneously for 2.4 GHz and 5 GHz bands.
- In the Pre-shared Key (PSK) field, enter your new password. You may deselect the Obscure PSK option to view the passcode you’re entering.
- Once that’s done, click on the Apply Changes button.

On D-Link
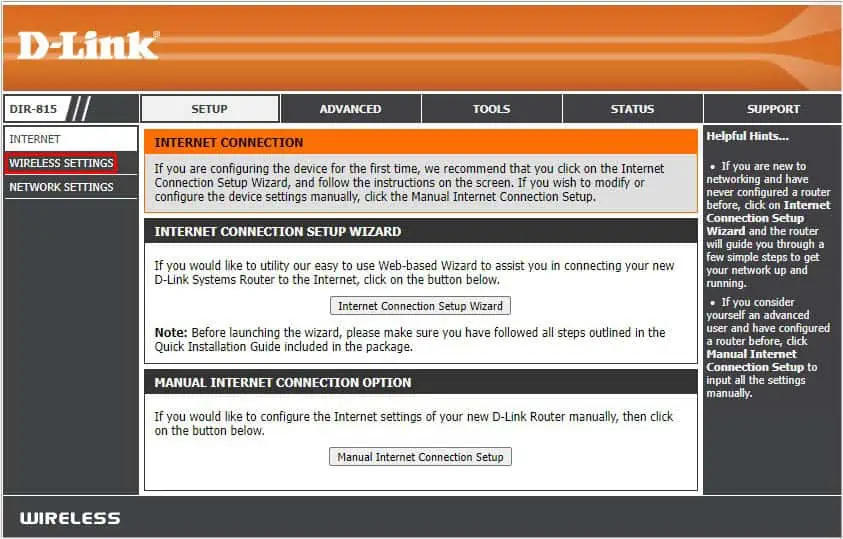
Here’s how you can change the Wi-Fi password on the Dir-815 router. Note the terms as they should somewhat be the same in other models too.
- After you’re successful in accessing the router’s interface, select Wireless Settings from the left part of the screen.

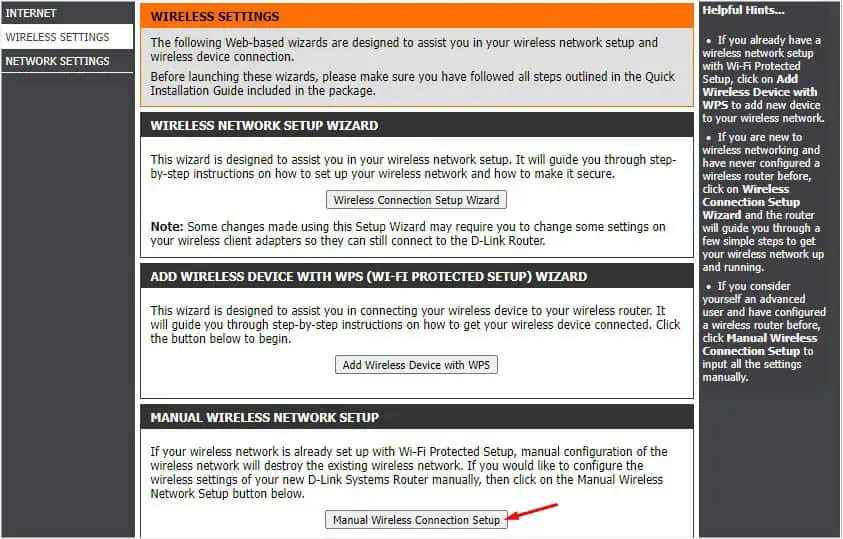
- Next, press the Manual Wireless Connection Setup button.

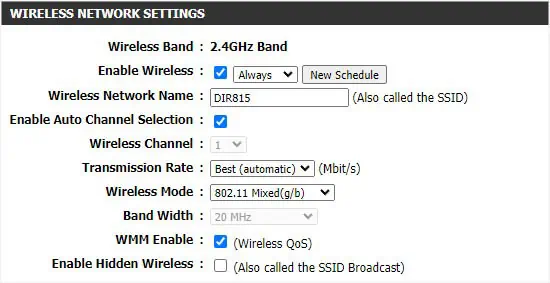
- Start with the 2.4GHz Band. You may deselect the Enable Wireless option to turn it off. Also, you may change the Wireless Network Name.

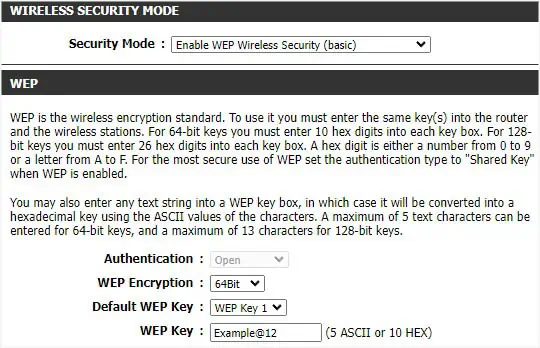
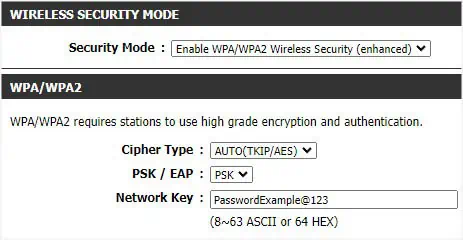
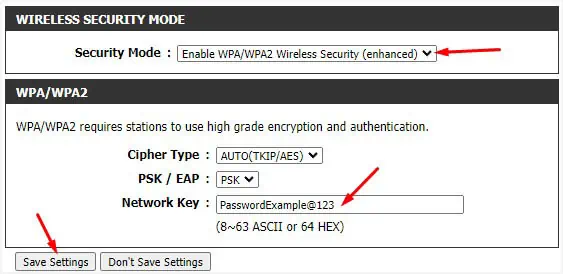
- To change the password, make sure you’ve first set a security mode.
- Based on the security key set, you’ll get a dedicated interface:
- For WEP Wireless Security (Basic), set the password in the WEP Key field.

- For WPA/WPA2 Wireless Security, set the new password in the Network Key field.

- Repeat the same steps for the 5GHz Band.
- Finally, press the Save Settings button from the top/bottom of the window.

Other Ways
We can change the Wi-Fi password without needing to access the router page through the web browser. Some popular brands offer users a dedicated mobile application that lets them configure a wide variety of internet-related settings.
For example, TP-Link users can download the Tether application. Similarly, ASUS has a dedicated ‘ASUS Router’ app available on both Android and iOS.
However, to use the application, you need to have an account. Also, not all router models are compatible with these applications. Since this can be a little time-consuming, I would rather opt for the step-by-step guide above.
Another way to change the Wi-Fi password is from the dedicated ISP application. However, not all provide this feature. So, if you want to know more, it’s better to contact your service provider to learn more.

