Changing the refresh rate of your monitor to a higher value will enhance your viewing experience since the monitor can display more frames per second, resulting in a much smoother screen.
In the context of gaming, a higher refresh rate monitor can provide a competitive edge by presenting more information on the screen, provided the system can deliver enough frames to match the monitor’s refresh rate.
So it’s ideal that you change the refresh rate to the maximum value supported by your monitor. However, setting a high refresh rate will consume more power, especially on a laptop or mobile device, so it is preferable that you lower the refresh rate in such cases.
Via System Settings
When setting a refresh rate, we recommend that you set the refresh rate to the maximum value supported by the monitor.
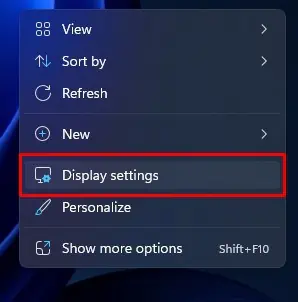
- Right-click on the desktop and select Display settings.

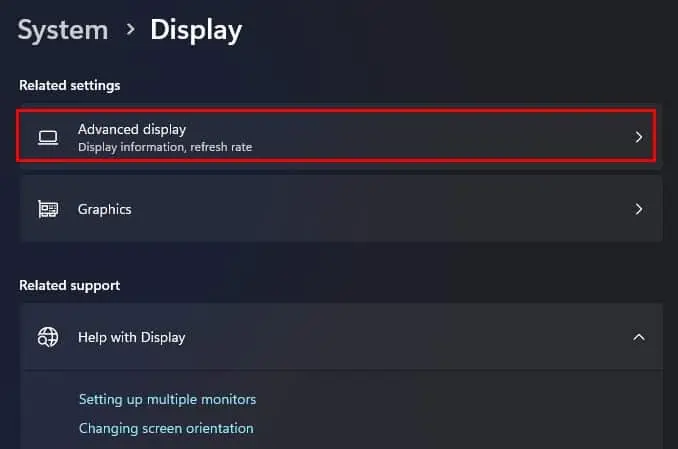
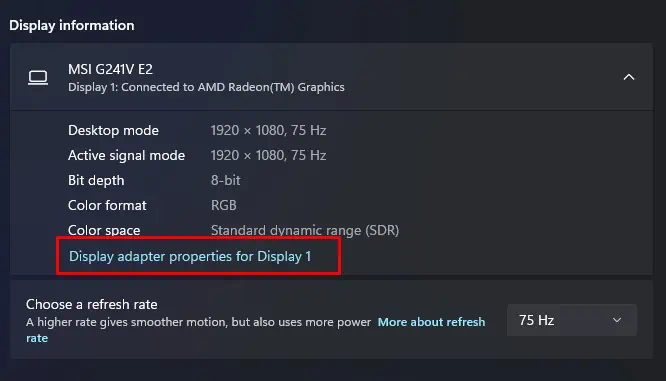
- Under Related settings, click on Advanced Display.

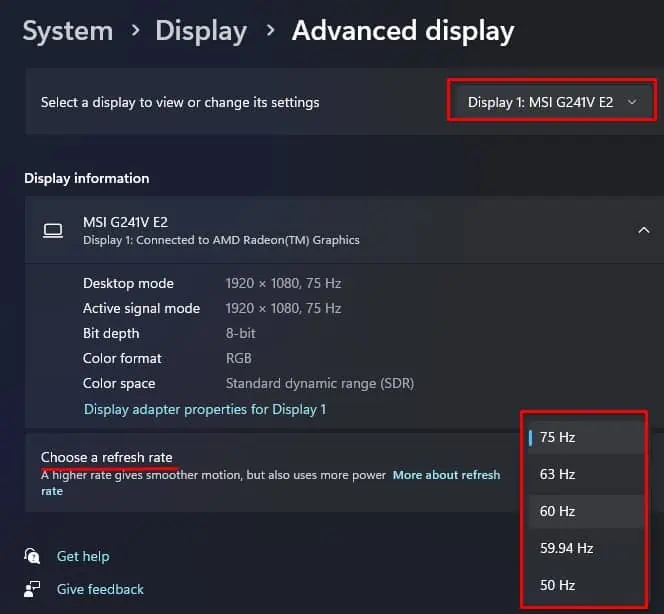
- If you have a multi-monitor setup, select the required monitor.
- Under Choose a refresh rate, set the Refresh Rate

- The screen might go black for a few seconds. After this, a prompt should pop up. Here, select Keep Changes.
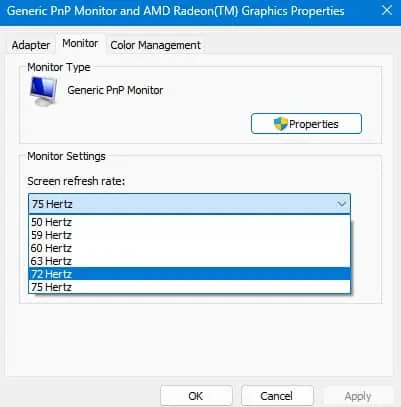
- If you cannot find an option to choose a refresh rate, click on Display adapter properties for Display.

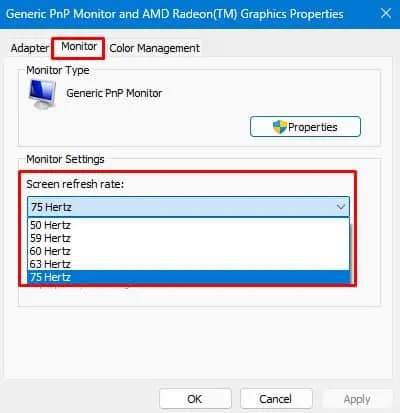
- Go to the Monitor tab and set Screen refresh rate from the dropdown menu.

- Click on Apply, then OK.
Via NVIDIA Control Panel
If you have an NVIDIA graphics card, you can also use the NVIDIA Control Panel to change the refresh rate of your monitor.
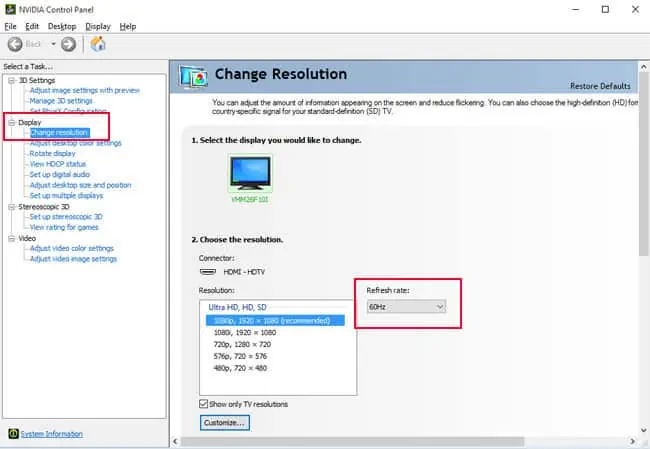
- Right-click on the desktop and select NVIDIA Control Panel. If you do not have it installed, install it from Microsoft Store.
- Expand Display and select Change resolution.
- First, select the display you would like to change.
- Under Refresh Rate, click on the drop-down menu and select the refresh rate that you want.

- Click on Apply.
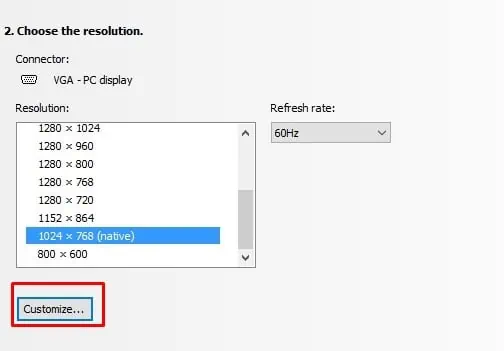
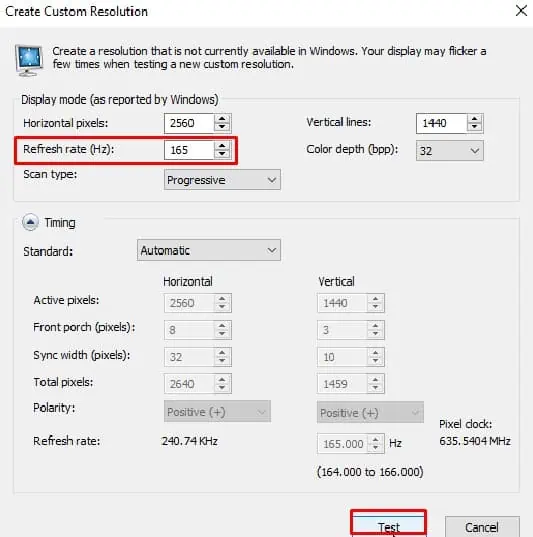
- If you want to set a custom resolution, go to Display > Change Resolution.
- Click Customize.

- Select Create Custom Resolution.
- Here, set refresh rate to any value equal to or below your monitor’s refresh rate.

- Click on Test.
- If the test goes correctly, Windows will now ask for a confirmation to save settings. However, if you set a higher resolution, the monitor might give you an Out of range error message.
Via AMD Software
If you are using a dedicated AMD card or have an AMD processor with integrated GPU, you can use AMD software to change the Refresh Rate on your monitor. AMD software also allows you to overclock your monitor if the monitor supports it.
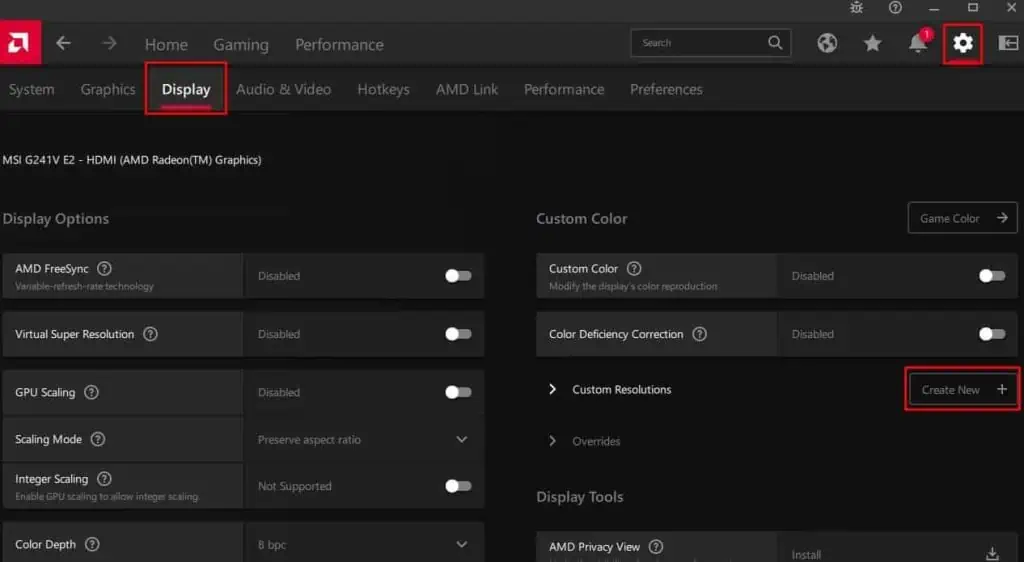
- Open AMD Software.
- Click on the Gear icon to open Settings.
- Go to the Display tab.
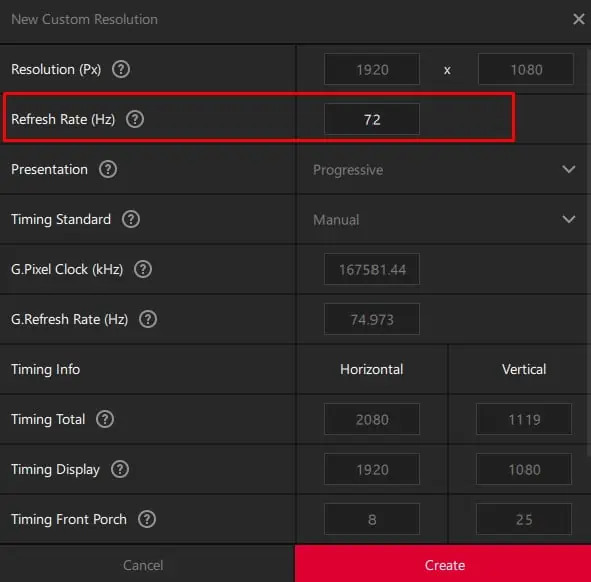
- Click on Create New on Custom Resolution.|

- On Refresh Rate, set a custom refresh rate lower than or equal to the monitor’s maximum refresh rate.

- Click on Create. The screen might flicker.
- Now, Open Settings and navigate to System > Display > Advanced display.
- Select your monitor and click on Display adapter properties for Display.
- Here, set the new refresh rate that you just set from AMD software.

Troubleshooting Issues After Changing Refresh Rate
Changing the monitor’s refresh rate will apply instantly and should work in most cases.
If you run into any issues like a black screen or screen tearing after changing the refresh rate, it could be the fault of the display port/cable or hardware limitation.
Check for Device Compatibility
Depending on the display cables/port and its version, it can only support up to a certain resolution and refresh rate.
So if you run into any issues like getting a black screen after changing the refresh rate, make sure your cable/ports support it.
Here is a list that shows the HDMI version along with the maximum supported resolution and refresh rate.
- HDMI 1.0 and 1.2: 60Hz at 1080p (2k), 30Hz at 1440p (2.5K) and 3440*1440 (3.5K) and 24Hz at 3840*2160 (4K) (for aspect ratio 21:9).
- HDMI 1.3-1.4: 144Hz for 1080p, 85Hz for 1440p, 60Hz for 3.5L and 30Hz for 4K.
- HDMI 2.0: 240Hz at 2K, 144Hz for 2.5K, 100Hz for 3.5K and 60Hz for 4K.
- HDMI 2.1: 480Hz for 2K, 360Hz for 2.5K, 300Hz for 2.5K, 180Hz for 4k and 50Hz for 8K.
Below we have listed the support for multiple DisplayPort versions.
- DP 1.0: 85-144Hz @ 2K. 60-100Hz @ 2K, 30-100Hz @ 3.5K and 24-30 Hz @ 4K.
- DP 1.2: 240 Hz @ 2K, 165 Hz @ 2.5k, 60Hz @ 3.5K and 75Hz @4K.
- DP 1.3: 360Hz @ 2K, 240Hz @ 2.5K, 120Hz at 3.5K and 4K and 30Hz @ 8K.
- DP 2: 360-600Hz @ 2K, 300-600Hz @ 2.5K, 165-300Hz @ 4K and 30-85Hz at 8K
To check the display port versions, we also recommend that you go through the motherboard’s specification list. Most motherboards released today have the latest version of DP and HDMI ports. So this should not be an issue if you have the latest motherboard.
As for cables, it can be quite difficult to determine their version. Check if the cable has any labels indicating its version. If you do not see any writing on the cable, check the connector.

If it says 8K on an HDMI cable, it is an HDMI 2.1. As for DisplayPort, if it says 8K, the cable is either DP 1.3 or 2.0.
Adopt Adaptive Sync

If you have a lower-end system that supplies fewer frames compared to the monitor refresh rate, the monitor will duplicate some frames to fill in the missing information. This can result in what looks like freezing or stuttering since the image on the screen is not updated.
On the other hand, if you have a high-end system that produces a high frame rate above the monitor’s refresh rate, the monitor may start to display a new frame before completing the previous frame. This might result in screen tearing, where the images on the screen are distorted or blurry.
The solution to both these issues is enabling adaptive sync. It sets the monitor’s refresh rate depending on the number of frames it receives, removing any stuttering or screen tearing problems.

