If multiple users are accessing the same computer, it’s pretty sure that each one wants to use their preferred setting. This is why most of us create separate sign-in accounts with individual user profile.
Having independent profiles is advantageous until you start experiencing issues with your user account. Sometimes, one of your user profiles may get corrupted and throw errors like ‘User profile cannot be loaded,’ ‘User profile service failed the sign-in,’ etc.
Whatever the scenario, there are just two things you can do – either completely remove the account from your PC or simply delete their user profile to reset it. Indeed, the second one looks much more favorable, and that’s exactly what we will cover in this article.
User Account Vs. User Profile – Are They the Same?
Although user account and user profile may sound identical, they are entirely different terms. While the former is the account that logs you into Windows or any other OS, the latter is a collection of settings for that individual user.
In Windows, you can create two types of user accounts – administrator and standard. While an administrator can tweak various system settings and configure the PC as a whole, a standard user can only use the settings set by the former. Fortunately, Windows allows you to change the administrator option, meaning you can easily convert a standard user to an administrator and vice versa.
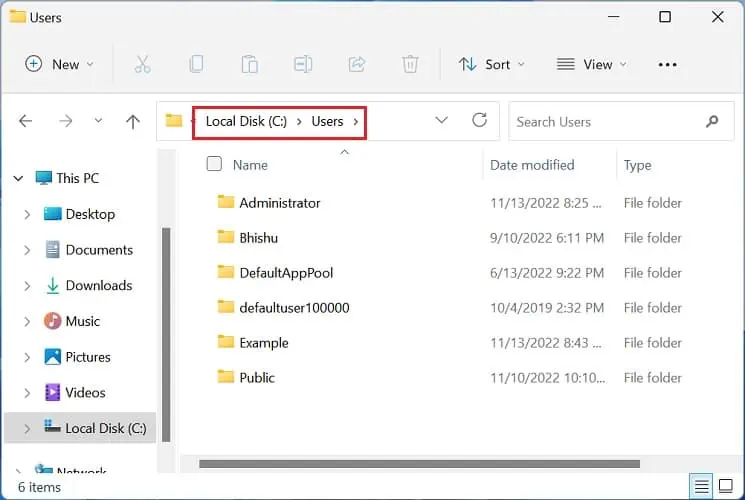
Regardless of the account type, each user can have personal preferences, like theme, color, audio settings, desktop background, etc. Basically, Windows records each and everything a user does on his account and stores them in this location: C:\Users. Well, you can open any user profile here and find several files and folders belonging to that user, like Contact, Desktop, Document, etc.
Interestingly, if your user account is set to a roaming profile (over the local one), these preferences are stored on a network server. Thus, you can even transfer your user profile to another computer.
To summarize, a user account holds the information that lets an authorized user access their content, while the user profile determines how their Windows environment is maintained. Therefore, deleting a user account will remove the user completely from your PC. On the other hand, deleting a user profile will remove just the associated data, but your account remains, and you can start from scratch.
How Can I Delete a User Profile on Windows 11?
Before deleting a specific user profile, ensure that you have signed out from the account and are using an administrator or a standard with administrative privilege. Otherwise, you’ll likely encounter the Folder in Use error (in file explorer) or may find the option grayed out (in Advanced Settings).
If you’re having any issues with deleting a user profile, this section includes three simple yet effective methods to solve your problem.
In Advanced System Settings
The most effective way to delete a user profile is using Windows’ advanced settings. Here, you can find a dedicated section for User Profiles that deals with the desktop settings related to your sign-in. So, without further delay, let’s jump into the detailed guide on how to do this on Windows 11:
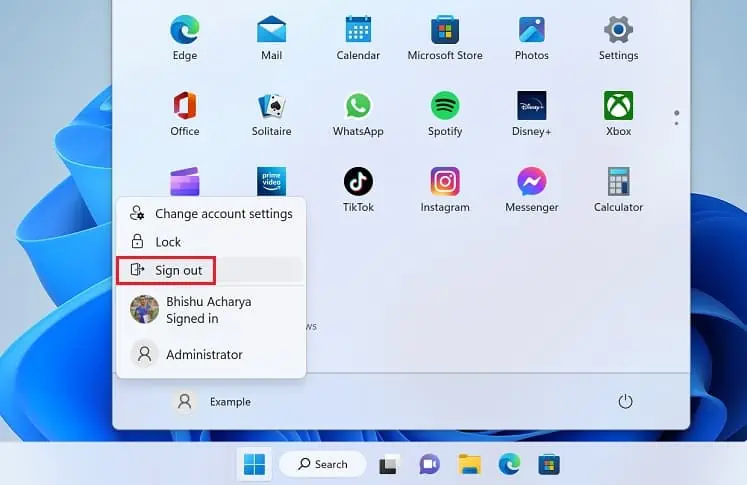
- If you’re signed in to the target user account, kindly move to the Start Menu and press your profile icon.
- Here, select the Sign out option.

- Now, log in to Windows using an administrator account. If you do not have any, we recommend using the built-in administrator account. Also, you can add an administrator account in Windows yourself.
- Once you’re signed in, press the Windows + I hotkey to launch the Settings app.
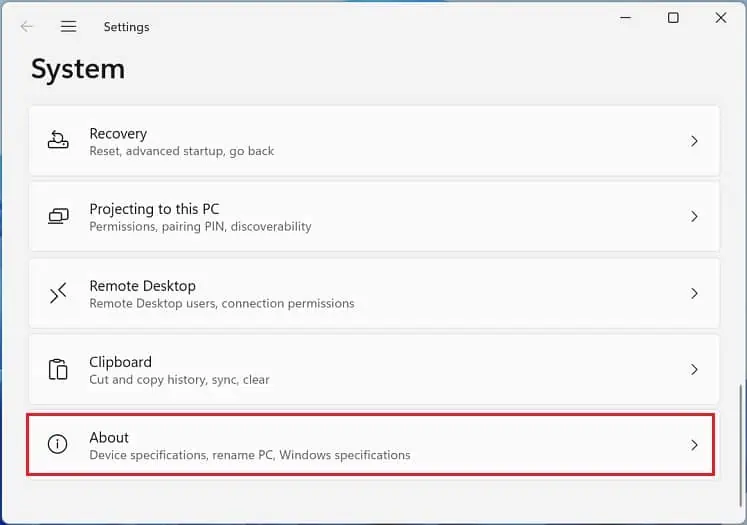
- Next, go to System > About.

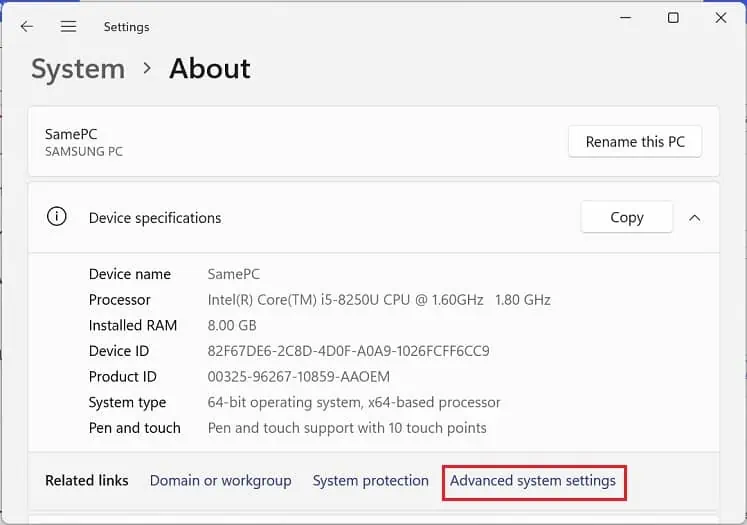
- Under Device specifications, press Advanced system settings.

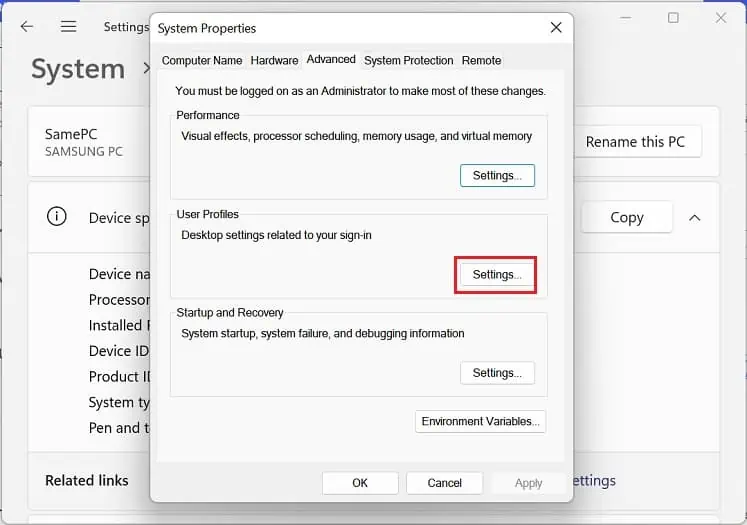
- Navigate to the User Profiles section and tap the Settings button.

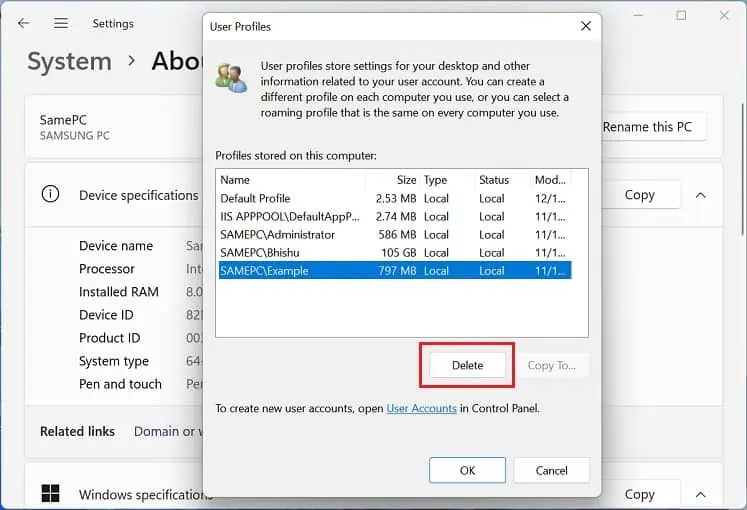
- Now, the User Profiles window should pop up. Here, select your target profile and hit Delete.

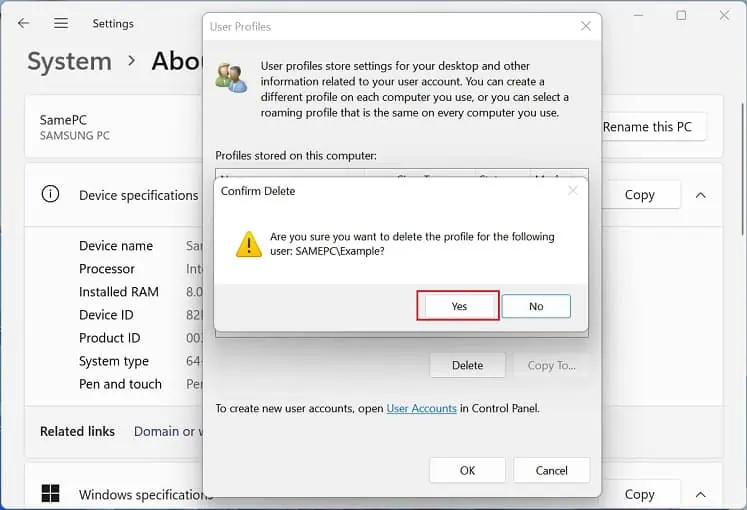
- Finally, press the Yes button to confirm the profile deletion.

Using File Explorer & Registry Editor
Another method to remove a user profile is directly from the stored location on your boot drive. However, just deleting the folder won’t do, and it will instead trigger the ‘We can’t sign into your account’ error. Thus, you need to delete the dedicated subkey in Registry Editor to make this work:
- Firstly, sign out of the target account and log into Windows using an administrator account.
- Next, navigate to the following path:
C:\Users
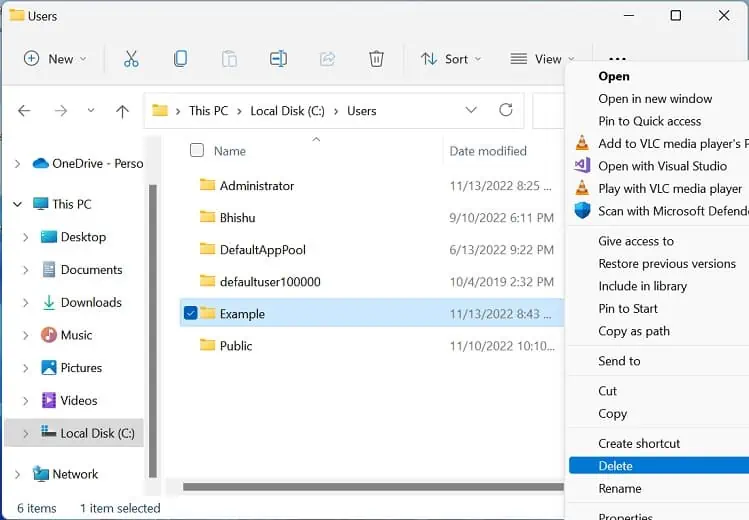
If you have changed the boot drive to D, E, or others, you need to navigate to your respective one. - Here, select the target profile and hit the Delete key on your keyboard. Or, you can right-click and select Delete.

- The Folder Access Denied dialogue box might pop up while trying to delete a user profile from a standard account with administrative privilege. In such a case, press the Continue button to confirm the deletion.
- Now, press Windows + R to launch the Run utility. Here, copy and paste the below command that should open Registry Editor:
regedit.exe - Here, navigate to the below path:
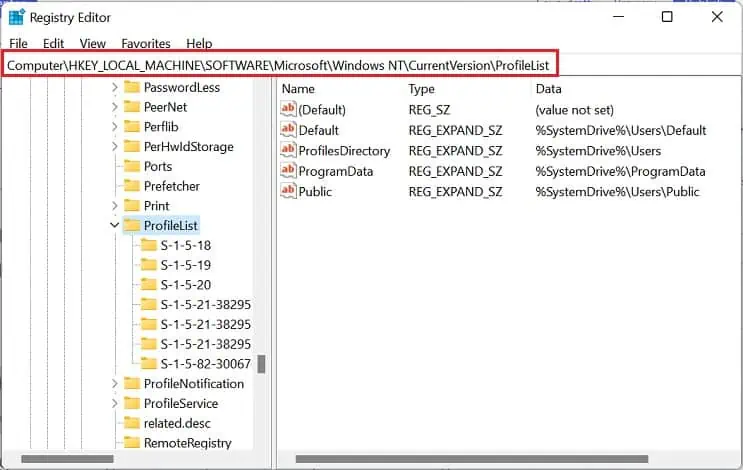
Computer\HKEY_LOCAL_MACHINE\SOFTWARE\Microsoft\Windows NT\CurrentVersion\ProfileList
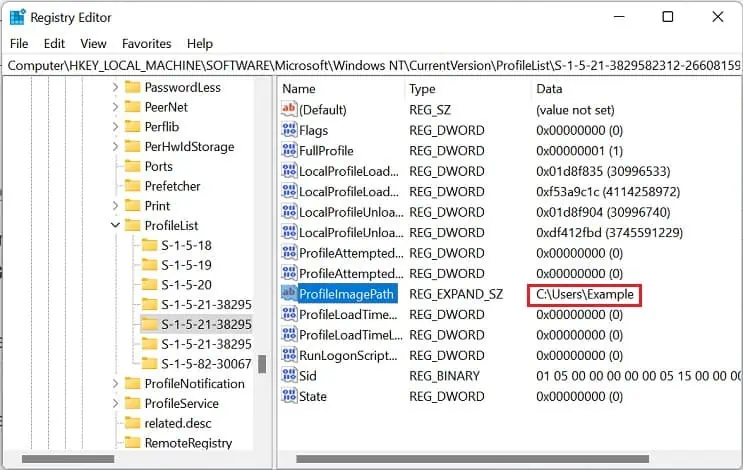
- Expand this and start looking for the target sub-key. To do this, start selecting each one and move to the right pane. Get to ProfileImagePath and check its Data field.
For example, we are trying to delete the user profile of the ‘Example’ account. So, the Data field we’re looking for isC:\Users\Example.
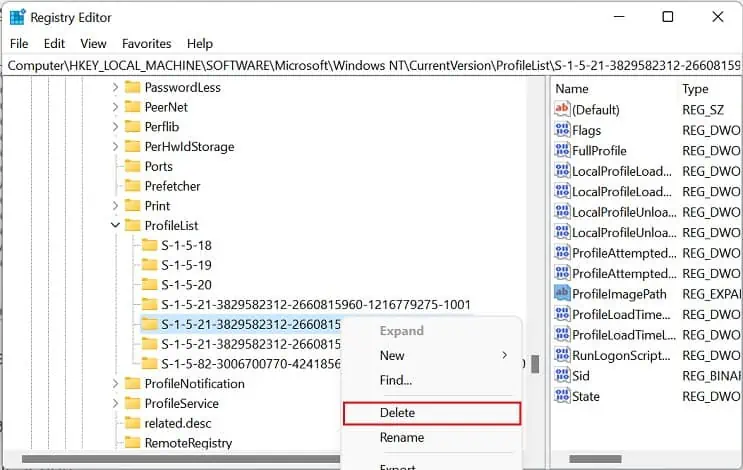
- Once you’ve found the target profile, get to the left pane again, right-click on the key, and select Delete. In our case, we delete the ‘
S-1-5-21-1900395867-263830858-1113368924-1001’ as shown below.
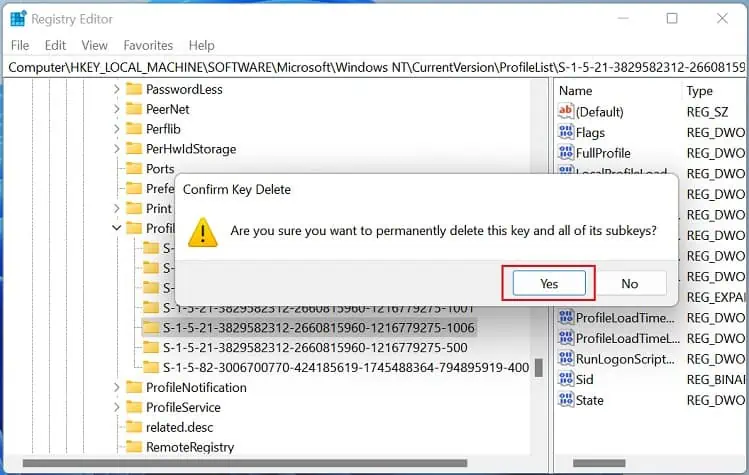
- Then, tap the Yes button to confirm your action.

- Now, sign into the target account, which should take you to the ‘We are getting everything ready for you’ screen, meaning the deletion is successful.
NOTE: Make sure to backup your registry before making any changes to it.
In Local Group Policy Editor
Interestingly, you can even set a policy that automatically deletes the user profile if it’s inactive for a certain number of days. Indeed, this can help increase the disk space as multiple users accessing your PC can take up an unnecessary amount of storage. Kindly follow the below instructions on how you can do just that:
- In the Run dialogue box, use the
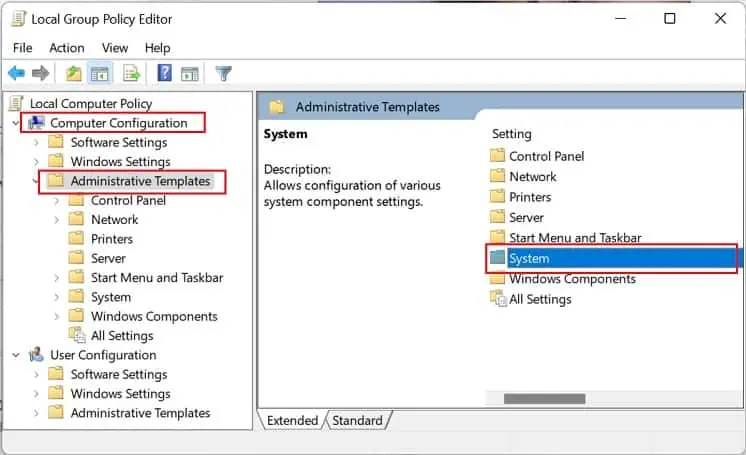
gpedit.msccommand to launch the Local Group Policy Editor. - Now, expand the Computer Configuration and select Administrative Templates.
- Then, move to the right pane and double-click the System folder.

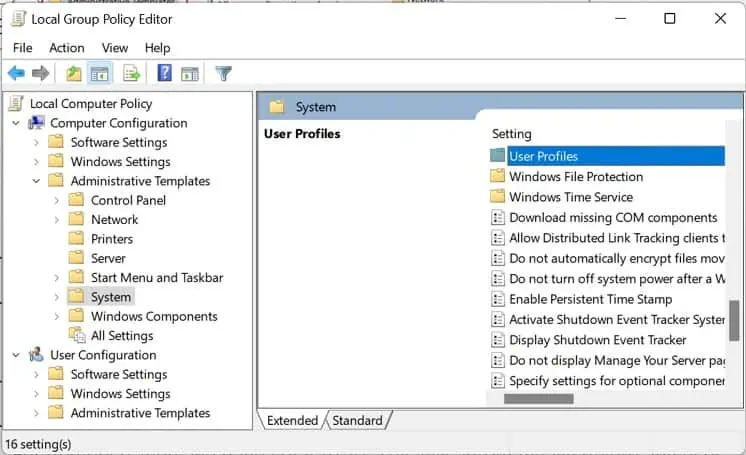
- Scroll down and get into the User Profiles folder.

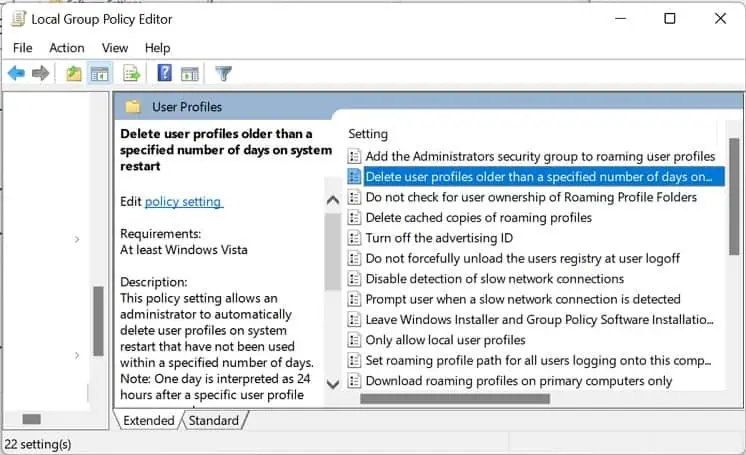
- Here, open the ‘Delete user profiles older than a specified number of days on system restart’ setting.

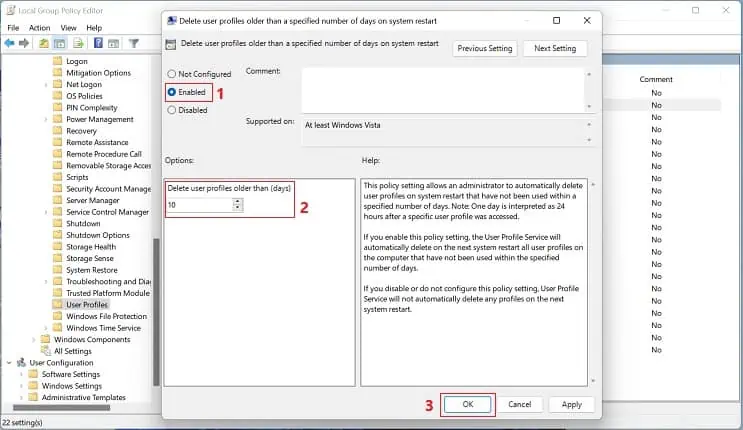
- In the new dialogue box, select the Enabled option.
- Next, move to the Options section and select the desired number of days. For demonstration, we have set it to 10. This will automatically delete any user profile that’s inactive for ten days.

- Finally, hit the Ok button to save this setting.


