The Fn key on the bottom of your Keyboard boosts the function key’s (F1-F12) capability to perform many media-related tasks, such as managing volumes, brightness, and other minor things on Windows devices. The major objective of this key is to enhance your productivity by giving you access to some Windows functionality under a keystroke.
If you enable the Fn lock Key, the Function key priority mode will be turned on, which will require you to press the Fn key to use media features from the Function keys. Disabling the Fn lock, on the other hand, will let you use the media features directly from the function keys without pressing the Fn key.
In today’s article, we will discuss how you could Enable or Disable the Fn lock Keys on your Windows device.
Enable/Disable Fn Lock Key in Windows
You can disable/enable the Fn lock keys on Windows devices to manage the media functionality of the Function Keys. To do this, you can use the dedicated Fn lock keys, or even configure it from the BIOS.
From the Function Lock Key
Most Keyboards nowadays have a dedicated fn lock key. You can use this key to disable or enable the fn key. To use this button, Press the Fn Key simultaneously with the dedicated lock key to disable or enable the fn key.
Generally, the fn lock key is the Esc key that lets you enable or disable the functionality of the Fn Key. In some cases, the Fn lock key might be different too. One way to identify the Fn lock key is through a small lock icon printed on the top of the Key. 
Some variations of the lock keys that are available on different devices are listed in the table.
| Manufacturers | Fn Lock Key Combination |
| Dell/Lenovo | Fn + Esc |
| HP | Fn + Shift or Ctrl+Fn |
| Asus | Fn + Esc or Fn + Insert or Fn + Shift |
Note: The dedicated function lock keys might differ with the laptop model or manufacturer. Check the user’s manual or contact the manufacturer to determine the key on your device.
Change Function Key Priority From BIOS
Using BIOS, users can configure many different hardware components of their device. The Fn keys can also be enabled or disabled from it. If the Fn key isn’t working right now, it’s possible that it’s been disabled in the BIOS.
To enable or disable the function keys from the BIOS,
- Press Windows Key + I to go to the Settings.
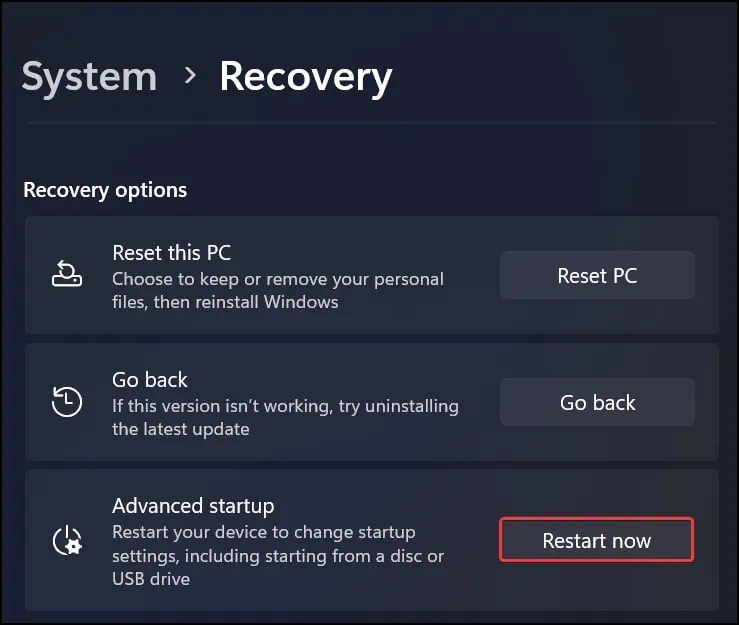
- Go to System > Recovery.

- Under Recovery options, find Advanced startup and click on Restart now.

- The PC will now boot into the Recovery environment.
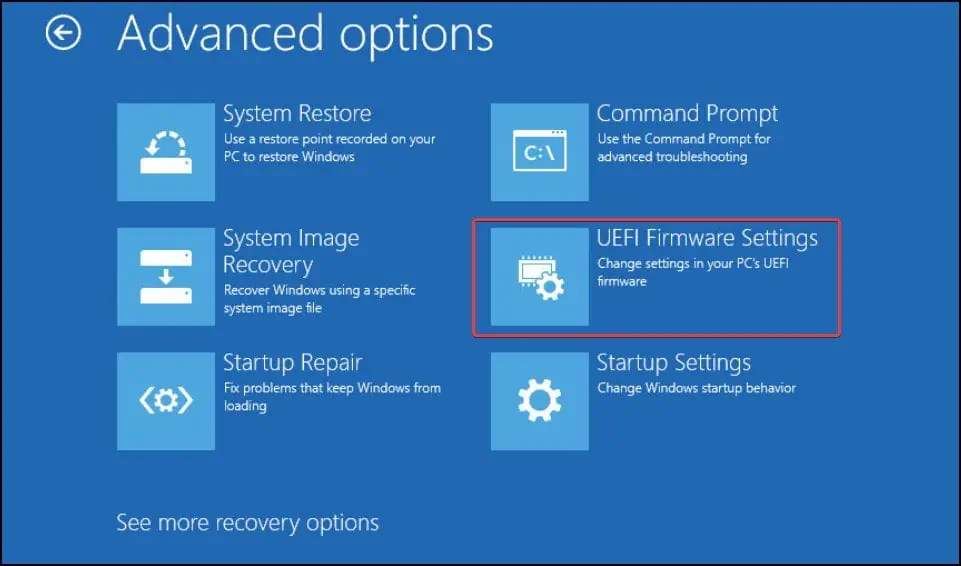
- Now, go to Troubleshoot > Advanced options.

- Click on UEFI Firmware Settings.

- Click on Restart.
- The system will now restart to BIOS.
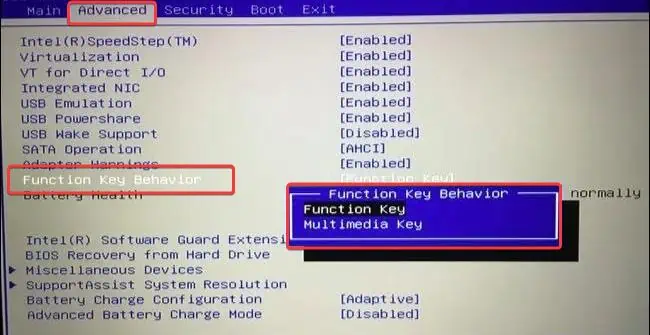
- Go to the Advanced tab.
- Navigate to the Function Key Behavior section and change the Function Key to Media Key. This will disable the Fn key on your Keyboard. Similarly, change it to the Function key to enable the Fn Key.

- Save the changes and exit from the BIOS.
- When the Windows boots up, check if the function keys are working as intended.
Note: The configurations related to Function key behaviors and priority can also be located under other tabs. For instance, On Dell laptops, it can be under the Advanced tabs. Check under all the menus and sections thoroughly to find the function key configurations.


