If you want to access your old laptop but you’ve forgotten its password, the ideal method is to factory reset it. Basically, this erases all your data, including the sign-in option, and restores the operating system to default.
Generally, logging in to your laptop should be easy if you have set up a Microsoft Account. This is because you could easily reset your password even if forgotten. But you can possibly not do it if you got it from your friend or bought a pre-owned laptop. In such a case, the only option left is to restore it to factory settings.
So, if you’re also stuck on the sign-in screen and want to access the laptop, you’re at the right place. Here, we have explained what a factory reset does and some easy techniques to do without a password.
What Does Factory Resetting a Laptop Do?
Factory reset is an option within Windows OS that sends the PC to its default system state. Usually, we perform the factory reset on Windows to solve any hard drive and OS-related issues.
Since this option deletes every software that’s creating issues on your system, we recommend factory resetting your laptop if you’re trying to sell it or you recently bought a used one. This way, even the lagging issues get resolved, and you can use the old laptop as if it’s brand new.
How to Factory Reset Laptop Without Password
Factory resetting can be easily done within the Settings when you’re already logged in to your laptop. Well, you’ll just need to go to System > Recovery > Reset This PC. Then, move ahead with the necessary steps.
However, you need to use alternative methods if you do not remember your laptop’s password. In this section, we have explained the proven ways to factory reset your Windows 11 laptop.
From Windows Recovery Mode
To enter the Windows Recovery Mode, we recommend checking the user manual as every manufacturer has different dedicated keys to open it. Generally, most PCs can navigate you to the recovery screen by pressing the F11 key when Windows is booting.
Moreover, you can use bootable media and select Repair your computer to open the Windows Recovery Mode. Also, you can directly navigate to this screen from the login screen, and here are the involved steps you need to follow:
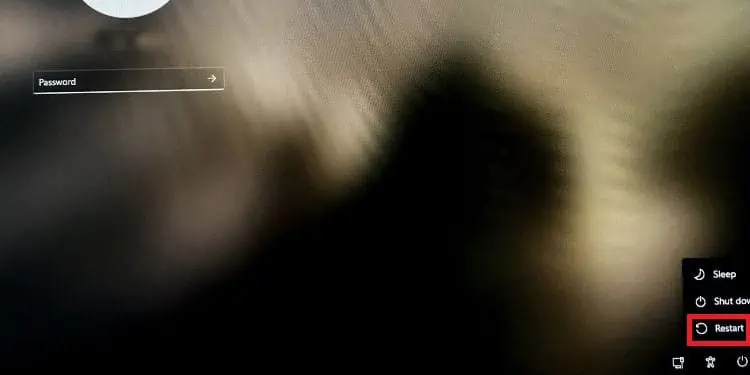
- Once you’re on the log-in screen, press the power icon in the window’s bottom-right corner.
- Now, while holding the Shift key, press the Restart option.

- Then, you may need to choose the Restart Now button if any other apps are running.
- Wait for several seconds until your system takes you to the Windows Recovery Mode.
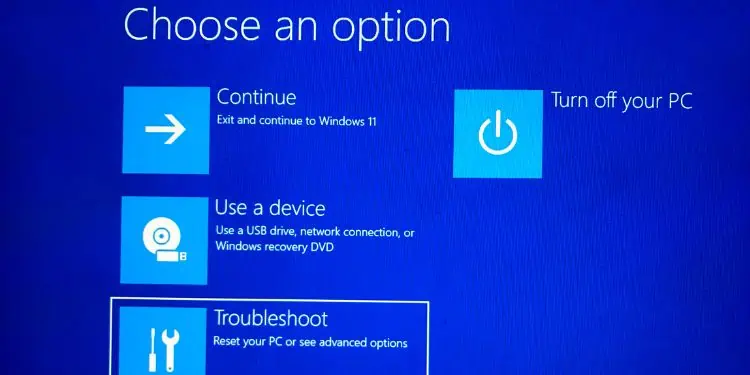
- Once the Choose an option window loads, select Troubleshoot.

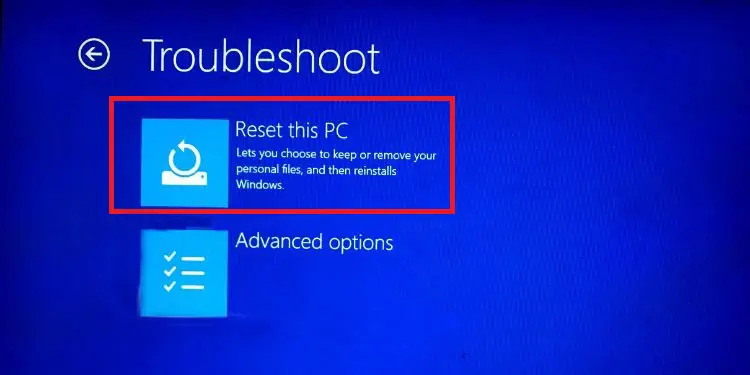
- Next, click on Reset this PC.

- Then, you’ll be shown two options – Keep my files and Remove everything. If you want to keep your personal files, choose the first option. But if you want your laptop to restore everything to its default settings, select the latter.

- If you selected Remove everything, you’d likely get two more options – Cloud Download and Local Reinstall. Choose one as per your requirement.

- Again, you’ll need to select either Just remove my files or Fully clean the drive. Well, we suggest selecting the second option if you wish your entire system to be restored.
- Now, click on the Reset button to start the reset process. This may take more than an hour.
- Once the factory reset is complete, the setup window pops up. Now, you can move ahead and complete the system setup.
- You’ll be asked to create a Microsoft account when this is completed. If you already have one, log in using your credentials. Otherwise, create an account and ensure you keep a password you remember.
From Your Laptop’s Recovery Partition
Interestingly, every manufacturer offers a recovery partition that can be accessed using a dedicated function key.
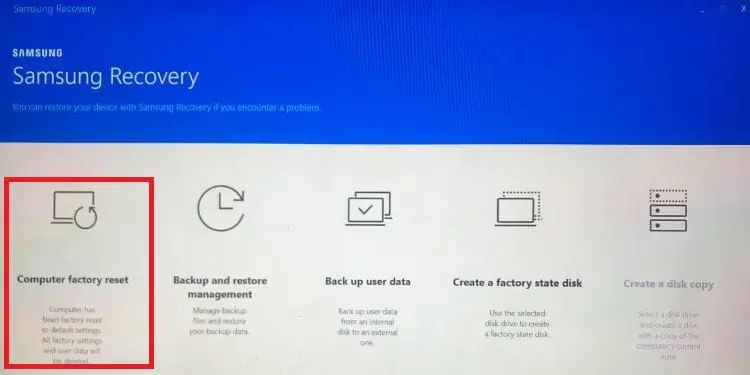
- Factory reset your laptop
- Perform backup and restore management
- Back up user data
- Create a factory state disk
- Create a disk copy
In this section, we have included the steps for some of the most popular laptops. If we have missed out on yours, the process is quite similar to any of them. So, all you have to do is read the user manual or refer to the internet to check the dedicated key for your laptop.
On Samsung
Samsung doesn’t just manufacture mobile phones but is also equally popular for producing laptops. For demonstration purposes, we have used Samsung Notebook here. Nonetheless, the steps should be similar for every other Samsung laptop too:
- Power on your device and wait until the Samsung logo pops up.
- Now, long hold the F4 key, and you’ll notice a Please Wait signal on the screen.
- After several seconds, your laptop initiates Samsung Recovery.

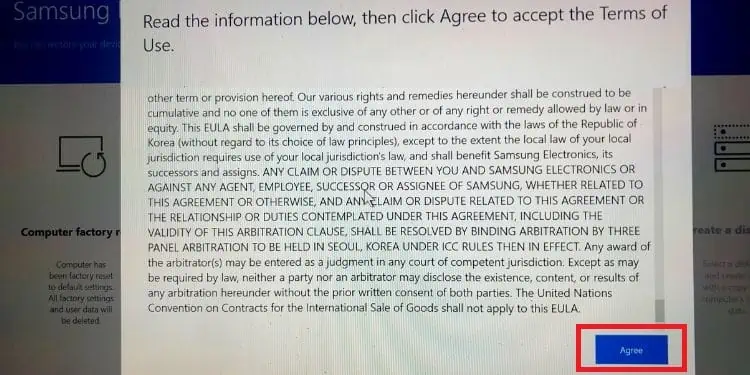
- Wait until the Terms of Use page loads. Scroll down and click on the Agree button.

- Next, in the Samsung Recovery window, choose Computer factory reset.

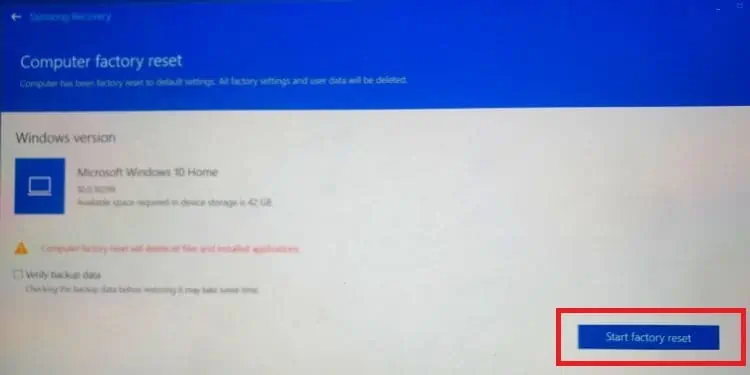
- Then, check the Verify backup data option so that all your files and data will be backed up.
- Now, choose the Start factory reset option and wait until the reset is complete.

- Once the reset is complete, your PC restarts, where you can log in to your Microsoft account and set the desired password.
On Lenovo
Lenovo has adopted OneKey Recovery to factory reset your laptop without needing a password. However, this option is available only on the Ideapad series.
For demonstration purposes, we’ve used the Lenovo G40 model. Nonetheless, the steps should be similar to other models as well:
- Find and press the Novo button that’s generally located on the left side of your laptop. You may need a pointed object to press the button.

- Once the Novo Button Menu pops up, choose System Recovery. In some models, you can press the F10, F8, or F12 keys to navigate here.

- Wait for several seconds until the OneKey Recovery window opens up.
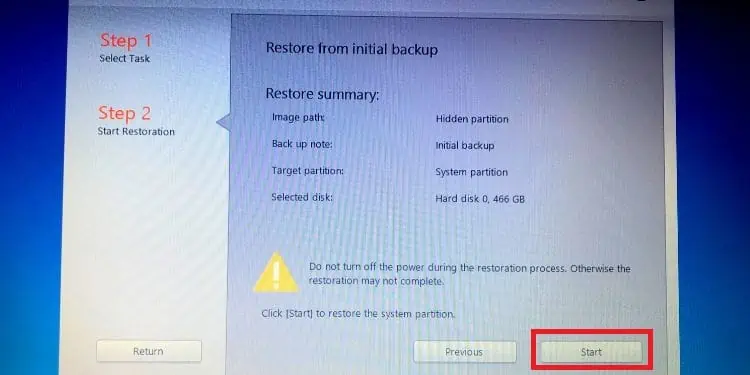
- Now, choose either Restore from initial backup or Restore from user’s backup and hit the Next button.

- Then, click the Start button to start a factory reset on your Lenovo laptop.

- Once the recovery is complete, set up Windows as per the screen instructions.
On Dell
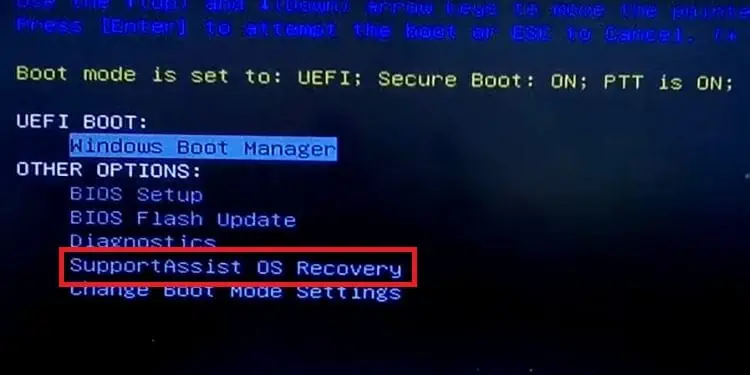
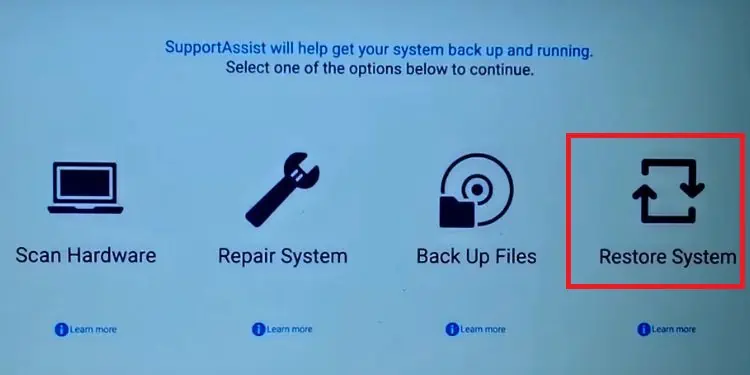
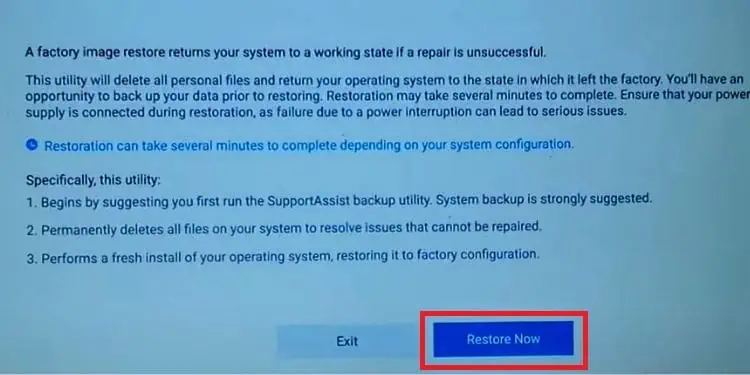
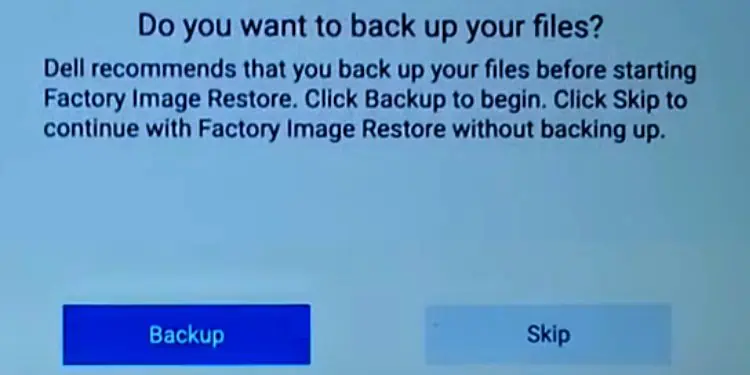
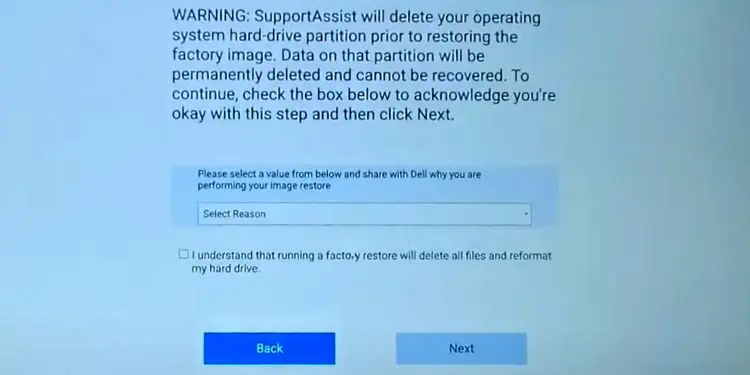
Dell users can factory reset their laptops using the SupportAssist OS Recovery feature. However, this option is only available on some models. Go through the below guide to restore your settings to default on a Dell laptop:
- Power on your PC and hit the F12 key multiple times to enter BIOS mode. In some models, you might need to use other keys. So, we suggest looking up the internet to check the key that works for you.
- Under Other Options, choose SupportAssist OS Recovery.

- Then, wait for about a minute until the feature loads and select Restore System.

- Next, click on the Restore Now button.

- Continue hitting Next until the ‘Do you want to backup your file’ message appears. Choose Backup if you want to; else, you can choose Skip.

- Now, select a reason why you’re performing the reset. Then, click on Next.

- Wait for the factory reset to complete and tap on the Finish button.
- Once the reset is complete, you can proceed with the instruction and install Windows.
Reinstall Windows Using an Installation Media
Generally, both resetting and reinstalling Windows are applicable if you’re trying to delete everything from your PC. So, if you have an original disk or it’s feasible to create a bootable drive, you can easily reinstall your OS.
To reinstall Windows using an installation media, you’ll need another Windows PC and an 8 GB or higher storage USB drive to make it bootable. Also, download Rufus from their official site as the below steps involve using this open-source application:
- Firstly, visit Microsoft’s official website on your other PC and download the Windows 11 ISO file.
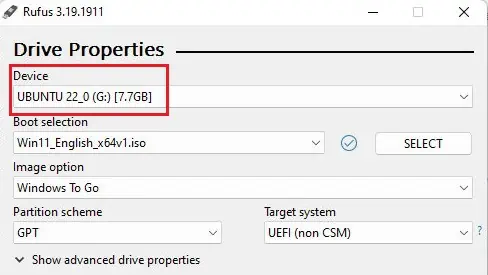
- Now, launch Rufus and under Device, choose your flash drive.

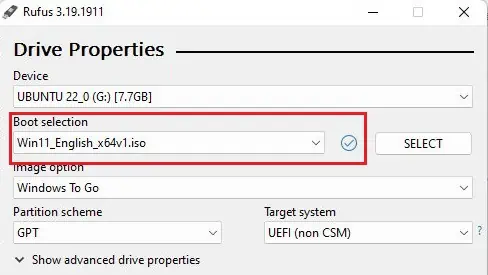
- Next, under Boot selection, select the downloaded ISO file.

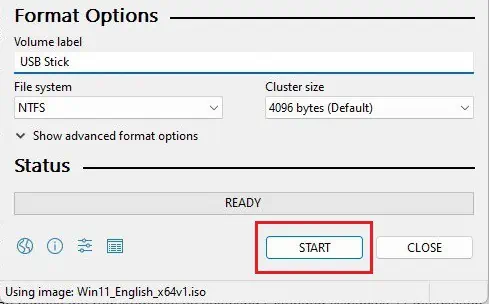
- Then, click on the START button to make your drive bootable.

- Once a warning message pops up, choose Ok.
- Unplug the USB cable and insert it into your laptop.
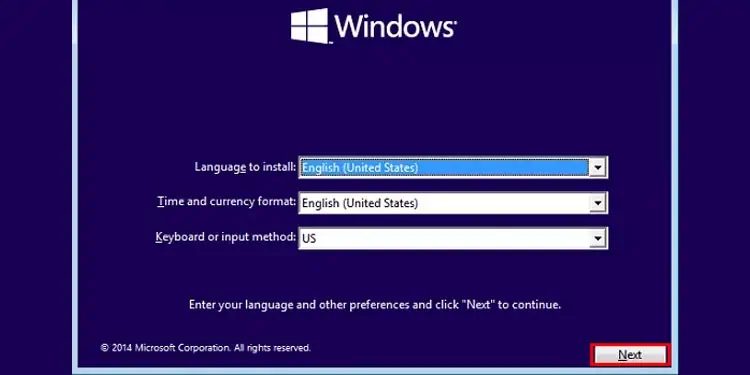
- Power on your laptop and wait until the Windows Setup window pops up.

- Next, choose the language, time, and keyboard. Then, select Next to continue.
- Now, click on the Install button.
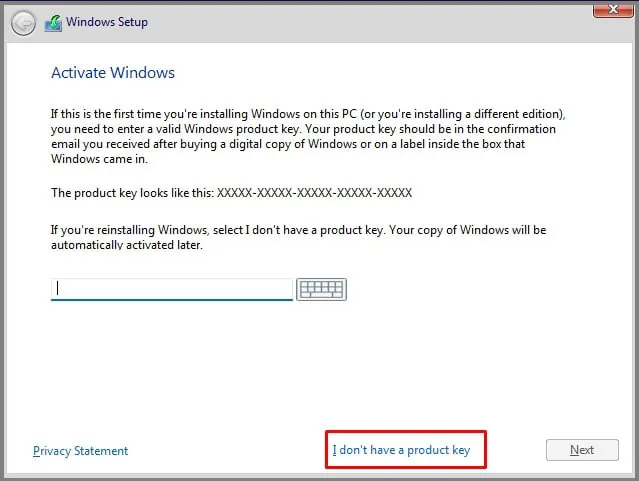
- If you have the activation key, enter it. Else, you can choose I don’t have a product key from the bottom of the dialogue box.

- Then, select the OS and proceed by clicking on Next.
- Check the Microsoft Software License Terms and again click on Next.
- Now, you’ll get two options – Upgrade: Install Windows and keep files, settings, and applications and Custom: Install Windows only.
If the supported version is already running, we recommend choosing the first option as this will reinstall Windows without losing data. Nonetheless, you can choose the latter one if you want the system to start from default. - Then, choose a drive to create a partition. While doing so, ensure you delete all the other drives.
- Finally, wait for Windows to get installed. Once done, you’ll be navigated to a new window where you can set up a Microsoft account and start using the OS from scratch.

