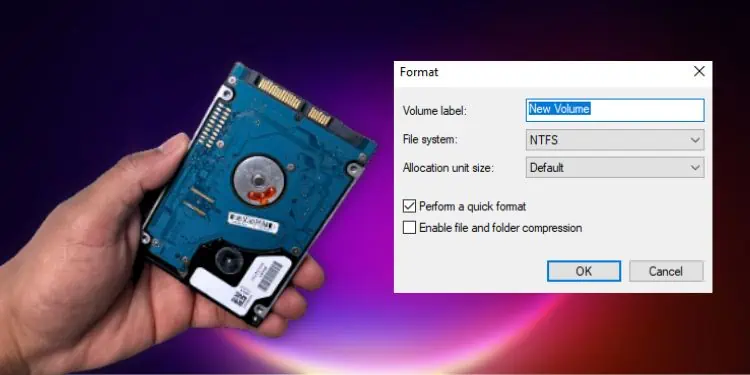
Most of us format a hard drive to get rid of unwanted files and bloatware or to simply free up disk space. Also, some of us might be planning to give the drive away and want to know how to format it so that the data can’t be recovered later.
Other than that, a newly installed hard drive can’t be used until and unless it’s correctly formatted. This is because you haven’t yet initialized the disk and specified a file system. In either of these cases, it’s important to understand what file system to use and whether to perform a full or quick format.
In this detailed guide, you should be able to understand everything about formatting and how to do it.
Basics to Hard Drive Formatting
Formatting a hard drive involves two main steps—physical/low-level and logical/high-level formatting. The first step refers to dividing a disk into tracks, sectors, and cylinders. Its main purpose is to make the hard drive ready to receive data. Since hard drives are already passed in low-level formatting by manufacturers, we as users do not have to worry about that.
The second step (logical formatting) is the process of organizing millions of bits contained in a hard drive for easy navigation. This involves partitioning the hard drive and then allocating a file system.
Well, you cannot format a hard drive having unallocated space—it needs to have at least one partition. Moreover, you cannot format a partition containing system files too. For this, you’ll need to use a Windows recovery media and reinstall the operating system.
Before moving on with the different methods of hard drive formatting, here are certain things you need to understand:
Volume Label
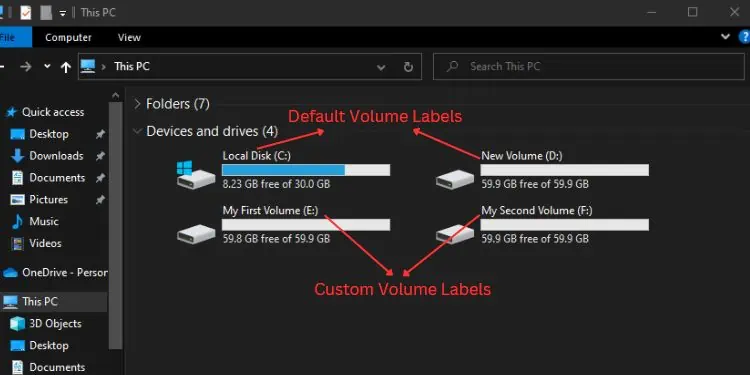
This is an optional field where you can name the volume as per your choice. By default, it’s named New Volume or Local Disk. It’s solely used for identification and does not affect your hard drive’s performance in any way.
File System
It is an integral part of the logical formatting process. Before making use of a hard drive and installing an operating system, it’s essential to specify a file system. It is simply a method that your OS uses to manage data.
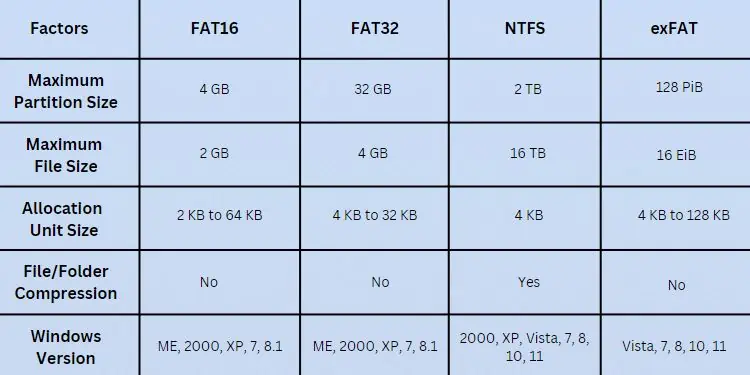
Among the various file systems, NTFS is the most popular in the latest Windows versions and is best for internal hard drives. Some older operating systems require formatting in FAT32. These days, exFAT is becoming more popular which is optimized for external storage, mainly SD cards and flash drives.
Allocation Unit Size
Allocation unit or cluster size determines the smallest amount of space that can store the files. This is different for every file system and also differs based on the volume size. To learn more, you can check for the default cluster size on Microsoft’s support page.
For standard users, it’s best to stick with the default unit size. However, if you’re planning to work only on small file sizes, it’s best to opt for a smaller cluster size. And set a higher unit size if you’re only going to work with big file sizes.
Quick Format vs Full Format
When formatting a hard drive, you might wonder whether to go for the ‘Quick Format’ option. By default, this is checked but note that it’s only going to delete the addresses that point to the data location. In simple words, it deletes files but doesn’t completely wipe the hard drive.
On the other hand, performing a full format rewrites every sector with zeros and makes it unrecoverable or extremely hard to recover data. Additionally, it checks for disk errors and hence takes a lot more time than quick format.
If you’re planning to give your hard drive away, always go for the full format. But if you’re just looking to save time and are not worried about data theft, you may settle for a quick format.
File and Folder Compression
When the ‘File and Folder Compression’ is enabled, everything that you add to this partition gets compressed. Note that this is only available for NTFS and remains greyed out for other file systems.
By default, the option is deselected and I would suggest keeping it that way. Even though it compresses your file, you’ll have to zip/unzip the desired folders anyway.
It can be beneficial in saving disk space for computers with faster CPUs. However, it’s worst for those having slower processors and can further have a negative impact on their performance.
How to Format a Hard Drive?
Now that you’re aware of what hard drive formatting is and the different options available, you should be able to do this quite easily. Based on your preference, you can adopt any of the six methods that I have discussed below.
From File Explorer
Starting off with the easiest method, you can use File Explorer to format any partition you want. However, this is not going to format the entire drive unless it has a single partition (that doesn’t store system files).
This method is recommended for external hard drives that we do not generally partition or store Windows files.
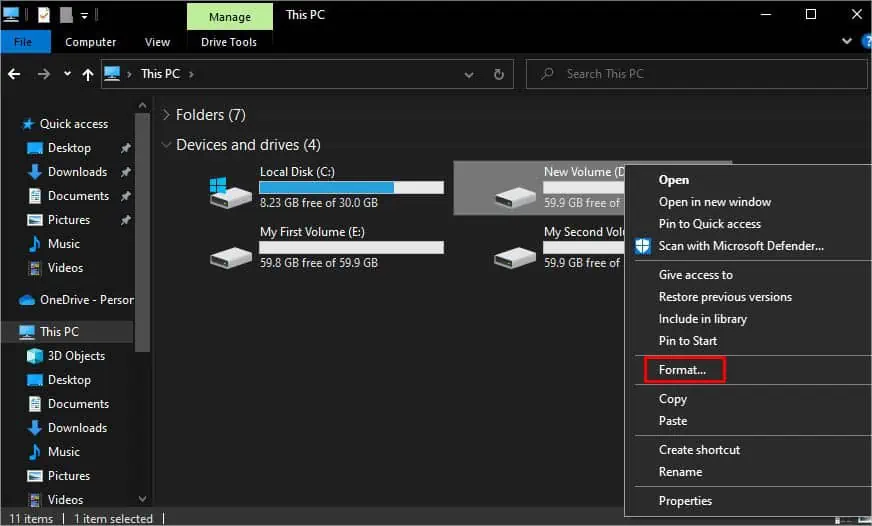
- Use Windows + E hotkey to launch File Explorer and move to This PC.
- Get to the Devices and Drives section.
- Right-click on the desired partition or hard drive and select Format.

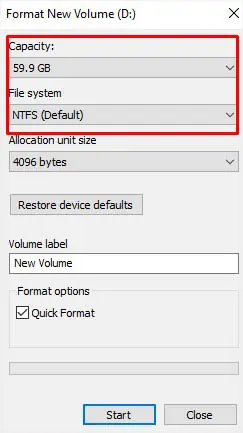
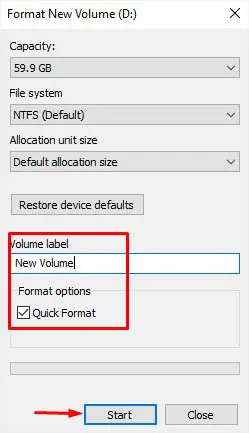
- Once the dialogue box pops up, ensure the Capacity and File System fields are appropriately set.

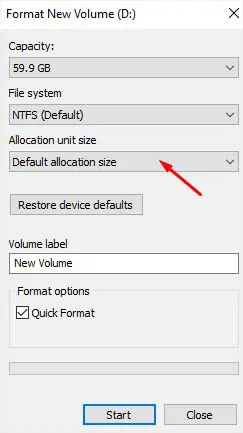
- Next, keep the Allocation unit size to the Default allocation size. You may press the Restore Device Defaults button. However, you can set it to a desired size (higher if you’re working on big files and lower for smaller files).

- Also, edit the Volume label as per your choice or skip it.
- Select/deselect Quick Format based on your preference in the Format options.
- Once all the fields are configured, hit the Start button.

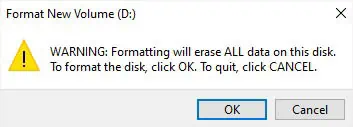
- A warning prompt should pop up. Press Ok to start the format.

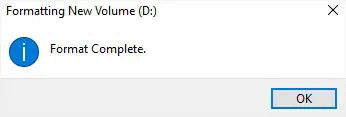
- Wait until the format is complete and a dialogue box pops up. Press Ok.

In Disk Management Utility
Unlike File Explorer, Disk Management lets you format both the partitions and hard drives. However, for the latter, you need to delete all the partitions and create one primary partition first.
For users who want to format their hard drives whilst keeping all the partitions, you need to format each of them:
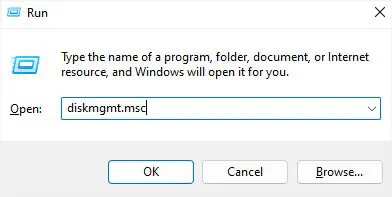
- Use Windows + R to open Run and execute the
diskmgmt.msccommand here.
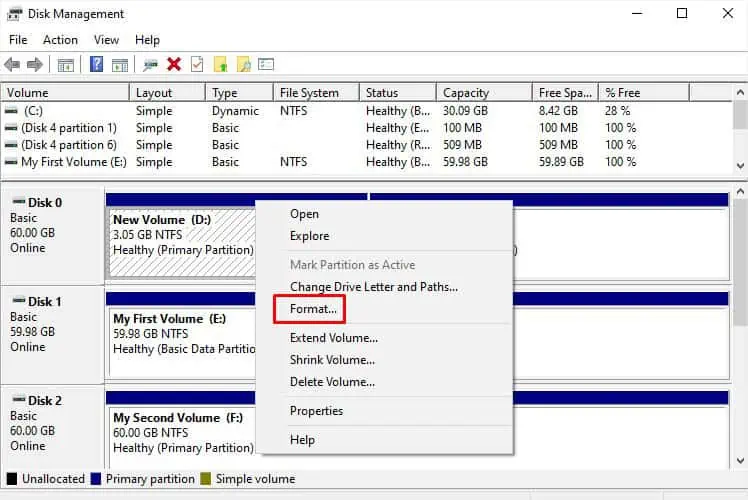
- Once you’re in the Disk Management window, right-click on the desired listed volume/partition and choose Format.

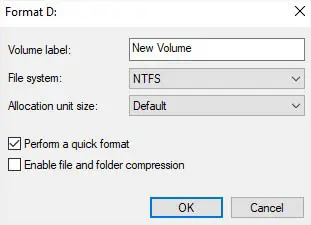
- In the dialogue box, set the volume name (optional), file system (NTFS for internal drives and exFAT for external is recommended), and Allocation Unit Size (leave it to Default).
- Then, put a checkmark on ‘Perform a quick format’ for quickly formatting the drive based on the provided details. To completely wipe the drive/partition, leave it unchecked.
- While you’re at it, check/uncheck the ‘Enable file and folder compression’ field accordingly.
- Once everything is configured, hit the Ok button.

- In the confirmation dialogue box, hit Ok again.

For users who do not wish to keep any partition and want to remove everything, here’s what you should do:
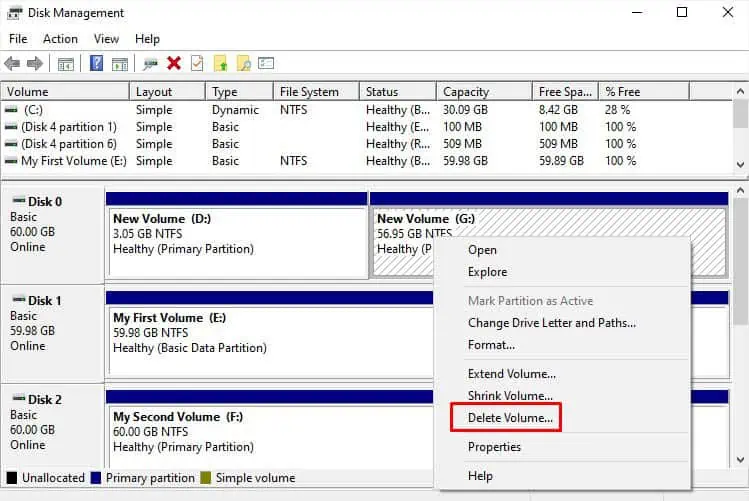
- Right-click on the partition and choose Delete Volume.

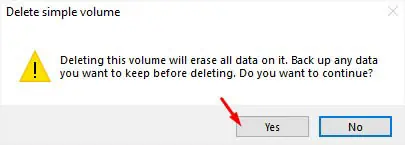
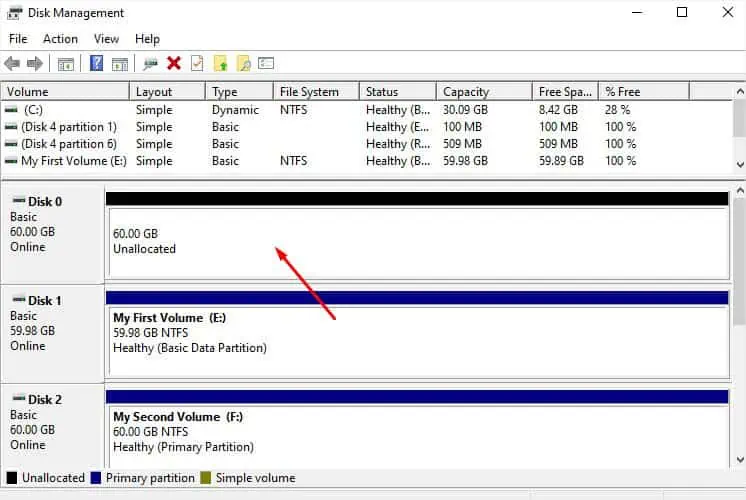
- In the Delete simple volume prompt, hit Yes. You’re now left with an unallocated space.

- If you have multiple partitions, delete each of them and you’ll be left with one single unpartitioned space.

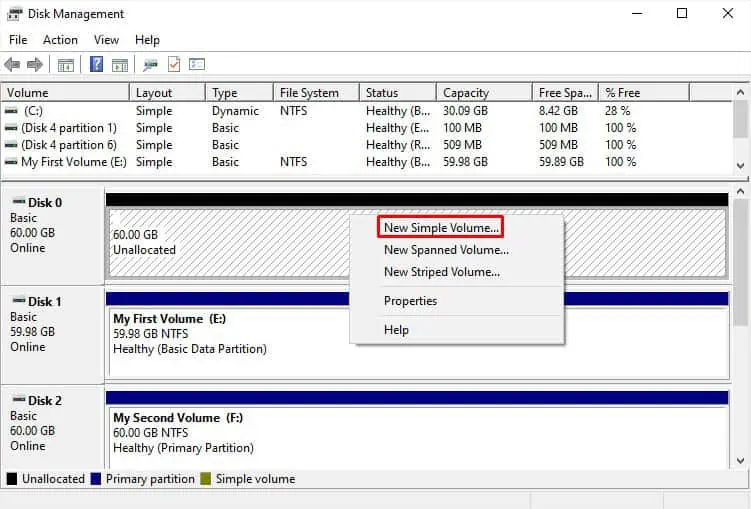
- Right-click on the space and choose New Simple Volume.

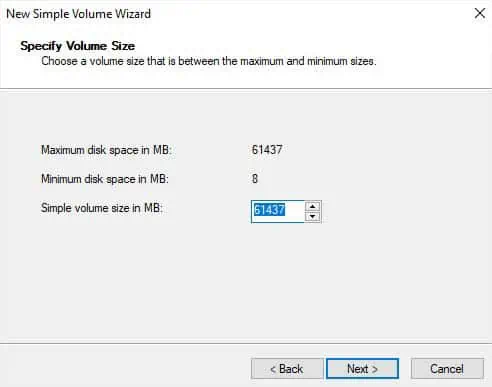
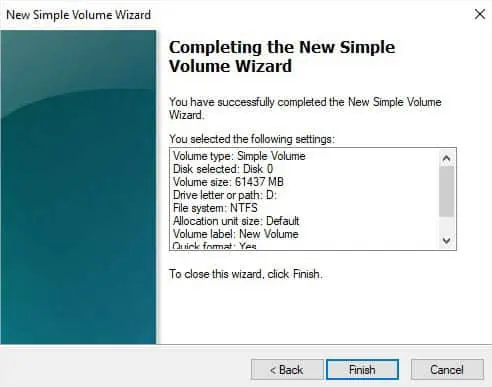
- Once the New Simple Volume Wizard opens, follow the on-screen instructions to build a primary partition.

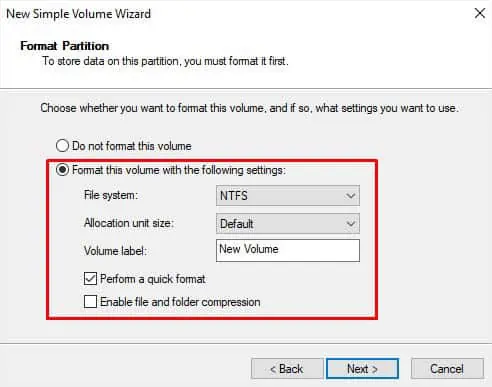
- After you reach the Format Partition page, select the ‘Format the volume with the following settings:’ option.
- Then, set the File System, Allocation unit size, and volume label accordingly.
- Also, make sure you have chosen the appropriate format and compression options. Put a checkmark in the respective fields (if required).

- Hit Next and then Finish to complete partitioning and formatting.

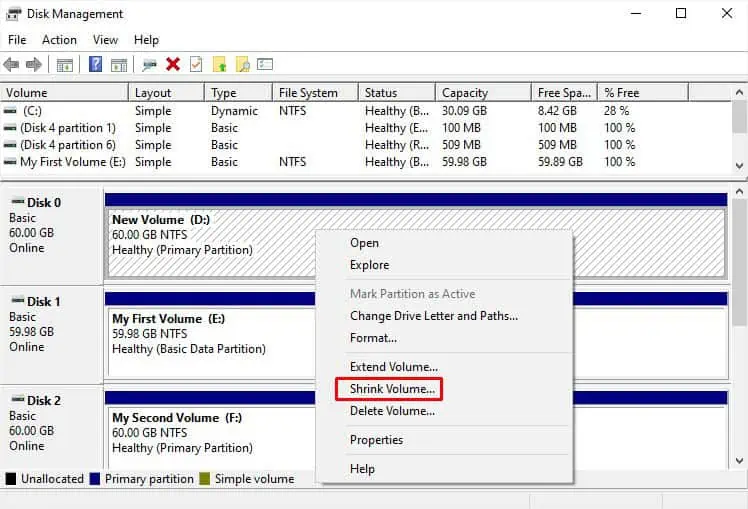
- You should now get a single healthy primary partition. To create new volumes, you may shrink this partition and proceed accordingly. For your ease, here’s a complete guide that should help you partition a hard drive.

Finally, the following steps are for those users who are looking to format a new hard drive (that hasn’t been formatted before):
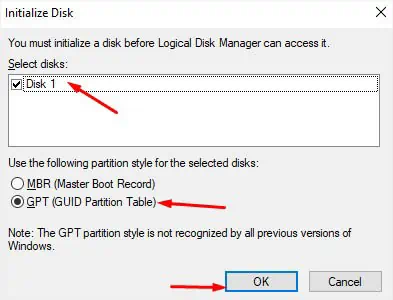
- Once you launch the Disk Management utility, the Initialize Disk dialogue box should also open with it.
- Depending on the number of new hard drives you had installed, select them from the listed disks.
- In the partition style section, choose MBR or GPT. If you’re new to this topic, here’s a complete guide that should help you differentiate them. In short, choose MBR if you’re using a legacy system. Else, GPT should be the ideal choice.
- Press the Ok button to complete disk initialization.

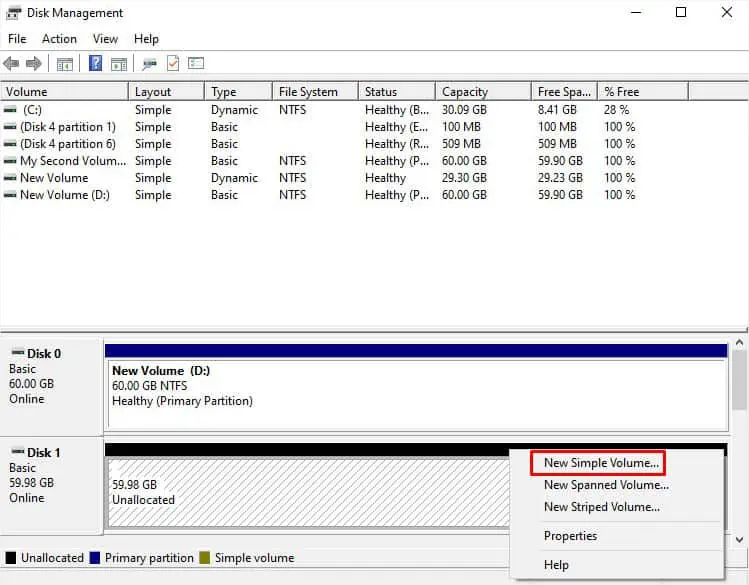
- Navigate to the disk in the Disk Management window and you’ll notice there’s an unallocated partition.
- Right-click here and choose New Simple Volume.

- Now, follow the on-screen instructions to create a primary partition and format it (as discussed above).
Using Format Command
While the GUI methods can take a lot of time, you can do the same using a single command from the Windows terminal. However, the format command that I’ll be discussing below is only applicable for drives containing a single partition.
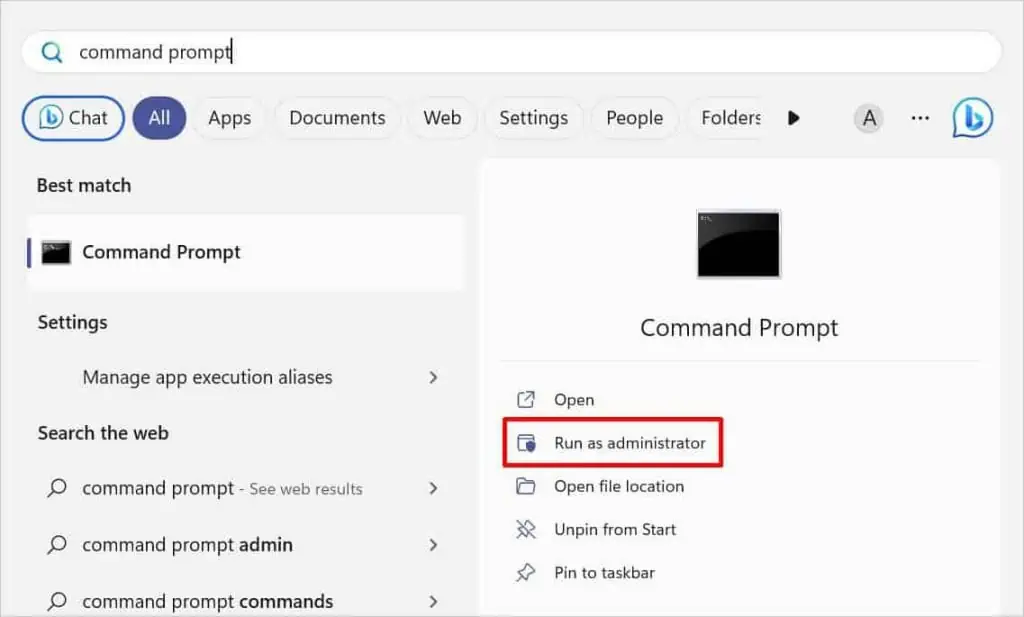
- First of all, launch the Command Prompt utility as an administrator.

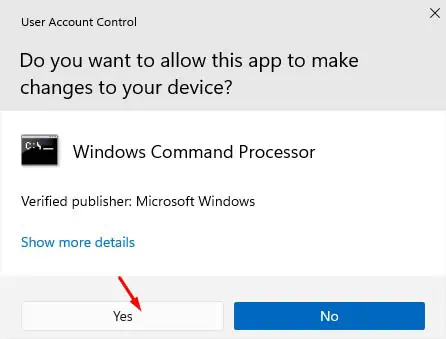
- Hit Yes in the User Account Control dialogue box to provide elevated privilege.

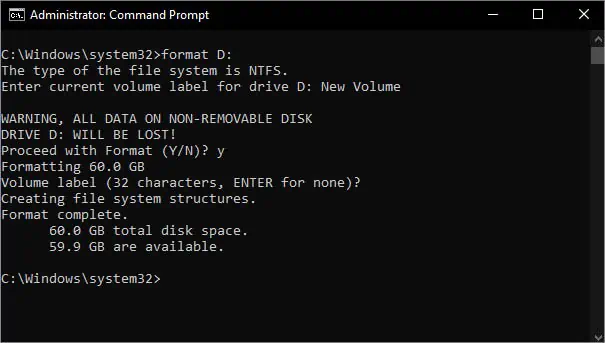
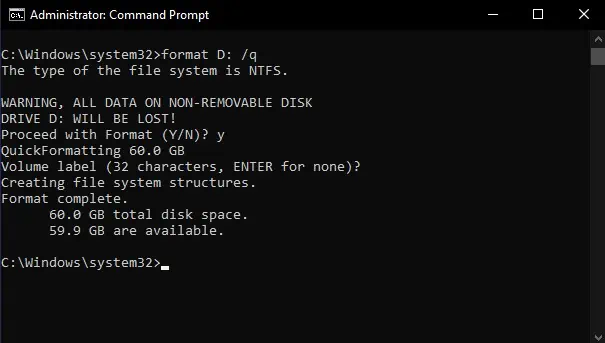
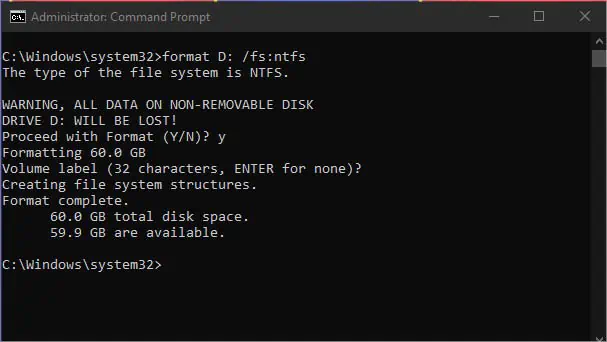
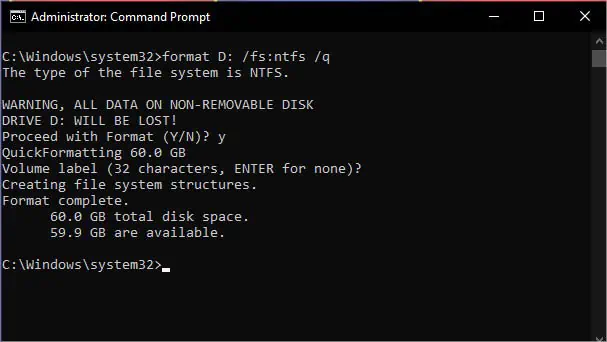
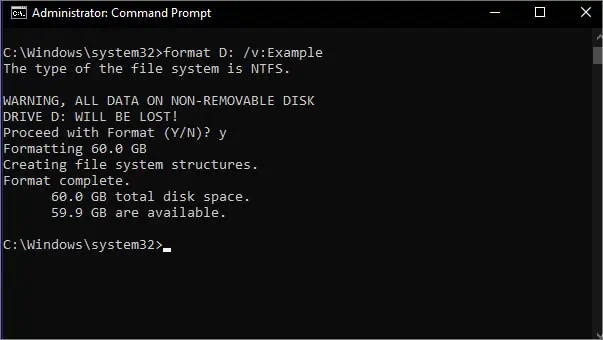
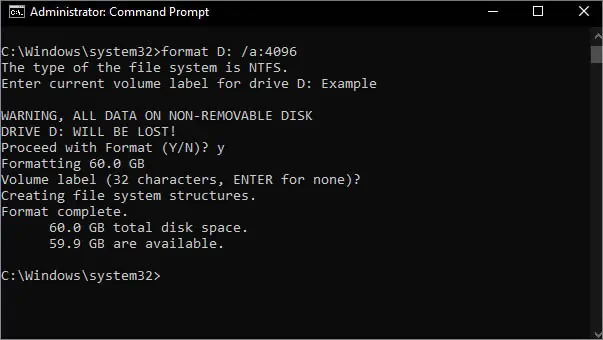
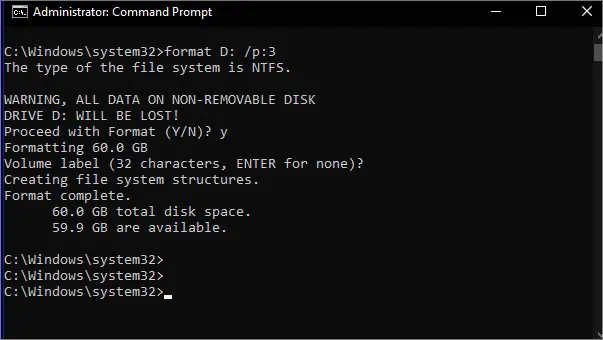
- Once you’re in the command-line interface, execute any of the below commands. I’ve included their usage inside () and also provided a screenshot of how each of them works.
format <drive>:(performs a full format on the specified drive)
format <drive>: /q(the /q switch is used for quick formatting)
format <drive>: /fs:<file_system>(the /fs switch formats the drive in the specified file system)
format <drive>: /q /fs:<file_system>(performs a quick format with the specified file system)
format <drive>: /v:<label>(the /v switch assigns a volume level during the format)
format <drive>: /a:<allocation_unit_size>(overwrites the allocation unit size)
format <drive>: /p:<count>(performs zero-write based on the count specified to completely wipe the hard drive)
Using Diskpart Utility
The aforementioned methods require formatting each partition or deleting a volume, which can be time-consuming. If you’re ready to erase the partitions and do a proper format of the drive, the clean command uninitializes it completely. Now, you’ll have to use the HDD from scratch as if it’s a brand-new drive.
- Launch Command Prompt with administrative privilege.
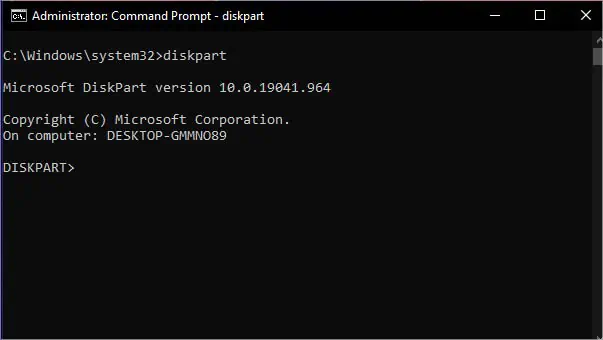
- Here, run the
diskpartcommand to start the command-line utility.
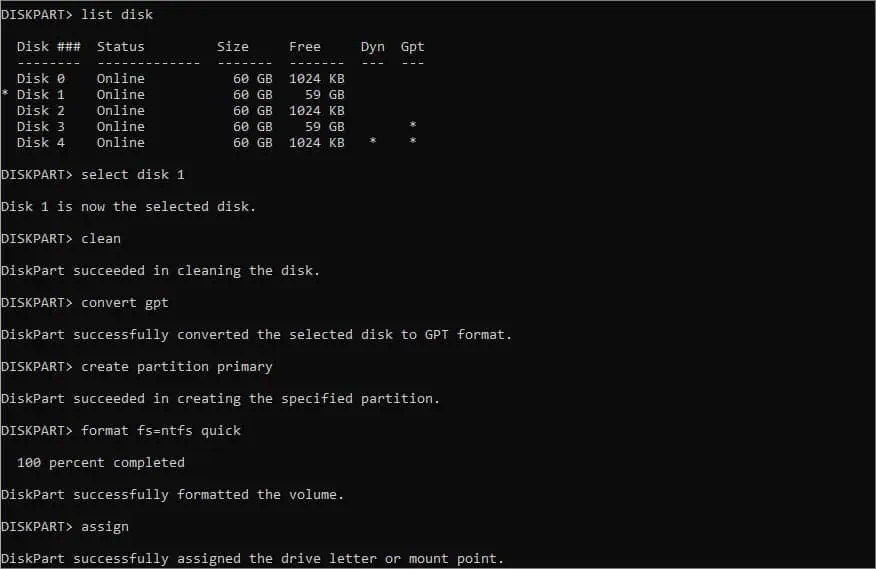
- Execute the below commands in succession to clean and format the drive:
list disk(lists all the storage drives installed on your PC)select disk <disk_number>(selects the specified disk)clean(deletes everything and the disk becomes uninitialized) or,clean all(completely wipes your drive which makes data unrecoverable)convert mbr/gpt(initializes the disk after setting a partition style)create partition primary(partitions your hard drive)format fs=ntfsorformat fs=ntfs quick(formats your hard drive as per the specified file system)assignorassign letter=<drive_letter>(assigns a volume letter)
- Now, you may run the
exitcommand to quit Diskpart and navigate back to Command Prompt.
Using Windows Installation Media
When you try formatting a drive or partition containing system files, the option is greyed out in Disk Management, and you’ll get some form of error in the CLI. But if you really have to format it, you’ll need to create a bootable Windows media first. You may use Rufus or the Mircorsoft-recommended Windows Installation Media.
After that, you can boot your computer using this flash drive and proceed with the installation. In one of the windows, you get to format and partition the drive. Below is a step-by-step guide to doing just that:
- Boot your computer using the bootable USB flash drive.
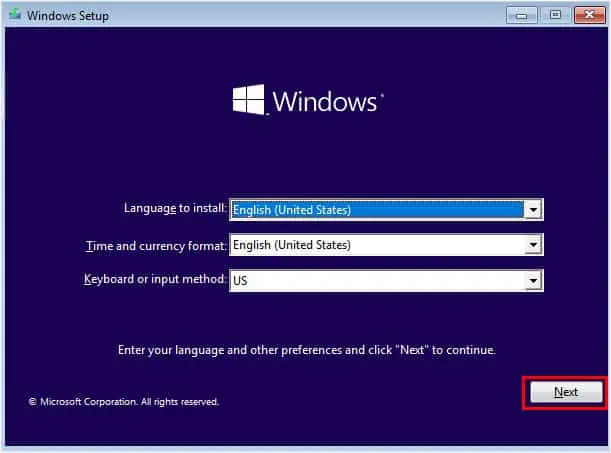
- Once you’re in the Windows Setup screen, confirm your keyboard input and related settings before pressing Next.

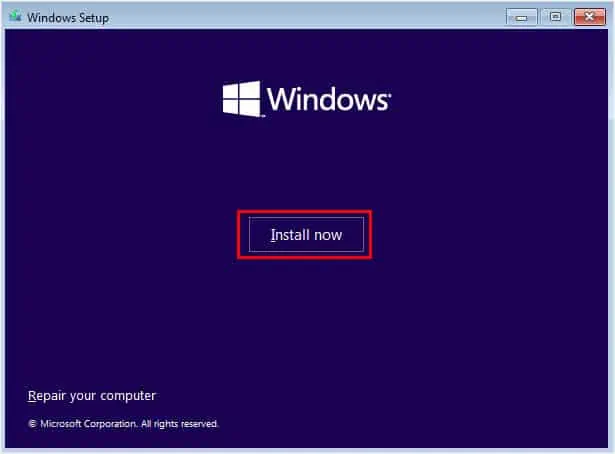
- Next, press the Install Now button.

- Now, follow the on-screen instructions–add the product key, choose the OS to install, accept the license terms, and pick an installation option.
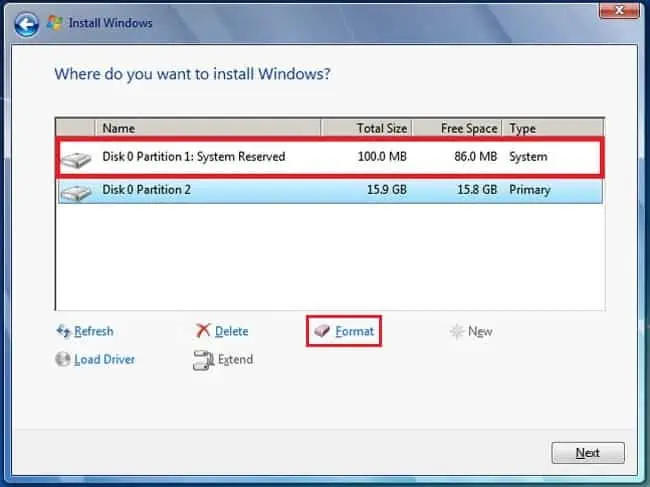
- From the list of partitions, select each of them and choose Format.

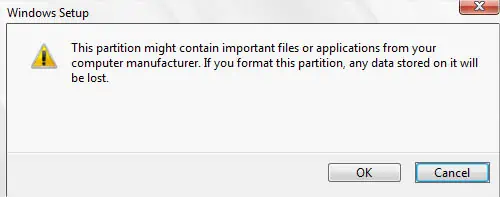
- In the confirmation dialogue box, press Ok.

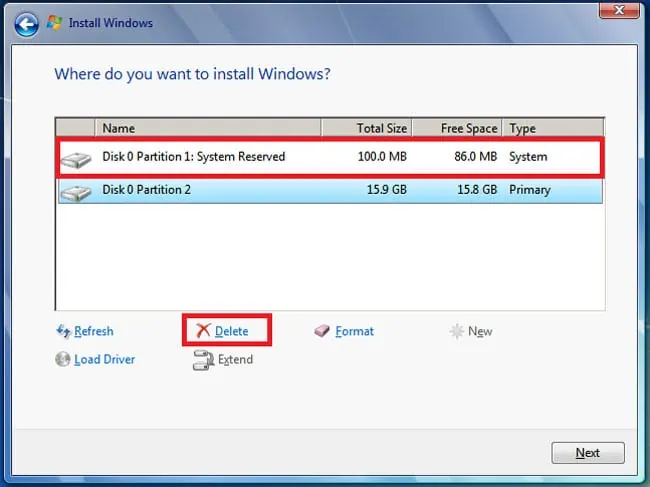
- You may even choose to delete each of the partitions and create new ones.

- Once the format is complete, select a preferred partition and hit Next. Your Windows will be installed here.
- Wait for the Windows setup to complete.
Through Proprietary or Third Party Software
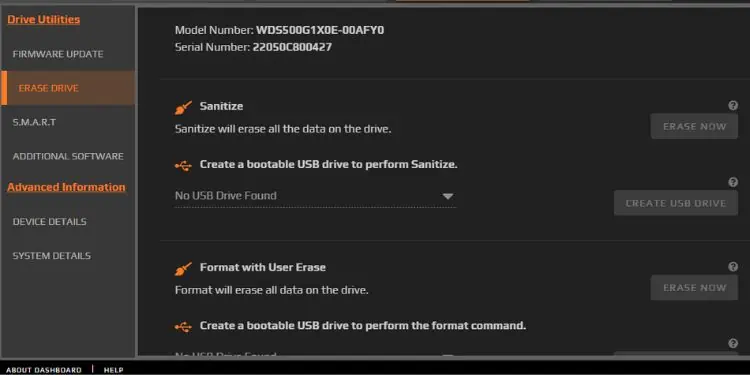
Some manufacturers offer dedicated software that lets you format or completely wipe your hard drive.
For example, Western Digital’s Dashboard application has Sanitize and Format with Erase features that both work differently. Likewise, Samsung users can opt for the Magician software, and HP users may go for the USB Disk Storage Format tool.
Apart from the proprietary programs, you can even find some open-source applications online. Some popular choices include DBAN, DiskWipe, Kill Disk, etc.

