You may want to format the SSD in order to free up the storage or install an operating system. Formatting allows users to revert the SSD to a clean state and reconfigure other drive parameters, such as the File system.
Many think that formatting a drive will permanently delete all the data stored in it. However, it is possible to recover and access those data, especially when Quick Format is performed. Therefore, it is a good idea to perform a Full Format when selling off an old drive.
What Does Formatting Do to Your SSD?
The actual full format process rewrites the cells in the SSD with 0s. It also scans for the bad sectors in the drive and fixes them. This is the reason a full format takes a long time.
If you Quick Format your SSD, it only marks the storage space on your SSD as available without actually deleting the files in it. So it is easier to recover your data on SSD even after a quick format. Also, the Quick Format process takes significantly lesser time than a Full format.
During the Formatting process, you can also choose the File system for your SSDs. Here’re some common file systems on Windows.
- FAT32: FAT 32 file system only supports a file size lower than 4 GB and also supports a limited partition size (on Windows) of just up to 32 GB. Despite this limitation, it is still compatible with Windows, Mac, and Linux systems.
- NTFS: This file system is most commonly used in Windows and it offers features such as individual compression of the files and better disk utilization of the files. It also has no limit set for file and partition size, unlike FAT32.
- exFAT: If you prefer using the SSD on both Windows and Mac systems, exFAT is the best option.
Precautions Before Formatting an SSD
Here are a few precautionary measures before we move into the various methods of formatting an SSD.
- Formatting the SSD will erase any data inside the SSD. If there are any important files in it, create a backup before you format the drive.
- Do not perform a Full format for your SSDs unless you’re selling off the drive. Full formatting diminishes the write cycle of your SSD. At other times, always choose the Quick format option.
Now, let’s move on to some of the methods you can use to format an SSD from your Windows device.
Using Windows Installation Media
On a live Windows environment, it is not possible to format an entire SSD that is also working as a boot drive. In such a case, you can use a Windows installation media to format all of the drive’s content.
In this, we format the SSD by going through the Windows installation process. While doing so, we will only format the drive and skip the Windows installation process.
- Create a Bootable USB Flash drive for Windows. Plug in the flash drive to your computer.
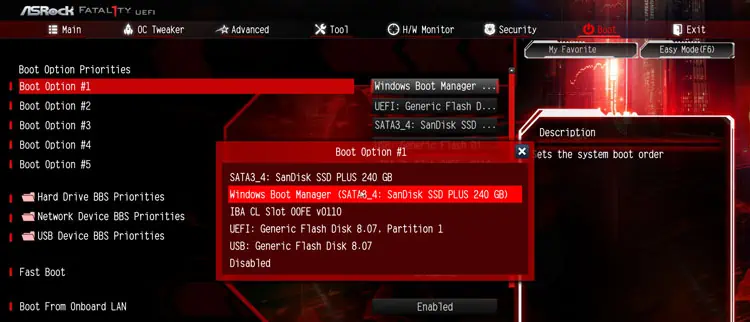
- Go to the BIOS and change the BOOT priority to USB Bootable Media. Then save and exit from BIOS.

- The computer will boot using the USB drive.
- Choose the language and keyboard options and click on Next.
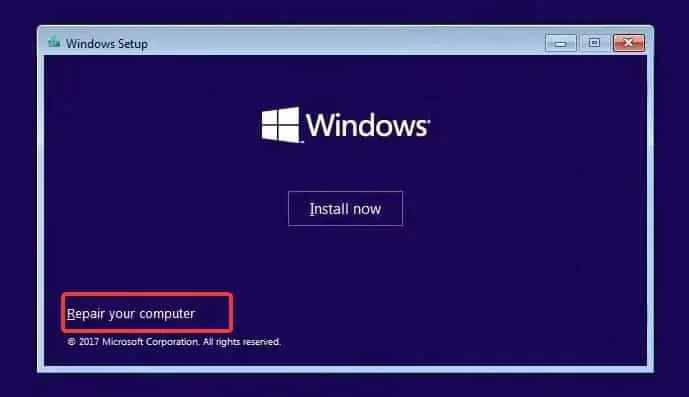
- When the Install now option appears, click on Repair your computer.

- Select I don’t have a product key option and accept the license agreements.
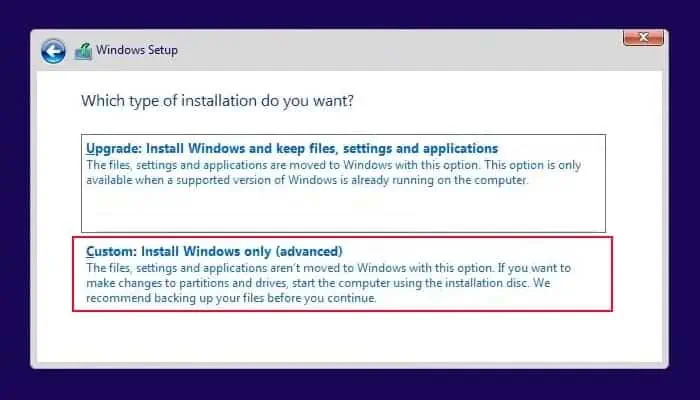
- Now, choose the Custom: Install Windows only (advanced) option.

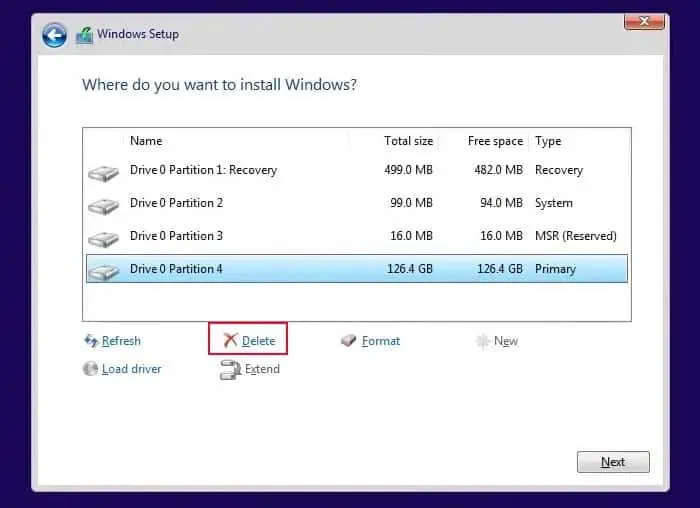
- Select the SSD and select Delete. If there are multiple partitions, do the same for all of them.

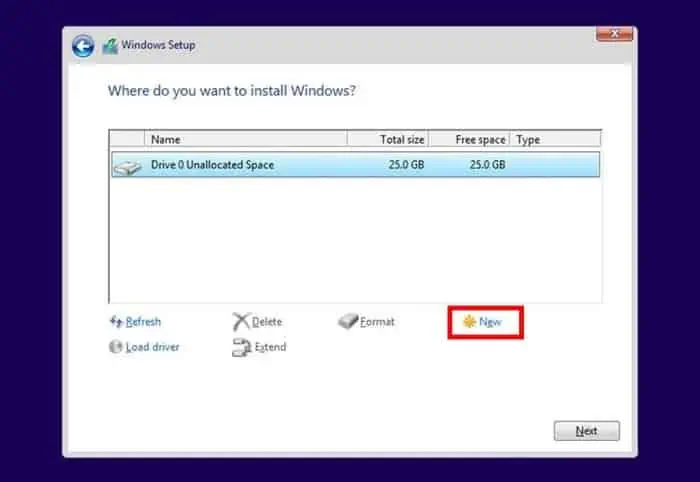
- Select Unallocated Space and click on New.

- Enter the maximum size for the new drive and click on Apply.
- Your SSD will now be formatted to the NTFS file system. If you wish to continue the Windows installation, you may do it from this point or cancel the process by clicking the Close (X) button.
From File Explorer
If you have an external SSD drive or a drive partition that you want to format, File explorer gives a convenient option to do just that. However, formatting the entire system disk will not be possible through this method.
- Open File Explorer. You may see the SSD in the list of drives.
- Right-click on the SSD you wish to format and select Format.

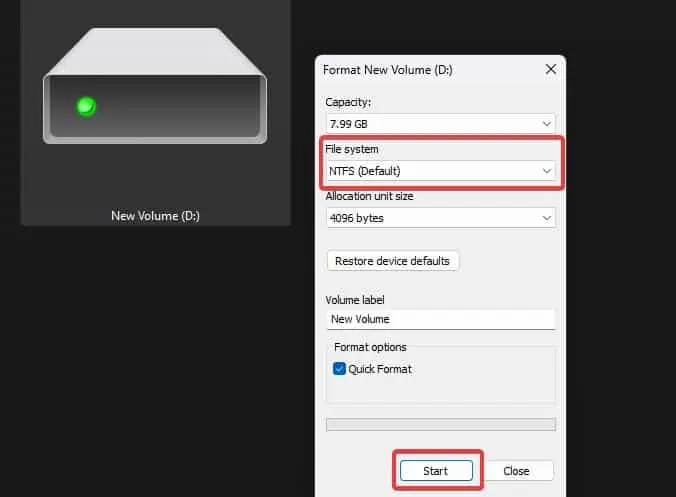
- You can assign a different File system and volume name for the drive.
- Check the Quick Format option.

- Click on Start.
From the Disk Management Utility
This method is ideal for formatting the drives that haven’t been assigned any drive letter and thus aren’t shown in the file explorer.
If you have a newly installed additional SSD drive, you won’t be able to access it unless you initialize and allocate the drive.
However, if the SSD is already allocated and you want to format it, here’s how you can do it from the Disk Management Utility.
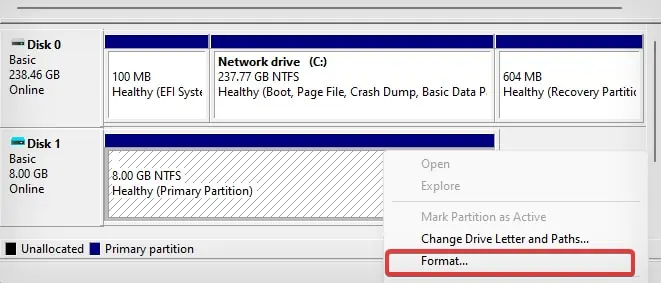
- Press Windows Key + X and select Disk Management.

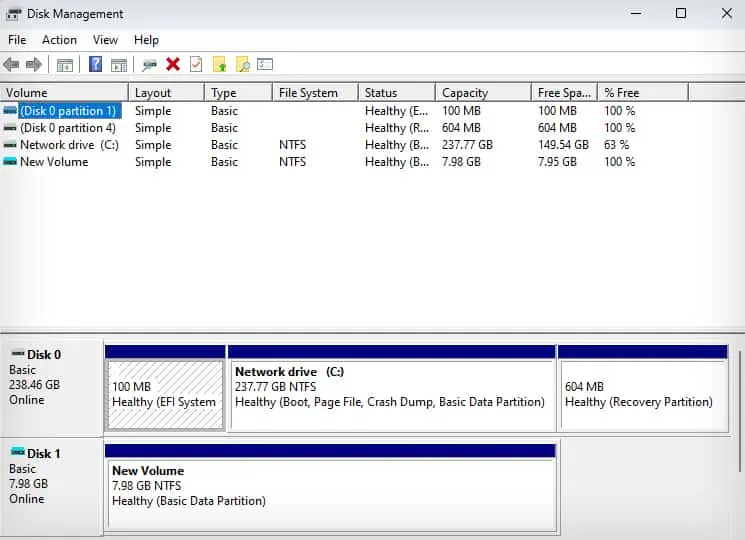
- In the Disk Management Utility, you will see the drives connected to your computer and the available partitions.
- Locate the SSD and right-click on it. Then select Format.

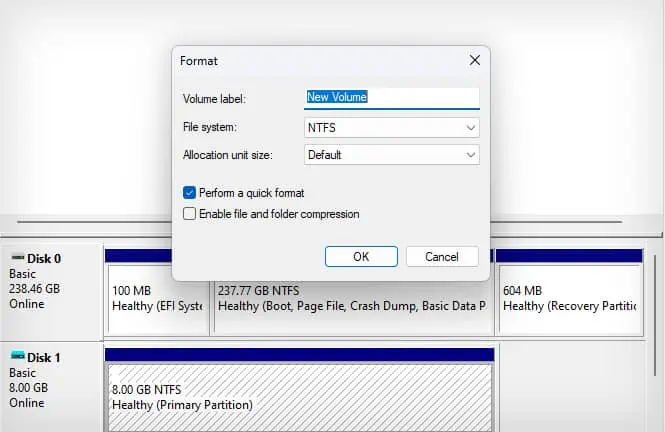
- Make sure that you have checked the Perform a quick format option. Windows will perform a Full scan if this option is not checked.

- Then, click on OK.
Using Command Prompt
You can also format the SSD using the command line interface. If there’s just a single partition on the drive, you may use the format command directly to format the desired drive.
For instance, if you’re formatting an SSD with the drive letter D:, you can type format D: , to completely format the drive. However, using this command line with the diskpart will give you the flexibility to choose an entire drive or a partition to format.
- Press Windows key + X and open Terminal (Admin).
- Now type
diskpartand hit enter.
- Now, use
List diskto get the info on all the drives. Alternatively, to list all the volumes or partitions, use theList volumecommand.
- Note the
disk idfor the SSD orvolume idfor the partition you wish to format. - Now, use the
select disk #command to select the SSD or selectvolume #for the partition. For instance, if the disk ID is 1, use the commandSelect Disk 1.
- Then type
format fs=ntfs quickand press enter. This command will delete the contents within the SSD and even change the file system of the SSD to NTFS. If you want to use another file system, replace NTFS in the command with FAT32 or exFAT as you desire.
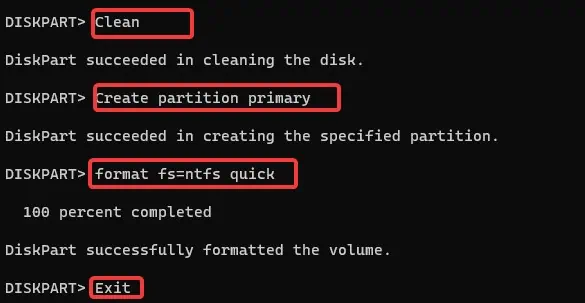
- If the drive has multiple partitions, you may use this method to format the SSD. This will clean the partition information of the drive as well. To do so, execute these commands after step no 5.
Clean
Create partition primary
format fs=ntfs quick
Exit

