Before being able to configure various hardware parameters, it’s essential to first learn the right way to get into the ASUS BIOS utility. Whether you rock a PRIME, ROG, TUF GAMING, or any other model, the involved steps remain identical.
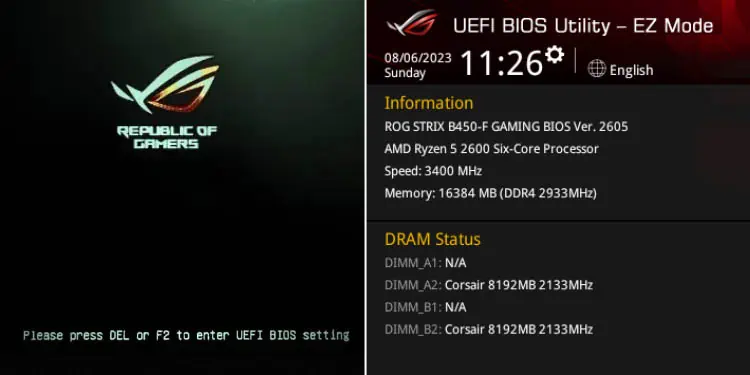
The BIOS access key for an ASUS motherboard is usually the “F2” or “Del” key. Press this key repeatedly as soon as the ASUS logo appears during the startup or splash screen to enter the BIOS menu.
If you’re already running Windows and do not wish to reboot, get to the Advanced Recovery Environment and pick UEFI Firmware Settings. Also, it’s possible to directly jump into the BIOS Settings page by running dedicated OS commands or creating a desktop shortcut.
I’ve always preferred restarting the PC and spamming the relevant key to access my ASUS BIOS dashboard. Since this is also considered the standard, I will be kick-starting this guide with the same.
Enter BIOS from Splash Screen

Both Del and F2 keys work on my PRIME B450-PLUS and B660M-K D4 models and should be the same in your case.
On laptops, it should be F2. That’s what I use on my Vivobook Pro 15.
While I haven’t personally found any ASUS system using a different BIOS key, you can still look out for exceptions. Reportedly, some older ones could integrate F9.
As you can see, the process is pretty straightforward and similar to other systems. But yes, timing is important here! If you’re even a second little late in pressing the key, you’ll be navigated to the Windows login screen.

In most cases, you’re going to encounter two different ASUS logos within just a few seconds. The second one features a dedicated message regarding what key you should press. Take a look at the above picture for reference on ASUS PRIME.
Even holding down the BIOS key should work. But keep in mind that you need to do this as soon as you start the PC.
Key Steps:
- Start/restart your ASUS PC.
- Hit the F2 or Del key on the ASUS splash screen (second window).
- Wait until the UEFI/Legacy BIOS interface pops up.
From Windows Recovery Environment
Another popular way to enter BIOS is from the Advanced options screen on the Windows Recovery Environment. This console is mainly used for troubleshooting purposes when your OS isn’t able to boot up.
Sometimes, such issues might occur due to misconfigured or corrupted BIOS settings. If you’re already on the Windows RE screen, you may directly jump to the steps below.
For beginners, you can follow our detailed guide on accessing the Advanced Startup screen. The easiest option would be holding down Shift when selecting the Restart option in the Start Menu.
Note: This method only works on ASUS systems supporting UEFI BIOS.
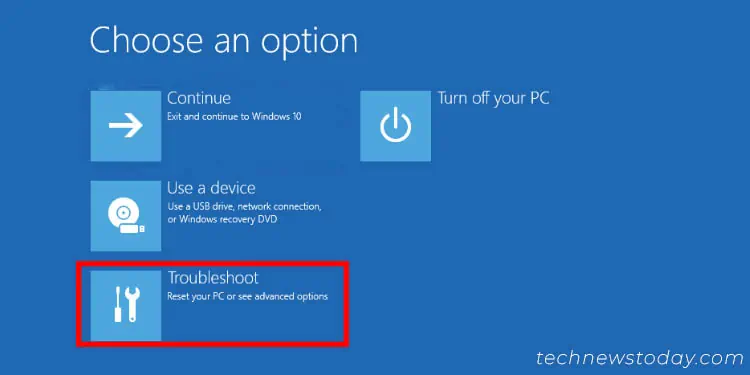
- Once you’re in the Choose an option screen, start by picking the final option – Troubleshoot.

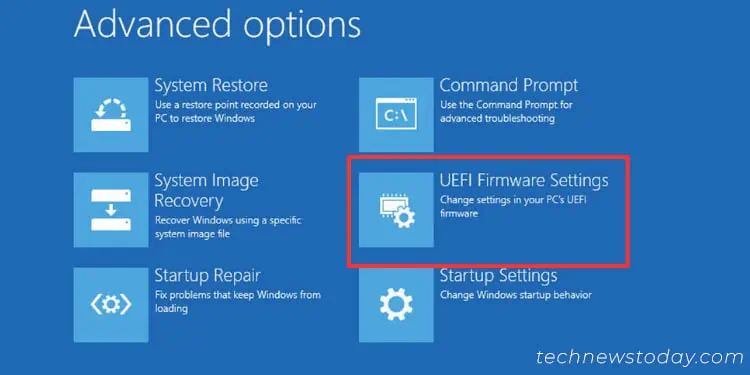
- Next, select Advanced options.

- Now, you should find UEFI Firmware Settings.

- After selecting the related option, press Restart.

- Wait for a few seconds and you should get to the UEFI Utility.
Use Other Utilities
The ones mentioned above aren’t the limited options for entering ASUS BIOS. Some other OS-based utilities offer much quicker options.
My personal favorite is creating a desktop shortcut. This way, I do not need to hassle about finding the correct key or entering the Windows Recovery console every time.
After providing administrative privilege, I can simply double-click the shortcut file and it takes me straight to the ASUS BIOS screen.
Along with that, here’s a quick overview of all the other ways to enter your motherboard’s firmware interface. These work on every system regardless of the manufacturer – even on ASUS:
- Use this simple Windows CLI command to perform a full shutdown and force your PC to enter BIOS on the next boot-up –
shutdown /r /fw. This works on both Powershell and CMD.
- Linux users can use
sudo systemctl reboot --firmware-setupon their distro’s Terminal to quickly access the BIOS settings. - If you’re looking to create a shortcut as I mentioned earlier, here’s what you can do:

- First, show your desktop screen, and right-click anywhere.
- Select New > Shortcut.
- Type
shutdown /r /fwin the location textbox and hit Next. - Next, name the shortcut and press Finish.
- You may run it as an admin and within a minute, your PC should reboot and take you to the BIOS screen.

Some motherboard utilities have a dedicated option that provides direct access to BIOS. For example, ASRock’s Restart to UEFI Utility and Gigabyte’s Fast Boot application.
Unfortunately, there’s no such option available on ASUS motherboards, and the aforementioned methods should suffice.
Final Words
Now that you’ve entered the BIOS interface, you probably want to explore the various settings available – managing boot priority, overclocking options, customizing fan speed, and more.
Well, locating them yourself can be a little challenging. Also, the available features hugely depend on your motherboard’s chipset.
You need not worry, as I have already prepared a comprehensive guide to help you navigate and set up BIOS easily.
Sometimes, several underlying issues might cause BIOS to not show up. Here are some basic troubleshooting tips that should help you fix it:
- Firstly, Fast Boot can skip the POST process and take you straightaway to the login screen. If that’s the case, try entering BIOS from Windows RE or an OS-based utility. Then, turn this feature off to ensure you don’t experience the problem again.
- Note that most Bluetooth keyboards won’t work unless the OS boots up. So, it’s best to use the one that uses USB or PS/2 (if available).
- Try clearing the CMOS and loading the optimized defaults. Resetting your ASUS BIOS can sometimes fix system instabilities.
- Are you seeing a red/orange light on the Q-LED indicators or hearing beep codes? If this is the case, your ASUS system is likely experiencing a NO POST issue. So, here’s a dedicated post that should help you fix your PC that’s refusing to boot into BIOS.


