Locking the desktop icon is the best way to organize the desktop screen—and you can do it with a click of a button. It allows you to arrange the icons on a grid system starting from the top-left side of the screen. In addition, it restricts the icons from being moved outside of this layout, while you can change their position anywhere within this arrangement.
Using Context Menu
The Context menu appears when you right-click the empty area on the desktop. It allows desktop customization and personalization according to user preference. Most importantly, it allows users to lock desktop icons.
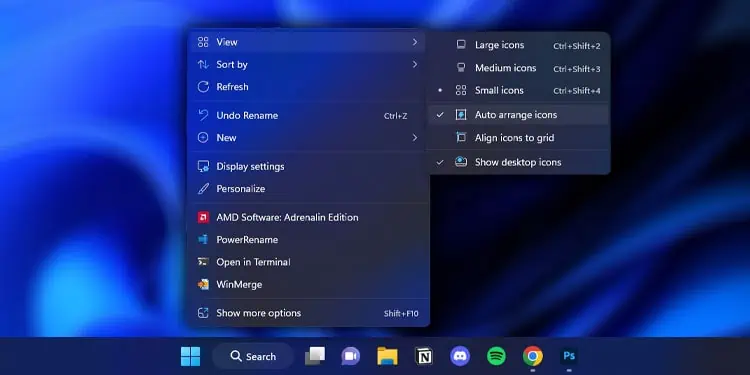
- Right-click the empty area on the desktop to bring up the context menu.
- Select View. Here, you will see two options, Align icons to grid and Auto arrange icons.

- When you enable Align icons to the grid, you can move icons freely across the desktop in a grid layout. Disabling Align icons to the grid allow you to overlap desktop icons.
- Check Auto arrange icons. The desktop should automatically lock on the left side of the screen.
Using Third-party Applications
Locking desktop icons using the context menu will restrict users from rearranging desktop icons. However, Windows does not let you lock a specific arrangement of desktop icons.
The icon alignment will change when you connect the screen to a second monitor or change display resolution or scaling. If you want to lock your desktop icons in a specific arrangement regardless of the resolution, you need a third-party application.
Applications like Fences, DeskLock, NimiPlace, etc., allow you to reconfigure and lock your desktop icon.
How to Prevent Desktop Icons from Changing?
Switching to a different Windows theme changes the entire desktop appearance. Your desktop icons might also change as you switch through themes. And any users that log in to your system can also change the desktop icon.
Disable Themes from Changing Desktop Icons
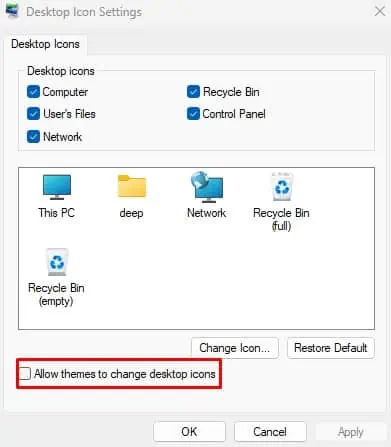
Changing Windows themes changes the desktop icons and to disable it you need to change configurations in Desktop Icons settings.
- Press the Windows + R key.
- In the Run dialog box, type
desk.cpl ,and then press Enter.
- Here, Uncheck Allow themes to change desktop icons.

- Click on Apply, then OK.
Disable Users from Accessing Desktop Icons Settings
If you want to restrict users from accessing the entire Desktop Icons Settings, you can do it through the Group Policy editor. This allows the administrator to set restrictions on anyone who uses the PC.
- Open Run.
- Type
gpedit.mscand press Enter. If you are on Windows Edition other than Pro or Enterprise, you need to enable Group Policy Editor.
- On the right panel, navigate to User Configuration > Administrative Template > Control Panel > Personalization.
- On the right panel, double-click on Prevent changing desktop icons.

- Check Enabled.

- Select Apply, then OK.
Now, when any users try to access Desktop Icons Settings, they will be prompted with the “Your system administrator has disabled launching of Display Control Panel” message.


