GPU, or Graphics Processing Unit, accelerates the rendering process of the 3D images on the computer screen. The CPU shares the graphical workload of the system with the GPU and improves the picture and video quality.
The capacity and ability of the GPU are getting better in every new build nowadays. But it is not always feasible to get a new one. The reason might be the increasing price factor with every new update. Or it might be that your current graphics card is equally good and it just needs a boost up.
Some hardware or software incompatibility and altered settings might also have slowed down your GPU. Hence, you might want to squeeze every bit of juice possible from it. You can easily apply several optimization methods and hacks to raise your GPU’s capability.
Let’s look at the ways to optimize the GPU and prevent yourself from buying a new one.
Need For GPU Optimization
You might be a regular heavy-duty gamer or designer or video editor. If so, you have to be on really good terms with your GPU in order to perform your tasks smoothly. Your content can be of excellent quality only if your GPU is exceptional.
- Faster Video or Image Rendering.
- Run High-end games in earlier GPU builds.
- Improve Frame Rates
- Decrease graphical load on CPU.
- Faster Design and Simulation Results.
- Big Data Computation with previous GPU models.
Now that we have shortlisted some reasons for GPU optimization, we can see the ways to maximize our GPU’s performance
How To Optimize GPU
Your older GPU might still have got the thing in it to enhance your graphical or computing experience. You just need to tweak some of its settings and force it to give its best to carry out the job.
So, with no further delay, let’s move towards the methods to optimize the GPU to meet your particular needs.
Switch Graphics Card Settings to Maximum Performance
Most of the GPU settings are set to perform by balancing power, picture quality and performance by default. This causes the GPU to sacrifice its full capacity to provide optimum power consumption or provide better texture.
You will have to set your GPU to choose performance over texture and power consumption. You can use the control panel for the respective GPU and change easily change the setting to provide maximum GPU performance to your program. Most of the users have not seen their picture quality drop much but were able to speed up their GPU by a noticeable amount.
Even though the settings are almost the same for NVIDIA or AMD GPU, you may find the way to get to it a bit different for them.
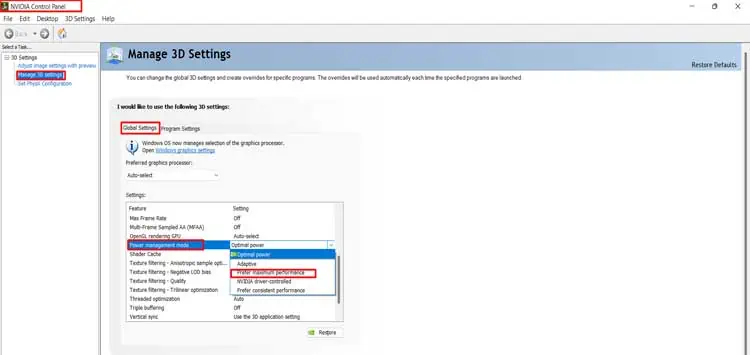
Switch Graphics Card Setting for NVIDIA GPU
Let’s see how you can change the settings to maximum performance for NVIDIA.
- Right-Click on Desktop and select NVIDIA Control Panel.
- Go to Manage 3D Settings and choose Global Settings.
- Look for Power Management Mode and set Prefer Maximum Performance option on it.

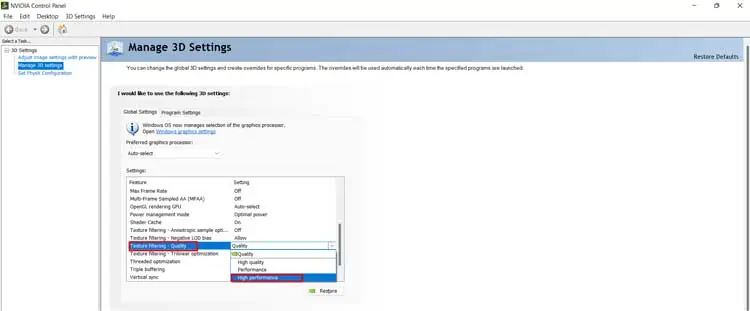
- Similarly, find Texture filtering – Quality and change it to High Performance.

- Click Apply at the lower-right end.
Switch Graphics Card Setting for AMD GPU
You can find the process to set the GPU to maximum performance for AMD below.
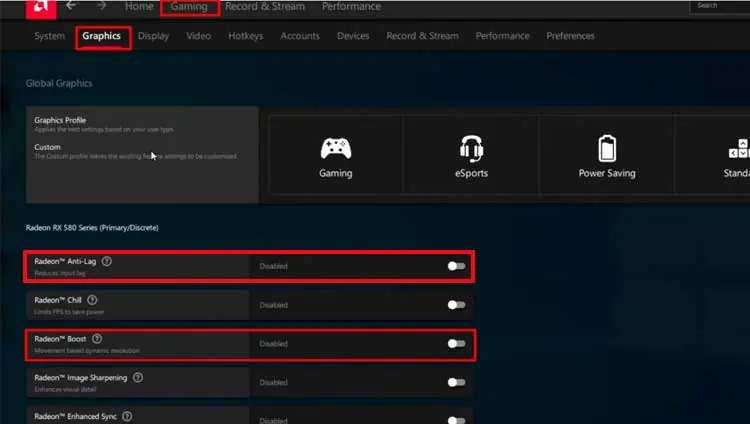
- Right-Click on Desktop and select AMD Radeon Software option.
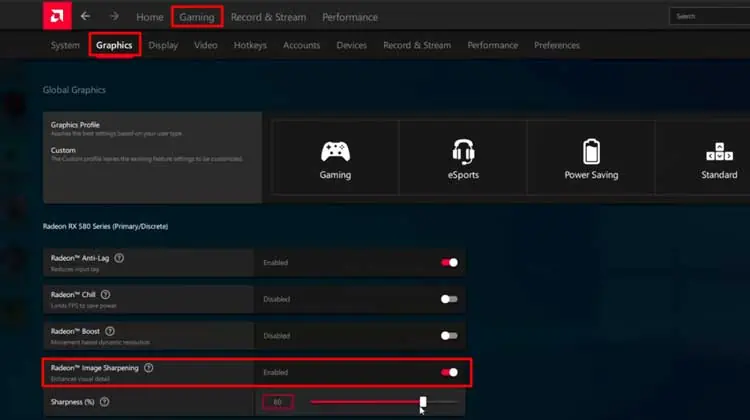
- On the home page, click on the Gaming tab.
- Choose the Graphics menu.
- You can choose either Gaming, eSports, or Standard option depending on your preferences. We are going to choose Standard for overall settings here.
- Enable Radeon Anti-Lag and Radeon Boost feature.

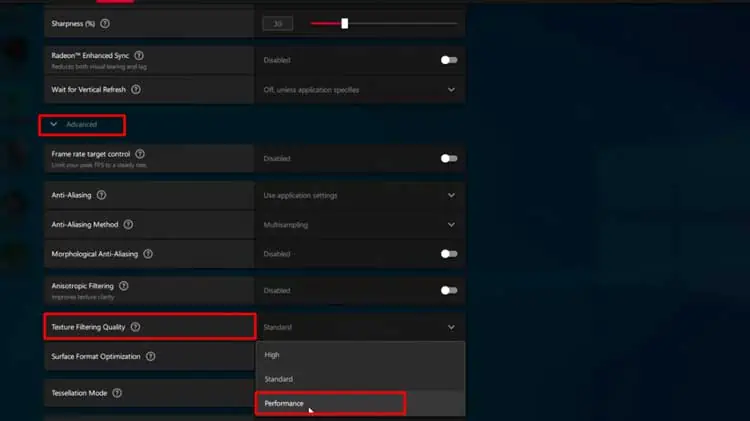
- Click on Advanced and set Texture Filtering Quality to Performance.

- You can play with other settings such as Anti-Aliasing and see what works best for you.
Run your desired program to see if its performance has improved.
Lower Display Resolution and Enable Image Sharpening Option
Whenever the resolution of your display is higher, it is asking for additional effort from the GPU to maintain the frame rate. But decreasing the resolution might cause you to sacrifice the image quality.
Hence, you can use the feature of image sharpening provided on your GPU settings that maintain the quality using post-processing tools. You will need to follow these instructions to do this.
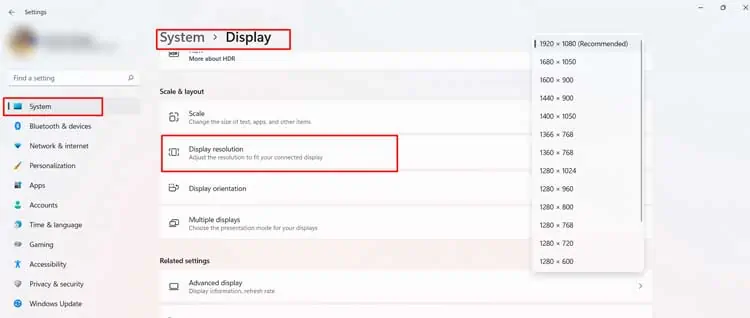
- Press Windows + X and select Settings.
- Choose System menu and then Select Display option in it.
- Find Display Resolution and decrease it to lower resolution up to a limit. For instance, if you have a 2K display, you can change it to 1080P or similar.

Once you have completed the part to reduce resolution, you need to change the settings for NVIDIA and AMD graphics differently. Let’s look at the ways for both of them.
Enable Image Sharpening for NVIDIA
Here is the way to enable Image Sharpening for NVIDIA graphics card.
- Open the NVIDIA Control Panel by right-clicking on the desktop.
- Go to Manage 3D Settings.
- On the Global Settings menu, find the Image Sharpening option and turn it on by double clicking it.

Enable Image Sharpening for AMD
AMD has numerous features in its settings to tweak for the GPU. We talked about a few of them in the earlier section. Here, we are just going to enable Image Sharpening settings in the following steps.
- Right-click on Desktop and choose AMD Radeon Software.
- Click on Gaming on the home page and select Standard, eSports or Gaming based on the reason you are trying to optimize your GPU.
- Choose Graphics and find Radeon Image Sharpening option.
- Enable the feature.

See if your GPU is working better than before.
Turn On Hardware-Accelerated GPU Scheduling and Variable Rate Shading
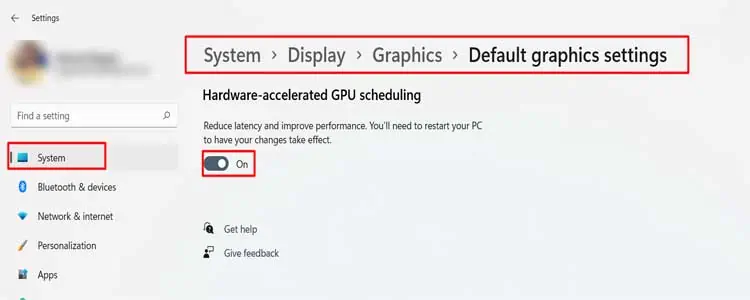
Windows have a feature of instructing your GPU on using the optimum amount of power depending on the tasks. It is known as GPU scheduling and it can help optimize your GPU mildly.
Similarly, Variable Rate shading or VRS also improves rendering quality by varying the amount of shading for different portions in the frame. However, VRS works only on selected programs and some computers might not even have the function.
You can go through this process to turn on these functions on your computer.
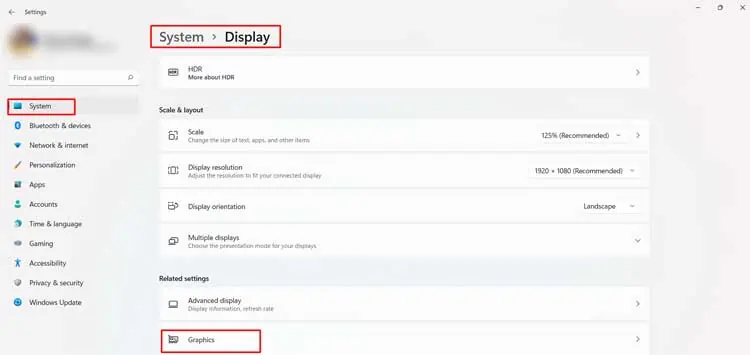
- Press Windows + ‘X’ and choose Settings.
- Go to Display Menu under System heading.
- Scroll down to find the Graphics option and click on Default graphics settings at the top.

- Turn on Hardware-accelerated GPU scheduling and VRS features.

You will find your GPU functioning slightly better.
Enable DLSS or FSR
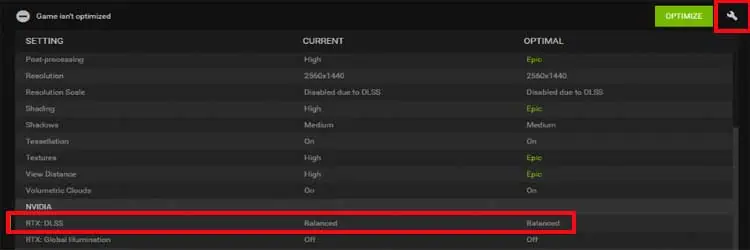
DLSS or Deep Learning Super Sampling is used by NVIDIA GPUs to render the images by reducing the resolution and enhancing the quality by the help of AI. This is similar to the tweak we mentioned earlier but is automatic and better. FSR or FidelityFX Super Resolution is a similar technique used by AMD.
The shortcoming of this technology is that not all programs support it. Furthermore, the feature is available only in newer GPUs. Let’s see how to enable DLSS in the NVIDIA GPU.
- Go to the GeForce Experience application.
- Enter your login details if it asks.
- Choose the game or program of your choice.
- Find the DLSS option and enable it.

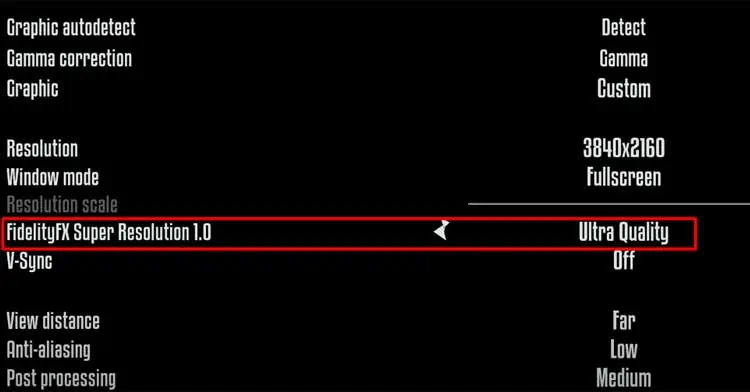
- Similarly, for AMD, you will have FSR option instead of DLSS.
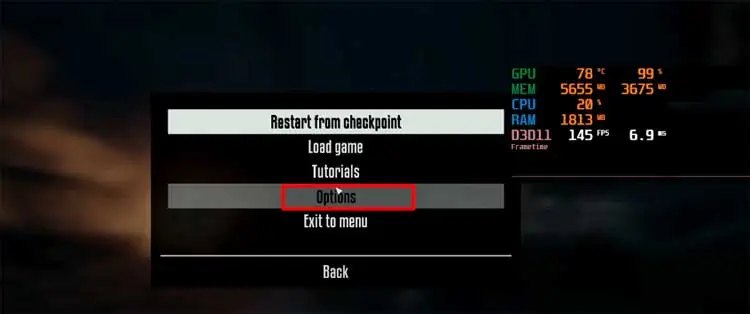
- Open the game you would like to play.
- Go to Menu and click Options or similar.

- Find FidelityFX Super Resolution or FSR and turn it into Ultra Quality.

- You can also turn on NVIDIA DLSS from the game. You will find DLSS in the place of FSR.
You will find the program run much better after turning this feature on.
Change GPU Settings using MSI Afterburner
MSI Afterburner is a free tool which you can use for any computer and monitor the functioning of your hardware. It also provides you the feature to change power settings to your GPU.
The graphics card of our computer can handle more power and more speed than that provided by default. If we can give more power to the GPU, it can work much better as well. Yes, it is risky to play with these settings but MSI Afterburner only lets you increase the value to the point your hardware can actually handle.
Let’s change these settings and optimize your GPU.
- Install MSI Afterburner from its official website and open the application.
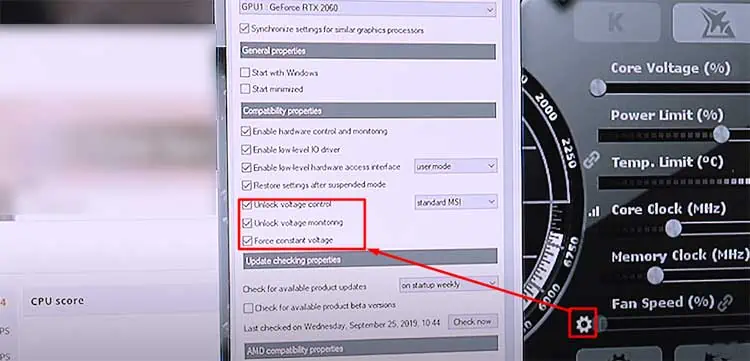
- Click on the gear icon and open settings.
- Check the options Unlock Voltage Control, Unlock Voltage Monitoring, Force Constant Voltage.

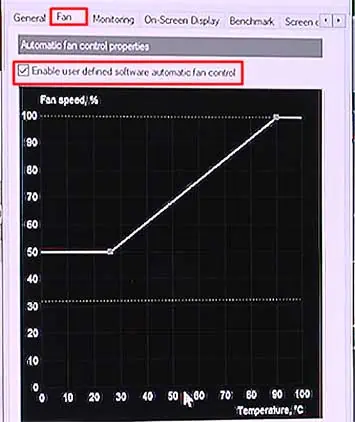
- Go to Fan and check “Enable User defined Software Automatic Fan Control” option.

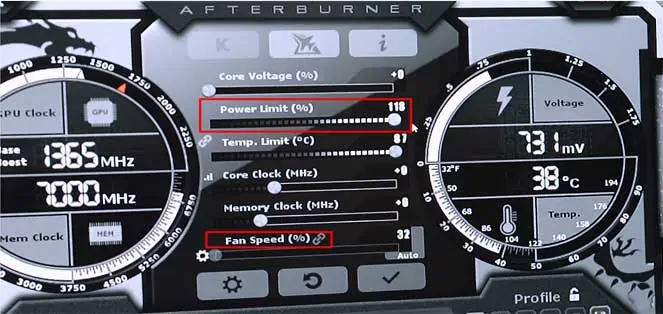
- Increase the Power Limit by 10 percent and also the Fan Speed by similar ratio. You can do this using heat and trial and finding the optimum value for you.

Run your respective program and see if it did the trick.
Overclocking GPU
Overclocking the GPU is one of the most used features by experienced gamer. Overclocking increases the clock speed of your GPU to run it faster.
When you overclock your GPU, it runs faster than the designed speed and its performance improves much more. You can overclock the GPU by using the MSI Afterburner application as well.
Let’s look at the way to do it.
- Follow the instructions up to step 4 on the earlier solution.
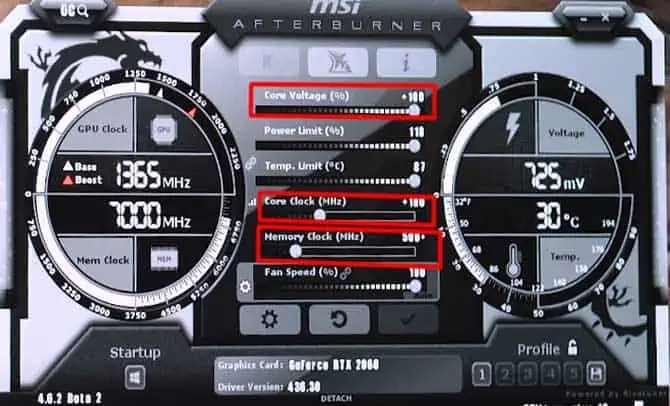
- Increase the Core Clock and then Memory Clock slowly by fine tuning the bar.
- It is advisable to change the settings one at a time at a small rate and check the benchmark to see if it worked.

If the function to reduce the Core Voltage is enabled, you can decrease it slightly and undervolt your GPU. Overclocking the GPU will raise its temperature and the speed will decrease dramatically after crossing a threshold temperature.
Hence, undervolting will help you keep the temperature in check and maintain the GPU speed.
Check whether your program or game is working better than before.
Update DirectX
Most of the games and programs utilize DirectX that provides a domain to optimize the frame rate and improve the GPU performance. Normally, Windows provides the DirectX update from the Windows Update feature automatically.
However, if your system has not updated DirectX in a while, then you can update it manually by following ways.
- Press Windows + ‘X’ and select Settings.
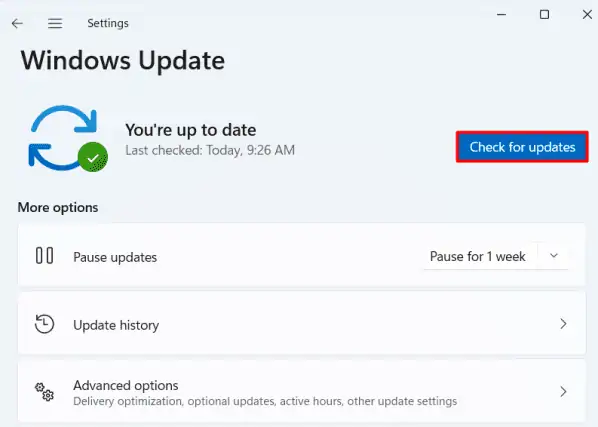
- Go to the Windows Update option at the end and click on Check for Updates.

- Your system will find the DirectX update if available.
- Click on Download and Install.
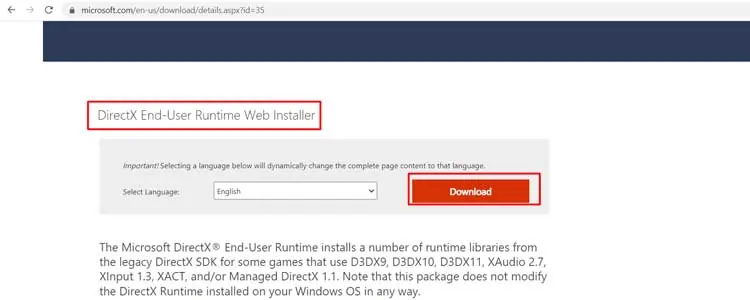
- You can also search for “DirectX Runtime Web Installer” from Microsoft’s official website and install it accordingly.

See if the performance of the GPU has improved.
Modify Settings Within the Game
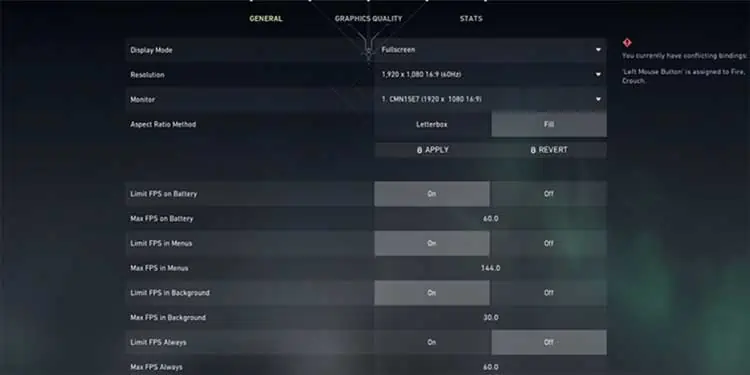
If you are an avid gamer and just want your GPU to help the game run smoothly, you can play with some specific settings inside the game. Every game has settings provided to change its graphical settings such as resolution, frame rate, image quality, etc.
You can decrease the texture, anti aliasing settings as well as disable tessellation to slightly reduce the visual quality while improving the frame rate and performance. These settings are specific to games and you may find them in varying names in different games.
Furthermore, some games nowadays have a feature called DRS or Dynamic Resolution Scaling which works similar to VRS but is game specific. It optimizes the visual quality and frame rate by varying with different elements present on the display. You can enable this feature and see how it changes your experience.
Similarly, if you prefer playing your game or running your program in windowed mode, then it is taking a toll on your GPU. In the windowed view, the GPU has to render the game as well as your desktop background. Hence, playing the game in full screen mode will definitely do the trick.
Reduce the Heat to the GPU
As we mentioned earlier, GPU speed drops a lot after it reaches a temperature limit respective of your system. Hence, if you can reduce the heat or maintain the temperature limit, you can enhance the GPU’s performance very much.
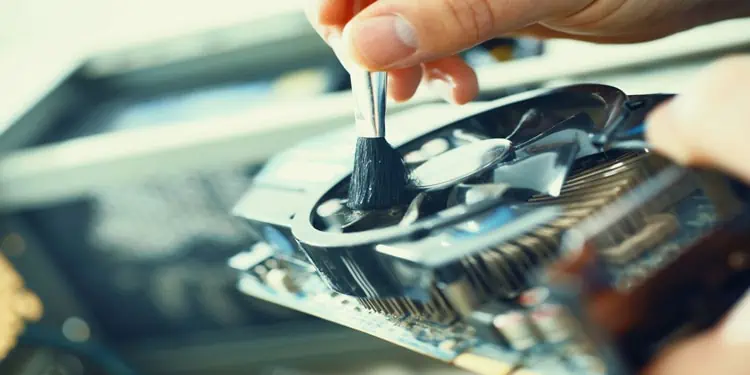
There are several ways to decrease the heating of your GPU. The first thing you can do is clean your system and remove any accumulated dust from over the GPU and motherboard. Dust can increase the heat to your system significantly while your GPU might have taken the toll due to it.
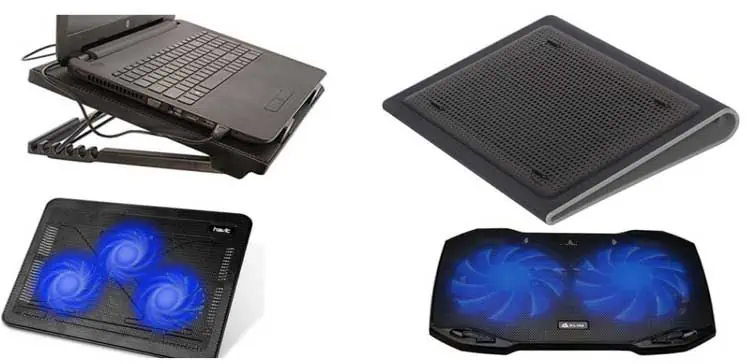
Similarly, you can use a cooling pad for a laptop or provide proper air flow to the GPU in your desktop by using casing fans.
Furthermore, it is better to use your laptop by connecting to the power supply instead of running it with battery during heavy gaming. The battery heats very fast, hence increasing the GPU and CPU temperature.
You can also change the power plan of your system to High Performance during heavy-duty work. It makes the CPU take some load as well, improving the performance of the system as a whole.
Update the Drivers
You should always keep your GPU drivers up to date. The manufacturer sends several fixes and provides bug removal and sometimes, even optimization settings in the update.
Please go through the steps below to find the way to update your drivers.
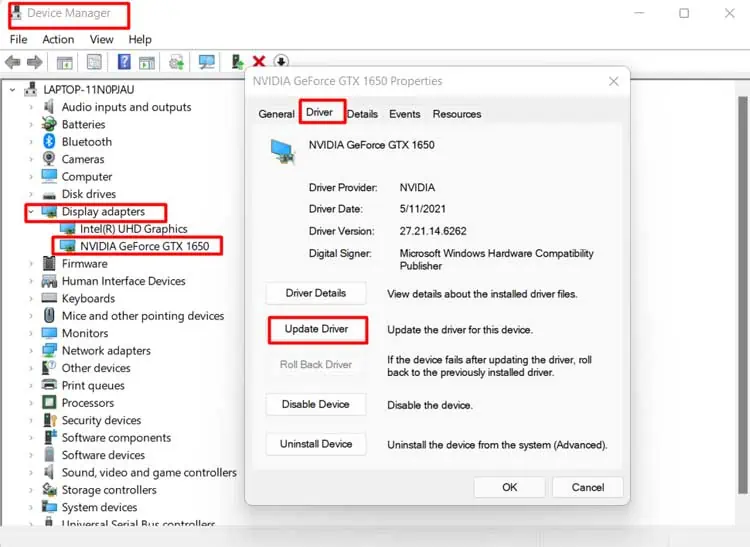
- Press Windows + ‘X’ and select Device Manager.
- Find Display Adapters and right-click on the GPU of your computer.
- Go to Drivers option and click Update Driver.

- Follow the instructions accordingly.
After applying these solutions, you must have optimized your GPU performance by at least 6 percent.

