Back in the days when we heavily relied on HDDs, we partitioned them to improve scalability and performance. Likewise, partitioning an SSD is also achievable.
Well, partitioning a solid-state drive lets you create separate sections so that file organization becomes much quicker. Moreover, it also helps run two different operating systems in a single device (for example, dual boot Windows 11 and Linux). However, this doesn’t add any advantage over the SSD speed and performance.
In this article, we will guide you through the four different methods of partitioning an SSD, alongside its pros and cons.
Partitioning HDD vs SSD
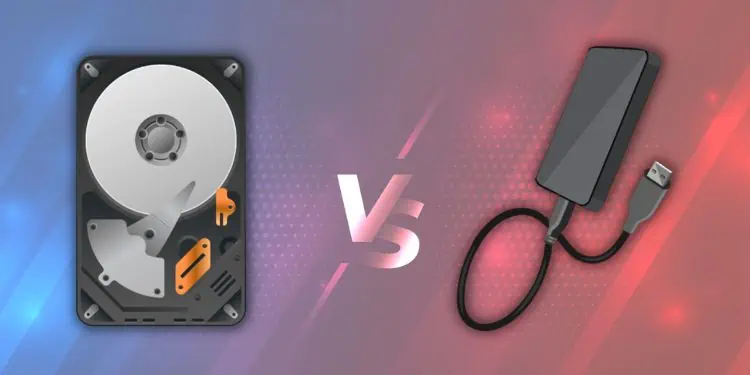
In HDDs, drive platters are used to store magnetic data. Hence, these physical movements of the circular disks can often cause wearing and tearing.
To avoid this, you can create partitions on your hard drive to reduce the time a magnetic head takes to perform a read or write operation. Thus, you notice a significant improvement in the drive’s performance.
On the other hand, SSDs use interconnected flash memory chips for reading and writing digital data. This way, the data transfer rate, bandwidth, and other factors are comparatively high in solid-state drives. Moreover, defragmentation, vital in HDDs, is not required here.
Hence, it’s not a compulsion to create partitions on an SSD, as it has no difference in terms of performance. Nonetheless, there are some other benefits of partitioning, which we will discuss in the below section.
Caution: Partitioning SSD having 120 to 128 GB capacity should be avoided, as the Windows files will cover most of the storage, leaving only around 100 to 110 GB of available space.
SSD Partitioning: Pros and Cons
Indeed, there can be both pros and cons to partitioning an SSD. Basically, this section deals with the plethora of myths regarding whether you should or shouldn’t partition a solid-state drive.
As discussed earlier, partitions do not improve the overall system performance, which means it’s not really required for average PC users. Likewise, another disadvantage is that it won’t increase the wear, as it does while partitioning HDDs.
Nevertheless, you can definitely partition your SSD if you’re looking for the possibility of dual-booting. Moreover, if you create separate sections for Windows files and other documents, your personal data won’t be altered when you’ll have to reinstall or repair the OS.
Well, you can go through the following table to learn more about the pros and cons of SSD partitioning.
- Easy and quick file arrangement
- Separates OS installation, which won’t affect personal files when erasing or reinstalling Windows
- Makes dual-booting possible
- Easier and quicker drive backups
- Allows the use of multiple file systems (NTFS, FAT32, exFAT, etc.) in different partitions
- Doesn’t affect speed or performance
- Doesn’t improve wear
- Multiple partitions can create confusion in configurations and trigger unwanted errors
- Data is still lost if your SSD fails or is physically damaged
4 Ways to Partition SSD
Generally, partitions aren’t done after an SSD is installed on a desktop or laptop. Hence, you only see the C drive (C:) under Devices and Drives in This PC.
To increase the number of drives, you can either use an external SSD or create partitions of the existing one. Regarding the same, this section will help you create multiple partitions on your solid-state drive.
In Disk Management Utility
Disk Management is an in-built Windows utility that lets you explore several advanced storage settings. Using this, you can quickly check the SSD health status, change paths, configure drive letters, or even shrink, extend, and delete volumes.
Likewise, the Disk Management utility allows the simplest way to partition your internal or external SSD. Kindly go through the below steps to learn how to do just that:
- Press Windows + X hotkey and select Disk Management from the list.
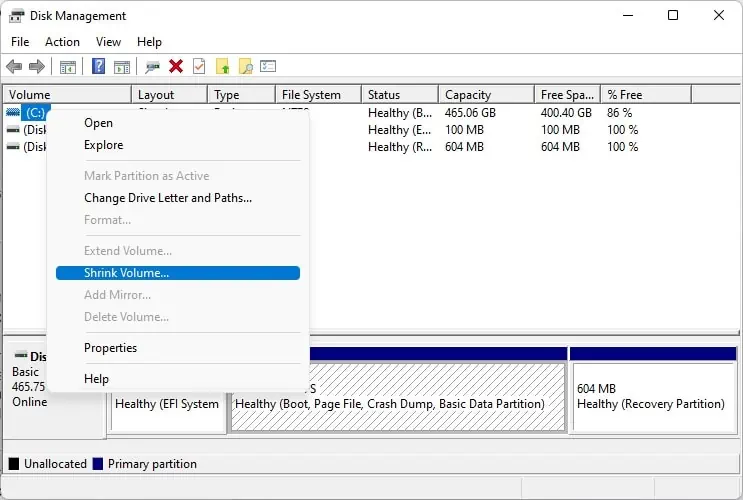
- Right-click on the Basic Data Partition and choose the Shrink Volume option.

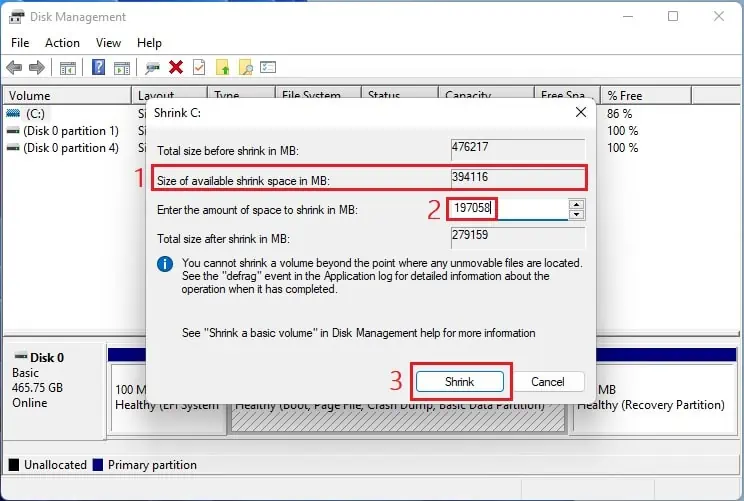
- Now, wait until the Shrink dialogue box pops up.
- Then, check the available shrink space and input the value (in MB) equal to or less than the former. For example, if the Size of available shrink space indicates
394116, enter394116or less value. Here, we have used197058for demonstration.
- Press the Shrink button, and this creates an unallocated memory space.
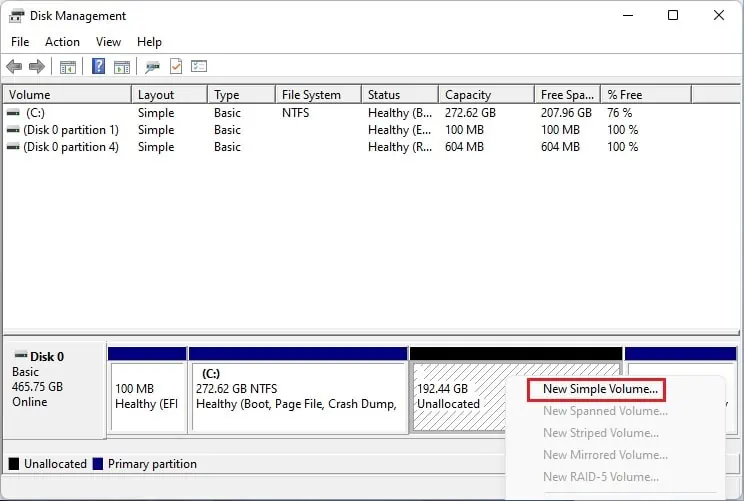
- Move to the below section in Disk Management and right-click the Unallocated space. Here, select New Simple Volume.

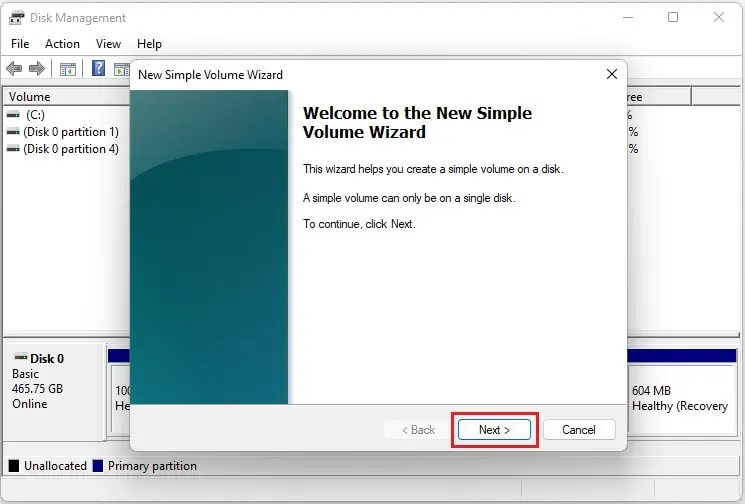
- Once the New Simple Volume Wizard opens, press the Next button.

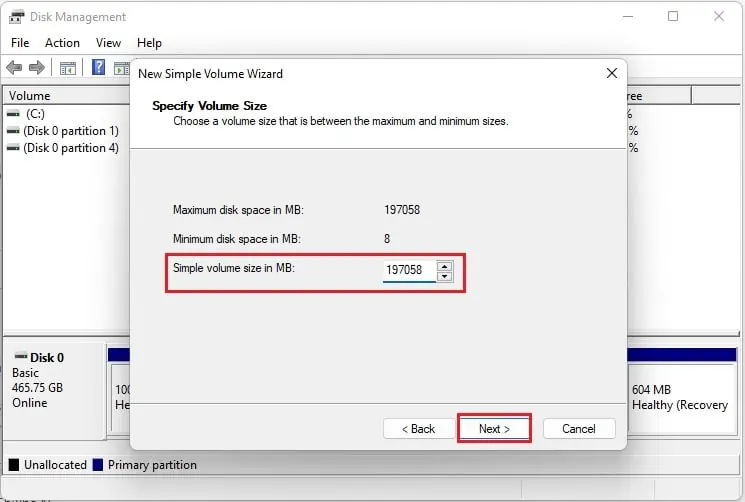
- In the Simple volume size in MB, input the value 197058 and click Next.

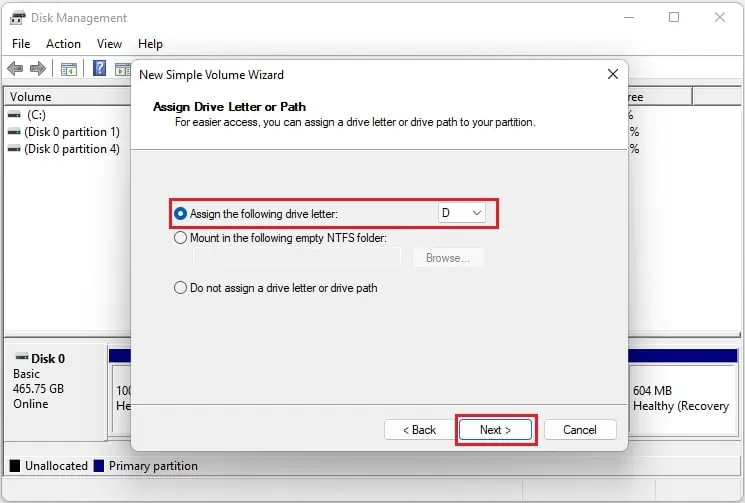
- Under Assign the following drive letter, expand the drop-down and pick a letter. For example, selecting D will set the partitioned disk as D drive.

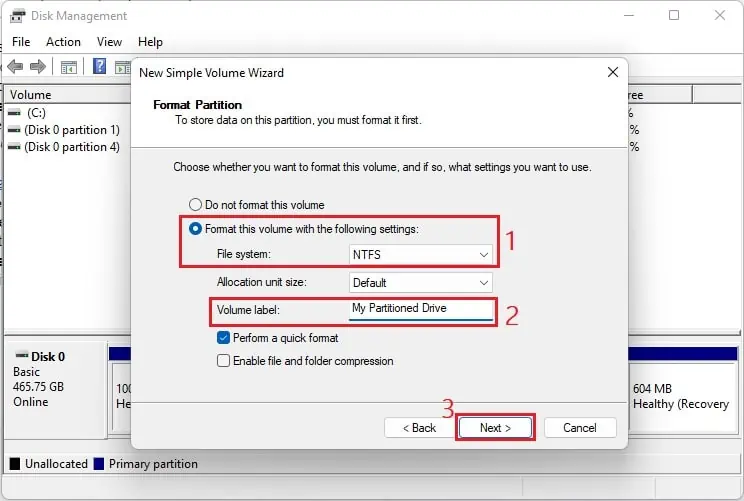
- Press Next, and you’ll move to the Format Partition section. Here, select Format this volume with the following settings. Also, ensure the File System is set to NTFS and Allocation unit size to Default.
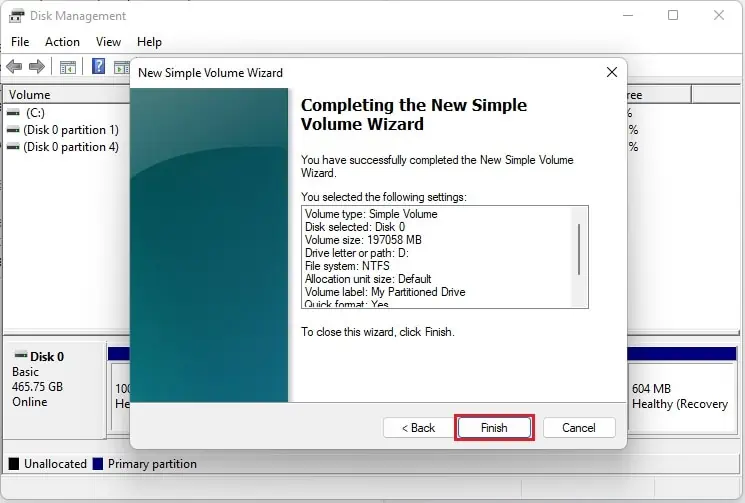
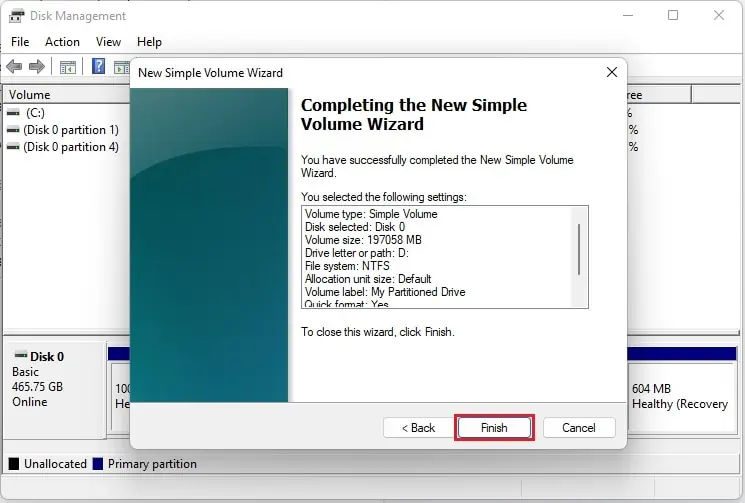
- Now, you can edit the Volume label field to edit the drive’s name and tap Next. For demonstration, we set it to ‘My Partitioned Drive’.

- Finally, click the Finish button, and your partition drive should be successfully created.

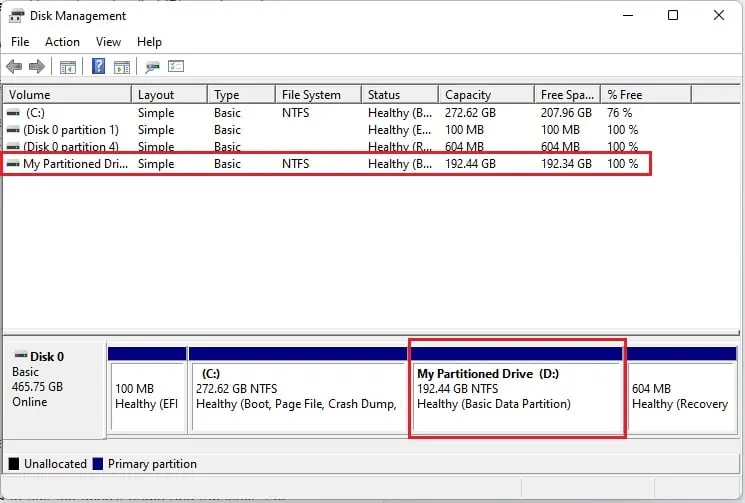
- To verify this, you can notice a new (D:) drive with a maximum capacity of
197058MB (192.34GB) in the Disk Management list.
Note: To create more than two partitions, you’ll need to check the available free space and partition the primary drive accordingly.
Using Diskpart in Windows Terminal
Interestingly, you can also use the Powershell window or Command Prompt to create two or more partitions on your SSD. Follow the below guideline step by step to do it the right way:
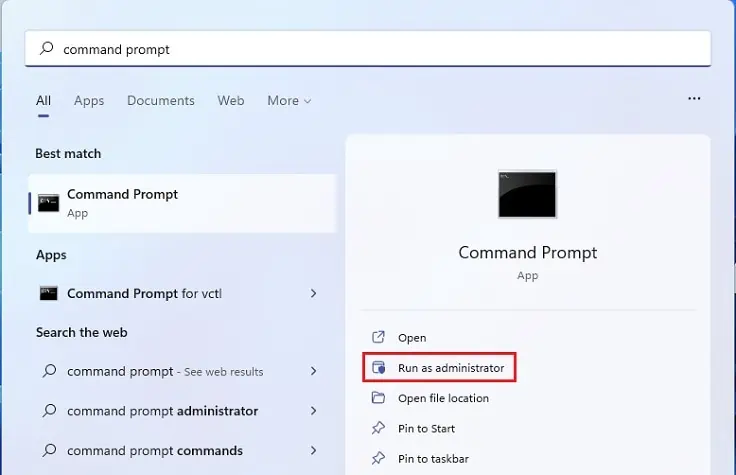
- First of all, navigate to the start menu and search for Windows Powershell or Command Prompt.
- Here, select Run as administrator from the right side.

- Now, press Yes, and you’ll be taken to the prompt.
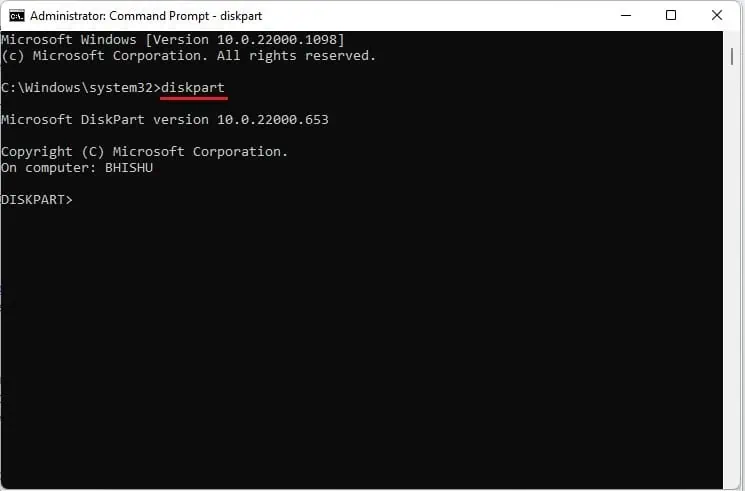
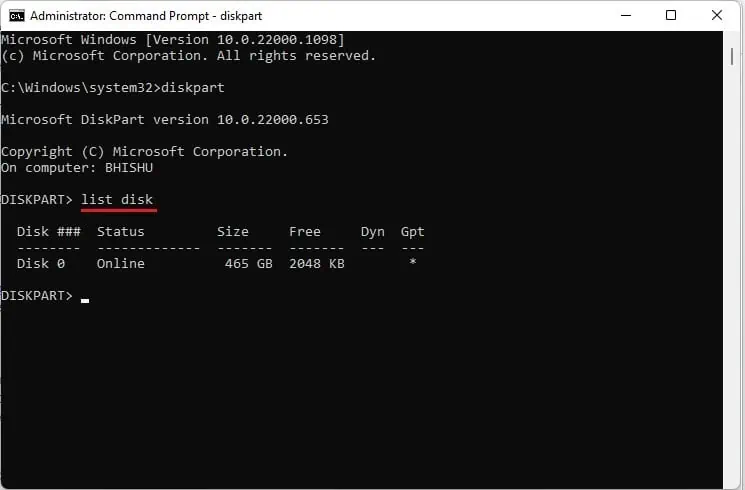
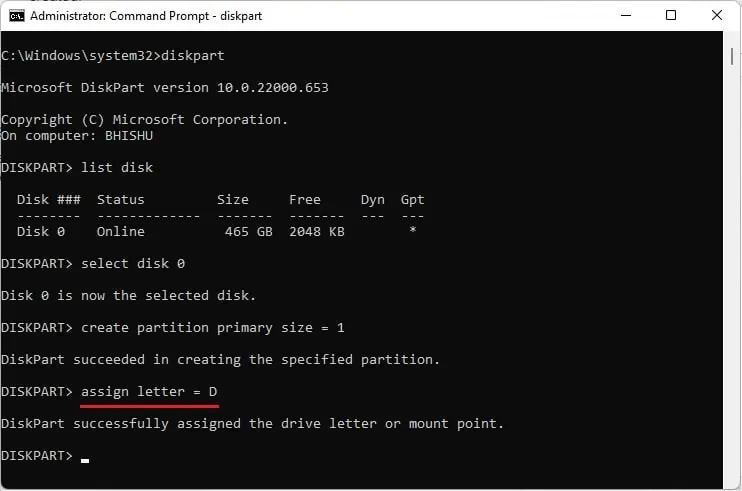
- Next, use the
diskpartcommand line to start the partition process.
- Then, use the
list diskcommand to check all the available disks and their information (status, size, free, Dyn, and Gpt).
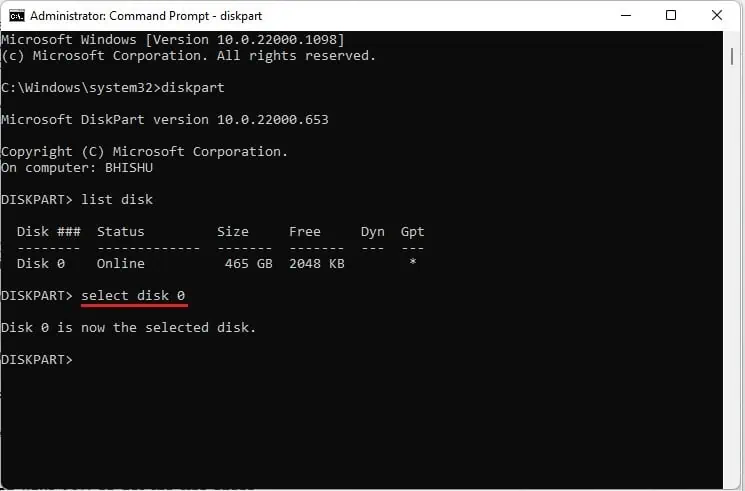
- Thirdly, run
select diskto choose your desired SSD. For example, we choose disk 0 here as that’s the only one available:select disk 0
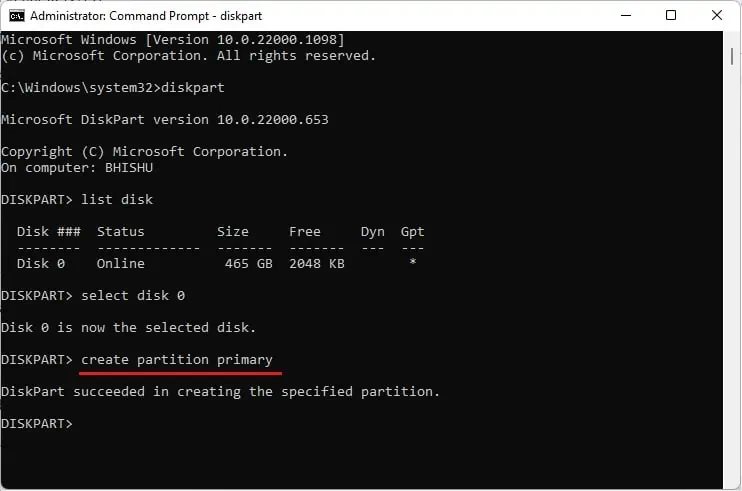
- Next, use
create partition primaryto partition your SSD as per the free space available.
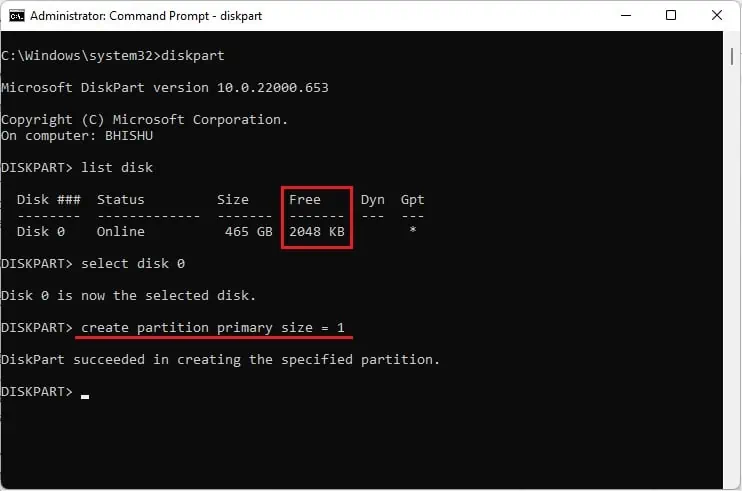
Likewise, you can also define a custom size. While doing so, please note that you need to leave at least 1 MB of space to place the MBR or GPT partition table. For example, we have only 2048 KB of free space. Thus, we can only create a partition having 1 MB (1024 KB) of total storage.
- Additionally, you can run
Assign letter = [Choose a letter]to name your partitioned drive.
- Now, use the
exitcommand to quit the Disk Partition utility. - Finally, you can navigate to the Disk Management tool to confirm that the disk is partitioned successfully.
Using Windows Media Creation Tool
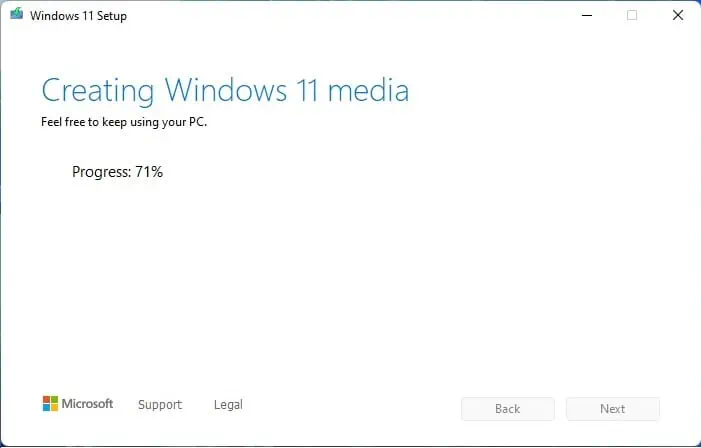
If you’re installing or upgrading Windows using the Windows Media Creation tool, partitions can be directly created from the installation screen. Basically, this is a free Microsoft utility that lets you create a bootable USB or DVD for the installation of Windows.
Please follow the below steps on how to use the Windows Media Creation tool for partitioning your SSD:
- Ensure that you have downloaded and installed the utility.
- Next, insert a USB and start creating a bootable Windows USB.

- Then, shut down your computer and turn it back on.
- Before the PC boots into Windows, press the dedicated key to start the Windows Setup.
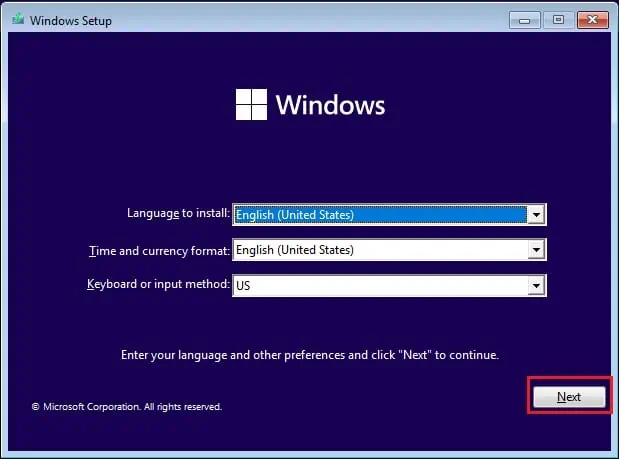
- In the language, time, and input method screen, use the correct details and choose Next.

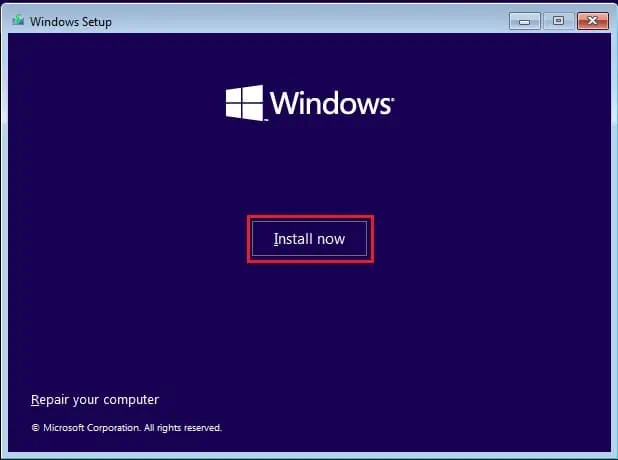
- Next, tap the Install now button.

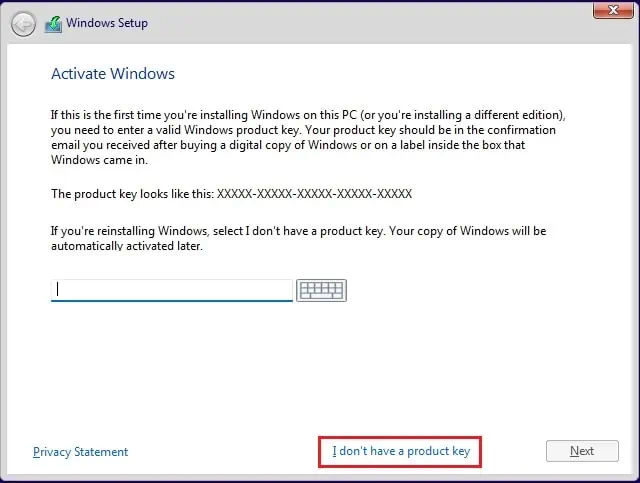
- In the Windows Activation screen, enter the product key. Else, you can choose I don’t have a product key option from the bottom of the dialogue box.

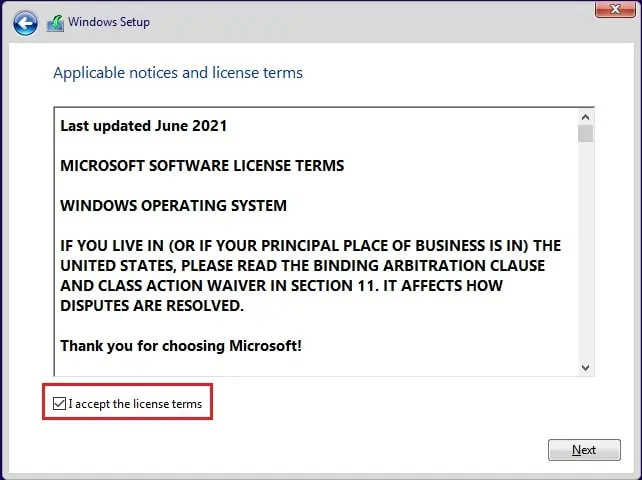
- Then, check I accept the License terms and hit Next.

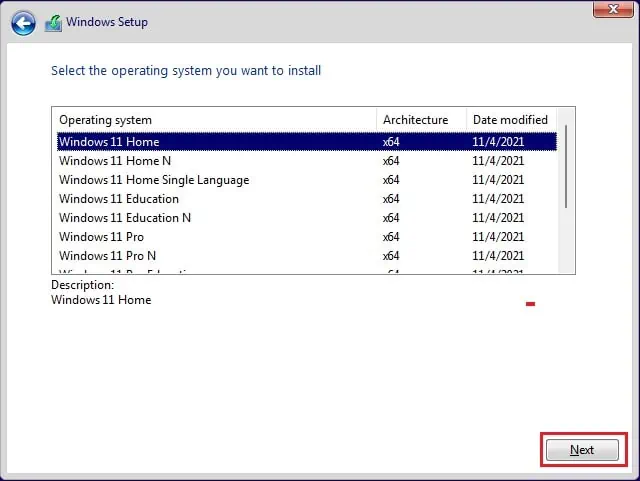
- Then, choose an OS and tap Next.

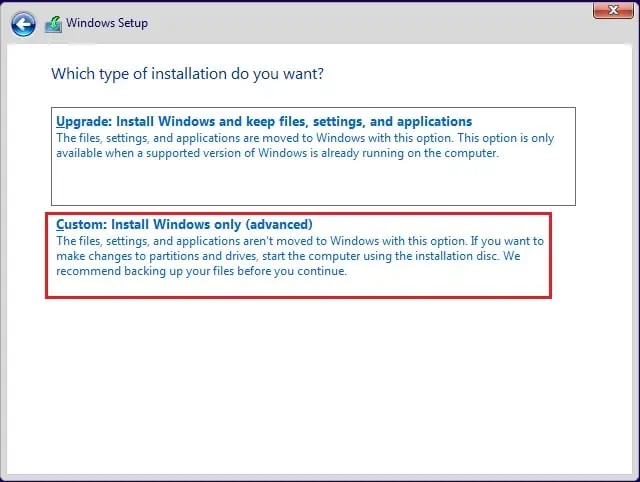
- Now, choose the custom installation option.

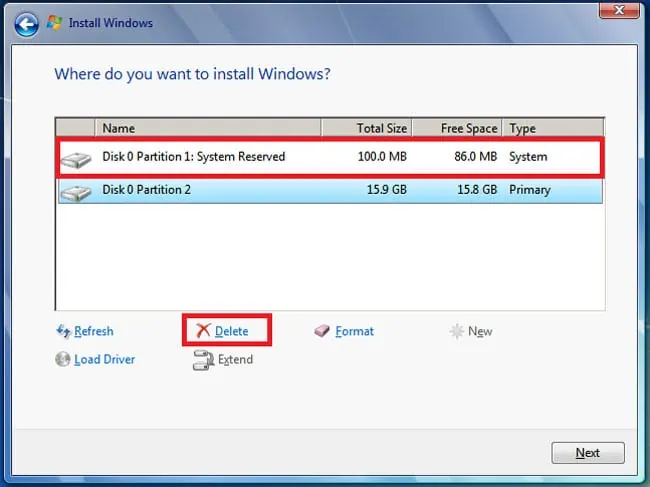
- Here, start deleting the unnecessary partitions.

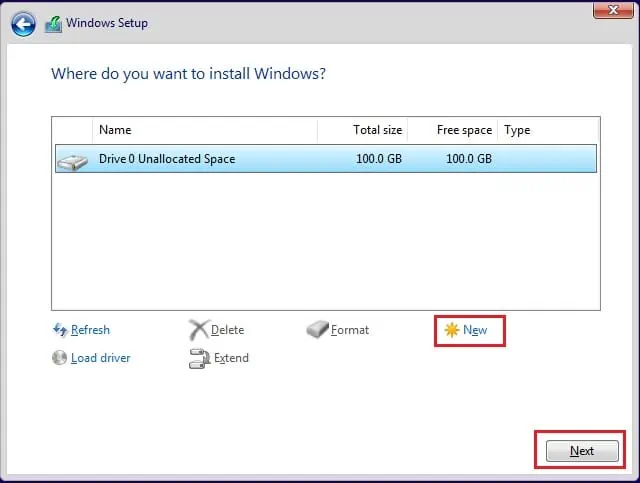
- When you’re left with the Drive 0 Unallocated space, select it and choose New.

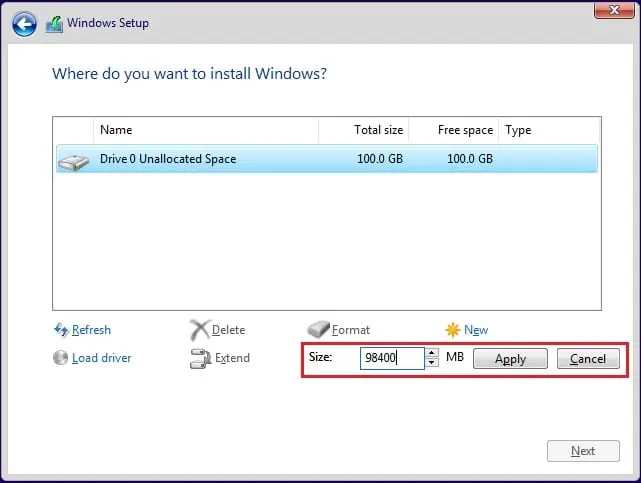
- Next, input the size and click Apply.

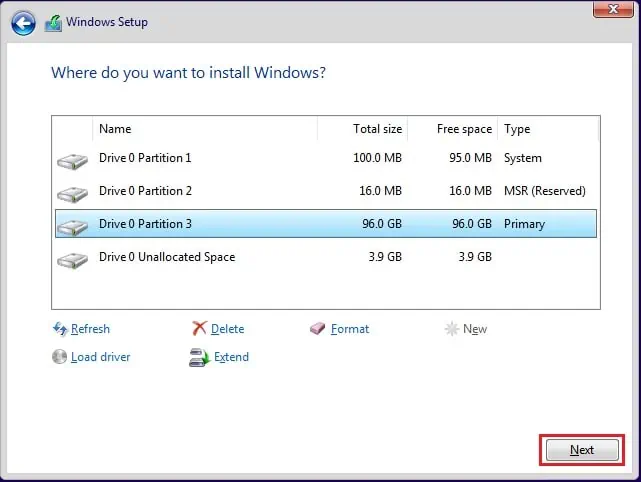
- Press the Next button and follow the on-screen instructions to complete the Windows installation.

- After the Windows boots, open the Disk Management utility.
- Here, right-click on each RAW partition and select Shrink Volume.
- Now, enter the right amount of space and tap the Shrink button.
- Once a new dialogue box pops up, click the Yes option to continue.
- Since you’re left with unallocated space, right-click on it and choose New Simple Volume.
- Finally, proceed with the on-screen instructions, creating a new disk drive.
Using Third Party Program
Apart from the Disk Management utility and Command Prompt, another technique to partition SSD is using any reliable third-party program. Some popular apps include Acronis Disk Director, GParted, etc.
Well, these third-party apps include an attractive user interface, making it easier to partition SSD or HDD. However, unreliable applications might corrupt your system, leading to other issues. Thus, we do not recommend any such programs and advise using the built-in methods.
How to Delete an SSD Partition?
Sometimes, you might get unsatisfied with the created partition or would even want to remove an existing SSD partition. However, deleting the unallocated free space can be a bit tricky.
Nonetheless, the simple steps below should help you do just that. But before moving forward, make sure you have backed up the partitioned drive, as deleting the volume will remove everything.
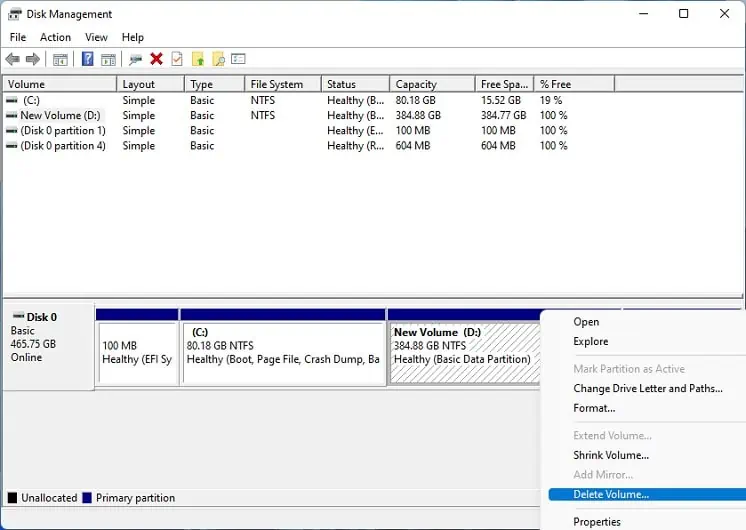
- Firstly, right-click on the partition and select Delete Volume.

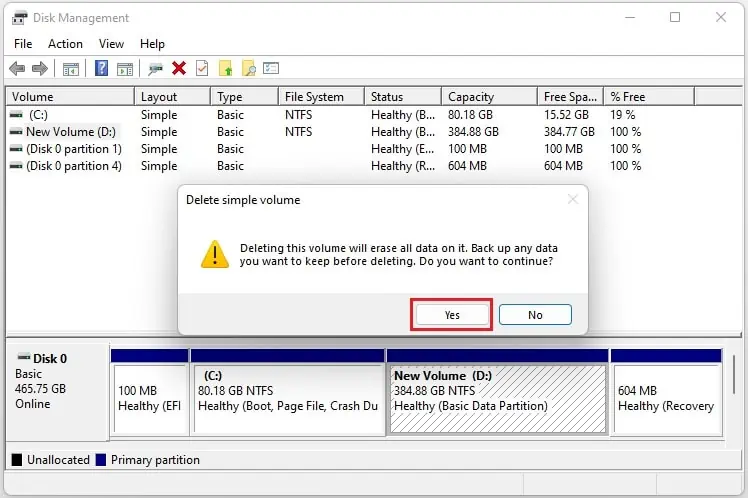
- Now, press Yes to complete the deletion.

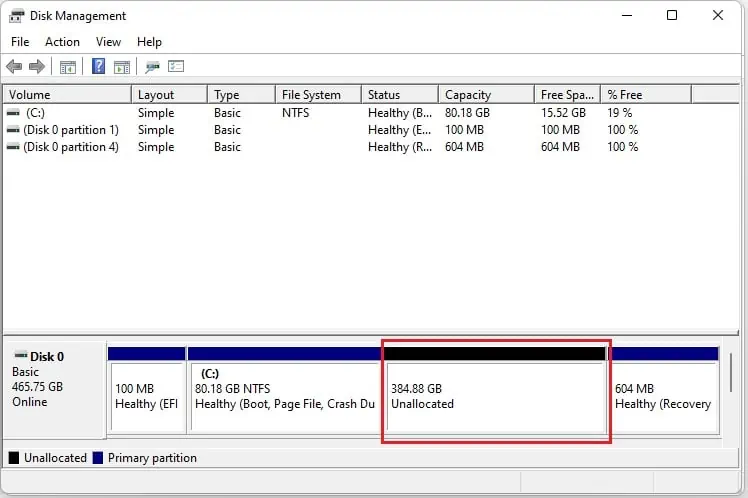
- Nonetheless, the unallocated free space still remains. To remove this, you’ll need to extend the volume of the primary SSD.

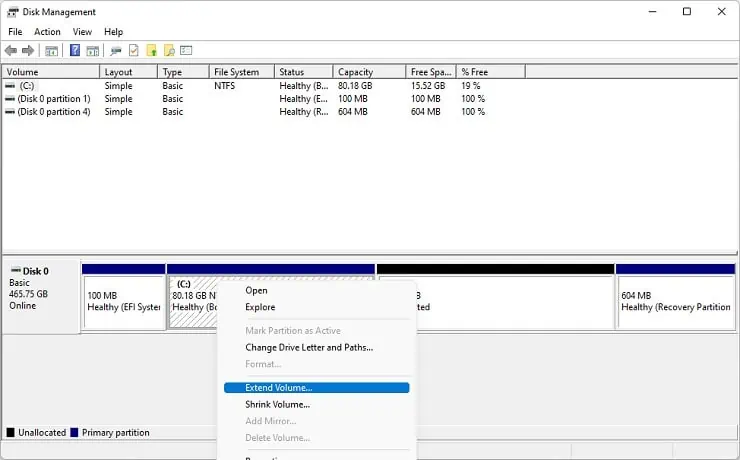
So, right-click on the drive and choose Extend Volume. However, you can read our other post if the Extend Volume is greyed out.
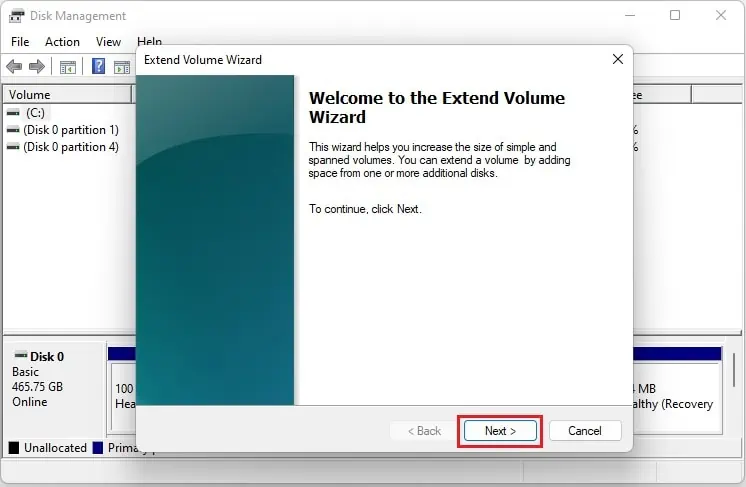
- Once the Extend Volume Wizard pops up, click Next to continue.

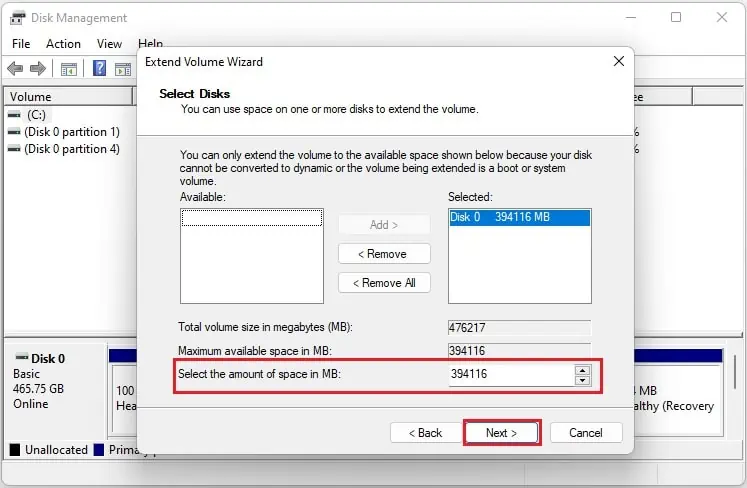
- In Select the amount of space in MB, ensure that the value is set exactly the same as the partitioned space, and tap Next.

- Then, hit Finish, which should completely remove the partitioned drive.


