Whenever you have multiple devices connected to the same Wi-Fi network, the internet bandwidth gets shared among them. However, there can be situations where one device hogs a lot of bandwidth, causing connectivity issues with other devices.
In such cases, it’s a good practice to specify a priority for the Wi-Fi so that your main device gets uninterrupted access to the internet. You can use the device-level QoS feature or specify a bandwidth limit on the routers to achieve this task.
Prioritizing Devices Using QoS or Traffic Control
Quality of Service (QoS) is a feature that manages the internet traffic over a network. Generally, it is used to prioritize the transfer of particular types of data traffic like streaming data, file transfer data, and so on. However, this feature also allows the router to prioritize certain connected devices over other devices.
Currently, QoS should be available in most routers out there. But if your router does not have this feature, you need to use the bandwidth limit or traffic control feature to prioritize Wi-Fi. You can manually impose limits on the download and upload bandwidth with this feature, but it is not as optimized as QoS.
Step 1: Access Router Portal
It is possible to change the relevant settings through the router portal or dedicated applications of the router. Since not all devices have such apps, I have only included the steps for the router portal.
- First, you need to figure out the gateway IP address of the router. Usually, the router should contain a sticker that shows this address. If not, you can get this info from command-line interfaces, such as:
- On Windows, use the command
WMIC NICConfig where IPEnabled="True" get DefaultIPGatewayon Command Prompt.
- On Mac, enter the command
netstat -rn | grep default | awk '{print $2}'on the Terminal.
- On Linux, you can use
ip route | awk '/default/ { print $3 }'on the Terminal.
- On Windows, use the command
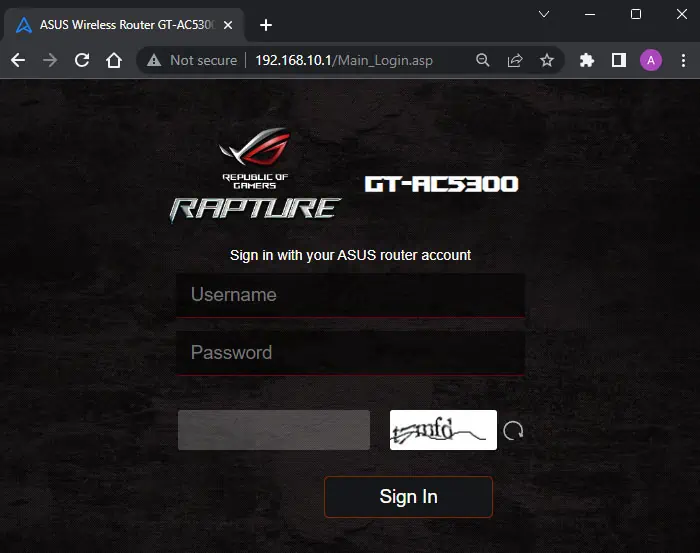
- Then, type the gateway address of the router into the address bar on a web browser and press Enter. It will lead you to the router login page.
- Enter the username and password for your portal. Enter any other verifications you may need as well.

- The most common default username is
adminand the most common passwords areadminandpassword.
Step 2: Change QoS or Traffic Control Settings
Now, you can change the necessary QoS configurations to prioritize certain devices on the Wi-Fi network.
The interface and the exact steps for changing the settings may be different based on the exact device. So, if you encounter any issues, try checking on the help sections (question mark icons) or visit official sources for more information.
fast.com, speedtest.net, speed.io, etc., to check these speeds. Some router portals also have options to test the speed, but it’s better to check on those websites as well.ASUS Router
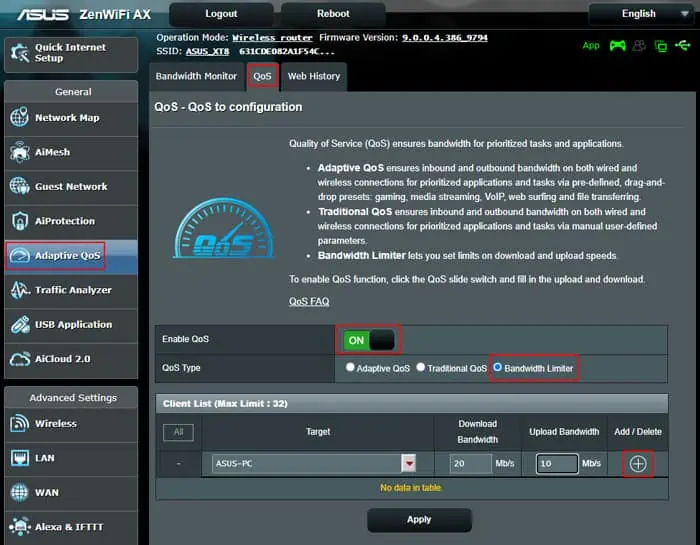
- On the Router Portal, select Adaptive QoS under General.
- Go to the QoS tab and toggle on Enable QoS.
- Check Bandwidth Limiter under QoS Type.
- Select a client device using the drop-down box under Target.
- Specify the download and upload bandwidth limit and click on the Add (+) sign.

- Do so for all the devices where you wish to impose a limit.
- On your device where you wish to prioritize Wi-Fi or the internet, you can specify the maximum values. Or you can skip this device so that no limit exists.
NetGear Router
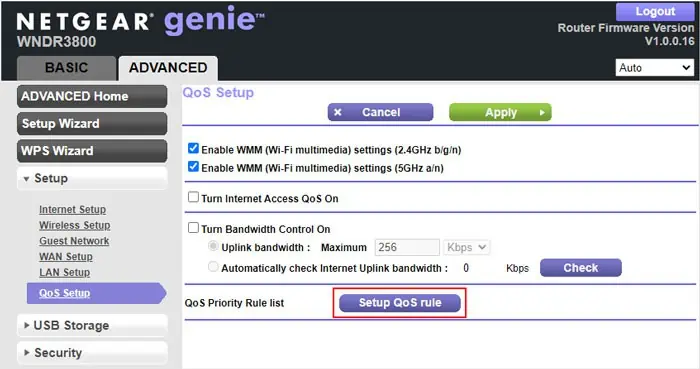
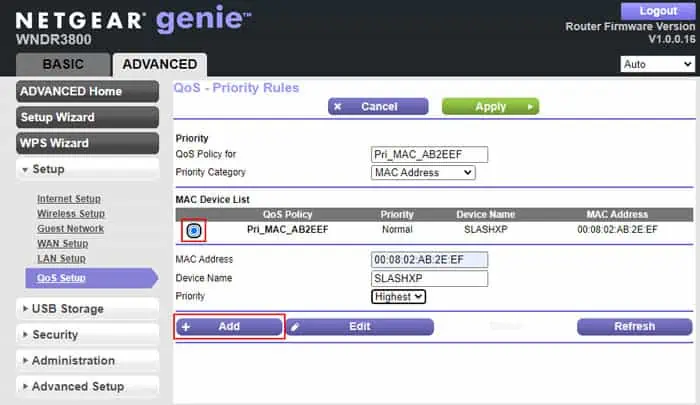
- Go to the Advanced tab and select Setup > QoS setup.
- Click on Set Up QoS Rule next to the QoS Priority Rule list and then Add Priority Rule.

- Select MAC Address under Priority Category.
- Check the device from the MAC Device List.
- Set the Priority level depending on your need.
- Click on Add.

- After specifying the priority level for all devices, click on Apply.
TP-Link Router
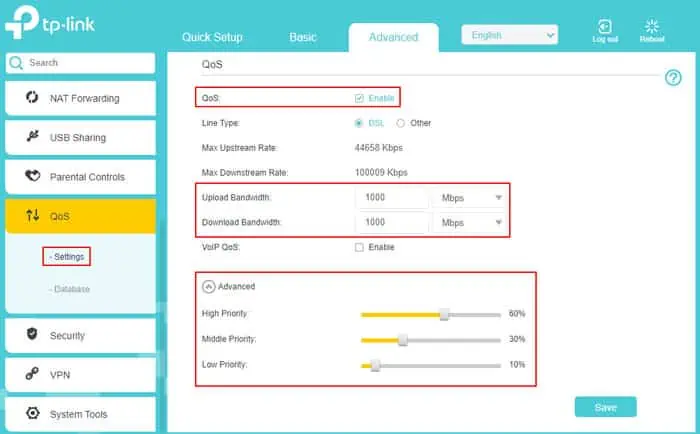
- Go to the Advanced tab.
- Select QoS > Settings.
- Check Enable QoS next to QoS.
- Specify your internet’s actual Upload Bandwidth and Download Bandwidth on the text boxes below.
- Expand Advanced and set the slides for High, Middle and Low Priority while keeping the following things in mind:
- The total of these values should amount to 100 or less as they denote the percentage of bandwidth allocated for the devices.
- It’s best to leave some percentage free (such as 5% in the default case) for devices that you may connect in the future. If not, those devices may experience connectivity issues.
- Values like 60, 20, and 15 should be appropriate for most users.

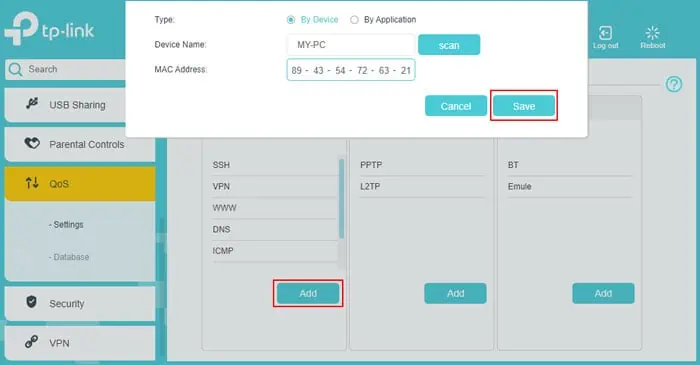
- Look at QoS Rule List, and click on Add under High Priority.
- Check By Device and click Scan next to Device Name.
- Select the main device or devices where you wish to prioritize Wi-Fi.
- Click on Save.

- You can specify other devices on other priority lists using the same method.
D-Link Router
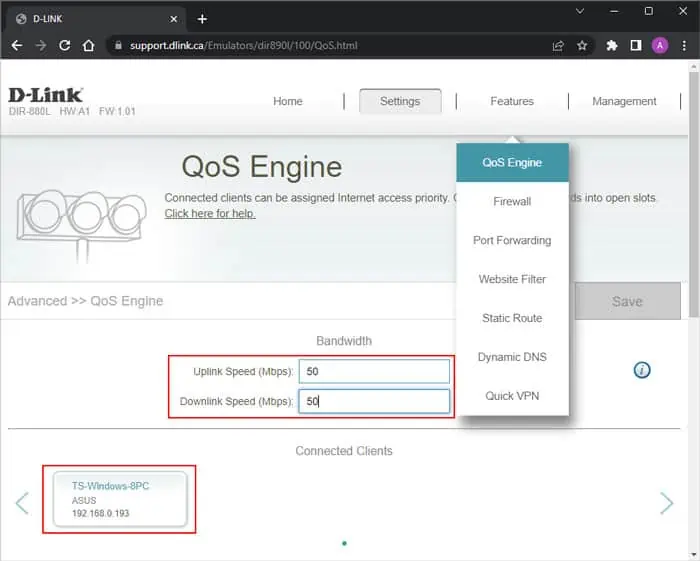
- Hover over Features and select QoS Engine.
- If you see AI Traffic Optimizer, enable it.
- Set the Downlink and Uplink Speed as per your internet service.
- Click on Save.
- Click on the devices under Connected Clients or click on the i icon of the devices.

- Set the Priority per your wish.
- Click Save.
Linksys
- Go to the Device Prioritization tab.
- Toggle on Prioritization if necessary.
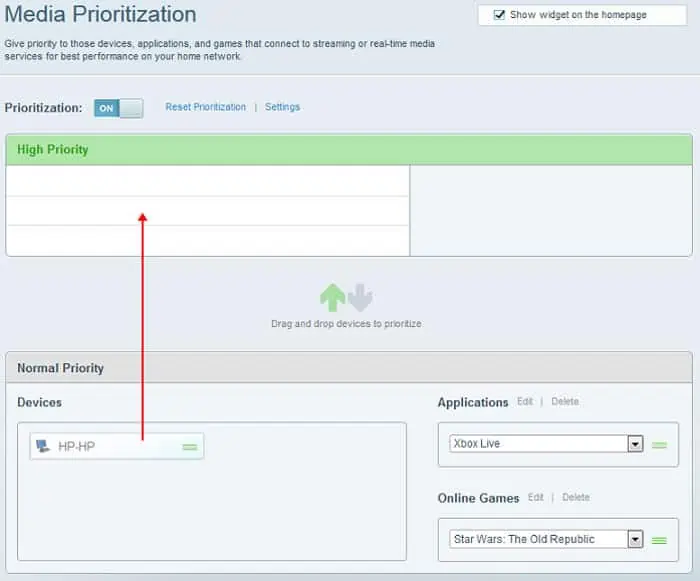
- Drag and drop the devices between Normal Priority and High Priority to specify the priority settings.

- Click OK.
Tenda
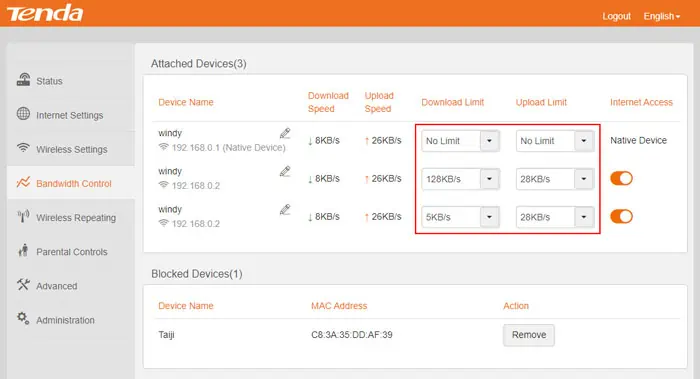
- Go to the Bandwidth Control tab.
- Set the Download Limit and Upload Limit for all devices depending on your need.

- Click OK.
Step 3: Test Speed on All Devices
After changing the router configuration, it’s better to check the internet speed using certain websites to make sure that the router is implementing the priority changes. If you need to you can go back and change the configuration to make them more suitable for your use.
Prioritizing Wi-Fi on Google Nest
If you use Google Nest Wifi Pro, Nest Wifi, and Google Wifi devices, you can use the Google Home app to prioritize Wi-Fi on a particular device for some time.
- Open Google Home on your mobile phone.
- Go to Favorites and select the Wi-Fi icon.
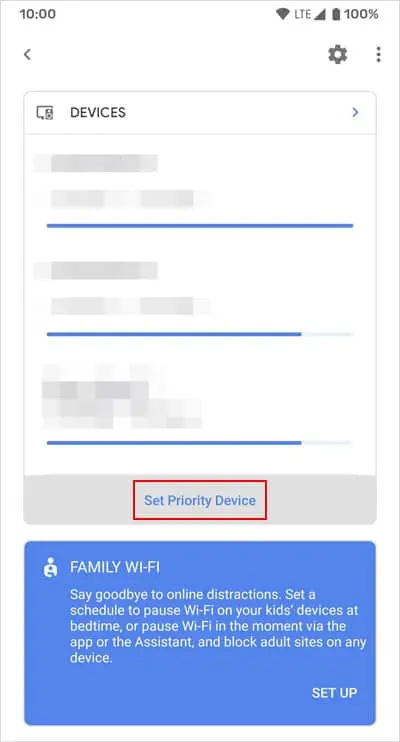
- Tap on Set priority device from under Devices.

- Select the device where you want to prioritize the Wi-Fi.
- Set the time duration per your wish and select Save.
