Taking screenshots is a very convenient method of capturing visual information on the screen. Pretty much all devices, including Lenovo Yoga devices, offer various ways of capturing a screenshot.
Lenovo Yoga comes as tablets or laptops, so they have different operating systems. Depending on which device you are using, you will need to use different methods to capture a screenshot.
How to Screenshot on Lenovo Yoga Tablets?
Lenovo Yoga tablets use the Android operating system. So, the process of taking a screenshot is similar to that for Android phones or tablets.
Using Side Buttons
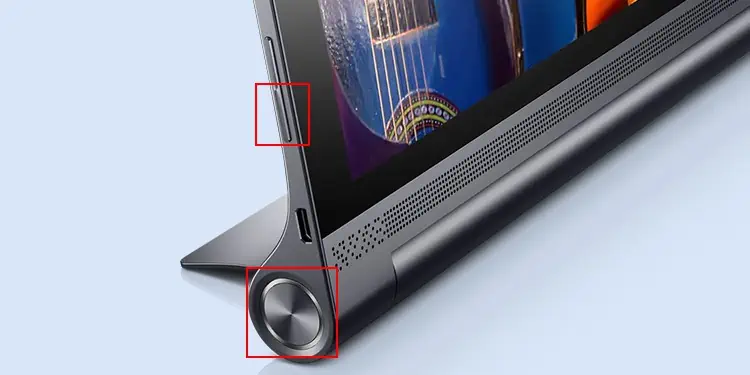
The easiest way to take a screenshot on Lenovo Yoga tablets is to press the Volume down and the Power buttons on the side of the tablet. Doing so will take and save a full screen which you can view on your Photos or Gallery in the Screenshots folder.
Depending on the model, the power button may be a smaller button right below the volume buttons or a big button on the hinge.
Using the Screenshot Option in the Pop-up Menu
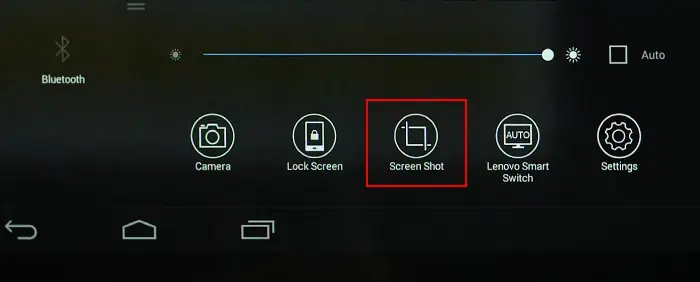
Swiping up from the bottom of the screen pops up a menu that contains certain quick settings or apps. It also has an option to take a screenshot, which allows you to capture a full screen as well as a cropped area image.
- Swipe up from the bottom of the screen.
- It will show some pop-up options. Select Screenshot.

- If you want to take a screenshot of the full screen, select Full screen on the menu.
- If you want to screenshot a smaller rectangular area,
- Tap on a point on the screen and drag your finger to another point to create a crop area for snipping the screen.
- You can also adjust the snip area by dragging its corners and edges afterward.
- After determining the snip area, tap on the Crop to take and save the screenshot.
- Same with the above method, you can find the screenshots on the Gallery or Photos app and inside the Screenshots folder.
How to Screenshot on Lenovo Yoga Laptops?
Lenovo Yoga laptops or Lenovo Yoga books use the Windows operating system by default. So you can use all the screenshot methods for Windows to capture an image on this device as well.
Using the Print Screen Key
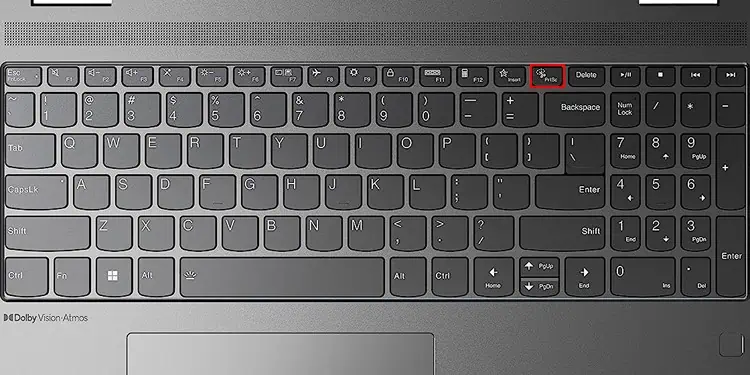
Windows comes with an integrated screenshot feature that you can use with the PrtSc or Print Screen key. You can use this feature to capture your full screen image or just an active window.
- Press the PrtSc key to capture a full screen. Doing so only saves the image in the clipboard, so you need to paste it into Paint or an image editor like Photoshop and then save it. Or you can directly share it with someone else on the internet by pasting it from the clipboard.
- You can also press the Windows key (⊞) + PrtSc to directly take and save a full screenshot.
- Your system saves the screenshot in the
Pictures\Screenshots(insideC:\Users\“username”) folder. It uses the name Screenshot (xx), where xx is a number. - The number is the first unused number for the same name in incremental order. So, if you have screenshots, Screenshot (1).png, Screenshot (2).png, and Screenshot (4).png, the next screenshot will be Screenshot (3).png.
- It also saves the screenshot in the clipboard along with the Screenshots folder, so you can directly use it in any photo editor as well.
- Your system saves the screenshot in the
- Press Alt + PrtSc to take a screenshot of the currently active window and save it on the clipboard. While Windows key (⊞) + Alt + PrtSc does take and save a screenshot, it actually uses the Xbox Gamebar feature, and we’ll talk more about it below.
Using Snipping Tool
You can also use the built-in Snipping Tool app to take a screenshot on your Lenovo Yoga laptop.
On Windows 10, this tool is called Snip & Sketch, and Snipping Tool was a similar but different program. However, Microsoft removed the older Snipping Tool in Windows 11 and renamed Snip & Sketch to Snipping Tool.
You can open this program and then open its snipping screen to take a screenshot or directly open the snipping screen. The shortcut for the snipping screen is Windows key (⊞) + Shift + S.
To open and use the program,
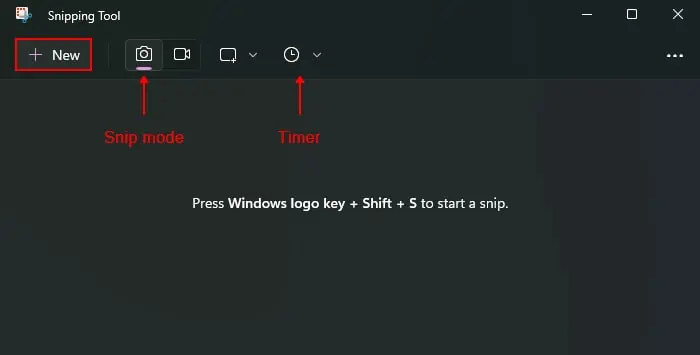
- Go to Start Menu > All Apps > Snipping Tool. Or you can search for this app on the search bar (Windows key ‘⊞’ + S) and then open it.
- Make sure to select the camera icon, which is for screenshot or snip mode, instead of the Record icon.
- Set the timer as you want if you want a delay before you start taking the screenshot.
- Click on New to open the snipping screen where you can take a screenshot.

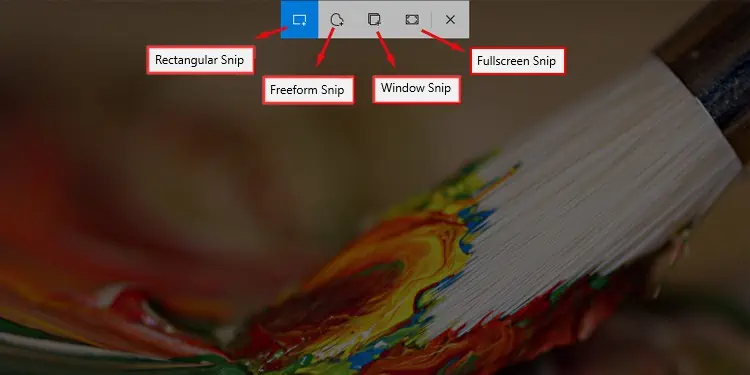
- On the top menu on this screen, you will see four options along with the Close icon. Choose one according to your need and take a screenshot accordingly.
- Rectangular Snip: It allows you to take a screenshot of a rectangular cropped area. You need to click or tap on any point and drag your mouse or finger to another point. It will create a crop area with the two points as a diagonal.
- Freeform Snip: It allows you to capture an irregular screenshot. You can click on a location on the screen and drag your mouse around a perimeter to take a screenshot of the area within this perimeter.
- Window Snip: It allows you to take a screenshot of a single window. You can click or tap anywhere inside a window to capture its image.
- Fullscreen Snip: Clicking on it takes a full-screen screenshot of your display.

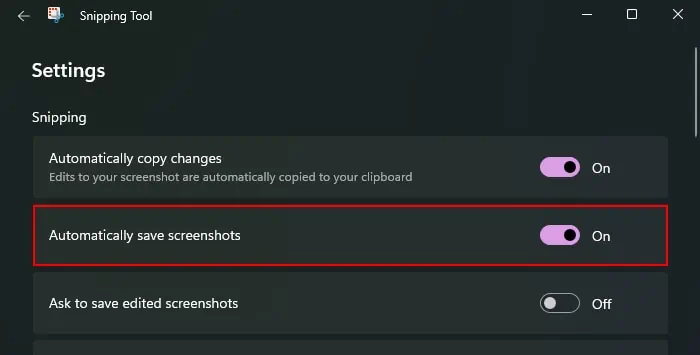
- Depending on the Snipping Tool’s settings, your system may automatically save the screenshot to the
Pictures\Screenshotsfolder or only save it in the clipboard history (default behavior). If it is the latter, you need to paste it into an image editor to be able to save it. You can check the current behavior using the steps below.- Click on the triple-dot icon on the Snipping Tool app.
- Select Settings.
- Check the status of the Automatically save screenshots option and change it as necessary.

- If you open the app and then take a screenshot, or if you clicked on the screenshot notification after capturing it, you can also edit the screenshot on the Snipping Tools app. Then, you can copy or save it as you need.
Using Xbox Gamebar
The Xbox Game Bar feature in the Windows system is more geared towards video recording. However, it also allows you to capture a screenshot of an active window.
- You need to press the Windows key (⊞) + Alt + PrtSc to take a screenshot of the active window through the Xbox Gamebar. You will get a pop-up notification saying Screenshot saved.
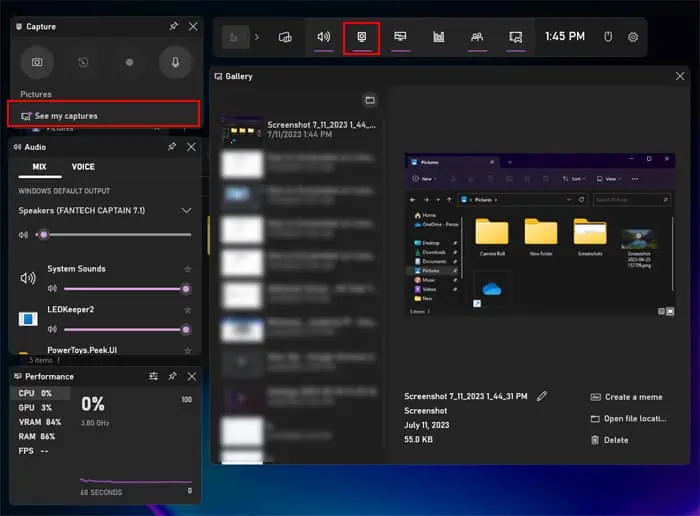
- You can click on the notification or open the Xbox Game Bar (Windows key (⊞) + G), enable Captures tab from the top panel, and select See my captures to check the screenshots you captured using the Game Bar.
The Captures tab also includes a camera icon, which you can use to take a screenshot as an alternative for the above hotkey.
- You can also go to the
Videos\Capturesfolder inside theC:\Users\“username”directory, which is the actual save location of the Game Bar screenshots, to view the images.
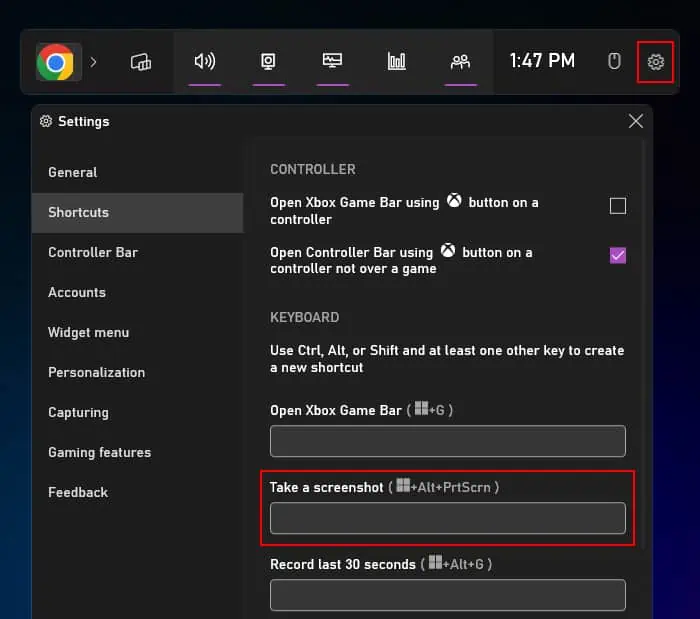
It is also possible to change the shortcut from within the Game Bar Settings.
- Press the Windows key (⊞) + G to open the Xbox Game Bar.
- Click on Settings from the top panel.
- Go to Shortcuts and click on the Take a screenshot textbox.

- Press the new hotkey you want and if it is valid, click on Save.
