A guest Wi-Fi Network is relevant in both home and business settings. It provides internet access to your guests without needing to disclose the credentials of the main network.
In addition to the obvious privacy reasons, the added security, thanks to device isolation and the ability to control what level of access the guests have, are some other major reasons to set up guest Wi-Fi networks. Anyway, let’s stop with the benefits and instead focus on how to actually set up the guest Wi-Fi.
You can utilize a number of router functionalities for this purpose, from Guest Networks and Dual Bands to Operation Modes. We’ve detailed these methods further with full steps in the sections below.
Ways to Setup A Guest Wi-Fi Network
The way the guest network is set up differs according to the router. For instance, some may perform Layer 2 isolation to create the guest Wi-Fi while the subnet for both networks remains the same. Others may use separate subnets, and some even use VLANs.
Ultimately, what this means for the user is that support for the Guest Networking functionality will depend on the router. In some cases, updating the router firmware can help with this. But even when supported, the exact steps to use this feature will vary slightly.
Either way, if you’re unable to set up the Guest Wi-Fi with this feature, you can use the latter two methods from this article as alternatives.
Enable Guest Networking
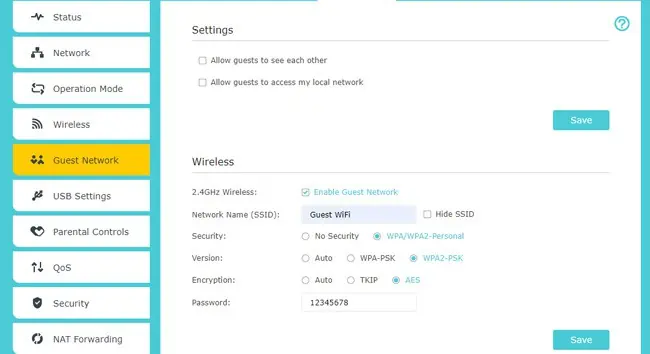
Many modern routers support Guest Networking or similar functionality that you can access via the router’s app or web interface. Setting up a guest Wi-Fi network with this feature is very simple; here are the necessary steps for the web version:
- Launch any web browser and enter your router’s IP address.
- Enter the login credentials to access the router settings page.
- Go to the Guest Network section. It may be located under the Wi-Fi, Wireless, Advanced, or similar tabs.

- Enable the Guest Network option here.
- Set the network name (SSID) and choose whether you want to broadcast or hide it.
- Select the Wi-Fi security mode and set the password.

- Depending on the router, you may also be able to configure additional settings such as:
- Allowing guests to discover each other.
- Allowing guests to access local network shares.
- Once you’re satisfied with the configurations, save the changes. Your router should start broadcasting the guest network now.
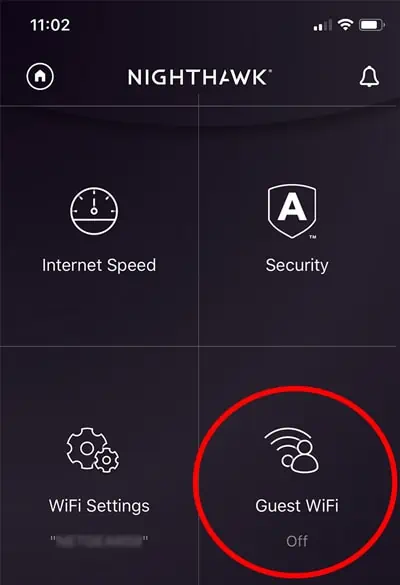
You can also perform the same thing via your router or ISP’s mobile application or programs like Google Home. For reference, here are the steps for Netgear’s Nighthawk app:
- In the Nighthawk app, tap on Guest Wi-Fi.

- Select the Wi-Fi band and enable Guest Wi-Fi.
- Set the network name (SSID) and password and configure optional settings like QR Code Access and Active Time Period.
Use Second Band as Guest Network
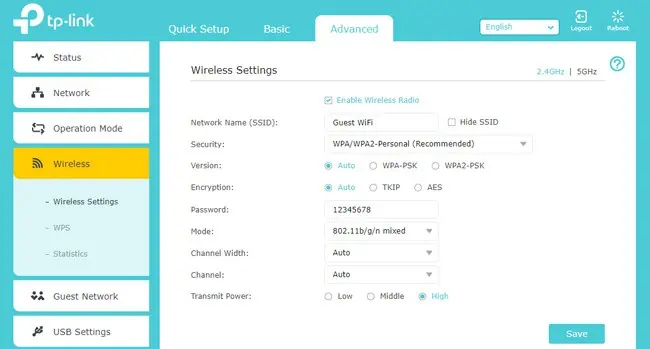
Dual-band routers broadcast on both the 2.4GHz and 5GHz bands simultaneously. As you can configure them separately, you can set one of the bands as the guest network. Here’s how you can do this:
- In the router settings page, go to the Wireless or similar section.
- Select which band you’re going to set as the Guest Network.

- Set the SSID and security mode, and specify whether the guest network should broadcast the SSID.

- Leave the channel settings to auto (default) and save the changes.
Use Secondary Router
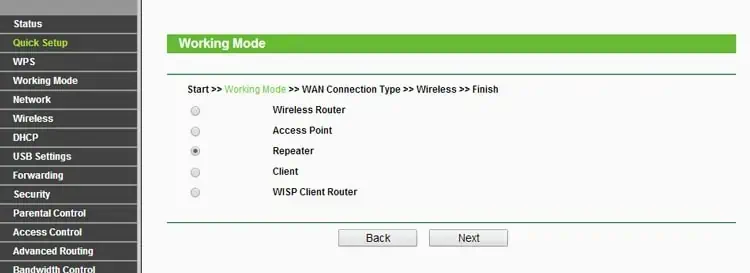
Another way to set up a guest network is by using a secondary router. The secondary router operates in WISP, Repeater, WAP, or a similar mode and rebroadcasts the network with a different SSID. This is popularly done to repurpose old routers as Wi-Fi extenders, but it also works great for setting up a guest Wi-Fi network.
For best results, we recommend making a LAN-to-LAN or LAN-to-WAN connection from the primary to the secondary router to use it as a Wireless Access Point (WAP). But if an Ethernet isn’t possible, wireless connections in Repeater, WDS Bridge, or WISP Client modes are viable options as well.
We have an in-depth article on using a router as a Wi-Fi extender if you’d like to delve further into this, but here are the main steps for now:
- Locate the Reset pinhole or button on the secondary router and press it for around 15 seconds.

- After the router resets, log in to the router setup page.
- If prompted to perform Quick Setup or Easy Setup, select the operation mode to use.

- Otherwise, manually navigate to the Operation Mode or Wireless tab first, and then select/enable the mode to use here.

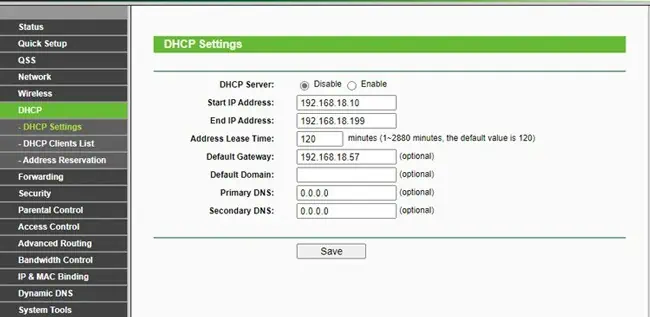
- Switch to the DHCP section, disable the DHCP Server and save the changes.

- Next, go to Network > LAN and change the IP Address to match the Network ID of the primary router. Save the changes afterward.

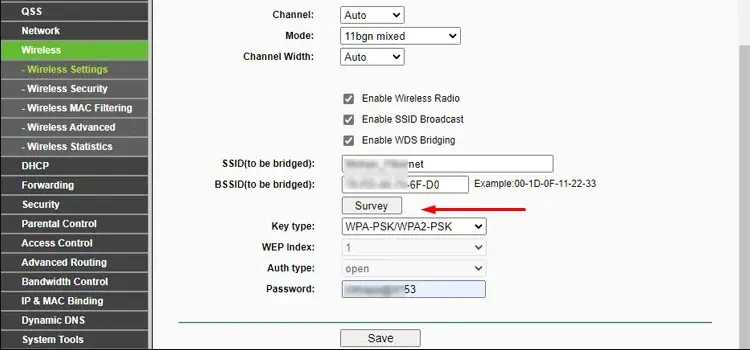
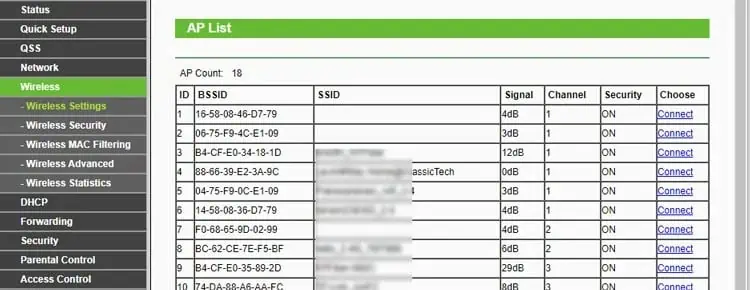
- Head to the Wireless tab again. In the Connect to Network or Wireless Settings section, click on Scan / Survey.

- Locate the main Wi-Fi network from the list and press Connect.

- Set the security mode and enter the password.
- Match the AP channel to that of the main router.
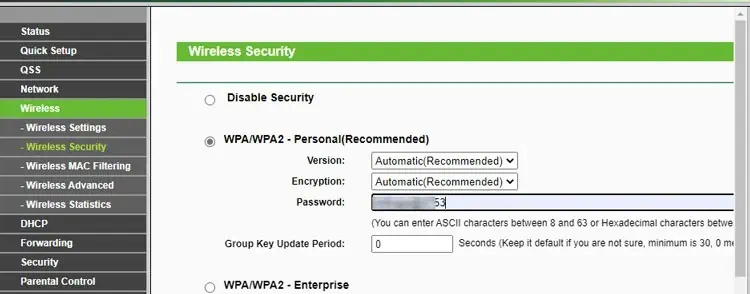
- Reboot the router and go to the Wireless Security tab. Finish setting up the guest Wi-Fi network here and save the changes.


