A lock screen helps to prevent other people from unauthorized access when you are away from your computer after a certain time.
However, it can be inconvenient when the system locks too fast or too frequently. As a result, you need to enter the password multiple times.
From changing settings in the settings app/control panel to tweaking the registry editor, here are several ways to stop the computer from locking when idle or inactive.
Change the Power and Sleep Settings
You can extend the time the system takes to turn off the screen to avoid your issue. You can do it as follows.
On Windows 10
- Open the Settings app.
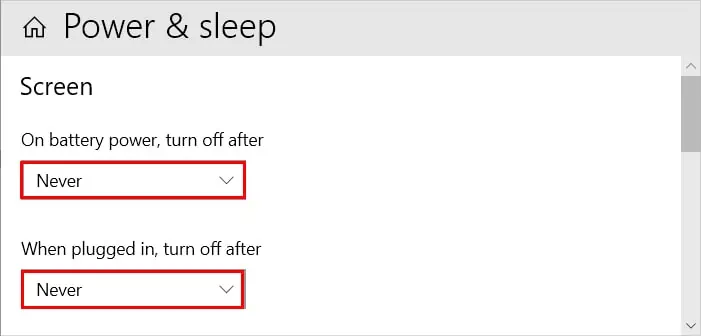
- Navigate to System > Power & Sleep.
- On the right pane, choose the Never value for both the Screen and Sleep sections.

On Windows 11
- Open the Settings app.
- Select Power from the right pane.
- Next, click to expand the Screen and sleep dropdown.
- Then, set the value to Never for both the settings inside it.
Change Sign-in Options
You can change the sign-in options if you don’t want to enter the password each time your PC goes to sleep mode. Here’s how you can do it.
On Windows 10
- Press the Windows + I key to open the Settings app.
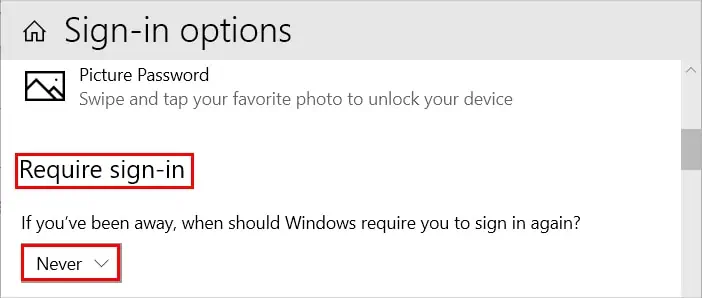
- Navigate to Accounts > Sign-in options.
- Now, on the right pane, expand the dropdown under the Require sign-in section, and set its value to Never.

On Windows 11
- Open the Settings app.
- Select the Accounts option from the sidebar.
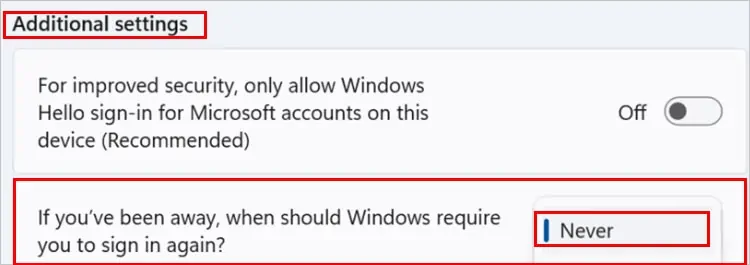
- Then, scroll down to the Additional settings section.
- Next, set the value for If you’ve been away, when should Windows require you to sign in again? to Never.

Turn off Dynamic Lock
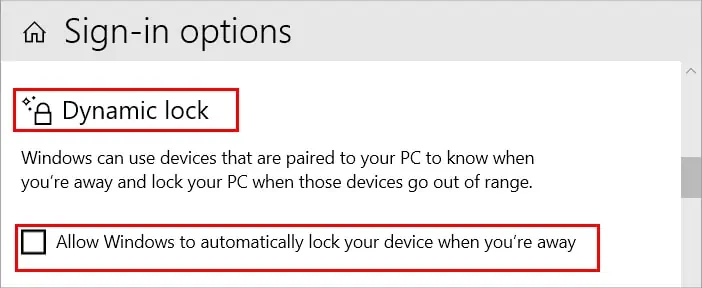
Dynamic lock is a Windows feature that automatically locks your system whenever your Bluetooth-paired device is out of range. You should turn this off to prevent your computer from locking. To turn it off,
On Windows 10
- Open the Settings app.
- Then, navigate to Accounts > Sign-in options.
- In the right pane, uncheck the Allow Windows to automatically lock your device when you’re away checkbox under the Dynamic lock section.

On Windows 11
- Press the Windows + I key to open the Settings app.
- Select Accounts from the sidebar and expand the Dynamic lock option under the Additional settings section in the right pane.
- Then, uncheck the Allow Windows to automatically lock your device when you’re away checkbox.
Using the Control Panel
You can configure the following settings on the control panel to prevent your laptop from locking after closing its lid.
- Press the Windows + R, type
powercfg.cpl, and press Enter to open the Power Options. - Then, click the Choose what closing the lid does option from the sidebar.
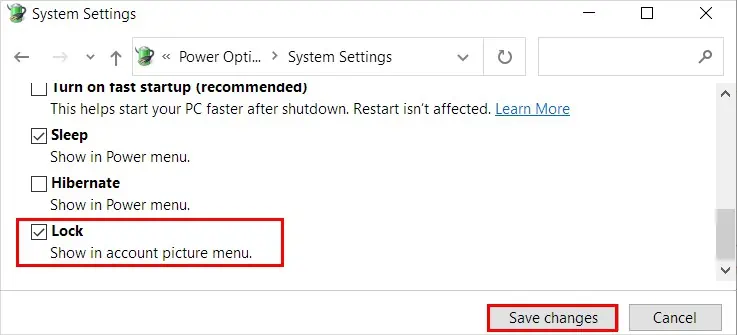
- Now, click Change settings that are currently unavailable.
- Next, uncheck the Lock checkbox and click Save changes.

Using the Registry Editor
You can tweak some settings in the registry editor to stop your system from getting locked. However, changing registry settings can cause system issues if done haphazardly, so we recommend you to backup registry before continuing.
- Press the Windows + R key and type
regeditto open the Registry Editor. - Then, navigate to
Computer\HKEY_LOCAL_MACHINE\SOFTWARE\Policies\Microsoft\Windows. Instead of navigating manually, you can copy and paste the above address into the registry editor’s URL bar. - If you see Personalization inside the Windows dropdown, skip directly to Step 5. Otherwise, right-click on Windows and select the New > Key option.
- Next, name it Personalization.
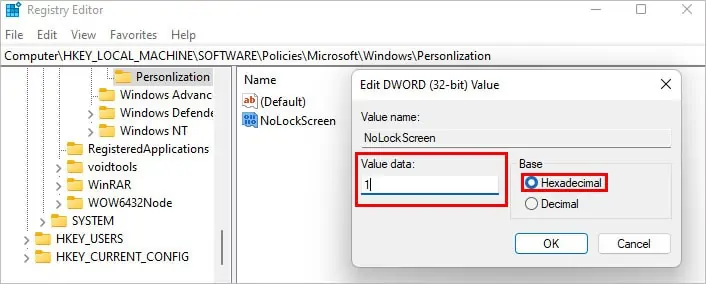
- Then, right-click on Personalization, select New > DWORD (32-bit) Value and name it “NoLockScreen.”
- Open NoLockScreen from the right pane and set its Value data to 1 and Base to Hexadecimal.

- Click on OK and restart your system.
Using the Group Policy Editor
You can prevent your computer from locking by disabling a setting in the group policy editor. However, this option is only available on Windows Pro Edition, so skip this method if you have different windows versions.
- Press the Windows + R, type
gpedit.msc, and press Enter to open Group Policy Editor. - Then, expand Computer Configuration > Administrative Templates > Control Panel and select Personalization.
- Now, from the right pane, double-click and open the Do not display the lock screen setting.
- Next, select the Enabled option.
- Click Apply and OK to save changes.
Change Screen Saver Settings
You can change the screen saver settings so that when your system is idle for a certain time, it doesn’t get locked. Here’s how you can do it.
- Open the Settings app.
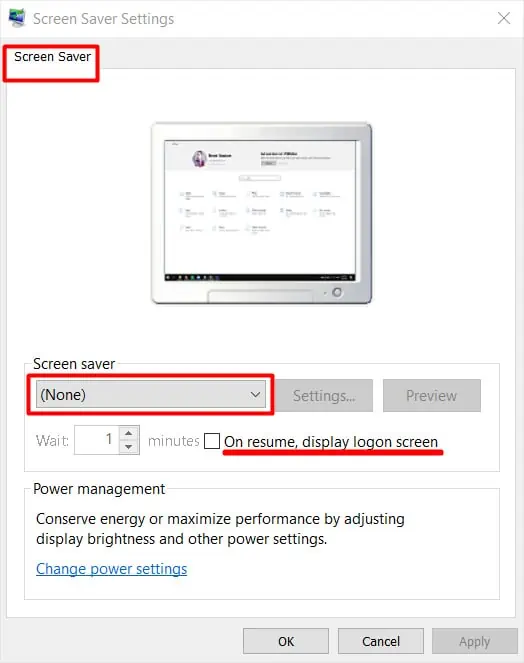
- Search for “change screen saver” and open it.
- Now, under the Screen saver section, click on dropdown menu and select None.

- Also, uncheck the On resume, display logon screen checkbox.
- Click Apply and OK to save changes.


